Word 2016 For Dummies (2016)
Part IV
Spruce Up a Dull Document
Chapter 21
Lots of Lists
In This Chapter
![]() Automatically bulleting or numbering text
Automatically bulleting or numbering text
![]() Building a multilevel list
Building a multilevel list
![]() Numbering lines on a page
Numbering lines on a page
![]() Adding a TOC to your document
Adding a TOC to your document
![]() Creating an index
Creating an index
![]() Using footnotes and endnotes
Using footnotes and endnotes
Lists can be simple, such as a list of the various diets you’ve tried over the past years. Lists can be complex, such as a table of contents, an index, and other more professional listy things. In Word, you can type such lists manually, but it’s better to use the proper tools. That way, a list of anything can be formatted automatically and updated as necessary. Add that tip to your list of timesavers.
Lists with Bullets and Numbers
Whenever you have more than two items to describe in your document, consider using one of Word’s automatic list-formatting commands. These tools format the list in a way that draws attention, calling it out from the rest of your text.
· Word’s list commands are found on the Home tab, in the Paragraph group.
·  You might find Word overly eager to format a list for you. The feature is called AutoFormat. See Chapter 33 for information on disabling this potentially annoying feature.
Making a bulleted list
In typesetting, a bullet is a graphical element, such as a ball or a dot, which highlights items in a list. The word bullet comes from the French word boulette, which has more to do with food than with round pieces of lead quickly exiting a firearm, like this:
· Bang!
· Bang!
· Bang!
![]() To apply bullets to your text, highlight the paragraphs you want to shoot and click the Bullets button, shown in the margin. Instantly, your text is not only formatted with bullets but also indented and made all neat and tidy.
To apply bullets to your text, highlight the paragraphs you want to shoot and click the Bullets button, shown in the margin. Instantly, your text is not only formatted with bullets but also indented and made all neat and tidy.
· To choose a different bullet style, click the menu triangle next to the Bullets command. Select a new bullet graphic from the list, or use the Define New Bullet command to concoct a unique bullet style.
· Bullets are a paragraph format. As such, the bullets stick to the paragraphs you type until you remove that format. To do so, click the Bullet command button again and the bullets are removed from the paragraph format.
Numbering a list
![]() For a list of numbered items, just write the text. Don’t write the numbers at the start of each paragraph. Then, after the list is complete, select the paragraphs as a block and click the Numbering command button, shown in the margin. The Numbering command assigns a number to each paragraph, plus it formats the paragraphs with a hanging indent, which looks nice.
For a list of numbered items, just write the text. Don’t write the numbers at the start of each paragraph. Then, after the list is complete, select the paragraphs as a block and click the Numbering command button, shown in the margin. The Numbering command assigns a number to each paragraph, plus it formats the paragraphs with a hanging indent, which looks nice.
The paragraph numbering continues (it’s a format) until you turn it off. To do so, either press the Enter key twice or click the Numbering command button again.
As a bonus, if you insert or rearrange paragraphs in the list, Word automatically renumbers everything. That makes this feature better than trying to manually number and format the paragraphs.
· To choose another numbering format, click the menu triangle next to the Numbering command button. You can choose letters or Roman numerals, or you can concoct a numbering scheme by choosing the command Define New Number Format.
· The None number format removes numbering from a paragraph.
· You can break and resume paragraph numbering: First, apply the numbering to all paragraphs. To un-number a paragraph, click at the start of the first word and press the Backspace key. The numbering for that paragraph is removed, and the remaining paragraphs are renumbered.
Creating a multilevel numbered list
A multilevel list consists of items and subitems all properly indented, similar to those presented in Figure 21-1. Word automatically formats such a list, but it’s a tricky thing to do. Pay attention!
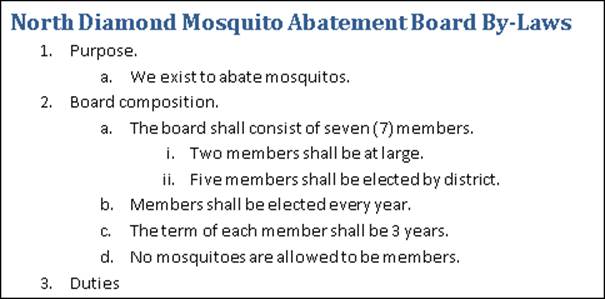
Figure 21-1: A multilevel list.
![]() To format a multilevel list, click the Multilevel List button, shown in the margin. Start typing the list. Press the Tab key to indent and create a sublevel. Press Shift+Tab to unindent and promote an item to a higher level.
To format a multilevel list, click the Multilevel List button, shown in the margin. Start typing the list. Press the Tab key to indent and create a sublevel. Press Shift+Tab to unindent and promote an item to a higher level.
You can also write the entire list in advance, select it, and then click the Multilevel List button to format it. As long as you use Tab and Shfit+Tab to organize the topics, you won’t break the format and the list stays intact.
If you’re creating a complex, hierarchical list, use Word’s Outline view instead of the multilevel list format. See Chapter 25.
Numbering lines on a page
Word lets you slap down numbers for every line on a page, a popular feature with those in the legal profession. Here's how it goes:
1. Click the Layout tab.
2. In the Page Setup group, click the Line Numbers command button to display its menu.
3. Choose a numbering format.
For example, to number lines on each page 1 through whatever, chose the Restart Each Page option. Or to number all lines on all pages cumulatively, choose Continuous.
To remove the line numbers, choose None from the Line Numbers command button. Or choose Suppress for Current Paragraph if you don’t want the selected paragraph numbered.
 Line numbering is a page-level formatting command. It sticks to each page in your document. If you prefer to number only one page, set aside that page as its own section. See Chapter 14 for more information on sections.
Document Content Lists
Word helps you build lists of items in your document, lists that would otherwise be brutally cumbersome to create and monstrous to maintain. These lists include a table of contents and an index.
Creating a table of contents
The trick to creating a tablet of contents, or TOC, for your document is to use Word’s Heading styles. Use Heading 1 for main heads, Heading 2 for subheads, and Heading 3 for lower-level heads and titles. Word’s Table of Contents command uses those formats to build a table of contents field, which reflects the heading names and their page numbers.
Providing that you’ve used the Heading (or equivalent) styles in your document, follow these steps to create a table of contents:
1. Create a separate page for the TOC.
Word places the TOC field at the insertion pointer’s location, though I prefer to have the thing on its own page. Refer to Chapter 13 for information on creating pages; a blank page near the start of your document is ideal for a TOC.
2. Click the mouse to place the insertion pointer on the blank page.
The TOC field is inserted at that point.
3. Click the References tab.
4. In the Table of Contents group, click the Table of Contents button.
The Table of Contents menu appears.
5. Choose a format.
The TOC is created and placed in your document, page numbers and all.
Above the TOC, you may also want to add a title — something clever, such as Table of Contents. Do not format that title as a heading unless you want it included in the table of contents.
· When the steps in this section don't produce the effect you intended, it usually means that your document doesn’t use the Heading styles.
· If your document uses your own heading styles, ensure that the paragraph format specifies the proper outline level. See Chapter 15 for more information.
· The TOC field is static, so it won’t reflect further edits in your document. To update the field, click once to select it. On the References tab, click the Update Table button. Use the Update Table of Contents dialog box to choose what to update. Click OK.
· Cool people in publishing refer to a table of contents as a TOC, pronounced “tee-o-see” or “tock.”)
· See Chapter 23 for more information about fields in your document.
Building an index
An index is yet another document reference or list Word can build and format, providing that you know the trick: You must mark text in a document for inclusion in the index. Once the words are marked, an index field is inserted, which displays the index.
Select index entries
To flag a bit of text for inclusion in an index, follow these steps:
1. Select the text you want to reference.
The text can be a word or a phrase or any old bit of text.
2. On the References tab in the Index group, click the Mark Entry button.
The selected text appears in the Mark Entry dialog box.
3. If the entry needs a subentry, type that text in the Mark Index Entry dialog box.
The subentry further clarifies the main entry. For example, the word you select (the main entry) might be boredom and you type In a waiting room as the subentry.
4. Click one of the buttons, either Mark or Mark All.
Click the Mark button to mark only the selected text. Click the Mark All button to direct Word to include all matching instances of the text in your document.
 When you mark an index entry, Word activates the Show/Hide command, where characters such as spaces, paragraph marks, and tabs appear in your document. Don’t let it freak you out.
Because Show/Hide is on, the Index code appears in the document. It looks something like this: {@@dmsXE@@dms”boredom”@@dms}.
5. Continue scrolling your document and looking for items to place in the index.
The Mark Index Entry dialog box remains open as you continue to build the index.
6. Click the Close button when you’re done, or just tired, to banish the Mark Index Entry dialog box.
7. Press Ctrl+Shift+8 to cancel the Show/Hide command.
Use the 8 key on the keyboard, not on the numeric keypad.
Place the index in the document
After marking bits and pieces of text for inclusion in the index, the next step is to build and place the index. Do this:
1. Position the insertion pointer where you want the index to appear.
If you want the index to start on a new page, create a new page in Word (see Chapter 13). I also recommend putting the index at the end of your document, which is what the reader expects.
2. Click the References tab.
3. In the Index group, click the Insert Index button.
The Index dialog box appears. Here are my recommendations:
· The Print Preview window is misleading. It shows how your index might look but doesn’t use your actual index contents.
· Use the Formats drop-down list to select a style for your index. Just about any choice from this list is better than the From Template example.
· The Columns setting tells Word how many columns wide to make the index. The standard is two columns. I usually choose one column, which looks better on the page, especially for shorter documents.
· I prefer to use the Right Align Page Numbers option.
4. Click the OK button to insert the index into your document.
 What you see is an index field, displayed using the information culled from the document. See Chapter 23 for more information on fields.
Review your index. Do it now. If you dislike the layout, press Ctrl+Z to undo and start over. Otherwise, you’re done.
If you modify your document, update the index: Click the index field. Then choose the Update Index command button from the Index group. Word updates the index to reference any new page numbers and includes freshly marked index entries.
· Feel free to add a heading for the index because Word doesn't do it for you.
· Use a Heading style for the index header so that it’s included in your document’s table of contents. See the section, “Creating a table of contents.”
· Word uses continuous section breaks to place the index field in its own document section. Refer to Chapter 14 for more information on sections.
Adding a list of figures
The References tab’s groups help you insert other document lists, but only if you’ve created the list appropriately.
For example, you can create a table of figures, providing you’ve used the References tab’s Caption button. (See Chapter 22 for details.) To build the table of figures, click the Insert Table of Figures button. The process works similarly to inserting a table of contents or an index, but it works only when you’ve properly inserted the captions.
Footnotes and Endnotes
Both footnotes and endnotes contain bonus information, a clarification, or an aside to supplement text on a page. Each is marked by a superscripted number or letter in the text1.
The difference between a footnote and an endnote is in the placement: A footnote appears on the bottom of the page and an endnote appears at the end of a document. Otherwise, both references are created in a similar way:
1. Click the mouse so that the insertion pointer is to the immediate right of a word or text that you want the footnote or endnote to reference.
There’s no need to type the note's number; it's done automatically.
2. Click the References tab.
3. From the Footnotes group, choose either the Insert Footnote or Insert Endnote command button.
A superscripted number is inserted into the text, and you're instantly whisked to the bottom of the page (footnote) or the end of the document (endnote).
4. Type the footnote or endnote.
5. To return to where you were in the document, press Shift+F5.
The Shift+F5 keyboard shortcut returns to the previous spot in your document where you were editing.
Here are some footnote endnote notes:
· The keyboard shortcut for inserting a footnote is Alt+Ctrl+F.
· The keyboard shortcut for inserting an endnote is Atl+Ctrl+D.
· If you’re curious, you'll want to know that the keyboard shortcut Alt+Ctrl+E enables and disables Word’s Revision Marks feature, covered in Chapter 26.
· The footnote and endnote numbers are updated automatically so that all footnotes and endnotes are sequential in your document.
· To browse footnotes and endnotes, click the References tab. In the Footnotes group, use the Next Footnote button's menu to browse between footnote and endnote references.
· You can preview a footnote’s or endnote's contents by hovering the mouse pointer at the superscripted number in the document's text.
· Use the Show Notes button (References tab, Footnotes group) to examine footnotes or endnotes as they appear on the page.
· To delete a footnote or an endnote, highlight its reference number in the text and press the Delete key. Word magically renumbers any remaining footnotes or endnotes.
· To convert a footnote to an endnote, right-click the footnote’s text at the bottom of the page. Choose the command Convert to Endnote. Likewise, you can convert endnotes to footnotes by right-clicking the endnote text and choosing the command Convert to Footnote.
· For additional control over footnotes and endnotes, click the dialog box launcher button in the Footnotes group. Use the Footnote and Endnote dialog box to customize the reference text location, format, starting number, and other options.
1 See? It works!