Word 2016 For Dummies (2016)
Part II
Your Basic Word
Chapter 5
Search for This, Replace It with That
In This Chapter
![]() Finding text in your document
Finding text in your document
![]() Using various Find command options
Using various Find command options
![]() Searching for text that cannot be typed at the keyboard
Searching for text that cannot be typed at the keyboard
![]() Hunting down formatting codes
Hunting down formatting codes
![]() Replacing found text with other text
Replacing found text with other text
![]() Fixing formatting with the Replace command
Fixing formatting with the Replace command
Little Bo Peep has lost her sheep. Too bad she doesn’t know about Word’s Find and Replace commands. She could find the misplaced ruminants in a matter of nanoseconds. Not only that, she could use search and replace to, say, replace all the sheep with real estate. It’s all cinchy after you understand and use the various Find and Replace commands. Sadly, it’s only words that are replaced. True, if Word could search and replace real things, there’d be a lot less sheep in the world.
Text Happily Found
Finding text is one of the most basic and ancient tools available in a word processor. The only issue has been whether the command is called Find or Search. The terms Relentlessly Hunt Down and Fiendishly Locate were never considered.
In Word, finding duties are split between the traditional Find dialog box and the Navigation pane.
Finding a tidbit o’ text
Don’t bother with the Ribbon! To find text in your document, press Ctrl+F, the memorable keyboard shortcut for the Find command. You see the Navigation pane, similar to what’s shown in Figure 5-1.
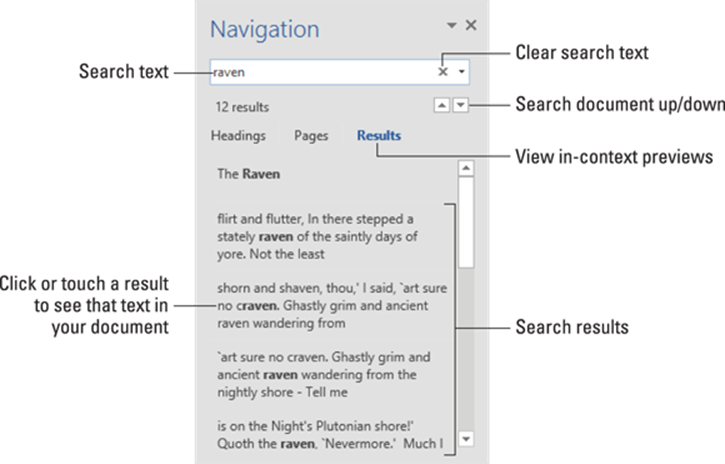
Figure 5-1: The Navigation pane.
In the Search Document box, type the text you want to locate. As you type instances of the text are highlighted in the document. In-context chunks of text appear in the Navigation pane under the Results heading, as illustrated in Figure 5-1.
To peruse found text, use the up and down arrows in the Navigation pane, as illustrated in Figure 5-1.
When text can’t be found, the Navigation pane explains that it can’t find the text. It uses the pronoun we, which I find disturbing.
· To clear text from the Search Document box, click the X button found at the right end of the box.
·  Do not end the text with a period unless you want to find the period, too. Word’s Find command is persnickety.
· Word finds text only in the current document (the one you see in the window). To find text in another document, switch to that document’s window and try searching again. Or you can use the Find command in Windows, which is not covered in this book.
· Word does host the Find command on the Ribbon’s Home tab. Seriously, press the Ctrl+F key. It’s faster.
Scouring your document with Advanced Find
The Navigation pane is a handy tool for locating text. In fact, I keep it open for all my documents. When it comes to exercising some Find command muscle, however, you must turn to a more specific tool. That’s the traditional Find dialog box, called the Find and Replace dialog box, shown in Figure 5-2.

Figure 5-2: The Find and Replace dialog box.
Follow these steps to conjure forth the Find and Replace dialog box:
1. Click the Home tab.
2. In the Editing group, choose Find ⇒ Advanced Find.
The Find and Replace dialog box appears, with the Find tab forward. You may see only the top part of the dialog box. So:
3. Click the More button to reveal the dialog box’s powerful bits.
What you see now appears just like Figure 5-2.
4. Type the search text in the Find What text box.
5. Use the dialog box’s controls to make further adjustments.
Examples for using the various controls are found throughout this chapter.
6. Click the Find Next button to locate the text.
Once the text is found, you can do whatever to it: Edit it, change it, or click the Find Next button to continue looking for text.
After the Find command has scoured the entire document, you see an info box explaining that the search is finished. Click OK, and then click the Cancel button to dismiss the Find and Replace dialog box.
·  It’s possible to reassign the keyboard shortcut Ctrl+F from the Navigation pane to the Advanced Find dialog box. This bit of Word wizardry is divulged in Chapter 31.
· Options set in the Find and Replace dialog box remain set until deactivated. When you can’t seem to locate text that you know is in your document, review the dialog box’s settings. Turn off the ones you no longer need.
Find case-sensitive text
When you want to find Pat in your document, the Find command needs to know the difference between Pat and pat. One is a name, and the other is to lightly touch something. To use the Find command to locate one and not the other, use the Find and Replace dialog box (refer to Figure 5-2). Select the Match Case option under Search Options. That way, Pat matches only words that start with an uppercase P and have lowercase at in them.
Find a whole word
Word’s Advanced Find command can locate Pat and not pat, but it might also flag the word Pattern at the start of a sentence. To avoid that situation, select the Find Whole Words Only option.
Find word variations
Two options in the Find and Replace dialog box assist you with finding words that may not be exactly what you’re looking for.
The Sounds Like (English) option allows you to search for homonyms, or words that sound the same as the search word. These words include their and there, deer and dear, and hear and here. The command doesn’t, however, locate rhyming words.
The Find All Word Forms (English) option expands the search to include different forms of the same word. With this option set, you can search for the word hop and also find matches with hops, hopped, and hopping.
Search this way or that
The Find command searches from the insertion pointer’s position to the end of a document and then back 'round the top again. To override its sense of direction, use the Search drop-down list, as illustrated in Figure 5-2. You see three options:
· Down: The Find command searches from the insertion pointer’s location to the end of your document, and then it stops.
· Up: The Find command searches from the insertion pointer’s location to the start of your document. Then it stops.
· All: The Find command searches the entire document, from the insertion pointer's location down to the end of the document, back up to the beginning, and then stops at the point where the search began.
You can use keyboard shortcuts to search up or down. The Ctrl+PgDn key combination repeats the last search downward; the Ctrl+PgUp key combination repeats the most recent search upward.
Finding stuff you can’t type
The Find command is brilliant enough to locate items in your document such as tab characters or text colored red. The puzzle is how to input that type of information in the Find and Replace dialog box. The secret is to use the Format and Special buttons lurking near the bottom of the dialog box (refer to Figure 5-2).
Find special characters
To hunt down untypeable characters in your document, click the Special button in the Advanced Find dialog box. Up pops a list of 22 items that Word can search for but that you would have a dickens of a time typing.
Despite the exhaustive list, here are the few items you’ll eventually (if ever) use:
· Any Character, Any Digit, and Any Letter are special characters that represent, well, just about anything. These items can be used as wild cards for matching lots of stuff.
· Caret Character allows you to search for a caret (^) symbol, which may not seem like a big deal, but it is: Word uses the ^ symbol in a special way for finding text; see the next section.
· Paragraph Mark (¶) is a special character that’s the same as the Enter character — the one you press to end a paragraph.
· Tab Character moves the insertion pointer to the next tab stop.
· White Space is any number of blank characters: one or more spaces, tabs, empty lines, or a combination thereof.
Choose an item from the list to search for that special character. When you do, a special, funky shorthand representation for that character appears. The shorthand involves the ^ character and then another character, such as ^t to search for the tab character.
Find formatting
In its most powerful superhero mode, the Find command can scour your document for text and formatting. You can search for the formatting information itself or use it with text to locate specifically formatted text.
The secret to hunting down text formats is to use the Format button, found at the bottom of the Find and Replace dialog box, as shown in Figure 5-2. Click that button to view a menu full of formatting categories, such as Font, Paragraph, and Tabs. Choose a category to pluck out a specific format.
For example, suppose that you want to find the text red herring in your document. The text is italic and colored red. Follow these steps:
1. Click the Home tab.
2. In the Editing group, choose Find ⇒ Advanced Find.
The Find and Replace dialog box appears.
3. Type the text you’re searching for.
In this example, that would be red herring.
4. Ensure that the dialog box details are displayed; click the More button if necessary.
5. Click the No Formatting button to remove any previously applied formatting.
The No Formatting button is available when you’ve previously searched for format attributes.
6. Click the Format button and choose Font from the pop-up list.
The Find Font dialog box appears
7. Choose Italic as the font style.
8. Select Red from the Font Color menu.
Yes, many shades of red dwell on the menu. Pick the correct one.
9. Click OK.
The Find Font dialog box goes away and you return to the Find and Replace dialog box. Below the Find What text box appears the search format. It lists which attributes the Advanced Find command is looking for.
10. Click the Find Next button to locate the formatted text.
If you want to search only for a format, leave the Find What text box blank (refer to Step 3). That way, you can search for formatting attributes without regard to what the text reads.
 The Find command remembers your formatting options! The next time you want to search for plain text, click the No Formatting button (Step 5). Doing so removes the formatting attributes and allows you to search for text in any format.
Replace Found Text
The Find command is good only for finding stuff. When you want to find something and replace it with something else, you use the Find and Replace command. That will help Little Bo Peep establish her real estate empire.
Replacing one thing with another
To find a bit of text and then replace it with another bit of text, use the Replace command. Follow these steps:
1. Click the Home tab.
2. In the Editing group, click the Replace command button.
When the Replace command button isn't visible in the Editing group, click the Editing button, and then choose the Replace command button from the pop-up group of command buttons that appears.
Choosing the Replace command button summons the Find and Replace dialog box with the Replace tab forward, shown in Figure 5-3.
3. In the Find What box, type text you want to replace.
For example, if you're finding coffee and replacing it with tea, type coffee.
4. In the Replace With box, type the replacement text.
To continue from the example in Step 3, you type tea here.
5. Click the Find Next button.
At this step, the Replace command works just like the Find command: Word scours your document for the text you typed in the Find What box. If the text is found, proceed with Step 6. If nothing is found, start over again with Step 3 or just abandon your efforts and close the dialog box.
6. Click the Replace button.
The found word, highlighted on the screen, is replaced.
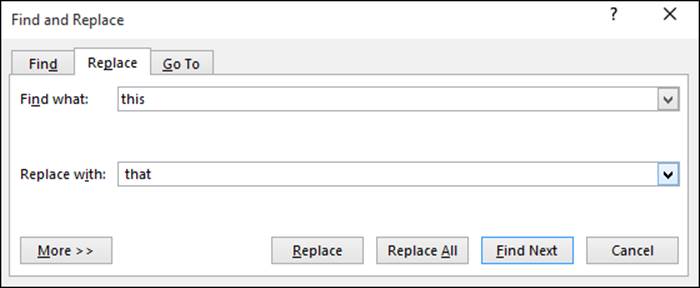
Figure 5-3: The Replace tab in the Find and Replace dialog box.
After you click the Replace button, Word immediately searches for the next instance of the text, at which point you repeat Step 6 until the entire document has been searched.
· The Replace command's dialog box also sports a More button, which can be used exactly like the More button for the Find command. See the section "Scouring your document with Advanced Find," earlier in this chapter.
· Word may find and replace your text in the middle of another word, such as use in causes. Oops! Click the More button and select the Find Whole Words Only option to prevent such a thing from happening.
·  If you don’t type anything in the Replace With box, Word replaces your text with nothing! It's wanton destruction!
· Speaking of wanton destruction, the Undo command restores your document to its preceding condition if you foul up the Replace operation. See Chapter 4 for more information.
· The keyboard shortcut for the Replace command is Ctrl+H. The only way I can figure that one out is that Ctrl+F is the Find command and Ctrl+G is the Go To command. F, G, and H are found together on the computer keyboard, and Find, Replace, and Go To are found together in the Find and Replace dialog box. Go figure.
Replacing it all at once
I confess that it’s tedious to use the Replace button when replacing text. Sure, sometimes it’s handy, especially when you don’t want to replace everything. But if you’ve changed your novel’s main character name from Xlaborded to Zlaborded, you can probably and safely replace every instance all at once. That's why the Replace command's dialog box sports the handy Replace All button.
The Replace All button directs the Replace command to find all instances of the Find What text and — without question or pause — replace it with the Replace With text.
 Be doubly certain that you made the proper settings in the Find and Replace dialog box before you click that Replace All button! You can still undo any mistakes, but for a large document, a lot of text can be found and replaced in a manner most merciless.
Finding and replacing formatting
Perhaps the trickiest thing to replace in a document is formatting. Say you work at the DMV and you’ve been directed to change all underline text to italic. That trick is possible, but it runs the risk of screwing up the document’s formatting.
The general steps for replacing a format are as follows:
1. Summon the Find and Replace dialog box (press Ctrl+H).
2. Clear all text and formatting from the Find What and Replace With text boxes.
3. Click the Find What text box, and then click the Format button to choose a format to find.
4. Click the Replace With text box, and then use the Format button to select a replacement format.
For some font attributes, you must also remove the original text format, which can be tricky.
5. Click the Replace or Replace All buttons.
Better than the preceding generic steps, consider a specific example. Follow these steps to replace underline with italics:
1. Press Ctrl+H to summon the Find and Replace dialog box.
2. Click the More button, if necessary, to display the full dialog box.
3. Click the Find What text box and erase any text there.
4. If it’s available, click the No Formatting button.
You want to direct the Replace command to ignore any previous formatting searches.
5. Click the Format button and choose Font.
The Find Font dialog box appears.
6. Choose the solid underline from the Underline Style menu.
It’s the third item in the menu, right above the double underline.
7. Click OK to close the Find Font dialog box.
The text Format: Underline appears below the Find What box.
8. Click the Replace With text box and erase any text.
9. Click the No Formatting button, if necessary, to remove any previous formatting.
10. Choose Font from the Format button's pop-up list.
The Find Font dialog box appears.
11. From the Font Style list, choose Italic.
12. From the Underline Style list, choose (none).
If you just chose the Italic style, Word would simply underline italic text. Instead, by choosing (none) as the underline style, Word removes any previously applied underline format.
13. Click OK to close the Find Font dialog box.
The text Format: Font: Italic, No underline appears below the Replace With box.
14. Cross your fingers
15. Click the Replace All button.
Word scours your document and replaces any italic text with underline.
16. Close the Find and Replace dialog box.
The key to replacing formatting is not only to replace one format with another but also to peel off the existing format. To do so, you replace an underline style with (none), or Italic with Not Italic, or Bold with Not Bold, and so on. That way, the text formatting is replaced, not added to.
· An easier way to update formatting in a document is to use and apply styles. Refer to Chapter 15 for details.
· Don't forget about the No Formatting button! You need to click it if you want to change the formats or replace text without paying attention to formats.
All materials on the site are licensed Creative Commons Attribution-Sharealike 3.0 Unported CC BY-SA 3.0 & GNU Free Documentation License (GFDL)
If you are the copyright holder of any material contained on our site and intend to remove it, please contact our site administrator for approval.
© 2016-2026 All site design rights belong to S.Y.A.