Learning MySQL (2007)
Part IV. Web Database Applications with PHP
Chapter 14. PHP
In Chapter 13, we discussed how the triad of MySQL, PHP, and the Apache web server is one of the most popular web development platforms. In this chapter, we introduce you to building web database applications for this platform. We cover the following topics:
§ An introduction to the PHP language
§ How the commonly used MySQL library functions are used to access the MySQL DBMS
§ How to handle MySQL DBMS errors, use include files to modularize code, and secure user data
§ How to write data to databases and manage sessions in applications
PHP has a large set of libraries available that can be used for tasks as diverse as string manipulation, network communications, data compression, and disk access. We can only touch on some of these in this book; you’ll find the PHP manual and the resources listed at the end of this chapter invaluable as you learn more about the language.
Language Basics
This section is a short introduction to the basic syntax of PHP. If you’re familiar with high-level languages such as C, C++, Java, JavaScript, or Perl, then you’ll find PHP very easy to learn. PHP began its life as a simple, procedural language that was designed to be embedded into HTML pages, and that’s mostly what we focus on this chapter. More recently, it has become a full-fledged object oriented (OO) language that can be used for nonweb and cross-platform applications, including both scripts that run from the command-line and programs with graphical user interfaces (see the PHP-GTK web site, http://gtk.php.net). You’ll find pointers to comprehensive PHP resources in Resources” at the end of this chapter.
As discussed previously, PHP scripts are surrounded by the PHP start tag <?php and the PHP end tag ?>. You’ll sometimes see the start tag abbreviated to <?, but this conflicts with the XHTML standard and should be avoided. Statements in a script are terminated with a semicolon. Statements can be formatted for readability by including any amount of whitespace—such as space characters, tab characters,or blank lines—in a script.
Comments can be included in a PHP script using the following styles:
// One-line comment
# Another one-line comment
/* A
multiple-line
comment */
Anything that appears after the // or #, or between the /* and */ characters, is ignored.
Variables are prefixed with a dollar sign ($) and variable names are case-sensitive. PHP has several variable types. Scalar variables contain one value; scalar types are integer, Boolean, string, and float (floating-point number). There are two compound types of variable, array andobject, that themselves contain scalar variables—possibly of different types.
Variables are automatically declared and given a type when they’re first used. You don’t have to declare them beforehand; the type of a variable can change in a script. Values are assigned to variables with a single = character:
// $x is an integer with the value 4
$x = 4;
// Now $x is a float
$x = 3.142;
// Now $x is a string
$x = "Selina";
// Now $x is a Boolean
$x = true;
// $y is an array of integers, strings, and Booleans
$y = array("hello", 1, 2, true, false, "cat");
Strings
PHP Strings are enclosed in double or single quotes. The following are identical:
$string = "Hello world";
$string = 'Hello world';
You can switch between quote styles for the convenience of including the other type of quote in the string:
$string = "This string includes a single ' quote";
$string = 'This string includes a double " quote';
You can also include quotes using the backslash character as an escape code:
$string = "This string includes a double \" quote";
$string = 'This string includes a single \' quote";
To include a backslash character, escape it with a backslash:
$string = "Here's a \\ blackslash character";
Unlike most other languages, you can incorporate carriage returns and line feeds directly into strings:
$string = "Here's a string spread over
two lines";
You can also include carriage return, line feed, and tab characters using the \n, \r, and \t shortcuts, respectively:
$string = "This string is spread over\n two lines. And it has a \t tab in it.";
Adding newlines and tabs in content sent to the browser makes the HTML source more readable. However, such whitespace has no significance in HTML unless you enclose the text in <pre> tags to mark it as preformatted content. Adding such whitespace characters often comes in handy when developing and debugging an application, but you can also safely omit them in production code.
Arrays
Arrays can be accessed by their numeric or associative index. Numeric indexes are numbered from zero. Consider two sample arrays:
// This is an associative array
$x = array("one" => 1,
"two" => 2,
"three" => 3);
// The value 1 from the array $x is placed into the variable $y
$y = $x["one"];
// This is a numerically indexed array
$a = array(10, 20, 30);
// This places the value 20 from the array $a in the variable $b
// (since arrays begin with an index of 0)
$b = $a[1];
You can create and manipulate arrays using the indexes. For example, in addition to using the array() syntax:
$x = array(10, 20, 30);
you can access the elements directly and get the same result by writing:
$x[0] = 10;
$x[1] = 20;
$x[2] = 30;
The style you use is a personal preference; the former style is compact and simple, while the second style is familiar to most programmers.
Manipulating Variables
You can manipulate variables to modify the values they contain. For example, you can add the values in two variables and place this value in a third variable:
$x = 4;
$y = 7;
$z = $x + $y;
You could in fact place the sum into an existing variable, such as $x:
$x = $x + $y;
Of course, this would overwrite the previous value (4) with the sum (11).
The arithmetic shortcuts that work in many other languages also work in PHP:
$x = 4;
// add one to $x in three different ways
$x = $x + 1;
$x++;
$x += 1;
// subtract one from $x in three different ways
$x = $x - 1;
$x--;
$x -= 1;
// Multiply $x by two in two ways
$x = $x * 2;
$x *= 2;
// Divide $x by three in two ways
$x = $x / 3;
$x /= 3;
To concatenate strings, use the . operator:
$x = "Hello";
$y = "world";
// $z contains "Hello world";
$z = $x . " " . $y;
Displaying Information
To display information, we can use the PHP statements print, echo, or printf. The first two are interchangeable; the third is for more complex output, and its use is identical to that in programming languages such as C, and in scripting languages such as awk. Consider a few examples:
// These are the same; all display the text: [This is output]
echo "This is output";
print "This is output";
printf("This is output");
The printf command can be used with placeholders, or format specifiers. For example, %d represents an integer number, %f represents a floating-point (decimal) number, and %s represents a string of characters:
// This displays: [6 inches x 2.540000 = 15.240000 centimeters]
printf("%d %s x %f = %f %s", 6, "inches", 2.54, 6*2.54, "centimeters");
We can modify the format specifiers to control formatting; for example, we can space values out and limit the number of decimal digits displayed:
// This displays: [ 6 inches x 2.54 = 15.2 centimeters]
printf("%10d %s x %10.2f = %-10.1f %20s", 6, "inches", 2.54, 6*2.54, "centimeters");
The %10d specifies that 10 characters should be set aside for displaying the integer value—in this case, 6; since the number is only one character long, there are nine blank spaces to the left of the displayed value. If you add a minus sign just after the percent symbol, the spaces appear to the right of the value. With floating-point numbers, we can control the number of decimal places to be displayed; here, we’re limiting the first floating-point number (2.54) to two digits, and the second floating point number (6*2.54) to one decimal place. You can learn more about format specifiers from http://www.php.net/manual/en/function.sprintf.php.
You can print variables using print or echo using several styles. The most convenient is to incorporate the variable into a string enclosed in double quotes:
$x = 4;
// Prints "x is 4";
echo "x is {$x}";
The braces, { and }, form an escape sequence that tells PHP to process the enclosed value as a variable expression. You don’t always need to use the braces; the following works equally well:
$x = 4;
// Prints "x is 4";
echo "x is $x";
However, using braces is useful to avoid ambiguity, and you can even display values from an associative array without needing to escape the double quotes:
// This is an associative array
$x = array("one" => 1,
"two" => 2,
"three" => 3);
// This prints "x is 1"
echo "x is {$x["one"]}";
Adding braces allows all variables to be included directly into strings that are delimited by double quotation marks. If a variable can be unambiguously parsed from within a double-quoted string, then the braces can be omitted. Here, the double quotes around the array index ("one") can be confused with the double quotes surrounding the complete string, and so the braces are necessary; you can also include braces to help make your code more readable, even when they’re not strictly needed.
If you wanted to avoid using braces, you would need to append the associative array value to the string with the period symbol (.):
echo "x is ".$x["one"];
If you actually want to display a brace, you need to escape it with the backslash symbol (\):
echo "A left brace: \{";
Variable substitution in strings doesn’t work with single-quoted strings: whatever is included in a single-quoted string is printed out literally:
// Doesn't work as expected. It prints: ["x is {$x}"]
echo 'x is {$x}';
Conditional Statements
You can have parts of a PHP script executed only if certain conditions are met. The most frequently used conditional statement in PHP is if:
if ($x < 5)
echo "x is less than 5";
Frequently used expressions are less-than (<); greater-than (>); less-than-or-equals (<=); greater-than-or-equals (>=); and not-equals (!=).
You can implement more complex conditions using the else keyword:
if ($x < 5)
echo "x is less than 5";
else if ($x > 5)
echo "x is greater than 5";
else
echo "x is equal to 5";
You can write else if as one word, elseif.
The switch...case construct allows you to easily select between several possible values, as in the following example:
switch ($x)
{
case 1:
echo "x is 1";
break;
case 2:
echo "x is 2";
break;
case 3:
echo "x is 3";
break;
default:
echo "x is not 1, 2, or 3";
}
The default section is executed if the switch value doesn’t match any of the case values. The break keyword tells PHP to leave the switch construct; if you leave it out, processing will drop through to the next case condition, and the statements there will also be executed. For example, if $x is one, and the first break is missing, the program would print “x is 1”, and then continue into the next case, and also print “x is 2”.
Equality is tested with the double-equals (==) syntax:
$x = 4;
if ($x == 4)
echo "x is four!";
It’s a very common mistake to forget to write the second equals symbol (=) in an equality test. PHP considers a variable assignment operation to have a true value, so the test will always succeed. For instance, the test below will always succeed, and so the message "x is four!" will be printed whatever the value of x—for example, 3:
$x = 3;
if ($x = 4)
echo "x is four!";
A triple-equals operator (===) can also be used to test if the parameters are both equal and of the same type:
$x = 0;
// This prints, since 0 and false are the same value
if ($x == false)
echo "$x is false";
// This doesn't print, because 0 and false aren't the same type
if ($x === false)
echo "$x is false";
The not-equals operator (!=) is the opposite of the equality operator (==). Similarly, the !== operator is a type-sensitive not-equals and is the opposite of ===.
There are two handy functions—isset() and empty()—for checking the state of a variable:
// Has the variable been declared?
if (isset($x))
echo "x is set";
// Is the variable empty?
if (empty($x))
echo "x is empty";
A variable that doesn’t exist (is not set) is always empty. However, a variable that’s empty may or may not exist, but if it does, it has a NULL value. A third function, unset(), can be used to destroy a variable:
$x = 5;
unset($x);
// Prints "not set"
if (isset($x))
echo $x;
else
echo "not set";
Loops
The standard loop constructs are for, while, and do...while. Let’s look at different ways to print out the integers 0 to 9 using these constructs.
The for statement has three parameters: an instruction to initialize any variables, a condition that must be met for the loop to continue, and an instruction that is executed after each round of the loop. To count from 0 to 9, we can start by setting the variable $x to 0 ($x=0). We increment $xone by one ($x++) as long as it is less than 10 ($x<10):
for ($x=0; $x<10; $x++)
echo "$x\n";
The while loop can take the same parameters, but here they are placed at different locations in the code:
$x = 0;
while ($x < 10)
{
echo "$x\n";
$x++;
}
Notice that when more than one statement forms the body of the loop, the statements are enclosed in braces. Braces are also used with the conditional if when there’s more than one statement you want to execute.
The do...while loop is almost identical to the while loop:
$x = 0;
do
{
echo "$x\n";
$x++;
} while ($x < 10);
However, there is one important difference between while and do...while: in the latter construct, the condition is checked after the body of the loop, so the instructions between the braces are always executed at least once; if the condition is false, the loop is not repeated.
The foreach statement is a different type of loop construct that is used to simplify iteration through an array:
// $x is an array of strings
$x = array("one", "two", "three", "four", "five");
// This prints out each element of the array
foreach ($x as $element)
echo $element;
Functions
PHP has a large number of built-in functions that you can use to perform common tasks. A function call is followed by parentheses that contain zero or more arguments to the function. The following fragment uses the library function count() to display the number of elements in an array:
// $x is an array of strings
$x = array("one", "two", "three", "four", "five");
// Displays 5
print count($x);
The count() function takes one parameter, which should be an array type. Functions can return nothing or a value of any type; the previous example returns an integer value, which is then output using print. When a value is returned, the function can be used in an expression. For example, the following uses count() in an if statement:
// $x is an array of strings
$x = array("one", "two", "three", "four", "five");
if (count($x) >= 3)
echo "This array has several elements";
else
echo "This array contains less than three elements";
The PHP manual web site (http://www.php.net/manual) has excellent search and browse features for locating details on functions. When you visit this page, you’ll see a search box at the top right. By default, if you type text and press Enter (or click the small right-arrow icon), you’ll search the function library names for exact or near matches. For example, if you type print and press Enter, you’ll be taken directly to the manual page for the print statement. If instead you type prin, you’ll be taken to a page of near matches, including links to print, printf, sprintf, and related entries. Very close matches are shown in bold, while less likely matches are shown without bold (and, in this example, include functions such as phpinfo, phpinfo, and pi that make passing reference to printing in their descriptions).
You can also define your own functions. User-defined functions are created with the keyword function and enclosed in braces. Here’s an example of a user-defined function do-math() that itself calls PHP math library functions to output interesting values:
function do-math($x)
{
if ($x > 0)
{
print "log10(x) = " . log($x,10);
print "logN(x) = " . log($x);
print "sqrt(x) = " . sqrt($x);
print "x^2 = " . pow($x, 2);
return true;
}
else
return false;
}
// Print out interesting math for the value 10
$ret = do-math(10);
// This test should fail, since the function should return true for 10
if ($ret == false)
print "Can't do math for <=0";
// Now, try to print out interesting math for the value 0
$ret = do-math(0);
// This test should succeed and print the error message,
// since the function should return false for 0
if ($ret == false)
print "Can't do math for <=0";
The function returns true when the parameter is greater than 0, and false otherwise. In the example, the return value is assigned to $ret and used in the subsequent if test.
Passing variables by reference
If you add the ampersand symbol (&) before the name of a variable in a function declaration, a reference to the variable will be passed to the function, rather than the variable value itself. This allows the function to change the variable, and the main program can use the new value. ConsiderExample 14-1.
Example 14-1. Passing variables to function by value and by reference
<!DOCTYPE HTML PUBLIC
"-//W3C//DTD HTML 4.01 Transitional//EN"
"http://www.w3.org/TR/html401/loose.dtd">
<html>
<head>
<title>Passing variables to a function by value or by reference</title>
</head>
<body>
<table border='1'>
<tr>
<th>
Step
</th>
<th>
Variable Value
</th>
</tr>
<?php
// Set initial value for the variable
$Variable=110;
// Display the initial variable value.
echo "<tr>
<td>Initial value</td>
<td align='right'>$Variable</td>
</tr>";
// Pass the variable by value to the AddNineteen_value() function.
AddNineteen_value($Variable);
// Display the variable value after passing it by value.
echo "<tr>
<td>After passing by value</td>
<td align='right'>$Variable</td>
</tr>";
// Pass the variable by reference to the AddNineteen_reference() function.
AddNineteen_reference($Variable);
// Display the variable value after passing it by reference.
echo "<tr>
<td>After passing by reference</td>
<td align='right'>$Variable</td>
</tr>";
// Function to add 19 to the received variable;
// the function receives the variable value.
function AddNineteen_value($MyVariable)
{
$MyVariable+=19;
}
// Function to add 19 to the received variable;
// the function receives a reference to the variable
// (note the ampersand before the variable name).
function AddNineteen_reference(&$MyVariable)
{
$MyVariable+=19;
}
?>
</table>
</body>
</html>
The output of the program is shown in Figure 14-1.
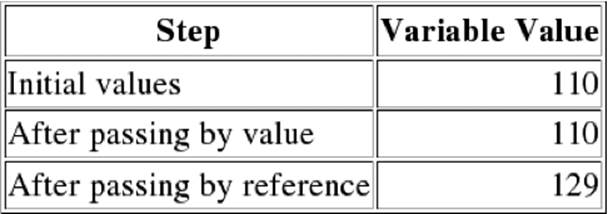
Figure 14-1. Web page produced when running Example 14-1
When the variable is passed by value, the function makes its own copy, and any operations it performs on the variable are limited to the function itself. When the variable is passed by reference, any changes that the function makes (in this case, adding 19 to the value) are seen by the main program. Note that the name of the variable used by the function can be different from the name used by the main program when calling the function; here, the AddNineteen_value() and AddNineteen_reference() functions use the name $MyVariable internally.
Handling Errors in PHP
Sadly, every programmer—however experienced—makes mistakes. PHP tries to help in finding and rectifying these mistakes by providing detailed error messages when it detects a problem. It’s useful to have PHP report detailed information on all errors during development, but it’s best to avoid displaying much of this information to the end user in a production system. This will reduce the amount of confusion and also hide information that an attacker could find useful.
PHP is configured through a php.ini configuration file that includes two important directives that affect error reporting: error_reporting and display_errors. The former controls what types of errors are trapped, and the latter controls whether error messages are reported. When PHP is configured, display_errors is set to On and error_reporting lists selected errors that can occur; by default, in PHP4 and PHP5, it reports all errors except those in the insignificant NOTICE class. Your PHP installation may be configured differently.
If you find that you’re not seeing PHP error messages, you can find the php.ini file and ensure that it contains the line:
display_errors = On
Add this line if necessary. Whenever you make a change to the php.ini file, you should restart the Apache web server to put the changes into effect. To ensure that all errors are reported, make sure the error_reporting line in php.ini file is set to:
error_reporting = E_ALL
and restart Apache.
If you don’t have control of the web server (for example, on a web-hosting site), you won’t be able to modify the php.ini file. You can instead enable error reporting by adding the two lines:
ini_set("display_errors", true);
error_reporting(E_ALL);
to the top of each PHP file, just after the PHP opening tag (<?php). There’s no harm in doing this even if the PHP configuration is suitable, and it allows your scripts to be portable independent of the PHP settings on the web server.
When you’re ready to deploy, turn off display_errors or change error_reporting to a setting that won’t show the user minor (or perhaps, at your discretion, any) internal error messages. For example, you can use:
error_reporting(E_ALL & ~E_NOTICE & ~E_WARNING);
to force PHP to display only critical error messages. You’ll find a description of the error-setting choices at http://www.php.net/error_reporting.
Throughout the rest of this book, we assume your PHP installation is configured to report all errors, or at least everything more serious than a notice.
Accessing MySQL Using PHP
Because this book is about MySQL, this chapter focuses on how to use PHP to access a MySQL database. Since the release of MySQL 4.1, there have been two PHP libraries that you can use: the original MySQL library and the MySQL Improved (MySQLi) library.
This creates a dilemma: which library should you use? If you’re working on legacy code or a MySQL server older than version 4.1, you may not have a choice and will need to use the original library. If you’re developing new code, you do have a choice: you can go with the original MySQL library that most developers still understand and use, or the MySQLi library that has additional features and better performance. We recommend that you use the new library for new code, but you should also learn about the older library because you’re likely to encounter it as you develop and modify PHP code.
The Original PHP MySQL Library
This section describes the original PHP library designed for MySQL versions earlier than 4.1. In most PHP installations, it works with later versions, although you can’t take advantage of some newer MySQL features.
In Chapter 13, we showed you a simple PHP code example that uses the original MySQL library. It’s reproduced in Example 14-2.
Example 14-2. Querying the music database with PHP
<!DOCTYPE HTML PUBLIC
"-//W3C//DTD HTML 4.01 Transitional//EN"
"http://www.w3.org/TR/html401/loose.dtd">
<html>
<head>
<meta http-equiv="Content-Type" content="text/html;
charset=iso-8859-1" />
<title>Artists</title>
</head>
<body>
<h1>Artists</h1>
<table>
<tr>
<th>artist_id</th>
<th>artist_name</th>
</tr>
<?php
// Connect to the MySQL server
if (!($connection = @ mysql_connect("localhost", "root",
"the_mysql_root_password")))
die("Cannot connect");
if (!(mysql_select_db("music", $connection)))
die("Couldn't select music database");
// Run the query on the connection
if (!($result = @ mysql_query("SELECT * FROM artist",
$connection)))
die("Couldn't run query");
// Until there are no rows in the result set, fetch a row into
// the $row array and ...
while ($row = @ mysql_fetch_array($result, MYSQL_ASSOC))
{
// Start a table row
print "<tr>\n";
// ... and print out each of the columns
foreach($row as $data)
print "\t<td>{$data}</td>\n";
// Finish the row
print "</tr>\n";
}
?>
</table>
</body>
</html>
This example uses four key MySQL functions that we’ll describe here. Each function takes one or more arguments and returns a value when it’s completed the required operation. In the list below, we’ve adhered to convention by writing the return type first, and then the function name, which is followed by parentheses enclosing the arguments that can be passed to the function:
resource mysql_connect(string hostname, string username, string password)
Opens a connection to the MySQL server. Conceptually, this is the same as running the MySQL monitor, and it requires the same parameters: a hostname that identifies the server machine, a username of a MySQL user, and a password for the MySQL user. The hostname can be an IP address, the mnemonic localhost, or a fully qualified machine and domain, such as ruttle.invyhome.com.
By default, a MySQL server listens for incoming connections on port 3306; if your MySQL server has been configured to use a different port, you can append this to the hostname as hostname:port.
If the hostname is localhost, PHP makes a fast direct connection through a Unix socket (under Linux or Mac OS X) or a named pipe (under Windows) rather than through the network. If your server has been configured with a nonstandard socket path, you can also append this to the hostname parameter after the port, as in localhost:port:path_to_socket. We discussed sockets and named pipes briefly in Configuring Access to the MySQL Server” in Chapter 2.
The return value of the function is a resource handle that is usually stored in a variable. The variable is then passed as a parameter to other MySQL functions—such as mysql_query()—to identify the connection to use. If the function fails, it returns false instead of a connection handle.
Boolean mysql_select_db(string database, resource connection)
Selects a database to use. This is conceptually identical to typing the USE command in the MySQL monitor. The first parameter is a database name to use, and the second is the MySQL server connection to use. The connection is the return value from a previous call to themysql_connect() function. The function returns true on success and false on failure.
mixed mysql_query(string query, resource connection)
Executes an SQL query on a connection. This is conceptually the same as typing an SQL query into the MySQL monitor and pressing the Enter key. The first parameter is an SQL query, and the second is a connection resource handle that was returned from mysql_connect().
The function does not return or display the results. Instead, for SELECT, SHOW, EXPLAIN, or DESCRIBE queries, it returns a resource handle that can be assigned to a variable and used to access the results. The mysql_fetch_array() function discussed next is usually used for this task. For UPDATE, INSERT, DELETE, and other queries that do not produce output, the return value is either true (indicating success) or false (indicating failure). Note that you don’t need to include a semicolon (;) at the end of the query string, though there are no problems if you do. In the MySQLi library, the order of the parameters is reversed.
array mysql_fetch_array(resource result[, int type])
Returns an array containing one row of results from a previously executed query. The result handle parameter is the return value from a previously executed mysql_query() function, and the optional type controls what type of array is returned; this is discussed later in this chapter inAccessing Query Results with mysql_fetch_array() and mysqli_fetch_array().” Each call to the function returns the next available row of results as an array, with false returned when no further rows are available.
The four previous functions are sufficient to build simple applications. The three functions discussed next are also important, and you’ll find them helpful in all but the most basic applications.
When you run queries, the MySQL monitor reports useful information that helps you make decisions about what to do next. To access this information from PHP scripts, you need to use functions. Three functions you’ll find useful are:
int mysql_insert_id(resource connection)
If you use the AUTO_INCREMENT feature, this function allows you to access the unique identifier value associated with the most recent INSERT statement on a connection. The database connection is passed as a parameter, and the return value is an integer that uniquely identifies the new row. A value of 0 is returned if AUTO_INCREMENT wasn’t used by the most recent query.
int mysql_affected_rows(resource connection)
Reports the number of rows that were modified by the last query on the connection identified by the resource handle connection. We describe this function in more detail later in Finding the Number of Changed Rows Using mysql_affected_rows and mysqli_affected_rows.”
int mysql_num_rows(resource result)
Reports the number of rows returned by a SELECT query identified by a result resource handle. The function doesn’t work for queries that modify the database; mysql_affected_rows() should be used there instead.
The PHP Improved MySQL Library
This section discusses the Improved MySQL library, which we refer to as MySQLi. This library was introduced with PHP 5 and is designed to work with MySQL version 4.1.3 and above. We use the same conventions in this section as in the last one so that you can use them as independent references.
Example 14-3 rewrites Example 14-2 to use the new MySQLi library.
Example 14-3. Querying the music database with the MySQLi library
<!DOCTYPE HTML PUBLIC
"-//W3C//DTD HTML 4.01 Transitional//EN"
"http://www.w3.org/TR/html401/loose.dtd">
<html>
<head>
<meta http-equiv="Content-Type" content="text/html;
charset=iso-8859-1" />
<title>Artists</title>
</head>
<body>
<h1>Artists</h1>
<table>
<tr>
<th>artist_id</th>
<th>artist_name</th>
</tr>
<?php
// Connect to the MySQL server
if (!($connection = @ mysqli_connect("localhost", "root",
"the_mysql_root_password")))
die("Cannot connect");
if (!(mysqli_select_db($connection, "music")))
die("Couldn't select music database");
// Run the query on the connection
if (!($result = @ mysqli_query($connection, "SELECT * FROM artist")))
die("Couldn't run query");
// Until there are no rows in the result set, fetch a row into
// the $row array and ...
while ($row = @ mysqli_fetch_array($result, MYSQL_ASSOC))
{
// Start a table row
print "<tr>\n";
// ... and print out each of the columns
foreach($row as $data)
print "\t<td>{$data}</td>\n";
// Finish the row
print "</tr>\n";
}
?>
</table>
</body>
</html>
The example uses three key MySQLi functions, described next in a simplified form. As with the standard MySQL library, each function takes one or more arguments and returns a value when it’s completed the required operation. Again, we follow convention and write the return type first, then the function name, and, in parentheses, the list of arguments that can be passed to the function:
resource mysqli_connect(string hostname, string username, string password, string database)
Opens a connection to the MySQL server and uses a database. Conceptually, this is the same as running the MySQL monitor and issuing a USE command. It requires the same parameters and input: a hostname that identifies the server machine, a username of a MySQL user, apassword for the MySQL user, and the database to use. The hostname can be an IP address, the mnemonic localhost, or a fully qualified machine and domain such as ruttle.invyhome.com.
By default, a MySQL server listens for incoming connections on port 3306; if your MySQL server has been configured to use a different port, you can specify this as an additional parameter to mysqli_connect() after the database name. If the hostname is localhost, PHP makes a fast direct connection through a Unix socket (under Linux or Mac OS X) or a named pipe (under Windows) rather than through the network. If your server has been configured with a nonstandard socket path, you can also append this as an additional parameter after the port. We discussed sockets and named pipes briefly in Configuring Access to the MySQL Server” in Chapter 2.
The return value of the function is a resource handle that is usually stored in a variable. The variable is passed as a parameter to other MySQL functions—such as mysqli_query()—to identify the connection to use. If the function fails, it returns false instead of a connection handle.
The database is selected when the connection is established. You can change the active database using the mysqli_select_db() function, but you normally just use the database that you activated in the call to mysqli_connect().
mixed mysqli_query(resource connection, string query)
Executes an SQL query on a connection. This is conceptually the same as typing an SQL query into the MySQL monitor and pressing the Enter key. The first parameter is a connection resource handle that was returned from mysqli_connect() and the second is an SQL query; note that the parameter order is the opposite of the original MySQL library’s mysql_query() function.
The function does not return or display the results. Instead, for SELECT, SHOW, EXPLAIN, or DESCRIBE queries, it returns a resource handle that can be assigned to a variable and used to access the results. The mysqli_fetch_array() function discussed next is usually used for this task. For UPDATE, INSERT, DELETE, and other queries that do not produce output, the return value is either true (indicating success) or false (indicating failure). Note that you don’t need to include a semicolon (;) at the end of the query string, though there are no problems if you do.
array mysqli_fetch_array(resource result[, int type])
Returns an array containing one row of results from a previously executed query. The result handle parameter is the return value from a previously-executed mysqli_query() function. Each call to the function returns the next available row of results as an array, with false returned when no further rows are available. This function is explained in detail later in Accessing Query Results with mysql_fetch_array() and mysqli_fetch_array().”
The three previous functions are sufficient to build simple applications. The three functions discussed next are also important, and you’ll find them helpful in all but the most basic applications.
When you run queries, the MySQL monitor reports useful information that helps you make decisions about what to do next. To access this information from PHP scripts, you need to use functions. Three functions you’ll find useful are:
int mysqli_insert_id(resource connection)
If you use the AUTO_INCREMENT feature, this function allows you to access the unique identifier value associated with the most recent INSERT statement on a connection. The database connection is passed as a parameter, and the return value is an integer that uniquely identifies the new row. A value of 0 is returned if AUTO_INCREMENT wasn’t used by the most recent query.
int mysqli_affected_rows(resource connection)
Reports the number of rows that were modified by the last query on the connection identified by the resource handle connection. We describe this function in more detail later in Finding the Number of Changed Rows Using mysql_affected_rows and mysqli_affected_rows.”
int mysqli_num_rows(resource result)
Reports the number of rows returned by a SELECT query identified by a result resource handle. The function doesn’t work for queries that modify the database; mysqli_affected_rows() should be used there instead.
The descriptions in this section are simplified. We’ve omitted function parameters that are rarely used, avoided some of the details of how the functions are used, and shown some optional parameters as mandatory. We’ve also shown only the procedural style for the library, which means we’ve shown the features of the library as functions; you can also use the new library in an object-oriented programming style, but that’s outside the scope of this book. You’ll find more detail on MySQLi functions in the PHP manual at http://www.php.net/manual/en/ref.mysqli.php and in the resources listed in Resources” at the end of this chapter.
What’s New in MySQLi
The examples and functions we’ve discussed don’t show the differences between the MySQL and MySQLi libraries; let’s look at these now. The most significant difference between the libraries is under the hood. The MySQLi library is a complete rewrite of the MySQL library, designed to offer better performance. This means that even if you’re not using the advanced features it offers, it’s always better to use MySQLi when you’re not constrained by other issues (such as maintaining legacy code). Other features of MySQLi include:
Support for encrypted and compressed connections
These allow faster, secure connections between PHP and MySQL over a network. Encryption using SSL is highly secure and ensures that hackers can’t eavesdrop on your data as it is being transmitted. Compression means that less data is transferred between the web server and the MySQL server, which for moderate or high rates of data transfer means that communications are faster.
Prepared statements
These allow you to prepare (parse, optimize, and plan) an SQL statement once and reuse it many times, saving that cost each time you use it. This is useful if you want to repeat a query with different parameters—for example, when bulk inserting data.
Object-oriented methods
As discussed previously, you can now use an object-oriented style with the MySQLi library in addition to the procedural style shown in this section.
Transaction control
Transactions are discussed in Transactions and Locking” in Chapter 7. The MySQLi library gives you functions to turn the autocommit feature on or off, and also start, commit, and roll back transactions.
Profiling
Allows you to view statistics and debugging information from your MySQL server. This includes timing details for function calls, the output of the EXPLAIN statement that describes how the queries are evaluated, and so on.
Distribution and replication functions
Many new functions have been added to allow you to manage many MySQL servers that perform the same tasks. This allows you to build highly scalable systems that can handle hundreds of thousands or millions of requests each day.
We don’t discuss these features in detail as they’re outside the scope of this book.
Accessing Query Results with mysql_fetch_array() and mysqli_fetch_array()
The mysql_fetch_array() and mysqli_fetch_array() functions retrieve result rows from queries that produce output. These functions are typically used to retrieve the results output by an SQL SELECT statement. This section uses examples to show how. To keep our description simple, we’ll use the standard MySQL library, but our explanations apply to mysqli_fetch_array() as well.
As with the array examples described previously, you can access elements returned with mysql_fetch_array() using either numeric or associative access. For numeric access, attributes are numbered in the order they are specified in the SQL statement. If you use a SELECT * FROMtable statement, then the attributes are ordered first by the table names and then by the order they were created with the CREATE TABLE statement (which is as listed by the output of the DESCRIBE or SHOW statements). Let’s explore three examples of numeric access that illustrate these ideas.
We’ll begin with a simple example that uses the music database. Suppose you want to output the artist_id column and then the artist_name column for all rows from the artist table. You can do this with the following PHP fragment:
// Tell the browser to expect preformatted text
print "<pre>";
// Run the query on the connection
if (!($result = @ mysql_query("SELECT artist_id, artist_name FROM artist",
$connection)))
die("Couldn't run query");
// Until there are no rows in the result set, fetch a row into
// the $row array.
while ($row = @ mysql_fetch_array($result))
{
// Start a new line
print "\n";
// Print out the columns
print "{$row[0]} {$row[1]}";
}
// Tell the browser that the preformatted text has ended
print "</pre>";
This produces the following output:
1 New Order
2 Nick Cave & The Bad Seeds
3 Miles Davis
4 The Rolling Stones
5 The Stone Roses
6 Kylie Minogue
You can see that the artist_id column is output by printing the first element of the array $row by referencing $row[0]. The artist_name is output by referencing $row[1].
Note that we enclosed the output in HTML <pre> tags; if we hadn’t, the browser would have ignored the newline (\n) character during display. You could still have used your browser’s View Source option to see the lines as they were sent to the browser by the PHP script.
Consider another example from the music database. This time, let’s examine the structure of the artist table:
mysql> DESCRIBE artist;
+-------------+-----------+------+-----+---------+-------+
| Field | Type | Null | Key | Default | Extra |
+-------------+-----------+------+-----+---------+-------+
| artist_id | int(5) | | PRI | 0 | |
| artist_name | char(128) | YES | | NULL | |
+-------------+-----------+------+-----+---------+-------+
2 rows in set (0.00 sec)
The following code fragment selects all rows from the artist table and prints the columns after a call to mysql_fetch_array(). In this example, rather than explicitly printing the individual elements, we print all elements of the row starting with the first:
// Tell the browser to expect preformatted text
print "<pre>";
// Run the query on the connection
if (!($result = @ mysql_query("SELECT * FROM artist", $connection)))
die("Couldn't run query");
// Count the number of columns in the results
$count = @ mysql_num_fields($result);
// Until there are no rows in the result set, fetch a row into
// the $row array.
while ($row = @ mysql_fetch_array($result))
{
print "\n";
// Print out the columns
for($x=0; $x<$len; $x++)
print "{$row[$x]} ";
}
// Tell the browser that the preformatted text has ended
print "</pre>";
The output looks identical to the previous example:
1 New Order
2 Nick Cave & The Bad Seeds
3 Miles Davis
4 The Rolling Stones
5 The Stone Roses
6 Kylie Minogue
You can see that the columns appear in the order they do in the table—that is, the artist_id appears before the artist_name. Notice also that we used the mysql_num_fields() function described in the previous example to figure out how many columns there were in the results.
Suppose that you want to to run the following query that uses two tables:
SELECT * FROM artist, album WHERE artist.artist_id = album.artist_id
With the monitor, you’d get:
mysql> SELECT * FROM artist, album WHERE artist.artist_id = album.artist_id;
+-----------+---------------------------+-----------+----------+...
| artist_id | artist_name | artist_id | album_id |...
+-----------+---------------------------+-----------+----------+...
| 1 | New Order | 1 | 1 |...
| 1 | New Order | 1 | 2 |...
| 1 | New Order | 1 | 3 |...
| 1 | New Order | 1 | 4 |...
| 1 | New Order | 1 | 5 |...
| 1 | New Order | 1 | 6 |...
| 1 | New Order | 1 | 7 |...
| 2 | Nick Cave & The Bad Seeds | 2 | 1 |...
| 3 | Miles Davis | 3 | 1 |...
| 3 | Miles Davis | 3 | 2 |...
| 4 | The Rolling Stones | 4 | 1 |...
| 5 | The Stone Roses | 5 | 1 |...
| 6 | Kylie Minogue | 6 | 1 |...
+-----------+---------------------------+-----------+----------+...
...+------------------------------------------+
...| album_name |
...+------------------------------------------+
...| Retro - John McCready FAN |
...| Substance (Disc 2) |
...| Retro - Miranda Sawyer POP |
...| Retro - New Order / Bobby Gillespie LIVE |
...| Power, Corruption & Lies |
...| Substance 1987 (Disc 1) |
...| Brotherhood |
...| Let Love In |
...| Live Around The World |
...| In A Silent Way |
...| Exile On Main Street |
...| Second Coming |
...| Light Years |
...+------------------------------------------+
13 rows in set (0.01 sec)
The PHP code you’d write to run this query would be as follows:
// Run the query on the connection
if (!($result = @ mysql_query(
"SELECT * FROM artist, album WHERE artist.artist_id = album.artist_id",
$connection)))
die("Couldn't run query");
// Count the number of columns in the results
$count = @ mysql_num_fields($result);
// Until there are no rows in the result set, fetch a row into
// the $row array.
while ($row = @ mysql_fetch_array($result))
{
print "\n";
// Print out the columns
for ($x=0;$x<$count;$x++)
print "{$row[$x]} ";
}
We’ve used nested loops here; the outer while loop iterates over each result row, while the inner for loop iterates over each column in the row. The output you get is as follows:
1 New Order 1 1 Retro - John McCready FAN
1 New Order 1 2 Substance (Disc 2)
1 New Order 1 3 Retro - Miranda Sawyer POP
1 New Order 1 4 Retro - New Order / Bobby Gillespie LIVE
1 New Order 1 5 Power, Corruption & Lies
1 New Order 1 6 Substance 1987 (Disc 1)
1 New Order 1 7 Brotherhood
2 Nick Cave & The Bad Seeds 2 1 Let Love In
3 Miles Davis 3 1 Live Around The World
3 Miles Davis 3 2 In A Silent Way
4 The Rolling Stones 4 1 Exile On Main Street
5 The Stone Roses 5 1 Second Coming
6 Kylie Minogue 6 1 Light Years
You can see that the two columns from artist appear before the three columns from album, since artist is listed before album in the SELECT statement.
Numeric access is clumsy when you want to print out columns in nonsequential order. For example, continuing the previous example, if you want to print the artist_name and album_name columns, then you need to know they’re referenced as $row[1] and $row[4], respectively. If you change the SQL query or change the table structure, then you also need to modify the PHP code that works with the array. A better approach is to access the columns using their names, but this has a few catches as we show you in the next few examples.
Let’s start with a simple associative access example. Suppose you want to do what we just discussed: print the artist_name and album_name columns after a join between the artist and album tables. Here’s the code fragment you need:
// Run the query on the connection
if (!($result = @ mysql_query(
"SELECT * FROM artist, album WHERE artist.artist_id = album.artist_id",
$connection)))
die("Couldn't run query");
// Until there are no rows in the result set, fetch a row into
// the $row array.
while ($row = @ mysql_fetch_array($result))
{
print "\n";
// Print out the columns
print "{$row["artist_name"]} {$row["album_name"]}";
}
You can see that to access the artist_name column, you provide the column name as an associative key into the $row array as $row["artist_name"]. As you’d expect, the code outputs the following:
New Order Retro - John McCready FAN
New Order Substance (Disc 2)
New Order Retro - Miranda Sawyer POP
New Order Retro - New Order / Bobby Gillespie LIVE
New Order Power, Corruption & Lies
New Order Substance 1987 (Disc 1)
New Order Brotherhood
Nick Cave & The Bad Seeds Let Love In
Miles Davis Live Around The World
Miles Davis In A Silent Way
The Rolling Stones Exile On Main Street
The Stone Roses Second Coming
Kylie Minogue Light Years
This is a flexible, powerful method: you use the database column names directly, and it makes your code readable and robust to most database and SQL query changes.
However, there are some cases where associative access is tricky. If both a table and attribute name are used in a SELECT statement, only the attribute name is used to access the data associatively. For example, if two or more tables contain columns with the same name, only the one that occurs last in the query result can be accessed associatively. You can get around this problem by using aliases as described in Chapter 7. For example, to access the artist_id columns from both the artist and album tables, you’d write:
// Run the query on the connection
if (!($result = @ mysql_query(
"SELECT artist.artist_id AS id1,
album.artist_id AS id2
FROM artist, album
WHERE artist.artist_id = album.artist_id",
$connection)))
die("Couldn't run query");
// Until there are no rows in the result set, fetch a row into
// the $row array.
while ($row = @ mysql_fetch_array($result))
{
print "\n";
// Print out the columns
print "{$row["id1"]} {$row["id2"]}";
}
You can see that the columns are accessed in the $row array using their aliases, id1 and id2.
You can’t solve the name-clash problem using table or database names as prefixes. For example, suppose you run the following query:
if (!($result = @ mysql_query(
"SELECT artist.artist_id,
album.artist_id
FROM artist, album
WHERE artist.artist_id = album.artist_id",
$connection)))
die("Couldn't run query");
If you try to access the column with the table name:
print "{$row["artist.artist_id"]}";
you’ll get a PHP notice telling you that you’re using an undefined index. If you omit the table name, like this:
print "{$row["artist_id"]}";
you’ll see the value for the last artist_id returned by the query, which is album.artist_id. The best solution is to use aliases; you could design tables that avoid duplicate names for columns you want to retrieve, but this could lead to a more convoluted design that’s less clear and could lead to other problems.
The array returned by mysql_fetch_array() contains two elements for each column, one each for numeric and associative access. You can see this when you use the foreach statement to output data:
// Run the query on the connection
if (!($result = @ mysql_query(
"SELECT * FROM artist, album
WHERE artist.artist_id = album.artist_id",
$connection)))
die("Couldn't run query");
// Until there are no rows in the result set, fetch a row into
// the $row array.
while ($row = @ mysql_fetch_array($result))
{
print "\n";
// Print out the columns
foreach($row as $element)
print $element;
}
In part, this displays:
11New OrderNew Order111Retro - John McCready FANRetro - John McCready FAN
11New OrderNew Order122Substance (Disc 2)Substance (Disc 2)
11New OrderNew Order133Retro - Miranda Sawyer POPRetro - Miranda Sawyer POP
Each column value is printed twice. If you want to use foreach or you have another reason for wanting only one copy, you can force mysql_fetch_array() to return one copy by passing a second parameter to the function. If you want only associatively accessed elements, you use:
while ($row = @ mysql_fetch_array($result, MYSQL_ASSOC))
For numeric access, you use:
while ($row = @ mysql_fetch_array($result, MYSQL_NUM))
The same problem occurs with other array functions such as count(). If you try count($row) on a row returned from mysql_fetch_array() without the second parameter, you’ll get twice the number of columns that were returned by the query—that is, twice the value reported bymysql_num_fields().
MySQL function values can be accessed associatively. Suppose you want to count the number of rows returned by a SELECT statement:
// Run the query on the connection
if (!($result = @ mysql_query(
"SELECT count(*) FROM artist",
$connection)))
die("Couldn't run query");
// There is only one row to fetch
$row = @ mysql_fetch_array($result);
print "There are {$row["count(*)"]} rows.";
This outputs:
There are 6 rows.
You can obtain the same result using SELECT * FROM artist and then using the mysql_num_rows() function. However, for large result sets, it’s more efficient to use the MySQL function count() instead, since it doesn’t buffer an entire result set that you’re not using.
Finding the Number of Changed Rows Using mysql_affected_rows and mysqli_affected_rows
We’ve seen how the mysql_num_rows() and mysqli_num_rows() return the number of rows retrieved by a SELECT query. However, some operations, such as UPDATE, DELETE, or INSERT, do not return a result set. For these, we have another pair of functions that we can use.
The mysql_affected_rows() and mysqli_affected_rows() functions report the number of rows affected by queries that change data, such as INSERT, UPDATE, and DELETE. If no rows were actually changed by a query, these functions return zero, but this doesn’t mean an error has occurred. For example, a zero is returned if a DELETE query with a WHERE clause doesn’t match any rows, or if an UPDATE doesn’t require any values to be changed. If an error does occur, the function returns the value –1. You can add code to check for these return values and handle any problems.
A REPLACE query updates an existing row or inserts a new row in a table. If there is an existing row in the table with the same key, that row is deleted before the new row is inserted. The insertion counts as one row affected, and a deletion would count as another affected row. Hence, aREPLACE query may be reported as affecting one or two rows.
Handling MySQL Errors
We provided an introductory discussion of PHP error handling earlier in Handling Errors in PHP.” In this section, we take a detailed look at the classes of problems that can occur when you’re developing a script that works with MySQL. Errors that occur in PHP scripts could be related to general PHP issues, the PHP MySQL functions, or MySQL data:
General PHP issues
These include syntax errors in scripts, problems with the script engine, runtime errors, and programmer-triggered errors. In turn, these are divided into the insignificant NOTICE class, the significant WARNING class, and the critical ERROR class.
For example, if you leave out a quote in a PHP statement:
echo "This is output;
a PHP error message such as:
Parse error: syntax error, unexpected T_STRING, expecting ',' or ';' in
/var/www/html/test.php on line 22
is displayed when the page is loaded in a web browser. These problems aren’t related to MySQL and are usually related to mistyped statements or flawed program logic.
PHP MySQL functions
These errors can occur during many operations; for example, the MySQL server might be unavailable, it might not be possible to establish a connection because the authentication credentials are incorrect, or an SQL query might be incorrectly formed. These are not PHP errors, but PHP can report them.
For example, if an attempt to connect to the MySQL server fails, the mysqli_connect() function returns FALSE and displays an error message, as below:
Warning: mysqli_connect() [function.mysqli-connect.html]: (28000/1045):
Access denied for user 'fred'@'localhost' (using password: YES)
in /var/www/html/wedding/index.php on line 68
MySQL data
These are error conditions that are detected programmatically, but are neither PHP nor MySQL problems. For example, deleting rows that don’t exist, returning incorrect numbers of rows, and concurrency-related problems fall into this class. Typically, these are design problems that are common to any database system.
You can use PHP to handle MySQL errors by testing for a FALSE return value from calls to functions such as mysqli_connect() and mysqli_query():
if(!($connection=@mysqli_connect
($DB_hostname, $DB_username, $DB_password, $DB_databasename)))
die("Failed while trying to connect to the database.");
Here, we’ve used the PHP die() function to display an error message and stop the program if mysqli_connect() returns FALSE. It’s common to suppress the default PHP error messages by adding the at symbol (@) just before the call to MySQL functions; without it, you’ll get both a message from PHP’s own error handler, which is cryptic to a user, and your message from the die() function. Here’s another example:
// Run the query on the connection
if (!($result = @ mysqli_query($connection, "SELECT * FROM artist")))
die("Couldn't run query");
Handling errors using the MySQLi library
PHP provides error-reporting functions that provide the text error message and the numeric error code for a MySQL error that has occurred. Error numbers make it easier to look up information in the MySQL manual list of error codes and messages athttp://dev.mysql.com/doc/mysql/en/Error-handling.html
The functions mysqli_connect_error() and mysqli_connect_errno() provide the error message and numeric code corresponding to the latest error that occurred while trying to initialize a given MySQL connection. If no error has occurred, mysqli_connect_error() returns an empty string (""), and mysqli_connect_errno() returns 0.
Similarly, the PHP functions mysqli_error() and mysqli_errno() provide the error message and numeric code corresponding to the latest error on an active connection. They do not report connection errors; the previous two functions do that instead.
Together, these can be used to report errors to the programmer, or to trigger code that displays useful messages to the user. You could use these error-handling functions in your own custom function; for example, you could display the error number and the error message:
// Custom error handler function
function showerror($connection)
{
// Was there an error during connection?
if(mysqli_connect_errno())
// Yes; display information about the connection error
die("Error " .
mysqli_connect_errno($connection) . " : ".
mysqli_connect_error($connection));
else
// No; display the error information for the active connection
die("Error " .
mysqli_errno($connection) . " : ".
mysqli_error($connection));
}
You could then call the showerror() function whenever you encounter a database error:
if(!($connection= @ mysqli_connect
($DB_hostname, $DB_username, $DB_password, $DB_databasename)))
showerror($connection);
This would display a message such as:
Error 1146 : Table 'music.art' doesn't exist
Consider the following code fragment that uses the MySQLi error functions.
// Connect to the MySQL server
$connection = @ mysqli_connect("localhost", "root",
"the_mysql_root_password", "vapor");
if (mysqli_connect_errno() != 0)
die("Connection problem: " .
mysqli_connect_error() . " (" .
mysqli_connect_errno() . ")");
$result = @ mysqli_query($connection, "SELECT * FROM artis");
if (mysqli_errno($connection) != 0)
die("Query problem: " .
mysqli_error($connection) . " (" .
mysqli_errno($connection) . ")");
If the mysqli_connect statement fails—as it will in this example, because the database vapor doesn’t exist—then mysqli_connect_errno() reports a nonzero value and you see:
Connection problem: Unknown database 'vapor' (1049)
If the database did exist, the mysqli_query() statement would fail because the table artis doesn’t exist, and the code would report:
Query problem: Table 'vapor.artis' doesn't exist (1146)
Handling errors using the older MySQL library
The default MySQL (as opposed to MySQLi) library has two similar error-handling functions that you can use to check for problems. The function mysql_errno() returns an error number for the most recent MySQL function that used the specified connection; if no error occurred, it returns 0. Similarly, the function mysql_error() returns a string describing an error for the most recent MySQL function that used the specified connection; if no error occurred, it returns the empty string "". Note that neither works for the mysql_connect() function; both need a working connection as a parameter to interrogate the MySQL server about the error. The old MySQL function library doesn’t have any equivalents for the MySQLi functions mysqli_connect_error() and mysqli_connect_errno(), so you need to check for a failed connection yourself, perhaps by calling the die() function to print an error message and stop processing.
Let’s look at an example. Suppose you have the following fragment that tries to use the nonexistent vapor database:
// Connect to the MySQL server
if (!($connection = @ mysql_connect("localhost", "root",
"the_mysql_root_password")))
die("Cannot connect");
if (!(@ mysql_select_db("vapor", $connection)))
die(mysql_error($connection) . " (" . mysql_errno($connection) . ")");
The final line of the fragment concatenates a string that describes the error using mysql_error() and then includes in parentheses the error number using mysql_errno(). When you run the fragment, you get the output:
Unknown database 'vapor' (1049)
As with the MySQLi library, you could write a simple function to handle MySQL errors:
// Custom error handler function
function showerror($connection)
{
die(mysql_error($connection) . " (" . mysql_errno($connection) . ")");
}
You could then call this function instead of the die() function and pass it the $connection parameter:
// Connect to the MySQL server
if (!($connection = @ mysql_connect("localhost", "root",
"the_mysql_root_password")))
die("Cannot connect");
if (!(@ mysql_select_db("vapor", $connection)))
showerror($connection);
Handling errors in production code
Production code needs to handle errors gracefully. As mentioned earlier, it’s very useful to allow PHP error messages to be displayed while you’re developing and debugging your code. However, when you’re ready to deploy your application, we recommend that you customize the messages that are displayed so that they’re more polite and also give away fewer details about your system to potential attackers.
We can have our showerror() function simply display a generic message as follows:
// Custom error handler function
function showerror($connection)
{
// Display a message to the user
echo "<h3>Failure</h3>
Unfortunately we're having technical difficulties.
Please try again later.";
}
However, as the administrator, you won’t know anything about the error unless your users complain.
You can configure PHP to record errors to a logfile. To do this, you’ll need to edit the php.ini configuration file and enable the log_errors option:
log_errors = On
You should also specify the location of the logfile with the error_log option. The web server should be able to write to this file, so you should check the permission settings of the directory you use. For example, we can specify the file /tmp/php_errors.log for a Linux or Mac OS X system:
error_log = /tmp/php_errors.log
On a Windows system, use a path such as C:\php_errors.log. If you modify the PHP configuration, you will need to restart the web server to activate the changes.
You can also log errors using the PHP error_log() function; let’s modify our showerror() function to log errors:
// Custom error handler function
function showerror($connection)
{
// Display a message to the user
echo "<h3>Failure</h3>
Unfortunately we're having technical difficulties; this has been logged.
Please try again later.";
// Create message with the current timestamp and the MySQL error.
$sMessage= date("Y.m.d_H:i:s").": ".mysqli_error($connection)."\n";
// Log the timestamp and error description to the file /tmp/php_errors.log
error_log(
$sMessage,
3,
"/tmp/php_errors.log");
exit;
}
The first parameter to the error_log() function is the message string. The second parameter is the type of logging we want; 3 means write to the specified file. The last parameter is the path to the logfile. In building up the message, we’ve used the date() function to get the current timestamp (for example, 2006.07.17_04:34:27) and then append the error message to this. The logfile would contain error messages like this:
2006.07.17_04:38:00: Can't connect to local MySQL server through socket
'/var/lib/mysql/mysql.sock' (2)
2006.08.05_11:52:37: Unknown column 'artist' in 'where clause'
Ideally, you wouldn’t want to regularly check the logfile to learn about problems. You can ask the error_log() function to send you an email for each error:
// Define the email address separately from the code, making it easier to maintain.
// This line can be placed in a separate configuration file.
define("ADMINISTRATOR_EMAIL_ADDRESS", "support@learningmysql.com");
// Custom error handler function
function showerror($connection)
{
// Display a message to the user
echo "<h3>Failure</h3>
Unfortunately we're having technical difficulties; this has been logged.
Please try again later.";
// Create message with the current timestamp and the MySQL error.
$sMessage= date("Y.m.d_H:i:s").": ".mysqli_error($connection)."\n";
// Log the timestamp and error description to the specified email address
error_log(
$sMessage,
1,
ADMINISTRATOR_EMAIL_ADDRESS);
exit;
}
Here, the second parameter is set to 1, indicating that we want to send an email, and the third parameter is the destination email address. In case you were wondering, using 0 for the second parameter writes the message to the default log specified in the php.ini file, while using 2 writes the message to a TCP port for use with a PHP debugging tool. We don’t think either of these options is particularly useful for you at this stage. Note that we’ve used the define() function to define the constant ADMINISTRATOR_EMAIL_ADDRESS outside the body of the function. This allows us to specify the email address somewhere easy to access and modify (perhaps in a header file), rather than having to search complex code for the email address.
Writing files and sending emails using PHP
We’ve just seen how the error_log() function can be used to write messages to a logfile or to email them to a specified address. This is a good time to look at how PHP generally accesses files and sends emails.
To write to a file, we first need to use the fopen() function to open the file for writing; this function returns a file pointer that we use for all further access to the file. We write the data using the fwrite() function, and then close the file using the fclose() function. Consider how we can use the PHP file-access functions to write error messages to file:
function showerror($connection)
{
// Display a message to the user
echo "<h3>Failure</h3>
Unfortunately we're having technical difficulties; this has been logged.
Please try again later.";
// Create message with the current timestamp and the MySQL error.
$sMessage= date("Y.m.d_H:i:s").": ".mysqli_error($connection)."\n";
// Save the message to the logfile
// Open the file php_errors.log in the /tmp directory for appending:
$fp=fopen("/tmp/php_errors.log", "a+");
// Write the message out, up to a maximum of 10000 bytes
fwrite($fp, $sMessage, 10000);
// Close the file
fclose($fp);
}
PHP has a mail() function that allows you to send emails with a configurable message and using different addresses. You can add a few more lines to the showerror() function to also send you an email:
...
// Assign the target email address and subject
$ToAddress = "System administrator <".ADMINISTRATOR_EMAIL_ADDRESS.">";
$Subject = "System error";
// Assign extra headers to improve appearance and handling in email programs.
$From = "From: System <".ADMINISTRATOR_EMAIL_ADDRESS.">\n";
$ReplyTo = "Reply-To: System <".ADMINISTRATOR_EMAIL_ADDRESS.">";
$Sender = "Sender: System <".ADMINISTRATOR_EMAIL_ADDRESS.">\n";
$ExtraHeaders = "$From$ReplyTo$Sender";
// Send the message
if(!mail($ToAddress, $Subject, wordwrap($sMessage, 78), $ExtraHeaders))
// If we couldn't send the message, tell the user to contact
// the administrator himself
die("Problems sending email - please send an email to the system administrator: ".
ADMINISTRATOR_EMAIL_ADDRESS);
}
The $ExtraHeaders string configures who the email appears to be coming from and where replies to the email will go. If you’re using the error_log() function to send emails, you can pass this same string as an optional fourth parameter.
Modularizing Code
A common requirement in PHP development is to reuse parameters and functions across many scripts. For example, you might want to use the username and password credentials many times to connect to the MySQL server, or you might have a function such as showerror() (described earlier in Handling MySQL Errors”) that you want to call from many different places. This section shows you how to do this effectively.
PHP has four built-in functions for including scripts in other scripts. These allow you to share variables and functions between those scripts without duplicating them, making it much easier to maintain code and decreasing the chance of bugs through duplication and redundancy. The functions are include(), require(), require_once(), and include_once(). We discuss the two require variants here, which are identical to the include variants in every way, except what happens when an error occurs: include() triggers a PHP WARNING (which, by default, doesn’t stop the script), while require() triggers a fatal ERROR that stops script execution.
Suppose you have the following code that you want to reuse across several scripts:
<?php
$username = "root";
$password = "the_mysql_root_password";
$database = "music";
$host = "localhost";
// Custom error handler function
function showerror($connection)
{
die(mysqli_error($connection) . " (" . mysqli_errno($connection) . ")");
}
?>
It’s stored in the file db.php. You can reuse it with the require() directive. Here’s an example, in which the file artists.php reads in and uses the contents of the db.php file:
<?php
require "db.php";
// Connect to the MySQL server
if (!($connection = @ mysql_connect($host, $username, $password)))
die("Cannot connect");
if (!(mysql_select_db($database, $connection)))
showerror($connection);
// Run the query on the connection
if (!($result = @ mysql_query("SELECT * FROM artist", $connection)))
showerror($connection);
...
?>
The code in db.php can be used as if it were incorporated directly in artists.php, and the showerror() function is accessible to the code in artist.php.
The difference between require() and require_once() is what happens when a file is incorporated twice. Suppose you decide to create a new file, musicheader.php, that has a function to connect to the MySQL server:
<?php
require "db.php";
function musicconnect()
{
// Connect to the MySQL server
if (!($connection = @ mysql_connect($host, $username, $password)))
die("Cannot connect");
if (!(mysql_select_db($database, $connection)))
showerror($connection);
return $connection;
}
?>
The function allows you to establish a connection, and it makes uses of the parameters and functions in db.php. Suppose you then write a script that uses musicheader.php but also uses require() to incorporate db.php:
<?php
require "db.php";
require "musicheader.php";
$conn = musicconnect();
...
?>
When you execute the script, you see the following error message:
Fatal error: Cannot redeclare showerror() (previously declared in
/Library/WebServer/Documents/mysql/db.php:7) in
/Library/WebServer/Documents/mysql/db.php on line 10
This occurs since the db.php file is included twice, once by the script and again by musicheader.php; this means that the function showerror() is defined twice, which causes PHP to stop processing.
Unfortunately, it’s sometimes difficult to ensure you avoid doing this; for example, it’s common that you want to include two header files in a script, and that those header files include the contents of a third because it’s needed in both. Fortunately, there’s an easy way around this withrequire_once(): you can use it as many times as you like for a particular file; the file will only be read in once. Here’s how you’d rewrite the previous examples with require_once(). First, there’s musicheader.php:
<?php
require_once "db.php";
function musicconnect()
{
// Connect to the MySQL server
if (!($connection = @ mysql_connect($host, $username, $password)))
die("Cannot connect");
if (!(mysql_select_db($database, $connection)))
showerror($connection);
return $connection;
}
?>
Second, there’s the script:
<?php
require_once "db.php";
require_once "musicheader.php";
$conn = musicconnect();
...
?>
The script now works as desired. We use require_once() in preference to require() because it automatically looks after the problem we’ve shown, and we recommend you do the same.
There are rare cases where you do actually want a header file to be included and processed multiple times; for example, you could have a set of statements that are loaded and run in the body of a loop, as in:
for($i=0; $i<10; $i++)
{
// Load the header file
require("myfile.php");
}
However, this code isn’t efficient (a custom function would be faster), so you’re generally better off avoiding require().
Protecting Script and Header Files
Web database applications need to store the database user credentials in the PHP program code. Users with accounts on your web server can access script and header files directly from disk, so you should set the file permissions such that only the web server has permission to read any files that contain sensitive information, such as the database server password.
PHP scripts are executed by the server before content is sent to a requesting web browser, so people won’t see the password when they load a PHP page. However, included files are sometimes given names with the .inc extension. The web server only processes files with the .php extension, and sends other text files untouched to the web browser. This presents a worrisome security problem if the file contains sensitive information; if a user correctly types in the URL of a header file, she’ll be able to see its contents.
We recommend that you always use the .php extension for header files. The web server will provide the output produced by running this script, and since the script doesn’t actually print anything, a user who directly requests the include file will see only a blank page.
If you choose to use an extension other than .php, you should place the include files outside the web server document tree, so that the web server does not serve the file to users; this can lead to difficulties with maintenance because the application files won’t all be located together. Alternatively, you can tell the web server to refuse access to files with that particular extension. For the Apache web server, you can do this by adding the following directives to the httpd.conf configuration file and restarting the server:
<Files ~ "\.inc$">
Order allow,deny
Deny from all
Satisfy All
</Files>
Processing and Using User Data
Up to this point, we’ve shown you how to query and return results from MySQL. However, all our examples are simple because they don’t take user input and use it in the querying process. Indeed, unless you change the data in the database, the queries we’ve shown produce the same results each time. This section shows you the basics of securely and effectively including user data in the process to customize your query input and output.
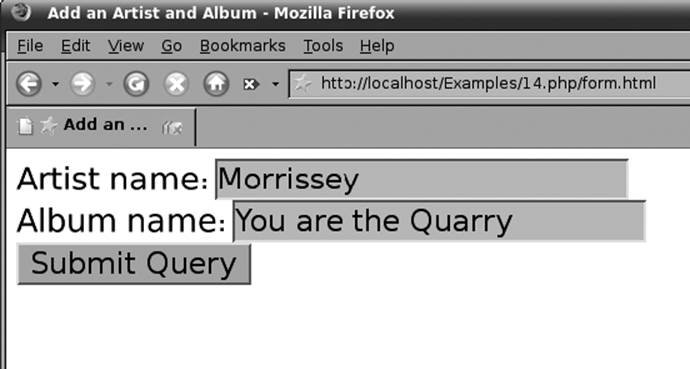
Figure 14-2. The HTML entry form shown in the Firefox web browser
Consider an example of an HTML page. Example 14-4 contains a form that’s designed to capture details about a new artist and album to add to the music database.
Example 14-4. A simple HTML form
<!DOCTYPE HTML PUBLIC
"-//W3C//DTD HTML 4.01 Transitional//EN"
"http://www.w3.org/TR/html401/loose.dtd">
<html>
<head>
<meta http-equiv="Content-Type" content="text/html; charset=iso-8859-1" />
<title>Add an Artist and Album</title>
</head>
<body>
<form action="add.php" method="GET">
Artist name: <input type="text" name="artist" />
<br />
Album name: <input type="text" name="album" />
<br />
<input type="submit" />
</form>
</body>
</html>
When it’s rendered in the Firefox web browser, the HTML page looks as shown in Figure 14-2. You can see we’ve entered the artist name Morrissey and the album You are the Quarry in the fields.
In our HTML example, the <form> tag has two attributes, action and method. The action attribute tells the browser what resource to request when the user submits the form. In this example, it’s add.php. The method attribute tells the browser how to send the data entered into the form to the web server. With the GET method that’s used in the example, the data is appended to the URL. For example, if the user types Morrissey and You are the Quarry in the fields and the web server runs at the address localhost, the URL that’s requested when the form submits is:
http://localhost/add.php?artist=Morrissey&album=You+are+the+Quarry
Notice that the name attributes of the <input> elements, artist and album, are paired with the values that the user typed in the fields. You can also see that the space characters in You are the Quarry are translated into + characters, since the HTTP standard doesn’t allow spaces in URLs.
The alternative to the GET method is POST. You should always use the POST method to submit confidential information from forms. If you use the GET method, any information typed into the form—including passwords—will appear in plain view in the browser’s address bar, and in any bookmarks of pages that receive the submitted data.
In the target PHP script, submitted form data is placed in the predefined $_GET or $_POST array variable, depending on the method that was used to submit the form. For example, the form variable artist would be accessible as $_GET['artist'] with a form submitted using the GETmethod, and as $_POST['artist'] with a form submitted using the POST method. The type of quotes—single or double—does not matter. The $_GET and $_POST arrays are superglobal variables, meaning that they’re automatically created and accessible anywhere in your PHP script.
Let’s now consider how add.php—the script that’s requested—accesses and uses the values from the form. You can display the values of the artist and album elements with the following short script stored in the file add.php:
<html>
<body>
<pre>
<?php
print $_GET["artist"] . "\n";
print $_GET["album"];
?>
</pre>
</body>
</html>
When run, this displays the text:
Morrissey
You are the Quarry
Our add.php script isn’t very useful because it doesn’t access the database to add the form data to it. Here’s a new version that does what we want:
<?php
// Connect to the MySQL server
if (!($connection = @ mysql_connect("localhost", "root",
"the_mysql_root_password")))
die("Cannot connect");
if (!(mysql_select_db("music", $connection)))
die("Couldn't select music database");
// Add the artist, using the next available artist_id
if (! @ mysql_query(
"INSERT INTO artist (artist_id, artist_name)
SELECT MAX(artist_id)+1, \"{$_GET["artist"]}\" FROM artist",
$connection))
die("Couldn't add artist");
// Discover the artist_id of the row we added
if (!($result = @ mysql_query(
"SELECT artist_id FROM artist WHERE
artist_name = \"{$_GET["artist"]}\"",
$connection)))
die("Couldn't find artist");
$row = @ mysql_fetch_array($result);
$artist_id = $row["artist_id"];
// Add the album, setting album_id to 1 and using the $artist_id
if (! @ mysql_query(
"INSERT INTO album (artist_id, album_id, album_name)
VALUES ({$artist_id}, 1, \"{$_GET["album"]}\")",
$connection))
die("Couldn't add album");
print "Added artist: {$_GET["artist"]}, with album: {$_GET["album"]}.";
?>
The script adds a new row to the artist table using an INSERT ... SELECT statement and the MAX() function described in Chapter 8. The artist value entered by the user is stored in $_GET["artist"]. It then uses SELECT to find the artist_id of the newly added row. The final step is to insert a row into the album table, using the new artist_id and the album name stored in $_GET["album"], and setting the album_id to 1 (since this is the first album for the artist). Finally, the script displays a success message or an error message depending on how things went.
The script has three serious problems. First, it’s not secure: no steps are taken to ensure that users pass sensible parameters to the script, and this can have serious consequences for some scripts; we show you basic steps to guard against this next. Second, it suffers from the reload problemthat’s discussed in The Reload Problem,” later in this chapter. When you request the add.php script a second time, it adds the same information to the database again. Last, it doesn’t have validation or error handling; for example, you can insert the same artist more than once, each will be allocated a new artist_id, and you won’t see an error message. In Chapter 15, we’ll look at examples of how to handle such errors.
The PHP Predefined Superglobal Variables
Superglobal variables are automatically created and initialized by the PHP engine, and are accessible throughout the script. We’ve already seen the $_GET and $_POST associative arrays that contain data passed to the script from a form using the GET or POST method, respectively.
The array $_SESSION contains data related to a user’s interaction with a web application within a single session; we describe sessions and this variable in Sessions,” later in this chapter.
The $_COOKIE array contains cookie data provided by the user’s browser. Cookies are strings that are passed back and forth between the web server and browser to maintain a unique key. They are useful for storing information on a user on the user’s computer; you can use the PHPset_cookie() function to send a cookie to the user’s browser. Each subsequent time the user visits your site, his browser automatically provides the cookie data. Cookies can be set to expire once the user closes their browser, at a later date, or never. A good use for cookies is to remember what news articles users have read and to show them new articles that they haven’t read yet. Note that cookies should never be used to store confidential information, as they are not secure. In addition, they shouldn’t be used to store information critical to your application, since users can move among computers, or modify or delete cookies at any time. Cookies have been widely abused by companies trying to track user web surfing and shopping habits, and so informed users tend to treat them with suspicion and often block them. For these reasons, we recommend you don’t make extensive use of cookies, and we don’t go into details of cookies in this book.
There’s one more superglobal array that you should know about. The $_SERVER array contains information on the server configuration and the currently executing script. In this book, we use one item from this array: the $_SERVER["PHP_SELF"] variable, which contains the relative path from the document root to the currently executing script. For example, the $_SERVER["PHP_SELF"] value for the script http://www.invyhome.com/shop/process.php will be /shop/process.php. You can find a full list of PHP variables in the output of the phpinfo.php page that you created in Checking Whether Your Apache Installation Supports PHP” in Chapter 2.
Untainting User Data
When you make scripts accessible from the Web, they are vulnerable to security problems caused by deliberate or accidental abuse from users all over the world. When your scripts process input provided by users, you must be even more vigilant and validate the data to ensure that it is in the format and size your scripts expect and must handle. Let’s look at three issues.
Limiting the Size and Type of Input Data
Many problems are caused by the system encountering data that it can’t handle; for example, a user may try to log in to the system with a login name that is longer than the database can handle, resulting in unexpected behavior. An attacker may try to overload your script with more data than it can handle and in this way cause something to break. You should limit the amount of data that you accept and process. There are server variables that you can configure to do this, but we won’t look at those. Instead, we’ll look at how your script can reject excess data.
The PHP substr() function returns a specified portion of a string. You can limit the data passed from a form using this function; for example, you can choose to use just the first 15 characters:
// Reduce the length of the artist name to at most 15 characters
$_GET["artist"] = substr($_GET["artist"], 0, 15);
The 0 indicates that the returned substring should start from the initial character (character 0), and the 15 specifies the maximum number of characters to be returned.
Before processing input data, you should check that some data has in fact been passed to you:
// Check that an artist name has been passed to us
if(empty($_GET["artist"]))
die("You should have entered an artist name.");
When data has a specific type, you should consider adding extra steps in the validation process. For example, suppose you’re expecting a user to type in a currency amount in dollars and cents, and this is available as $_GET["money"] in your script. You can validate it by checking that the data isn’t longer than expected and also that it contains only digits and period characters. There are many ways to do this, but let’s use one with the techniques we’ve shown in this chapter:
$len = strlen($_GET["money"]);
for($x=0; $x&<$len; $x++)
{
if (
(
($_GET["money"][$x] < "0" || $_GET["money"][$x] > "9")
&&
($_GET["money"][$x] != ".")
)
||
($x > 6)
)
die("Invalid parameter: {$_GET["money"]}");
}
The strlen() function is a string library function that reports the length of a string as an integer value. The for loop goes through each character in the input, which is accessed as $_GET["money"][$x]. If the character is less than 0 or greater than 9 and isn’t a period character, an error is generated. Also, if the loop is repeated more than six times, an error is generated because the input is too long.
Another common way to validate data is to use regular expressions; we won’t go into the detail of that approach here.
Abusing Calls to Shell Commands
Another way attackers can compromise your server is by adding extra parameters to scripts that run programs on the web server. For example, the semicolon character is used to separate commands on Unix-like operating systems such as Linux and Mac OS X. If a script passes user input directly to a shell command, it’s easy to manipulate the script using this character.
Consider this example: the system() function runs a program on the server host and returns the resulting text. For example, the following line runs the fortune program from the /usr/games/ directory and displays the result:
system("/usr/games/fortune");
The fortune program displays random quotes and jokes; if you loaded this script in your browser, you might see something like:
Rudeness is a weak man's imitation of strength.
You might decide to have a script that is more useful. For example, you might write a script that allows users to enter mathematical queries; the script passes the query to the bc program and displays the answer:
system("/bin/echo {$_GET['query']} | /usr/bin/bc");
Let’s say your script is called calculate.php; a user could load the page:
http://somehost.net/calculate.php?query=3*2
Not surprisingly, the server will display the answer 6.
What would happen if a user used the semicolon character as part of the query, followed by a command to list all accounts on the server?
http://somehost.net/calculate.php?query=3*2;/bin/cat%20/etc/passwd;echo%201
The system() function would execute the command:
/bin/echo 3*2;/bin/cat /etc/passwd;echo 1 | /usr/bin/bc
which is actually three commands. The first just prints 3*2, the second displays the contents of the /etc/passwd file, while the third passes the dummy value 1 to the bc program for it to calculate.
The simplest way to prevent this type of attack is to ensure that the semicolon and other special characters aren’t passed directly to the system() function but are escaped by adding a backslash in front of them so that they are interpreted differently. The escapeshellcmd() function does this for you:
// Escape any characters that could be used to trick a shell command
$query = escapeshellcmd($_GET["query"]);
system("/bin/echo {$query} | /usr/bin/bc");
In this way, the previous query would become:
/bin/echo 3*2\;/bin/cat /etc/passwd\;echo 1 | /usr/bin/bc
which is an incorrectly formed shell command that won’t be executed properly, so the attack will fail. We recommend that you completely avoid using any shell commands if possible, as the risk to security is relatively high.
Preventing SQL Injection Attacks
Another type of problem to protect against is the SQL injection attack, where a malicious user tries to insert additional SQL fragments into your SQL statements, and in this way cause the script to add, update, delete, or expose data that shouldn’t be modified or seen. Consider a PHP script that authenticates the user by verifying that the username and password entered by the user exist in the database users; the script might execute the following SQL query:
$query="SELECT * FROM USERS WHERE username='{$_POST["username"]}' AND
password='{$_POST["password"]}'";
The PHP script replaces the placeholders {$_POST["username"]} and {$_POST["password"]}' with the contents of the username and password fields entered in the form. If the query returns any matching rows, the user is authenticated.
Now, imagine if a malicious user enters:
' OR '' = '
for both the username and password. The SQL query composed by the PHP program would then be:
$query="SELECT * FROM users WHERE username='' OR '' = '' AND password='' OR '' = ''";
Since this is always true, the attacker will be authenticated and granted access to the system.
The attacker could likewise specify the username as:
testusername'; DELETE FROM users
The statement would then be:
$query="SELECT * FROM users WHERE username='testusername'; DELETE FROM users";
which would delete all entries in the users table!
To prevent this type of attack, we must ensure that characters that have special meaning in SQL, such as the single quote (') or the semicolon (;), are neutralized by adding a backslash before them.
We can use the PHP mysqli_real_escape_string() function to do this for us:
$input=mysqli_real_escape_string($connection, $_POST["username"])
The equivalent function in the old MySQL library is mysql_real_escape_string(), which doesn’t require the connection parameter:
$input=mysql_real_escape_string($_POST["username"])
Consider how each of the sample input strings is processed. Without the escaping step, the input:
' OR '' = '
for both username and password produces the SQL query:
SELECT * FROM users WHERE username='' OR '' = '' AND password='' OR '' = ''
but after the escaping step, we get the query:
SELECT * FROM users WHERE username='\' OR \'\' = \'' AND password='\' OR \'\' = \''
Similarly, the input string:
testusername'; DELETE FROM users;
results in the SQL query:
SELECT * FROM users WHERE username='testusername'; DELETE FROM users;'
AND password='testusername'; DELETE FROM users;'
without escaping, but:
SELECT * FROM users WHERE username='testusername\'; DELETE FROM users;'
AND password='testusername\'; DELETE FROM users;'
after it.
Note that the escaping step also helps avoid problems with input strings that legitimately have an apostrophe in them; for example, if we have an SQL query to select users by surname, the surname “D’Arcy” would result in an invalid query:
SELECT * FROM users WHERE surname='D'Arcy'
Escaping the backslash before the apostrophe solves the problem.
SELECT * FROM users WHERE surname='D\'Arcy'
PHP has a magic_quotes_gpc directive that, if set in the php.ini configuration file, automatically escapes single quotes and double quotes in data sent from the client’s browser from web forms or cookies. However, this in turn causes other problems and is disabled in the upcoming PHP version 6.
We can write a function to limit the length of the input data, and escape semicolons and, if needed, single and double quotes. This function—let’s call it clean()—takes two arguments—the input data to be cleaned, and the maximum length the data is allowed to have:
// Secure the user data by escaping characters and shortening the
// input string
function clean($input, $maxlength)
{
// Access the MySQL connection from outside this function.
global $connection;
// Limit the length of the string
$input = substr($input, 0, $maxlength);
// Escape semicolons and (if magic quotes are off) single and
// double quotes
if(get_magic_quotes_gpc())
$input = stripslashes($input);
$input = mysqli_real_escape_string($connection, $input);
return $input;
}
We can pass the input string and the maximum permissible length to the function, and obtain the processed string as the return value, for example:
$username = clean($_POST["username"], 30);
Remember that there must be an active connection to the MySQL server for mysqli_real_escape_string() to work, and so we must connect to the MySQL server before we ever use the clean() function. On a high-volume application, you can avoid unnecessary connections to the MySQL server by validating the input in two steps. First, the script can perform simple checks that don’t use mysqli_real_escape_string(). Then, the script can connect to the MySQL server, escape the input using mysqli_real_escape_string(), and then continue with other database operations.
The global keyword tells PHP to use the $connection variable from outside the clean() function; without it, PHP would create a new, completely different variable with the name $connection that would be in effect inside the function, which would be useless for our function. We could instead have defined the function as:
function clean($input, $maxlength, $connection)
{
...
}
so that the value of the $connection variable is passed to the function as part of the function call, for example:
$username = clean($_POST["username"], 30, $connection);
Using Data from the Client
You should also be careful how you use data that is received from the browser. For example, it is unwise to use the price of an item from a form widget to calculate an invoice; even if the price is hidden or read-only, the user can still change it by modifying the form or the URL. The correct approach is to verify the price against the database before calculating the invoice. Similarly, don’t embed SQL in HTML—even if it is hidden—as the user can browse the HTML source, understand the database structure, and then modify the statements. This may sound silly, but several companies have actually made such mistakes—and lost a lot of money as a result!
Validation, error checking, and security are large topics. Resources that discuss them in more detail can be found in Resources,” at the end of this chapter.
Sessions
The Web was designed for browsing documents, where each request from a web browser to a web server was intended to be independent of each other interaction. To develop applications for the Web, additional logic is required so that different requests can be related. For example, code is required to allow a user to log in, use the application, and log out when she’s finished. In PHP, this logic is provided by the sessions library. Sessions allow variables to be stored on the server, so that these variables can be restored each time a user requests a script. Consider a short example:
<?php
// Initialize the session
session_start();
// If there is no "count" session variable, create one, and welcome
// the user.
if (!isset($_SESSION["count"]))
{
$_SESSION["count"] = 0;
echo "Welcome new user!";
}
// Otherwise, increment the number of visits and display a message.
else
{
$_SESSION["count"]++;
echo "Hello! You've visited this page {$_SESSION["count"]} times before.";
}
?>
The session_start function activates an existing session or, if none exists, creates a new one. When the user requests the script for the first time, the $_SESSION["count"] variable does not exist, so the isset() function returns the value FALSE. A new session is created, and a new session variable count is defined in the $_SESSION superglobal array, with its value set to 0. Session variables are stored on the web server; when the user next requests the script, the isset() function returns TRUE, the $_SESSION["count"] variable is automatically restored by the PHP engine, and the count incremented. For example, on the fifth request of the script, the output is:
Hello!
You've visited this page 4 times before.
With its default configuration, the sessions library relies on cookies to maintain a unique key. This key is used on the server to locate the variables associated with the session. If cookies are disabled or unsupported by the browser, sessions won’t work; this problem can be solved by storing the session key in the URL, but we don’t discuss that here.
Sessions can be destroyed by calling the session_destroy() function. This is typically done to end a user’s session in an application:
<?php
// Logout of the system
session_start();
session_destroy();
print "You've logged out!";
?>
Note that a session must be started before it can be destroyed.
In a web environment, there is no guarantee that users will actually log out. They may forget to log out of an application, leaving the session active, and thus allow another person using the same browser to access the restricted sections of the application. Moreover, since the browser is tied to the session data on the server through a cookie value, an attacker could fake the cookie information to gain access to the target session.
To reduce the risk of unauthorized users gaining access to a session, PHP sessions have a timeout. This means that if a user doesn’t access the web server within a predetermined period, the session is destroyed. By default, the timeout is set to 1,440 seconds or 24 minutes, after which time the session is a candidate for being cleaned up. This can be adjusted—along with other session parameters—through the php.ini configuration file.
The Reload Problem
In Processing and Using User Data,” earlier in this chapter, we showed you an example that writes data to the music database. This section briefly discusses a common problem that can arise when writing to web databases and shows you a simple way to avoid it.
Consider a simple script, process.php, that writes an artist to the music database:
<?php
if(!empty($_GET))
{
// Include database parameters and related functions
require_once("../db.php");
$DB_databasename='music';
// Connect to the MySQL DBMS and use the wedding database - credentials are
// in the file db.php
if(!($connection= mysqli_connect($DB_hostname, $DB_username, $DB_password,
$DB_databasename)))
showerror($connection);
// Untaint the artist name, and use at most 15 characters
$artist_name = clean($_GET["artist_name"], 15);
// Add the artist, using the next available artist_id
$query="INSERT INTO artist (artist_id, artist_name) ".
"SELECT MAX(artist_id)+1, '$artist_name' FROM artist";
if (! @ mysqli_query($connection, $query))
die("Couldn't add artist");
print "Added artist: ".$_GET['artist_name'];
}
else
{
print "No artist name was provided";
}
?>
Note that we’ve included the db.php file for the database parameters and the definition of the clean() function to untaint data from the user.
Figure 14-3 shows what happens when the user submits the form we described earlier in Processing and Using User Data.” The web browser submits the artist name and the album name provided by the user, and requests the process.php script.
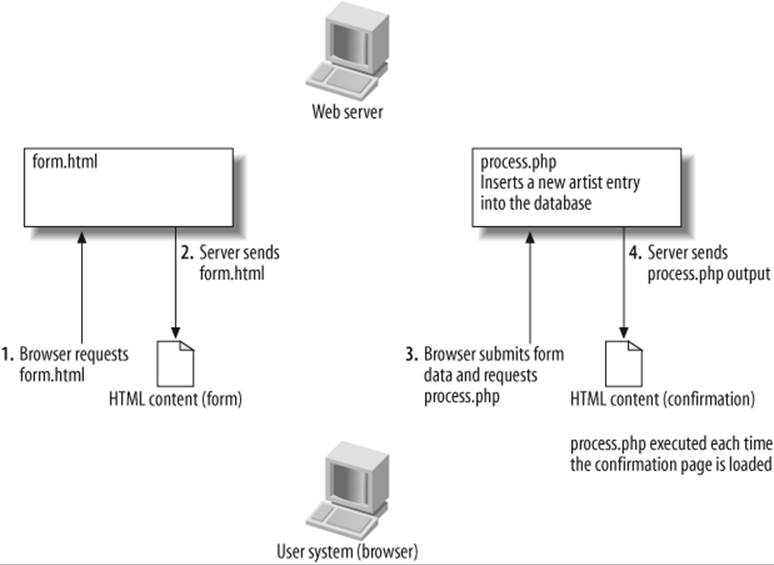
Figure 14-3. The reload problem
A new artist row is added to the database each time the process.php script runs, which is each time the PHP page is requested by a web browser. There are many ways that the page can be requested by a web browser. The user can press the Refresh or Reload button; type in the URL and press the Enter key; print the page; visit the page again using the Back or Forward buttons or browser history; or resize the browser window.
This is a common problem in web applications, known as the reload problem; it affects not only writing to databases, but also tasks such as registering session variables, charging credit cards, logging data, and every other situation in which an action has a lasting effect. Fortunately, it’s easy to avoid by not sending any content to the browser from the script that actually performs the action, but to instead produce the output from a different script.
Here’s the previous script, rewritten to avoid the reload problem:
<?php
if(!empty($_GET))
{
// Include database parameters and related functions
require_once("../db.php");
$DB_databasename='music';
// Connect to the MySQL DBMS and use the wedding database
// - credentials are in the file db.php
if(!($connection= mysqli_connect($DB_hostname, $DB_username, $DB_password,
$DB_databasename)))
showerror($connection);
// Untaint the artist name, and use at most 15 characters
$artist_name = clean($_GET["artist_name"], 15);
// Add the artist, using the next available artist_id
$query="INSERT INTO artist (artist_id, artist_name) ".
"SELECT MAX(artist_id)+1, '$artist_name' FROM artist";
if (! @ mysqli_query($connection, $query))
die("Couldn't add artist");
// Silently send the browser to the receipt page
header("Location: receipt.php?Status=OK&artist_name=$artist_name");
}
else
{
print "No artist name was provided";
}
?>
This modified script adds the artist but doesn’t produce HTML output. Instead, it sends an HTTP header to the web browser using the PHP library header() function:
header("Location: receipt.php?Status=OK&artist_name=$artist_name");
The Location HTTP header instructs the web browser to go to another page, in this case receipt.php. The receipt.php script performs no database activity, but simply displays a confirmation message:
<?php
print "Added artist: ".$_GET['artist_name'];
?>
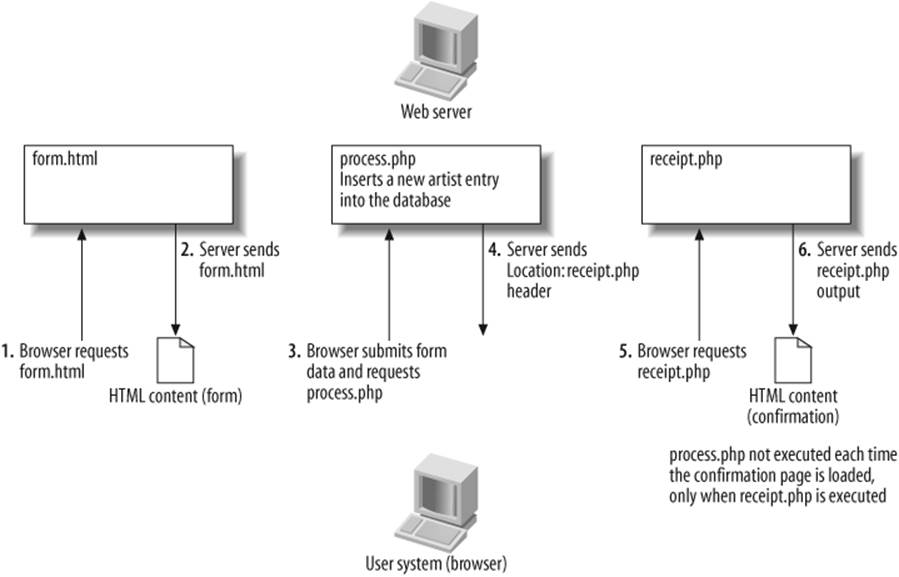
Figure 14-4. A solution to the reload problem
Figure 14-4 illustrates how the modified script works. Reloading this receipt page has no effect on the database; users can reload it as many times as they wish.
Before we end this section, we should point out that the header() function is associated with the very common error in which the PHP engine complains that it cannot send any header information:
Warning: Cannot modify header information
- headers already sent by (output started at logout.php:2)
This error occurs because the web server sends headers as soon as any output is sent to the browser. If you generate any output, or even accidentally leave a blank line or even a single space character before the PHP start tag, the server treats this output as content, and sends it to the browser along with the HTTP headers. You must ensure you don’t generate any output before the call to the header() function. The session_start() function sends its own headers to the browser, and so you’ll run into the same problem if you have any output before a call to this function.
Using PHP for Command-Line Scripts
PHP scripts don’t need to be run from a web server—although that’s how the majority of PHP scripts are deployed. In this section, we’ll briefly look at how you can run PHP scripts from the command line. This allows you to query the MySQL server from the command line to generate reports and to import or export data.
Consider Example 14-5, which simply says “Hello, world!”.
Example 14-5. A PHP script to say hello
<?php
echo "Hello, world\n";
?>
Type this in an editor and save it to a file called hello.cl.php.
You can run PHP scripts from the shell prompt or command window by running the PHP executable and passing the name of the script to it:
$ php hello.cl.php
Hello, world
If the operating system can’t find the php executable, you’ll need to specify the full path to the file. On a Linux or Mac OS X system, this may be available as the file /usr/bin/php. If you’ve installed XAMPP, you can use the program /opt/lampp/bin/php on Linux,/Applications/xampp/xamppfiles/bin/php on Mac OS X, and C:\Program Files\xampp\php\php.exe on Windows.
You can also have the operating system call the PHP program automatically when you run a PHP script from the command line. To do this on a Linux or Mac OS X system, you need to add this line to the top of each script to specify the PHP program to use:
#!path_to_the_php_executable
For example, you could specify the /usr/bin/php program in the hello.cl.pl script as follows:
#!/usr/bin/php
<?php
echo "Hello, world\n";
?>
You must add the “executable” permission to the file so that the operating system can execute this script:
$ chmod u=rwx,g=,o= hello.cl.php
We explained permission settings in Restricting access to files and directories” in Chapter 2.
You can now run the script by just typing in its name:
$ ./hello.cl.php
Hello, world
The initial ./ tells the operating system that the file is in the current working directory. If the script is in a directory that’s also listed in your system PATH, you can omit these characters. See Error Message About MySQL Executable Programs Not Being Found or Recognized” in Chapter 2for details on setting the system PATH.
For a Windows system, you should associate PHP files with the PHP program. Open a command-prompt window and type in these two lines:
C:\> ASSOC .php=PHPScript
C:\> FTYPE PHPScript=C:\Program Files\xampp\php\php.exe %1 %*
You can now type in the name of the script, and it should run automatically:
C:\> hello.cl.php
Hello, world
You can run almost any PHP script from the command line, although some functionality, such as sessions, is useful only in the context of web applications. Let’s try running the scripts of Examples 14-2 or 14-3 from the command line; these connect to the music database and display theartist_id and artist_name:
$ php query_artists.php
<!DOCTYPE HTML PUBLIC
"-//W3C//DTD HTML 4.01 Transitional//EN"
"http://www.w3.org/TR/html401/loose.dtd">
<html>
<head>
<meta http-equiv="Content-Type" content="text/html;
charset=iso-8859-1" />
<title>Artists</title>
</head>
<body>
<h1>Artists</h1>
<table>
<tr>
<th>artist_id</th>
<th>artist_name</th>
</tr>
<tr>
<td>1</td>
<td>New Order</td>
</tr>
<tr>
<td>2</td>
<td>Nick Cave & The Bad Seeds</td>
</tr>
<tr>
<td>3</td>
<td>Miles Davis</td>
</tr>
<tr>
<td>4</td>
<td>The Rolling Stones</td>
</tr>
<tr>
<td>5</td>
<td>The Stone Roses</td>
</tr>
<tr>
<td>6</td>
<td>Kylie Minogue</td>
</tr>
</table>
</body>
</html>
We get the output, but it’s HTML code that’s not very useful from the command line. If you want to run PHP scripts from the command line, you don’t need to include HTML tags in the output, but you should make good use of the \n newline character.
Example 14-6 rewrites Example 14-3 without the HTML tags.
Example 14-6. Querying the music database from the command line
<?php
print "Artists\n=======\n";
printf("%-40s %-40s\n".
"---------------------------------------- ".
"----------------------------------------\n",
"artist_id", "artist_name");
// Connect to the MySQL server
if (!($connection = @ mysqli_connect("localhost", "root",
"")))
die("Cannot connect");
if (!(mysqli_select_db($connection, "music")))
die("Couldn't select music database");
// Run the query on the connection
if (!($result = @ mysqli_query($connection, "SELECT * FROM artist")))
die("Couldn't run query");
// Until there are no rows in the result set, fetch a row into
// the $row array and ...
while ($row = @ mysqli_fetch_array($result, MYSQL_ASSOC))
{
// print out each of the columns
foreach($row as $data)
printf("%-40s ", $data);
// Start a new line
print "\n";
}
?>
This will produce output as shown below:
Artists
=======
artist_id artist_name
---------------------------------------- ----------------------------------------
1 New Order
2 Nick Cave & The Bad Seeds
3 Miles Davis
4 The Rolling Stones
5 The Stone Roses
6 Kylie Minogue
Using Command-Line Arguments
You can pass arguments to PHP scripts from the command line. You can use command-line arguments to modify the behavior of a program, or to provide information. The $argc variable indicates the count of the arguments passed, and the $argv array contains the argument values. The first entry in the $argv array ($argv[0]) is always the command that was used to run the script. The second entry in this array ($argv[1]) is the first argument typed in after the command name. The third entry ($argv[2]) is the second argument, and so on. This means that the the number of values in the $argv array will always be one more than the number of arguments typed after the command. If one argument is entered, the count will be 2.
Let’s modify our hello.cl.php script to use command-line arguments, as shown in Example 14-7.
Example 14-7. PHP command-line program that prints a message using the first command-line argument
#!/usr/bin/php
<?php
if($argc==2)
echo "Hello, {$argv[1]}!\n";
else
echo "Syntax: {$argv[0]} [Your First Name]\n";
?>
To use any number of entered arguments rather than just one, Example 14-8 uses the foreach() function to iterate over every argument. For each entry in the $argv array, the $index => $argument construct places the entry index (also known as the key) in the $index variable, and the entry value in the $argument variable. If the index is not zero, we print out the value. We don’t print the value for index zero, as that is the name of the command itself. Notice how we’ve included a space before each argument, and how we add an exclamation mark and newline after all the arguments have been printed.
Example 14-8. PHP command-line program that prints a message using all the provided command-line arguments.
#!/usr/bin/php
<?php
if($argc==1)
echo "Syntax: {$argv[0]} [Your Name]\n";
else
{
echo "Hello";
foreach($argv as $index => $argument)
if($index!=0)
echo " $argument";
echo "!\n";
}
?>
Now when you type in any number of arguments after the command name, they will be displayed as part of the greeting:
$ ./hello.cl.all_args.php
Syntax: ./hello.cl.args.php [Your Name]
$ ./hello.cl.all_args.php Somayyeh
Hello, Somayyeh!
$ ./hello.cl.all_args.php Somayyeh Sadat Sabet
Hello, Somayyeh Sadat Sabet!
Resources
We listed several resources on web database applications and PHP at the end of Chapter 13. This section lists resources you can read that contain more about using PHP with MySQL.
The descriptions we’ve provided in this chapter are simplified: we’ve omitted function parameters that are rarely used, avoided some of the details of how the functions are used, and shown some optional parameters as mandatory. See the MySQL manual (http://www.php.net/manual/en/ref.mysql.php) for more detail on MySQL functions.
There are also many useful web sites that include tutorials, sample code, online discussion forums, and links to sample PHP applications. The official PHP site links page (http://www.php.net/links.php) points to most of these sites. These include:
http://dev.mysql.com/usingmysql/php
The MySQL AB web page on using PHP with MySQL
http://php.net/manual/en/ref.mysql.php
The PHP manual section on MySQL
Exercises
1. In a PHP script, how can we access data entered by a user in an HTML form?
2. Why is it important to untaint information that arrives from the client?
3. What is the difference between the PHP library functions mysqli_num_rows() and mysqli_affected_rows()?
4. When would you pass a variable to a function by reference rather than by value?
5. What does this program do?
6. #!/usr/bin/php
7. <?php
8. $Time="2006-06-20 19:00:00";
9. TimeDifference($Time, $seconds, $hours, $minutes, $days);
10. echo "\n".sprintf("%3d days, %2d hours, %2d minutes, and %2d seconds",
11. $days, $hours, $minutes, $seconds);
12. echo " since you left ... :(";
13.
14. $Time="2006-11-15 20:00:00";
15. TimeDifference($Time, $seconds, $hours, $minutes, $days);
16. echo "\n".sprintf("%3d days, %2d hours, %2d minutes, and %2d seconds",
17. $days, $hours, $minutes, $seconds);
18. echo " till I see you again... :)";
19.
20. echo "\n";
21.
22. function TimeDifference($ReferenceTime, &$seconds, &$hours, &$minutes, &$days)
23. {
24. $seconds=abs(strtotime($ReferenceTime) - mktime());
25. $days =intval(($seconds) /( 24*60*60));
26. $hours =intval(($seconds-($days*24*60*60)) /( 60*60));
27. $minutes=intval(($seconds-($days*24*60*60)-($hours*60*60)) /( 60));
28. $seconds=intval(($seconds-($days*24*60*60)-($hours*60*60)-($minutes*60)));
29. }
?>
You should use the PHP manual at http://www.php.net/manual/ to look up information on new functions. To get you started, here are some short explanations:
abs()
Returns the absolute value of a number passed to it (it removes the minus sign for negative numbers).
intval()
Converts a floating number into an integer.
mktime()
Returns the current time in the Unix timestamp format.
sprintf()
Creates a string from the values passed to it using the format specifiers.
strtotime()
Converts a string into the Unix timestamp format.
What does the line at the top of the file indicate? What would happen if you tried to run this program from a web server?
All materials on the site are licensed Creative Commons Attribution-Sharealike 3.0 Unported CC BY-SA 3.0 & GNU Free Documentation License (GFDL)
If you are the copyright holder of any material contained on our site and intend to remove it, please contact our site administrator for approval.
© 2016-2026 All site design rights belong to S.Y.A.