Scaling PHP Applications (2014)
Database Server: Ultimate MySQL Tuning Guide
The database is the heart and soul of your application. It keeps your data safe and pumps it out to all of the application servers. After talking with and interviewing hundreds of my readers, most of them have told me that, hands down, their database has been the most difficult part of their stack to scale.
Even though MySQL is arguably one of the most popular databases in existence, there isn’t much helpful information available to help you grow your database from the initial “basic” configuration. Searches online often come up empty-handed and if you do find something, it’s either a copy-and-paste of someone’s 100 line my.cnf file (obviously with no explanation why it works), or some “holier-than-thou” armchair expert telling you to hire a DBA. Hire a DBA, right! That would be great if you were a 100-person enterprise, but a small shop with 5-10 programmers? Or even just two dudes working from their apartments? Forget about it- in what world could you justify having a DBA when you’re that small?
Let me tell you a secret. Database optimization and configuration isn’t some arcane craft that only those who’ve completed the 10 sacred quests are allowed the privilege to learn. In fact, it breaks down into a couple of pretty simple rules.
In this chapter, we’re going to focus on MySQL, since that’s what most people are already locked into and it’s not exactly easy to switch to something else at the drop of a hat. That being said, most databases (even NoSQL ones) follow the same scaling principles. Though the settings may have different names, the information in this chapter is still relevant, even if you’re not using MySQL.
Getting NoSQL Performance out of MySQL
MySQL gets tons of bad press for not being the fastest kid in town, but here’s a secret. With the right tweaking, MySQL can hold its own. NoSQL really shines when it comes to cluster management and scaling out horizontally to multiple servers. For example, Cassandra can bootstrap hundreds of brand new nodes with data, automatically, without any manual configuration. Compare that to having to manually configure and transfer data to a new MySQL slave or shard (which can take hours), and you’ll see where the benefits really shine.
Here’s the thing, though. You can get pretty far with one server and some read-only slaves. Twitter and Facebook still use MySQL, and I think that speaks for something. 37Signals often talks about how they’ve been able to take advantage of Moore’s Law to scale out without having to deal with complex sharding setups. Scaling your database horizontally and moving to a NoSQL database is great, but comes at a huge cost. Data needs to be reorganized, imported, and code needs to be rewritten. I’m a huge fan of NoSQL but I also believe in using the right tool for the right job, and for most jobs MySQL is the right tool.
Getting the most out of MySQL involves some configuration tweaking, and I’m going to touch on all of the most important settings that need to be tuned. However, there are thousands of settings available, and I’m not going to be able to cover all of them here. Instead, I’m going to give you the “too long, didn’t read” version and show you how to get the best bang for your buck.
If you want to know what every single configuration option (of the thousands available) does, as well as understand the deep inner workings of MySQL, you should look into the “bible” of MySQL books: High Performance MySQL: Optimization, Backups, Replication, and More. It’s the best book (700 pages) available on Advanced MySQL tuning.
|
|
What is a slave? In MySQL, we can scale out using a “Master/Slave” setup. That is to say, we designate a single server as the authoritative owner. All data from that server, or master, is replicated to slave servers, which provides fault-tolerance and more database capacity. Since the data flows in one direction only (from the master to the slaves), the slaves are read-only replicas and all writes must go through the master. If you write data to a slave server directly, it will not be replicated and will cause data fragmentation and inconsistency. |

Choosing the right MySQL version
You should always be running the latest major version of MySQL available to you. Oracle releases new versions of MySQL every couple of months and it’s important to keep up to date because there are often significant performance enhancements made in every version. At the time of publishing, 5.5 is the latest major version, but 5.6 is due out later this year. The speed difference between the same exact queries running on 5.1 and 5.5 can be staggering, so upgrading to the latest version is always a good idea.
Furthermore, benchmarks show that I/O performance on SSD drives is about 20% better on 5.5 than 5.1.
All right, so choose the latest version of MySQL - that’s simple. But wait, not so fast! Another option that I recommend exploring is using the Percona fork of MySQL.
Why use the Percona fork of MySQL?
Percona is a consulting company for MySQL that’s very well known for their MySQL Performance Blog. On top of that, they wrote the High Performance MySQL: Optimization, Backups, Replication, and More book that I mentioned previously. So when I say that they’re experts in MySQL, know that I truly mean it.
Anyways, “Percona Server” is a 100% free drop-in replacement for MySQL server and is constantly rebased with the latest MySQL code, so it’s always up-to-date with the latest MySQL releases. Your existing code and databases will work with Percona Server without any modifications, just faster while using fewer resources.
· It’s 40% faster than the stock MySQL Server.
· Provides more consistent performance over MySQL Server.
· XtraDB, a fork of InnoDB, is included, which offers more tunability and better memory usage.
· More tuning options, giving you greater control and much more. You can view the feature comparison here.
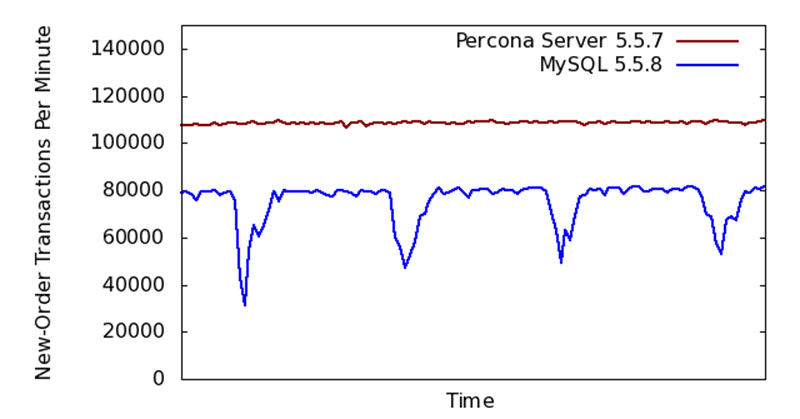
It’s also worth mentioning that Percona Server is rock solid. We’ve used it at Twitpic in production for over a year without any crashes, data loss, or issues. On top of that, other big players like Flickr, Tumblr, Etsy, Engineyard, and 37Signals are using Percona Server in production, too.
Installing Percona Server
1 > gpg --keyserver hkp://keys.gnupg.net --recv-keys 1C4CBDCDCD2EFD2A
2 > gpg -a --export CD2EFD2A | sudo apt-key add -
3 > vi /etc/apt/sources.list.d/percona.repo.list
4 deb http://repo.percona.com/apt precise main
5 deb-src http://repo.percona.com/apt precise main
6 > apt-get update
7 > apt-get install percona-server-server-5.5 percona-server-client-5.5
Should I shard my data?
Probably not! Of course, it’s hard to say without knowing your data intimately, but in most cases sharding with MySQL is using the wrong tool for the wrong job. When you shard your data, you lose everything that MySQL is good at and gain everything that MySQL is very bad at (particularly cluster management). Since you have to rewrite most of your existing code to shard your data, in most cases you’re better off switching to a database that supports sharing natively like MongoDB or Apache Cassandra.
|
|
What is Sharding? Sharding is when you split your data across multiple servers, so that no single server holds all of your data. Sharding allows you to scale more effectively when your database usage is too high for a single server. While many NoSQL databases include built-in support for sharding, MySQL does not. When you shard using MySQL, you lose the ability to run queries on your entire dataset and often need to write custom code for interacting with your database. |

Dealing with libmysql’s inability to set timeouts
Let’s talk for a second about how PHP communicates with MySQL. Whether you use mysql, mysqli or PDO, internally PHP either uses libmysql or mysqlnd to connect and communicate with your MySQL server.
When PHP 5.3 came out, one new feature that it added was mysqlnd, which stands for MySQL Native Driver. The MySQL Native Driver is a custom C library that PHP uses internally for handling MySQL connections. Prior to mysqlnd, PHP was using libmysql, a standard C library that ships with MySQL to interact with MySQL.
Since mysqlnd was written by the PHP team for the exclusive use of PHP, it’s a better fit and is able to tie in nicely with PHP. For example, you can now subclass mysqlnd with pure PHP code and change or inject functionality into the way that PHP interacts with MySQL. People have used this ability to add in query logging, load balancing, and even a PHP-based query cache.
One major flaw with both libmysql and mysqlnd is that neither allow you to set a connection timeout with a resolution of less than 1 second and neither allow you to set a query timeout at all. That means that if one of your MySQL servers becomes unreachable, the lowest possible timeout (for you to error or retry the connection) is 1 second, which is far too long in a high-volume environment.
Setting a connection timeout with PDO
1 <?php
2 $pdo = new PDO("mysql:host=localhost;dbname=test", "username", "password");
3 $pdo->setAttribute(PDO::ATTR_TIMEOUT, 1);
Setting a connection timeout with mysqli
And the way we do it with mysqli is very similar. Make sure to note the comment that’s in line with the code. You can’t use the mysqli constructor like you’re used to doing (i.e, $mysqli = new mysqli('localhost') won’t work).
1 <?php
2 // Note: When setting a connection timeout with mysqli,
3 // you _HAVE_ to use mysql_init() (which returns a mysqli
4 // object) to create the object and cannot use the constructor.
5 $mysqli = mysqli_init();
6 $mysqli->options(MYSQLI_OPT_CONNECT_TIMEOUT, 1);
7 $mysqli->real_connect("localhost", "username", "password", "test");
Query Timeouts
Without a query timeout, a rogue query could block your PHP-FPM process for up to max_execution_time (set in php.ini, in Chapter 5 we set it as 5 seconds). Still this is too long! In an ideal world, all of our queries have predictable performance characteristics but this isn’t an ideal world. The same query with different values in the WHERE clause can generate vastly different query plans. For example, look at the following two queries:
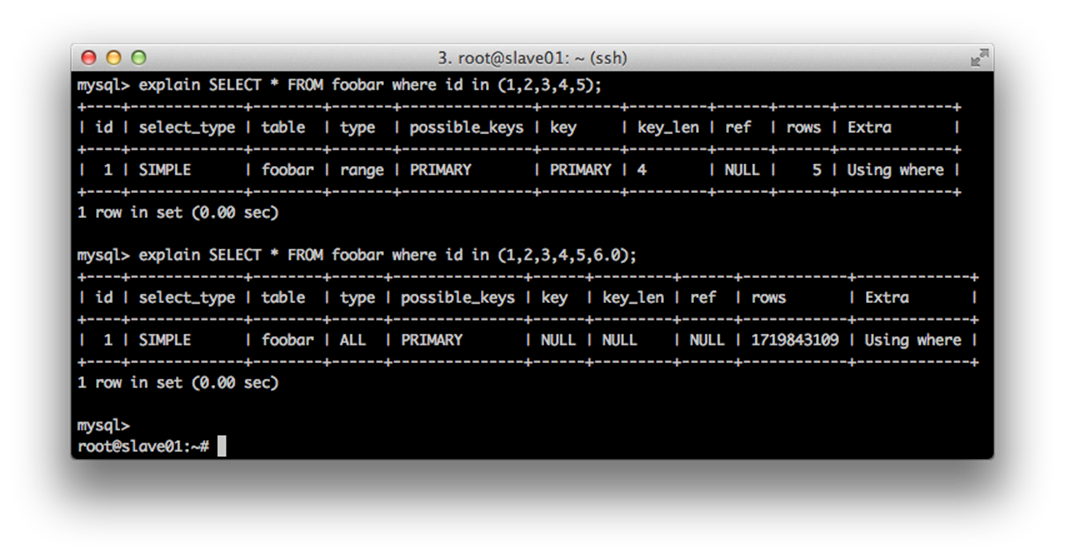
Running the same query on a table with 1.7 billion rows (yeah, that’s billion with a B). MySQL can easily scale into the billions with nothing more than the tuning in this chapter; the only difference between the two is that the first query has all integers in the IN statement and the second query has an extra non-integer parameter. So what’s the difference? The first generates a query plan to use the PRIMARY index and will respond almost immediately. The second query has to do a full-table scan, scanning every single one of the 1,719,843,109 rows and will likely take hours to run.
Even when PHP’s max_execution_time kills the PHP-FPM process, the query will continue to run on your MySQL servers - hammering the CPU and killing performance. There has to be better way!
Well, the sad news is that there really isn’t. There’s not a simple way to do query timeouts in PHP nor is there a server-setting that you can set in MySQL. It’s a pretty big oversight, in my opinion. There are two options that I’m going to talk about.
Piggybacking timeouts from HAProxy
In the “Load Balancing MySQL with HAProxy” section later in this Chapter, I talk about how you can load balance MySQL slaves using HAProxy. One small but important feature is that HAProxy allows you to set up TCP timeouts, which effectively gives you the ability to set MySQL connection and query timeouts down to the millisecond. Jump ahead to that section to learn more, but the relevant settings in /etc/haproxy/haproxy.cfg are below.
1 timeout connect 500ms
2 timeout client 1000ms
3 timeout server 1000ms
Using pt-kill from the Percona Toolkit
The Percona Toolkit includes a tool called pt-kill which can monitor MySQL for long-running queries and kill them when they pop-up. Of course, sometimes you have legitimate long-running queries from background jobs or OLAP systems, so what I typically do is set up a MySQL user just for my application and use the --match-user flag to only kill long running queries for that user. That way, pt-kill doesn’t interfere with legitimate long-running queries.
1 > pt-kill --daemonize --kill --busy-time 60s --match-user webuser
Before you use pt-kill, you need to install the percona-toolkit package. If you follow the instructions under the “Installing Percona Server” above, you can simply install percona-toolkit with apt-get.
1 > apt-get install percona-toolkit
The full documentation for pt-kill is available here.
Should you use Persistent MySQL Connections?
There is so much bad information about MySQL Persistent connections in PHP, it’s hard to get a solid understanding of them and their pitfalls. Most people say, no, you should absolutely not use persistent connections but I think part of the reason is just because it’s such a misunderstood topic.
A quick Google search shows lots of threads that read like this- “Well, you probably don’t need persistent connections, so don’t use them!” Or, “Well, they are really complex so don’t use them!” Premature optimization and all that. But, sometimes you DO have thousands of MySQL connections, and persistent connections are an option worth exploring.
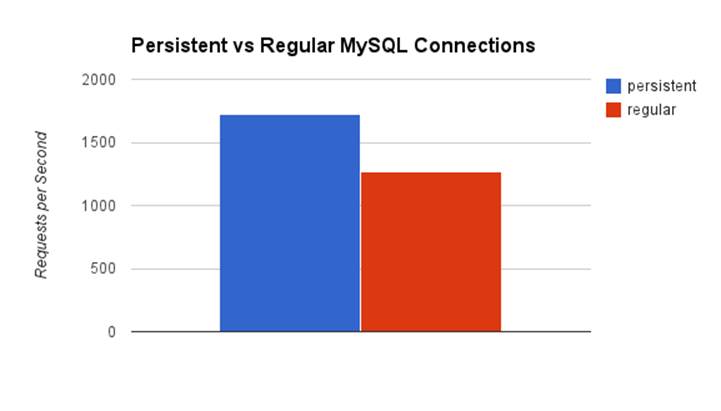
Before we talk about the pros and the cons, I ran some benchmarks with PHP 5.4 and discovered that persistent connections are about 20-25% faster than normal non-persistent connections. This ended up being around a 20ms difference per request, which obviously isn’t much, but when you’re talking about a single request or when you are dealing with thousands of requests per second, it adds up.
Benefits
· You remove the overhead of creating a new MySQL connection for each new HTTP request.
Negatives
· There is no mechanism to “reset” a connection, so if you leave a persistent connection in an inconstant state (like an uncommitted transaction), it can still get committed by another PHP-FPM worker that reuses the connection. mysqli mitigates this by calling mysql_change_user() every time that you re-use a persistent connection, which resets most of the connection state.
· Any MySQL variables you set on the connection (with the SET command) will still be there when the connection is reused.
· Your MySQL max_connections setting needs to be high enough to handle a connection from every PHP-FPM child in your application cluster. So, if you set pm.max_children to 100 in your PHP-FPM pool, and you have 10 application servers, MySQL’s max_connections needs to be at least 1000.
Persistent connections do make sense in some scenarios, for example; if you’re creating a new MySQL connection for most of your HTTP requests, not doing anything fancy with SET, and are diligent with your transactions.
Tuning your MySQL Configuration
MySQL offers a vast amount of tuning options through its my.cnf file, which (on an Ubuntu system) is located in /etc/mysql/my.cnf. Below are the most important settings, with “no-bullshit” comments telling you exactly how they work and impact your system. I’m not covering any MyISAMsettings because it’s horrible and should almost never be used in a high-volume situation.
1 [mysqld]
2
3 # Without considering MyISAM buffers, each connection uses about
4 # 192KB of memory. You need to make sure that-
5 # (max_connections * 192KB) + innodb_buffer_pool_size is less
6 # than your total amount of system memory, otherwise MySQL could
7 # start swapping. Default value is 100 connections.
8 # 2000 connections will use ~400MB of memory.
9 max_connections=2000
10
11 # This should be set to average number of connections * number
12 # of your most commonly accessed tables. So, if, on average
13 # you have 50 connections and have 5 frequently accessed tables,
14 # set this as 250. The default is low (64)
15 table_cache=250
16
17 # Disable the query cache. Both of these must be set as 0 due
18 # to a bug in MySQL. The query cache adds a global lock and
19 # performs poorly with a non-trivial write-load.
20 query_cache_size=0
21 query_cache_type=0
22
23 # Instead of having one big InnoDB file, split it up per table.
24 # This has no performance implications, gives you better data
25 # management features over your individual tables, and more
26 # insight into the system. It only impacts new tables and will
27 # not affect old "monolithic file" style InnoDB tables.
28 innodb_file_per_table
29
30 # InnoDB has two different versions: Antelope (the older version)
31 # and Barracuda (the newest). Tell InnoDB that we always want to use
32 # the Barracuda.
33 innodb_file_format=barracuda
34
35 # Tells the operating system that MySQL will be doing its own
36 # caching and that it should skip using the file system cache.
37 # Prevents double caching of the data (once inside of MySQL and
38 # again by the operating system.)
39 innodb_flush_method=O_DIRECT
40
41 # Set this to 1 on your master server for safest, ACID compliant
42 # operation (sync after every transaction, high I/O)
43
44 # Set this to 2 on your slave, which can cause up to a second of
45 # data loss after an operating system crash, but frees up I/O
46 # because it only fsyncs data to disk once per second.
47 innodb_flush_log_at_trx_commit=1
48
49 # Set this to 1 on your master server
50 sync_binlog=1
51
52 # Bigger log file size = less I/O used for writes, longer
53 # recovery time during a failure
54 innodb_log_file_size=128M
55
56 # Set this to ~90% of your memory. This is probably the most
57 # important MySQL value that you need to tune.
58 # 64GB -> 57GB
59 # 32GB -> 28GB
60 # 16GB -> 14GB
61 # 8GB -> 7GB
62 innodb_buffer_pool_size=57000M
63
64 # InnoDB uses background threads to prefetch
65 # and store data. The default is 4 threads, but
66 # should really be 4 * # of CPU cores
67 innodb_read_io_threads=32
68 innodb_write_io_threads=32
69
70 # This should be set as the maximum amount of
71 # IOPS that your system has. It sets a max cap
72 # on how much I/O that InnoDB can use.
73 innodb_io_capacity = 5000
74
75 # This limits the number of threads that InnoDB can perform
76 # at a given time. Setting it to 0 means that it's infinite and
77 # is a good value for Percona 5.5. Non-Percona setups should
78 # set it as 1x the number of CPU cores.
79 innodb_thread_concurrency=0
innodb_buffer_pool_size
Arguably, this is the most important configuration setting when tuning MySQL/InnoDB. MySQL caches table data from the disk in memory in order to speed up access times, and it uses this setting to determine exactly how much memory it should use. On a read-heavy workload (i.e., MySQL Slave), you’ll want to set this as high as possible while avoiding the possibility of swapping.
A good value is 90% of your server’s memory. On a read-heavy workload, if you use iostat and see that you have a very high utilization or service time, you can usually add more memory (and increase innodb_buffer_pool_size) to improve performance.
|
Server Memory |
Value |
|
64GB |
57GB |
|
32GB |
28GB |
|
16GB |
14GB |
|
8GB |
7GB |
On a write-heavy workload (i.e., MySQL Master), it’s far less important. I’ve had masters with 128MB buffer pools replicating to slaves with 64GB buffer pools. Also, if you setup a MySQL slave for making backups, you can usually set this low there, too, in order to save memory.
innodb_flush_log_at_trx_commit
This setting can be tweaked to improve performance at the slight cost of data durability. I use it on SLAVE servers only because it can cause up to 1 second of possible data loss in the event of a crash or ungraceful shutdown (i.e., tripping over the power cord).
On your master database, you should always set innodb_flush_log_at_trx_commit=1. Doing otherwise is irresponsible and can cause data loss.
I like to live on the edge with my slave databases, though. They are repairable, so I consider them throwaway and live a little more on the edge with performance improvements at the cost of durability.
When innodb_flush_log_at_trx_commit is set to 1, MySQL will write database changes to the InnoDB Log File and fsync them to the disk immediately. The system call fsync tells Linux to write the data to the disk right now, instead of caching it and writing it sometime in the near future. Obviously, this gives you the most durability because once the fsync call returns, you can be 100% positive that the data is stored safely on the hard drive and will still be there if someone rips out the power cord. Obviously, this durability comes at the cost of speed. Writing to the disk for every transaction is slow and uses valuable IOPS, but it’s necessary on your master server.
|
|
What are IOPS? IOPS is short for I/O operations per second, I/O referring to your disk drive. Reading and writing to your drive consumes an I/O operation and drives can only perform a limited number of I/O operations per second. On the low side of the IOPS scale are traditional rotational disks (around 200 IOPS). You can improve the number of IOPS by putting them in a RAID, but they are still slow. Likewise, the faster the disk (7200RPM vs 15000RPM), the more IOPS they can provide. On the high end of the spectrum are SSD drives. Depending on the manufacturer, type of flash, and internal components, they can provide anywhere from around 5000 IOPS to over 1 million IOPS. |

However, on your slave, you can change innodb_flush_log_at_trx_commit to 2. When it’s set to 2, MySQL will write out the database changes to the InnoDB log file immediately, but won’t call fsync just yet. Instead, it will let the operating system cache the write into memory and a background thread will call fsync about every second. What this means is that if the server crashes, you could possibly lose up to 1-second worth of data. The trade-off is that your slave servers spend much less of their disk IOPS on handling writes from MySQL replication and can better use the IOPS for scaling your database reads.
The problem that innodb_flush_log_at_trx_commit solves is that calling fsync is usually very expensive in terms of performance. However, if you’re using a battery-backed RAID controller with a cache, they can often significantly improve fsync speed and may make this setting unnecessary.
innodb_flush_method
The InnoDB flush method supports a bunch of different values, none of which are worth going over because the only one that matters is O_DIRECT. Setting this value as O_DIRECT tells the operating system not to buffer any of the data from the database inside of the file system buffers, because MySQL will be doing that itself (with innodb_buffer_pool_size). Not setting this value to O_DIRECT will cause double buffering- that is, MySQL and Linux will be buffering the same data, which is a waste of memory.
sync_binlog
The binary log is used to log all non-SELECT SQL statements run on the database. It’s an important component of MySQL replication. Anyways, on your master server, similar to innodb_flush_log_at_trx_commit, the value of sync_binlog should be 1. Setting it as 1 tells MySQL to fsyncthe SQL statements added to the binary log in real-time, so you never lose any data and a crash doesn’t cause replication to break.
Since slaves don’t keep a binary log unless they are told to with log_slave_updates, you can remove sync_binlog or set it as 0 on your slave servers.
innodb_log_file_size
Let’s talk about the innodb_log_file_size variable. To understand what values to use, instead of just blindly plugging in numbers, let me first explain how it works from a high-level view.
Imagine you were designing a database. You designed it to store the data in a complex file format that was very efficient but required a bit of computation time and random I/O. Since random I/O is slow, and you want to make your database as fast as possible, you decide that you can make your database more efficient by calculating and storing the data after answering the client instead of making them wait for you.
This is great! Things are fast. But uh-oh, Houston we have a problem. If the server crashes before you can store the data into the complex file format, that data will be lost forever since it hadn’t been persisted to the disk and was only stored in memory.
One solution you might come up with is to write the data, as it comes in, into a log file. Since the log file is being written sequentially, and there is no random I/O, it ends up being very fast because even the cheapest hard drives are good at doing sequential I/O. Since you know the data is stored in the log file, you can take your time storing it in the slower, but more efficient, file format. Maybe you can even re-order and group different pieces of data together since you’re in no rush to persist it to the complex format. If the server crashes, you can just replay the log file and verify that each change has already been made.
That’s more or less how the InnoDB log file works. There are two of them, and they’re capped at a fixed size. They need to be big enough that they can handle your incoming writes while still allowing InnoDB to leisurely push the data into its more complex data files. Set too small, I/O usage will increase because InnoDB won’t be able to efficiently group and re-order writes. Set too big and, in the event of a crash, it will take longer to recover your database because there is more log data that has to be replayed.
So how do we determine the best innodb_log_file_size? The best way, instead of setting it to some random value that you read in a book, is to calculate how many megabytes of data per minute are getting written to the file and setting the value to be large enough to hold one hour’s worth of writes. Make sure to do this during peak usage, too!
1 > show global status where variable_name like "%Innodb_os_log_written%";
2 select sleep(60);
3 show global status where variable_name like "%Innodb_os_log_written%";
4
5 *************************** 1. row ***************************
6 Variable_name: Innodb_os_log_written
7 Value: 234825649664
8 1 row in set (0.01 sec)
9
10 +-----------+
11 | sleep(60) |
12 +-----------+
13 | 0 |
14 +-----------+
15 1 row in set (1 min 0.00 sec)
16
17 *************************** 1. row ***************************
18 Variable_name: Innodb_os_log_written
19 Value: 234828058624
20 1 row in set (0.00 sec)
Ok, now take those two values - 234825649664 and 234828058624 and subtract them from each other.
1 234828058624-234825649664 = 2408960 bytes
2408960, that’s the number of bytes per minute that are getting written to my InnoDB log file. If you Google 2408960 bytes to megabytes, it tells me that MySQL is writing 2.29MB per minute to my log file.
Multiply the megabytes per minute times 60 minutes to determine how much data would be written out in one hour.
1 2.29MB * 60 minutes = 137.4MB
Since InnoDB keeps two individual log files, divide 137.4MB by 2 and we get about 69MB, so innodb_log_file_size should be around 70MB in this scenario. We can go higher, even up to 100MB or 200MB, but as you can see, for most cases, setting it very high is unnecessary.
(Calculation method adopted from the MySQL Performance Blog)
In order for the change to take effect on an existing MySQL database, you need to cleanly shut down MySQL, delete the InnoDB log file, and restart MySQL. If you don’t do this, MySQL will complain that the existing log file sizes do not match the value of innodb_log_file_size.
The files you need to delete are in your MySQL data directory, named ib_logfile0 and ib_logfile1. Remember, these files are only necessary in the event of a crash, so you may delete them freely as long as you’ve cleanly shut down MySQL using mysqladmin shutdown. MySQL will recreate the files, using the new size specified, when you start it again.
Caution: Do not delete the ibdata1 file, as this contains all of your InnoDB data if you’re not using innodb_file_per_table. It’s easy to accidently do this if you use a command like rm -rf ib*..
max_connections
You need to set max_connections as high as the theoretical maximum amount of connections that your application can ever have. Since each PHP-FPM process will typically only use one connection, you’ll want to use the pm.max_children setting from your PHP-FPM configuration file for this formula.
Formula for setting max_connections:
1 max_connections = pm.max_children * number of application servers
The default value of 100 connections is far too low, so make sure you bump this up. Another consideration is making sure you have enough memory to handle your theoretical maximum number of connections. MySQL is a threaded server and creates a new thread for each connection, each which requires about 192KB of memory. 192KB * 2000 connections is around 400MB, for example, so you’ll want to make sure that you have enough free memory to accommodate your connections after subtracting innodb_buffer_pool_size from the total amount of system memory.
innodb_io_capacity
The innodb_io_capacity setting tells InnoDB how many IOPS that your system can provide, giving it an upper limit to prevent it from saturating your disks. Therefore, you need to set this value, depending on the performance of the drives on your MySQL system. The default value is set to 100, way too low today’s hardware, so you absolutely must tune this value. Here are some good starting points-
|
Drive Type |
Value |
|
Enterprise SSD |
50,000 |
|
Single Consumer SSD |
10,000 |
|
4 Drives in a RAID-10 |
5000 |
|
Single 7200RPM Drive |
200 |
On our slaves, we use Enterprise-Level Micron SSD drives in a RAID-0, and we’re able to set it as high as 150,000.
Don’t know how your system stacks up? You can run a quick test with fio to determine the number of random IOPS your system can push. Let’s pretend you want to test the disk /dev/sdb1, which is mounted as /mysql for this test.
First we need to install fio and setup the job file. The job we’re defining will test random read+write I/O performance on a 128MB file. If you’re on a system with faster drives, you’ll want to increase the size to at least 5GB because the test will finish almost instantly. On a single 7200RPM drive system, the test takes about 30 seconds to run.
1 > apt-get instal fio
2 > cd /mysql
3 > mkdir /mysql/fio
4 > vi random-rw.fio
5 [random_rw]
6 rw=randrw
7 size=128M
8 directory=/mysql/fio
Now, run the job file that we just created.
1 > fio random-rw.fio
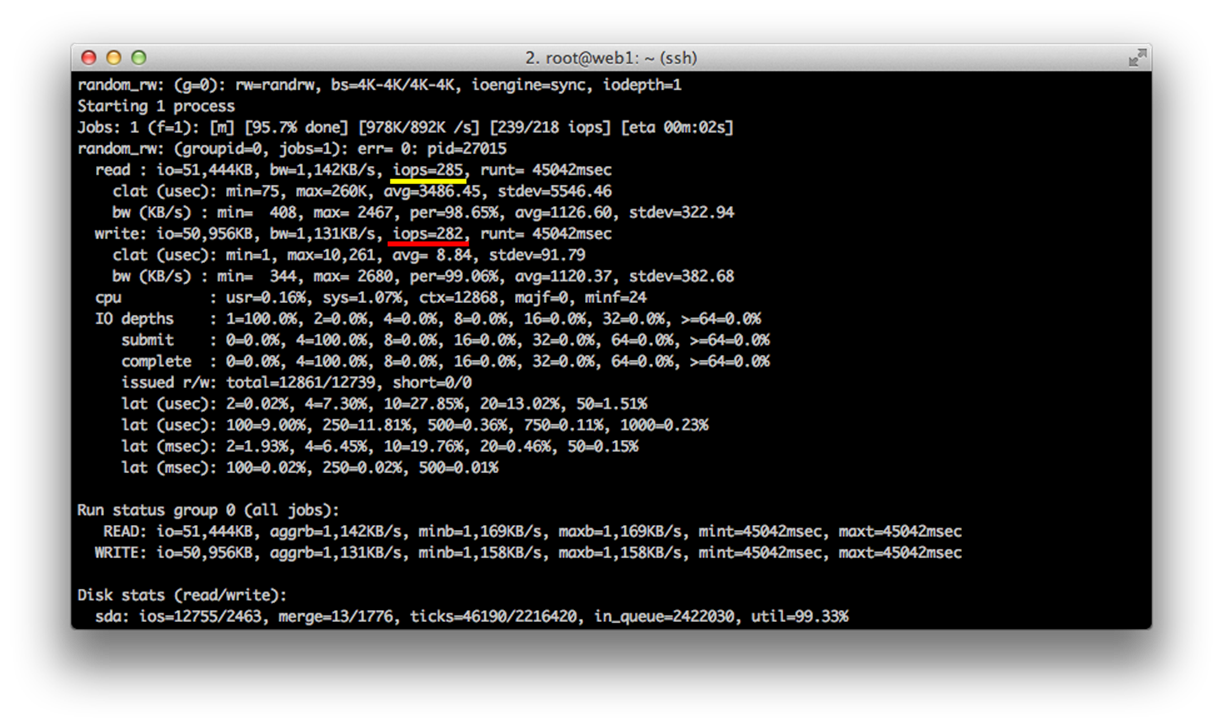
Once the job finishes running, you should see something similar to the above output. The value underlined in yellow is your average random read IOPS (285 in this case), and the red underline sows the average write IOPS (282). For reference, this is from a single 7200RPM drive system.
It’s worth noting that fio supports a bunch of different configuration options. There are a few different types of tests you can run, too. By changing the rw=randrw variable, you modify the type of benchmark that is performed. The different ones available to you are-
|
Name |
Type of test |
|
read |
Only benchmarks sequential reads |
|
write |
Only benchmarks sequential writes |
|
randread |
Only benchmarks random reads |
|
randwrite |
Only benchmarks random writes |
|
rw |
Benchmarks sequential reads+writes |
|
randrw |
Benchmarks random reads+writes |
Random I/O is the worst case scenario and is very slow, so using the value from the randrw test is a pretty conservative starting point for innodb_io_capacity, but it gives you an idea of how your system can perform. You can try running the job with rw=rw to see how your system performs in the best case, 100% sequential, scenario.
|
|
What different types of I/O does MySQL use? · Writing to the InnoDB log file uses Sequential I/O. · Writing to the InnoDB data files uses mostly Random I/O. · Reading from the InnoDB data files uses mostly Random I/O. |
innodb_read_io_threads & innodb_write_io_threads
InnoDB uses background threads to manage some reading and writing tasks. By default, it’s set to 4, which is too low for modern systems. These should be set to 4 x the number of CPU cores on your system.
query_cache_size
The MySQL query cache, at first glance, seems like a great idea. It stores the result of each query into memory, so if you issue the same query again, it can respond immediately- it doesn’t even have to parse the query. If you have a heavily read table, it can really speed up the response of your queries, effectively replacing the need for a separate cache layer, such as Memcached.
The problem happens on writes, though. Since the query cache is designed to never serve you stale, out-of-date data, it needs to be able to intelligently update cached data. Unfortunately, that’s not the way it handles the problem. Instead, every time there is a write to the database, the query cache completely wipes out and resets the cache for that entire table. EVERY SINGLE TIME. Think about that- if you have 100 INSERTS, UPDATES, or DELETES per second, the query cache needs to be flushed 100 times per second. It becomes all, but useless.
Not only is it useless, but it also hurts performance. The larger the cache, the longer it takes for it to be wiped, slowing down each INSERT query. Additionally, the query cache uses a single global lock- that is, only one thread can access the query cache at a given moment. This causes all of your other threads to block while waiting to wipe out the useless query cache.
Here’s the skinny. If your workload has any significant amount of writes, disable the cache altogether. Remember- InnoDB has its own internal data cache without such constraints, so your queries will still be fast. If you have tables that are heavily read from and are very rarely written to, the query cache makes sense. In situations like this, it can actually save you from having to implement an entire cache layer, greatly reducing the complexity of your application.
Due to a bug in MySQL, you need to set both query_cache_size and query_cache_type as 0.
But, but! What if my application has BOTH types of tables? Since the query cache is set globally, and not per table, what do you do? You should probably disable the query cache, because it usually causes more harm than good. You can turn on the on-demand which, if used correctly, can provide some benefits.
First, you want to set your configuration values to turn on the on-demand cache.
1 query_cache_type=2
2 query_cache_size=16M
16MB is a good starting point for the size of your query cache. Remember, you want to keep it very small because it needs to be wiped out on every single write. And it’s only storing the queries + results, which are often only a few KB each.
Now, when you issue a query, by default, it will skip the query cache entirely. If you want a specific query to use the cache, you need to change SELECT to SELECT SQL_CACHE. For example-
1 mysql> SELECT SQL_CACHE FROM foobar WHERE id = 123456
However, the on-demand query-cache still suffers from the global write that’s described above, so it’s far from the perfect solution.
XtraDB/InnoDB vs MyISAM
You’ll notice that I’ve not touched on any MyISAM-related performance settings in this Chapter. That’s because you shouldn’t be using MyISAM in production ever. Why shouldn’t you use MyISAM?
It doesn’t support row-level locking
So what? That means that every insert into MyISAM locks the entire table, making it unavailable for other concurrent connections to read or write from the table until the query is complete. That’s a pretty huge limitation. InnoDB supports row-level locking, so only the rows involved in an insert or update get locked while they are being modified.
If you’re in a low-volume environment, it, of course, doesn’t make a big difference, but MyISAM is absolutely not suited for a high-volume workload and has no place when scaling. Switch everything to InnoDB and don’t look back.
How can you tell if a table is MyISAM or InnoDB?
1 mysql> SHOW TABLE STATUS WHERE 'Name' = 'foobar'\G
2 *************************** 1. row ***************************
3 Name: foobar
4 Engine: InnoDB
5 Version: 10
6 Row_format: Compact
How can you switch the table from MyISAM to InnoDB?
1 mysql> ALTER TABLE foobar ENGINE = INNODB;
Warning: The alter table will probably take a long time and put a write-lock on the table, preventing data from being written to it.
What about searching?
It’s true that InnoDB doesn’t support full text searching like MyISAM. Truthfully, there are far better alternatives for searching, anyways. Check out:
· ElasticSearch
· Sphinx
· Solr
Rumor has it that MySQL 5.6 will add full text searching to InnoDB. I haven’t tested it yet, so I can’t comment on the performance, but it’ll likely replace or at the very least reduce the need for a separate search service.
Tuning Linux for an intensive database
Linux and MySQL are a match made in heaven. Out of the box, MySQL will run pretty decently on a Linux system but we can squeeze out 30-40% more performance (mostly on the I/O side of things, our weakest link!), just by tuning some settings and making the right decisions from the start.
Changing the I/O Scheduler
The Linux kernel ships with three I/O schedulers- they are cfq, deadline, and noop. You can see which one you’re using with the following command, where sda is the device id of your disk.
1 cat /sys/block/sda/queue/scheduler
2 noop deadline [cfq]
On most distros, it’s set as cfq by default, which is supposed to provide fair I/O sharing across the entire system, great for desktops where you have a bunch of different programs playing grabby hands with I/O. But you don’t have lots of different programs; you’re running a monolithic database server and you want your database to have all of the I/O resource available.
It’s not so much which I/O scheduler you choose, deadline or noop both work swell, it matters which one you don’t choose. cfq is extremely slow and you’ll see massive gains by switching. noop is supposed to be a better choice for SSDs and Hardware RAID, but in my testing, both deadlineand noop performed similarly.
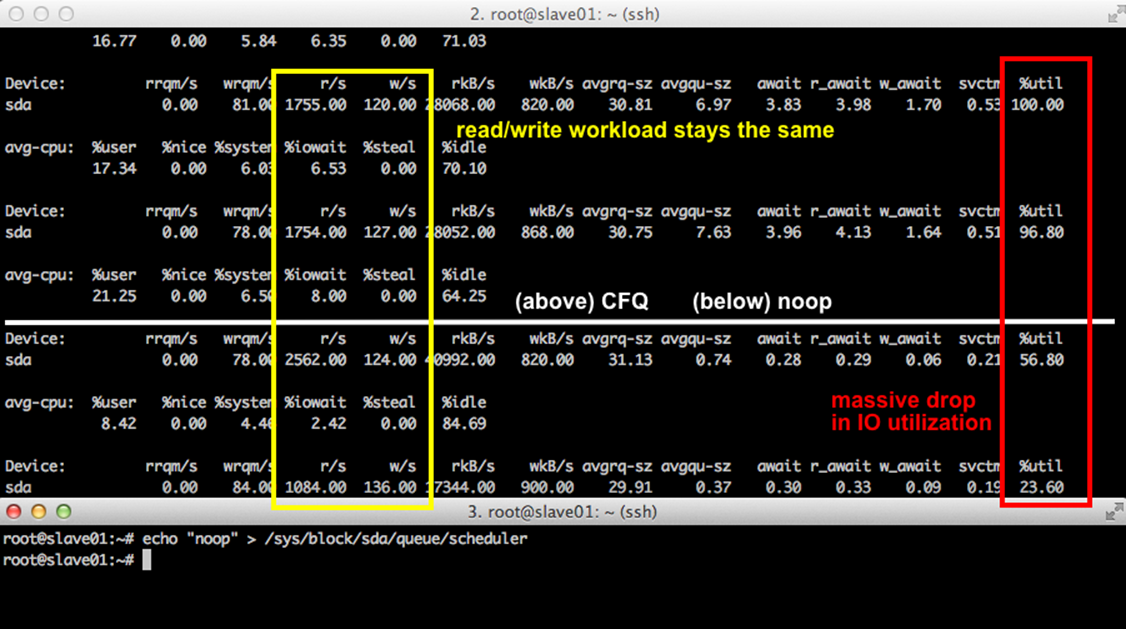
Looking at the benchmark above, the top window is running the command iostat -x 1, which displays information on the I/O usage every second. Above the white line drawn through the middle, we’re running with the cfq scheduler. You can see, highlighted in the red column that I/O usage is hovering at around 100%. After 2 seconds, I switch over to the noop scheduler. I/O utilization immediately cuts in half and hovers around 20%.
The section highlighted in the yellow square just highlights that the read per second and write per second workload stays about the same during the entire test, so the drop in I/O utilization is because of the change in scheduler.
Switching the I/O scheduler is extremely easy and it’s extremely low hanging fruit for increasing your database write performance in seconds.
The main disk that my database uses is /dev/sda, which is the disk that I’m changing the I/O scheduler for in the example below. If your disk has a different identifier, change sda to that identifier in the examples below. sda is the right choice for most people.
1 > echo noop > /sys/block/sda/queue/scheduler
2 > vi /etc/rc.local
3 # Add this line to your rc.local file because the
4 # I/O scheduler will revert to the default after a
5 # system reboot.
6 echo "noop" > /sys/block/sda/queue/scheduler
Tuning swapiness
Swapping usually means the death of a MySQL server. Since MySQL does its own internal caching, it expects the internal buffer pool to always be fast. When Linux swaps out some of this buffer pool to the disk, it pulls the rug out from under MySQL and will often crash the server when it runs out of memory. It’s extremely important to configure MySQL so that you maximize your memory usage without going so high that you can eventually cause the server to swap.
We can configure the vm.swappiness setting to tell the kernel that it shouldn’t swap inactive areas of memory to the disk. However, keep in mind that if you disable swap completely the server will most definitely crash in an out-of-memory situation, since it doesn’t have the luxury of using a disk as a swap space.
1 > sysctl -w vm.swappiness=0
2 > vi /etc/sysctl.conf
3 vm.swappiness=0
Increasing the number of open files
As we discussed in the Load Balancer Chapter, on a stock-Linux configuration, the maximum number of open files allowed per process is set very low (1024). For MySQL, we need to increase the number of open files for two reasons. The first is to make room for the max_connectionssetting, since each connection eats up one file descriptor. The second reason is that each open table requires a file descriptor! If you have 10 tables and 100 connections, you’d need at least 1000 open files since each connection thread maintains its own file handles.
Luckily, it’s an easy to setting to change.
1 > vi /etc/security/limits.conf
2 * soft nofile 999999
3 * hard nofile 999999
4 > ulimit -n 999999
Turning off file system access times
As we discussed in the application server chapter, by default, in most Linux distributions, the file system keeps track of the last time a file was accessed or read. It’s rarely useful to have this information and it causes an I/O operation every single time a file is read, such as MySQL reads from a table. We can disable this behavior by modifying the partition where your MySQL database files are stored. Open up /etc/fstab and look for your main partition. Mine looks like this:
1 /dev/sdb1 / ext4 errors=remount-ro 0 1
Change it to
1 /dev/sdb1 / ext4 noatime,nodiratime,errors=remount-ro 0 1
noatime tells the file system to not track when individual files are read, and likewise, nodiratime tells the file system to not track when directories are read from.
You can remount the file system (without a reboot!) with the command mount -o remount /dev/sdb1 (replace /dev/sdb1 with whatever file system that you had to edit in your /etc/fstab file).
Picking the best file system
Ahh… the database file system wars. There are plenty of options and a thousand opinions available on the internet. Let’s talk about hard numbers- I’ve compared and benchmarked the two most recommended MySQL file systems, ext4 and XFS. We use ext4 on Twitpic, and from the research I’ve done, I expected it to perform equally as well as XFS - not to mention, ext4 is the default file system choice for most Linux distros nowadays.
Anyways, using sysbench (covered at the end of the chapter), I performed a read/write MySQL benchmark comparing XFS to ext4 and the results surprised me. I ran the test on a 16-core machine to make sure that benchmark wouldn’t become CPU bound and skew the results. It created a table that was a bit larger than the innodb_buffer_pool_size, so not all of the data could be fit into memory, forcing it to hit the disk for some reads.
Comparing ext4 to XFS, I found that XFS was extremely more performant on a benchmark of 100,000 read and write queries.
|
XFS |
ext4 |
|
21,755 qps |
16,560 qps |
By the way, to install XFS on Ubuntu, you just need to install xfsprogs and run mkfs.xfs on the device you want to format.
1 > apt-get install xfsprogs
2 > mkfs.xfs /dev/sdf1
The tests were done using a dedicated disk for the MySQL data files, so there was no I/O competition from other system processes.
Raw Device Mode
You can even use InnoDB in something called Raw Device Mode, where it writes data directly to an unformatted disk or partition without using any file system at all. I highly recommend not using it, even though it’s slightly faster, because it makes managing your data a complete nightmare. You lose all visibility in the database files that you would otherwise have when using a normal file system. Additionally, benchmarks show that ext4 and XFS are only a tiny bit slower than using a raw device.
For the curious, you can use raw device mode by changing the innodb_data_file_path setting-
1 innodb_data_home_dir=
2 innodb_data_file_path=/dev/sda1:500Gnewraw
Restart MySQL, it will create the data file, then change innodb_data_file_path again.
1 innodb_data_file_path=/dev/sda1:500Graw
The future of file systems
It’s worth quickly mentioning ZFS and btrfs. Both are pretty cool and likely the future of file systems, because they support modern features like copy-on-write, SSD caching, and de-duplication, but ZFS doesn’t have great support on Linux yet and Btrfs is still too experimental to use in production.
Load balancing MySQL Slaves
Having multiple read-only MySQL slaves are great, but you need a way to load balance them in your code. By default, PHP doesn’t handle this for you at all, and it’s something you need to code in yourself. I’m going to show you a few ways to do it below.
Database Class
The easiest way is to do it within code using a simple database class. Select a slave at random and return a database connection depending on the one you chose.
1 <?php
2 class Database {
3 static function connect() {
4 // Assuming your slave hosts come from a configuration file, but
5 // for brevity, we just define them here.
6 $slaves = array('192.51.100.1', '192.51.100.2', '192.51.100.3');
7 $slave = $slaves[array_rand($slaves)];
8
9 return new mysqli($slave, 'user', 'password');
10 }
11 }
12
13 $slave = Database::connect();
The downside of handling slave selection this way, and doing it in code in general, is that if one of your slaves crash, it will not be handled gracefully while it waits for the connection to timeout. Of course, you can remove the slave from your configuration manually when it goes down, but that’s a manual process and I’m not a huge fan of waking up in the middle of the night to update configuration files.
Extending PDO
Similarly to the above, if you’re using PDO, you can handle load balancing a bit more elegantly, but with the same downsides as the Database class used in the previous section (ungraceful handling of down slaves).
1 <?php
2 class SlavePDO extends PDO {
3
4 public function __construct($dsn, $user=null, $pw=null, $options) {
5 // Assuming your slave hosts come from a configuration file, but
6 // for brevity, we just define them here.
7 $slaves = array('192.51.100.1', '192.51.100.2', '192.51.100.3');
8 $slave = $slaves[array_rand($slaves)];
9
10 $dsn .= ";host={$slave}";
11 parent::__construct($dsn, $user, $pw);
12
13 }
14
15 }
16
17 $slave = new SlavePDO('mysql:dbname=test', 'user', 'password');
Using the mysqlnd_ms plugin
The MySQL Native Driver is an alternative MySQL driver written by the PHP team that was first included in PHP 5.3. It was added to remove PHP’s dependency on libmysql and tie MySQL further into the core of PHP. The MySQL Native Driver also added in the ability for developers to create both PHP and C plugins to add functionality PHP’s MySQL Driver. Since MySQLND is used internally, MySQLND plugins work with any interface that you use to interact with MySQL- PDO, MySQLi, and even the old-school, deprecated, unrecommended MySQL extension.
First, you need to install the mysqlnd_ms PECL plugin.
1 > pecl install mysqlnd_ms
Next, add a configuration file to your app. For the example, let’s say it’s stored in ./config/db.conf
1 > vi ./config/db.conf
2 { "app" : {
3 "master": [ { "host": "192.51.100.10" } ],
4 "slave": [
5 { "host": "192.51.100.1" },
6 { "host": "192.51.100.2" },
7 { "host": "192.51.100.3" }]
8 },
9 "failover": { "strategy": "loop_before_master" }
10 }
And then enable mysqlnd_ms in your application.
1 <?php
2 ini_set("mysqlnd_ms.enable", 1);
3 int_set("mysqlnd_ms.config_file", "./config/db.conf");
Now, whenever you want to make a MySQL connection (this works with both PDO and mysqli), you just pass in app as the host.
1 <?php
2 $mysqli = new mysqli("app", "username", "password");
The cool thing here is that not only will it round robin between your slaves, it will also send any write queries to your Master database. The failure handling is still sub-optimal, though.
The plugin lets us set a failure strategy in the configuration. In the example, I’ve set it as loop_before_master, which means that it will try the other slaves and then try the master when a slave fails. This is great, but it doesn’t remember failed slaves between requests, so you’ll still pay the cost of waiting for the slave to timeout, every single time. This is, however, better than just outright failure.
Using HAProxy
The best way to handle slave load balancing is to use a software load balancer like HAProxy. As discussed in Chapter 4, HAProxy can do Layer 4 load balancing, i.e., raw TCP sockets. While most people use this functionality load balancing HTTP, it can be used equally as well for internally load balancing your MySQL connections as well.
Why is HAProxy the best solution? For two reasons-
1. When it detects a database slave as unresponsive (crashed, down, whatever), it removes it from the load balancer pool and stops using it. It does this detection quickly and is completely transparent. No configuration changes, no downtime, no waiting for connections to timeout, and, best of all, no waking up in the middle of the night.
2. HAProxy lets you set very granular timeouts down to the millisecond. This lets you side step the poor MySQL timeout management in PHP (which is limited to 1 second, minimum) and set more reasonable timeouts.
The installation and setup is pretty similar to how we setup our HTTP Load Balancer.
1 > apt-get install haproxy
2 > vi /etc/haproxy/haproxy.cfg
3
4 global
5 maxconn 50000
6 user haproxy
7 group haproxy
8 stats socket /tmp/haproxy
9 node lb1
10 nbproc 1
11 daemon
12
13 defaults
14 log global
15 retries 3
16 option dontlog-normal
17 option splice-auto
18 timeout connect 200ms
19 timeout client 2s
20 timeout server 2s
21 maxconn 50000
22
23
24 listen mysql 192.51.100.100:3306
25 mode tcp
26 balance leastconn
27
28 server slave01 192.51.100.1:3306 check
29 server slave02 192.51.100.2:3306 check
30 server slave03 192.51.100.3:3306 check
31
32 listen stats *:1936
33 mode http
34 stats enable
35 stats uri /
36 stats hide-version
37 stats auth Username:Password
HAProxy won’t run until you enable the init.d script, so let’s do that now.
1 > vi /etc/default/haproxy
2 # Set ENABLED to 1 if you want the init script to start haproxy.
3 ENABLED=1
4
5 > service haproxy start
With this configuration, we set up three database slaves, each defined with a server line. Now, all we have to do is modify our code to connect to HAProxy’s IP Address instead of the slave IP Address. (The HAProxy IP is defined in the configuration file in the listen setting. In this example, it’s 192.51.100.100.)
1 <?php
2 $mysqli = new mysqli("192.51.100.100", "username", "password");
Now, every time you make a MySQL connection, you will connect to HAProxy instead of directly to the MySQL slave. HAProxy will choose the slave with the least amount of connections and connect you to that slave. You can also use balance roundrobin as your balancing strategy if you want HAProxy to use less intelligence when picking slaves.
Since we set timeout connect as 200ms, if a connection to a slave fails to happen in in less than 200 milliseconds, HAProxy will try another slave instead. Failed or overloaded MySQL slaves are now a non-issue.
With timeout client and timeout server both set at 2s, it means that a long-running client or hung query will get disconnected after 2 seconds. Having a very low query timeout threshold makes sense for a web application, but obviously not for any kind of analytics or background processes, so you’ll want to connect directly to the slaves or set up a secondary HAProxy listen block with different timeouts for those scenarios.
The best feature, in my opinion, is that failed slaves are automatically removed from the pool and re-added once they come back up. Until we ran this setup in production on Twitpic, I’d have to wake up in the middle of the night to manually remove broken slaves from our configuration files. It was a real pain-point for us as we grew to more and more slaves.
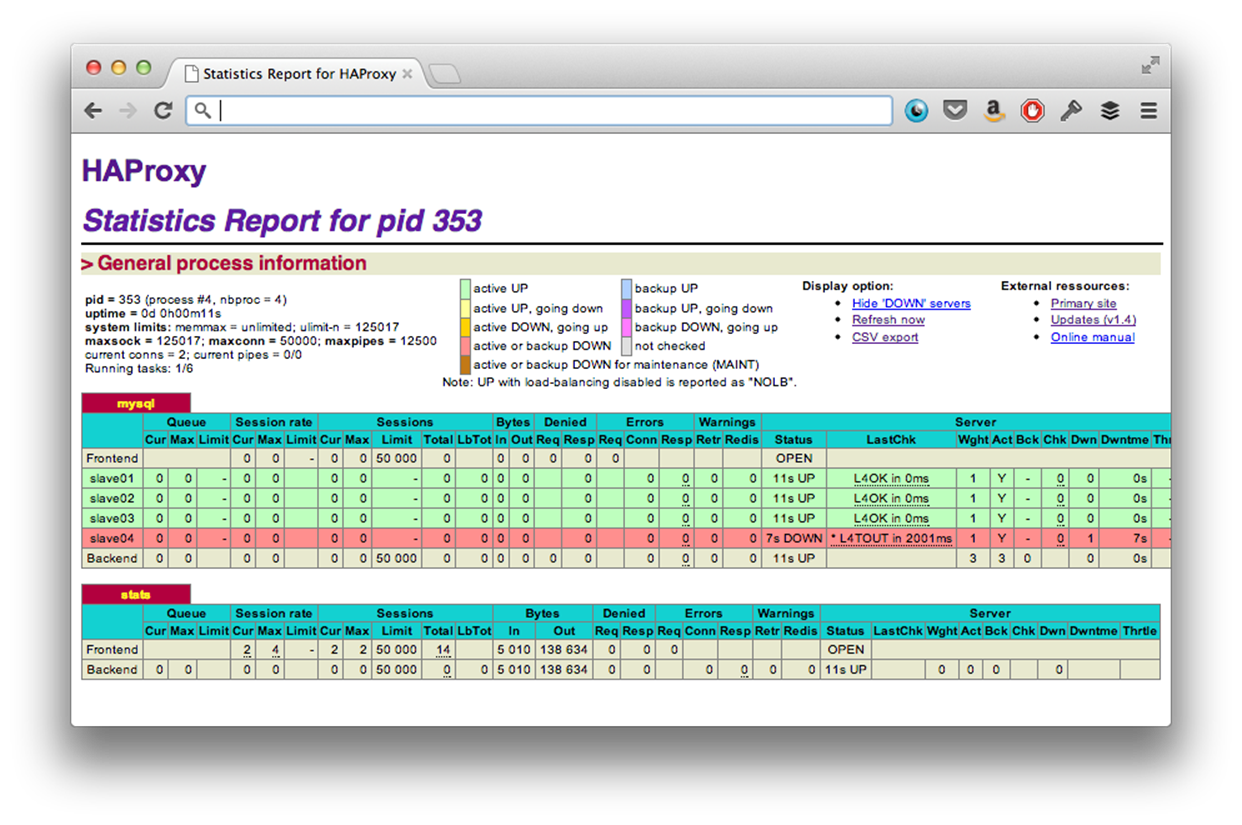
You also get a really nice web interface for viewing the status of your MySQL slaves.
Accepting the Master as a SPOF
When you choose to use MySQL, you need to learn to accept and understand that your master server is always going to be a single point of failure. Of course, there are solutions and workarounds like DRBd, Percona XtraDB Cluster, and MySQL Master-Master Replication. The downside, though, is that they are often slow and extremely complex.
The alternative is to accept and deal with the fact that your master database server is going to be a single point of failure. You can work around the problem by scripting the failover process and dealing with the situation with as little downtime as possible. Check out JetPants by Tumblr as a starting point for a MySQL master failover/slave promotion toolkit.
What really happens when your master fails?
I used to be worried that if our master database crashed, we would lose data and be faced with an enormous amount of downtime. When I thought about it, though I realized a few things-
The site won’t go down
Since we only write data to the master, and never read from it, it’s really just a glorified coordinator of data. If it crashes, our site just goes into a read-only state, but it’s still up and functioning.
We won’t lose data
Because we make daily, off-site backups, even in the event of a catastrophic failure, losing just the master is even less of a big deal because data is replicated and stored safely on all of the slaves.
Using semi-synchronous replication in MySQL 5.5 is needed to guarantee that we don’t lose anything in the event of a master crash. With the default asynchronous replication, it’s possible to lose data that has been written to the master but not yet replicated to the slaves during a crash. Semi-synchronous replication, instead, guarantees that new data is replicated to at least one slave.
Promoting a slave as the master
Okay, so your master database has failed. What is next? Well, we need to promote a slave to be the new master to get it up and running as quickly as possible.
Let’s quickly go through a high level overview of the slave to master promotion process.
Assumptions
· Your master server is named master01, and you have five slaves, slave01-05.
· You want to promote slave01 to be the new master.
· master01 is still up-and-running.
· Your code writes to the MySQL using the database user app_user.
If master01 is still up-and-running, it’s important to disable writes to it before failing over to the new master so your data doesn’t get out of sync. On master01, first delete the user that your application uses (app_user), so it won’t be able to establish any new connections. Next, put the database in read-only mode:
1 > DROP USER `app_user`
2 > SET GLOBAL read_only=1;
3 > FLUSH TABLES WITH READ LOCK;
At this point, your database cluster is in a total read-only mode. If master01 has crashed or become unavailable, this step is unnecessary because your cluster is already effectively in a read-only state.
Next, we need to pick a slave to be the new master. In this scenario, we’ve decided to promote slave01. On slave01, you’ll want to copy over your my.cnf from master01, particularly the log-bin setting, and restart MySQL. It’s helpful to have a backup master server already configured for this purpose.
On slave01, you’ll want to run SHOW MASTER STATUS to determine the binlog position.
1 mysql> show master status \G
2 *************************** 1. row ***************************
3 File: master-bin.000001
4 Position: 98
Now that you know the position of the binlog, you can connect to the rest of your slaves and reconfigure them to use slave01 as the new master server with the CHANGE MASTER TO command.
1 mysql@slave02> STOP SLAVE;
2 mysql@slave02> CHANGE MASTER TO MASTER_HOST="slave01",
3 MASTER_LOG_FILE="master-bin.000001", MASTER_LOG_POS=98;
4 mysql@slave02> START SLAVE;
Lastly, update your application configuration to write to slave01 instead of master01.
Doing it manually isn’t the best scenario, and a good portion of this can be scripted. Instead of scripting it yourself, though, it’s worth checking out mysql-master-ha which can handle automatic master failover by scripting the solution described above.
Further research and reading
The topic of MySQL Master Failover is huge and could easily take up its own book, so it’s impossible for me to cover all of the possible solutions here. For most people, taking it into a read-only state and manually promoting a new master is the simplest and best approach. Unfortunately, it’s not a solution that works for everyone, so here are some further places to look for more information on some more robust (and more complex) solutions for handling master failure.
· Automated Master Failover (Slides)
· How to evaluate which MySQL HA solution best suits you
· MySQL ZFS Replication
· MySQL DRBd Replication
· Percona XtraDB Cluster
· Percona Replication Manager
· Tungsten Replicator
Understanding issues with NUMA
TL;DR- NUMA (Non-Uniform Memory Access) is pretty much a complex topic and only involves a subset of MySQL implementations: Servers running multiple Intel Nehalem or newer CPUs, with large amounts of Memory (i.e., over 64GB) and a very large innodb_buffer_pool_size. What happens is MySQL swaps out large amounts of memory even though there may be plenty of free memory on the system, causing MySQL performance to drop dramatically.
While the problems around NUMA architecture haven’t been completely solved, you can fix most of the issues by patching /usr/bin/mysqld_safe, running Percona Server 5.5, and setting zone_reclaim_mode to 0.
What exactly is NUMA?
Before Nehalem CPUs, most multi-CPU systems used a SMP architecture which gave both CPUs equal access to all of the system memory.
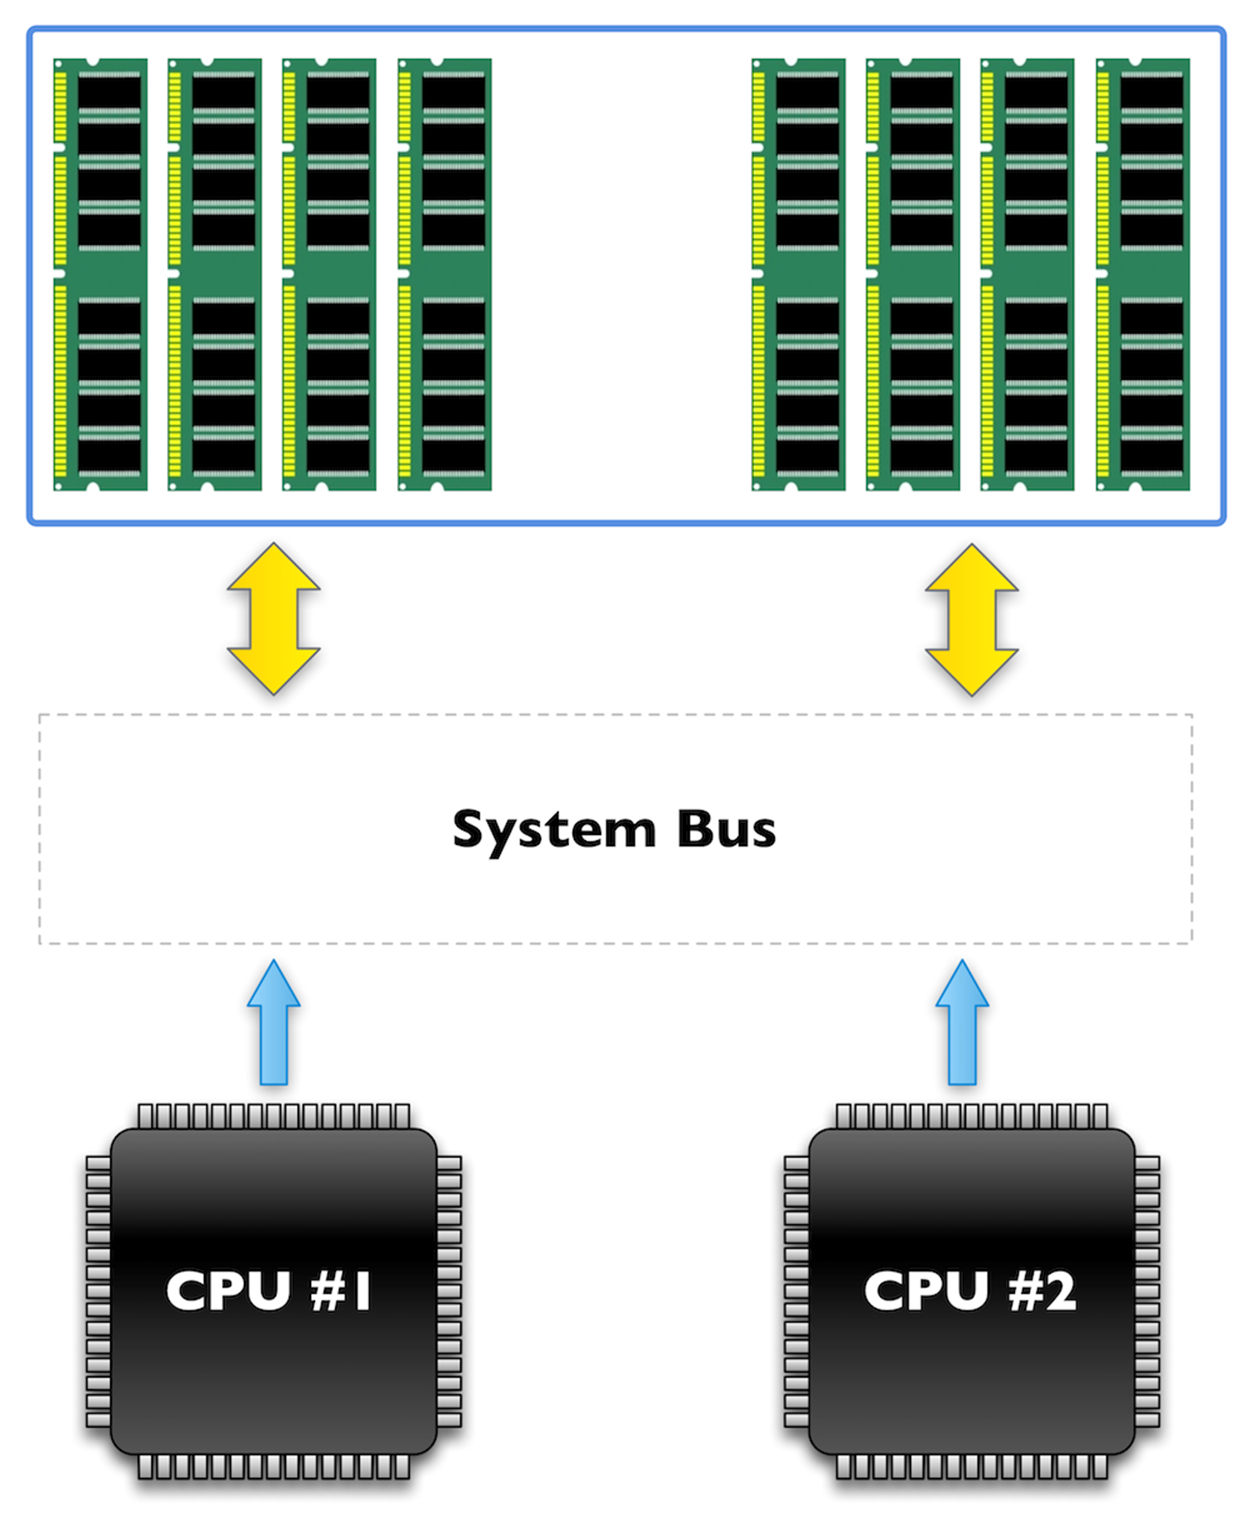
System architecture with SMP
Starting with Intel’s Nehalem architecture, Nehalem processors and newer processors (Sandy Bridge and Ivy Bridge included), use a new method of accessing memory in multiple CPU systems. It’s worth noting that this only matters on systems with multiple physical CPUs, not single CPU systems with multiple cores.
Anyways, described simply- with NUMA, instead of having a central access path to memory, each CPU now has direct access to some local memory banks. This ties specific sticks of memory to each CPU and makes accessing non-local memory slower and more complex.
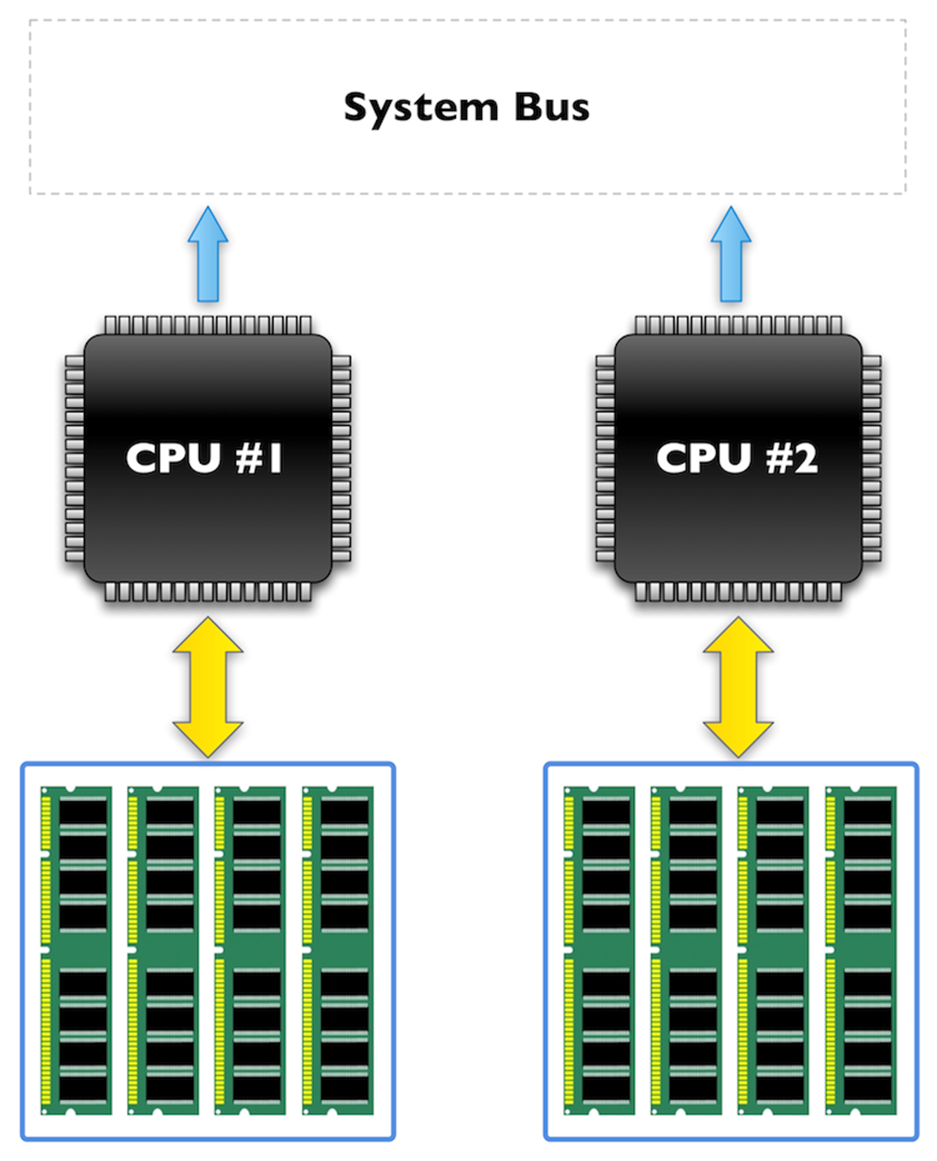
System architecture under NUMA
How does NUMA impact MySQL?
Let’s imagine a scenario- You have a huge MySQL system with 2 Physical CPUs and 64GB of memory. Obviously, to take advantage of your 64GB, you set your innodb_buffer_pool_size to be 57GB. You run your system under heavy load and notice that even though there is plenty of free system memory, MySQL is performing very poorly because it’s swapping memory to the disk. At first glance, this doesn’t make any sense.
What’s happening is that Linux doesn’t let each CPU address the full 64GB- instead, each CPU can only work with its “local” pool of memory- 32GB in this case. As soon as a single CPU needs to access more memory than is free in its local pool, Linux starts swapping to the disk even if there is free memory in the other CPU’s local pool.
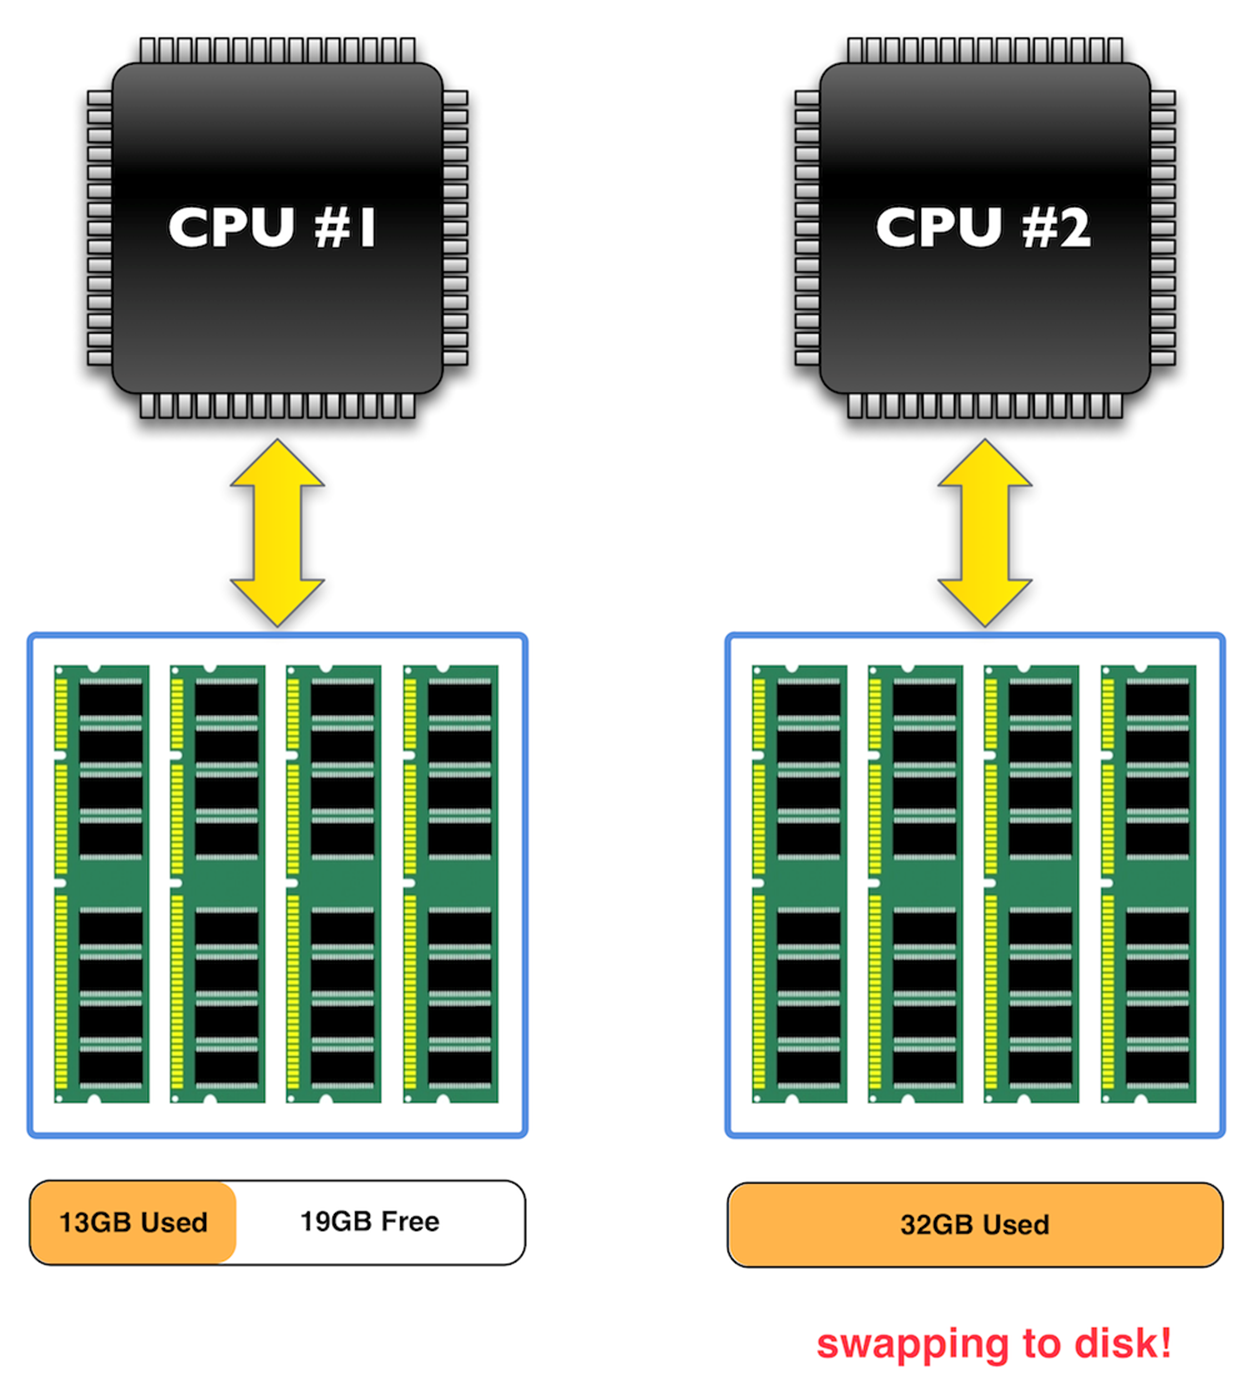
What happens when a CPU needs to address more than 32GB
How can we overcome this problem?
There are a couple of ways that we can overcome this serious limitation.
1. Set innodb_buffer_pool_size to 32GB.
2. Only use MySQL servers with a single physical CPU.
Obviously, these are both horrible solutions. Luckily, there is a better solution. The first step is to use Percona Server 5.5 instead of the stock MySQL Server from Oracle. The version from Percona includes numerous enhancements and patches that make MySQL a bit saner on NUMA systems.
The second part of the solution is to tune Linux to allow memory interleaving across the CPUs, effectively removing the 32GB limit from each CPU and allowing it to work with the full 64GB.
To do this, we need to install numactl.
1 > apt-get install numactl
Next, we have to patch the MySQL startup script mysqld_safe to use numactl.
1 > vi /usr/bin/mysqld_safe
Once the file is open, we need to replace this line (line 735 on my system):
1 cmd="`mysqld_ld_preload_text`$NOHUP_NICENESS"
with a line that uses numactl:
1 cmd="/usr/bin/numactl --interleave all $NOHUP_NICENESS"
Further Reading
A great article on NUMA and MySQL is The MySQL “Swap Insanity” Problem and the Effects of the NUMA Architecture by Jeremy Cole. It’s pretty long, but an interesting read, if you want to really understand the problem and the solution.
Choosing the best hardware
If you’re going to spend money on hardware, putting it into your MySQL cluster is almost always going to give you the biggest performance increase.
When choosing a CPU, there are a couple of things to keep in mind.
CPU Speed (impacts a single query)
MySQL executes each query in a single thread. It does not parallelize your query, so a single query can only take advantage of one CPU core. So, for single query performance in a purely CPU-bound environment, more GHz is always going to win over more cores. Keep in mind though that unless you can fit all of your data into memory, MySQL is rarely CPU-bound.
CPU Cores (impacts concurrency)
MySQL can’t split up a single query across multiple cores, but it can run multiple queries concurrently and having more cores gives you more concurrency. In a high-volume environment, more cores are better.
Right now, the best CPU on the market is the Intel Xeon SandyBridge 26xx Series. You can put up to two CPUs per box, each of which can have up to 8-cores each. That gives you 32 concurrently executing threads with Intel’s Hyper Threading. On top of that, they make them as fast as 3.5GHz per core.
Memory
This one is easy. Get the most amount of memory that you can possibly cram into your motherboard. As long as you have more data than memory, there is no reason (other than cost) why you should avoid maximizing the memory in your database servers. The more memory you have, the bigger you can set innodb_buffer_pool_size.
We run ours with 64GBs per slave, but 128GB, 256GB, or even 512GB in a box isn’t unheard of nowadays. At the time of writing, a 16GB stick of ECC/Registered DDR3 runs around $175, so even 512GB only costs around $5500.
If you go with the Intel Xeon 26xx CPUs, SuperMicro even makes a motherboard with enough sockets to fit 768GB. Crazy times we live in.
Storage
Making the right storage decisions is very important to the performance of a MySQL cluster. Not all storage is built the same and a master/slave setup means that you have vastly different storage requirements. What works on your master database server won’t necessarily work well for your slave server, and vice-versa.
Hard Drives
I highly recommend using high-end server hard drives for your master database. Grab a couple of 10,000 or 15,000 RPM drives and put them into a RAID (discussed below).
Why not go for SSDs on your master? Remember what we talked about when sizing out innodb_log_file_size? For writes, MySQL can use mainly sequential I/O by taking advantage of a correctly sized log file. Sequential I/O is fast, even on rotational disks, so for a write-only master database server, it’s not really necessary to pay the price for SSDs.
Put your Master Server’s disks into a RAID!
Don’t play with fire. Your drives will fail, usually at the worst time, and will cause downtime.
Don’t use RAID-5!
The cost/GB is tempting in a RAID-5 but it’s too slow to use on a high-volume database server. If you’re working on the cheap, use a RAID-1.
Do use a RAID-10
RAID-10 is combination of RAID-1 and RAID-0. RAID-0, by itself, offers the best performance but is dangerous because losing a single disk will cause downtime. In RAID-10, two RAID-0’s are mirrored with RAID-1. Losing a disk won’t cause any downtime.
RAID-10’s downfall is that it has a bad cost/GB ratio. For example, four 600GB drives in a RAID-10 (2.4TB of raw space) will only yield a 1.2TB RAID array.
Use hardware RAID Controller
Don’t mess around with Software RAID. It’s not worth it. Investing in hardware RAID for your master server is the right move, from both a speed and durability point of view. Why hardware RAID?
· RAID cards have internal memory (often around 512MB) that is used to cache data before writing it to a disk. This makes fsync (and subsequently, any write to a disk) very fast.
· Good RAID cards offer a battery or capacitor backup, which guarantees that the data inside of the internal memory will get written to the disk after loss of power.
I really like the Adaptec 5405Z RAID card. It’s PCI-Express, has a 512MB write cache + 4GB flash cache, can connect up to 256 drives, and works great with Linux.
Solid-State Drives
For your slave MySQL servers, SSDs are where it’s at. Your slaves are going to be handling an unrelenting workload of random reads- which rotational disks are very bad at. On the other hand, SSDs are several orders of magnitude faster than rotational disks are at random I/O. It’s not uncommon for an SSD to push 30,000 random IOPS while your typical hard drive can barely do 200 IOPS with the same workload.
The downside of SSDs is that they’re expensive. The prices are coming down, especially in the consumer market, but price per GB is still high.
One consideration to make when looking at SSDs is that the performance between brands and products can be VASTLY different. You can’t compare just GBs anymore, you have to look at the raw IOPS performance. Some companies make 256GB SSDs with 5,000 IOPS and others with 500,000 IOPS.
Flash Wear
Due to the underlying technology that’s used to make SSD drives, it’s possible to wear them out if you do heavy writing to them. The topic of wear endurance is pretty controversial. Depending on the manufacturer and type of flash-memory used, it’s hard to wrap your head around it and get a definitive answer.
My conclusion: I don’t worry about it. Our slaves are replaceable and with our HAProxy load-balancing setup, a crashed slave doesn’t create any downtime.
If you’re worried about it, one way to mitigate the problem is to write your InnoDB Log Files and Binary Logs on a separate, non-SSD drive. You can change the location of the log file location with the innodb_log_group_home_dir setting and similarly, the location of the Binary Log can be changed with the log_bin setting. Because the binary log files store temporary data and only depend on sequential writes, non-SSD drives can be fast enough, without wearing down your flash drives.
If you’re really worried about flash wear, the easiest solution is to look for the most durable types of flash drives. The biggest differentiator between flash storage is the type of storage cells used- SLC (Single Layer Cell), MLC (Multi Layer Cell), and (less commonly) TLC (Three Layer Cell).
SLC Flash Storage can only hold one bit per cell, while MLC holds two bits per cell and TLC can hold three. MLC and TLC have a capacity advantage because they can store more data in a single cell, increasing storage density and reducing costs.
The downsides to MLC and TLC, though, is that with more “states” represented in a single cell, it needs to be more exact. Everyone loves the glass-of-water analogy here, so let’s use that.
Imagine that a cell of flash storage was represented by a glass of water. If it was an SLC cell, and only had to store one bit of data, you could do that pretty easy. An empty class would be 0 and a full glass would be 1. Even if the glass got inaccurate over time, and a little water was leftover when emptying it, you could still assume that it’s empty (0), if there was a little bit of water left in the bottom.
Now imagine if the glass of water was an MLC cell. Now you need to represent 2 bits in a single cup. How would you do that? Well, maybe an empty glass would be 00, 1/4 full would be 01, 1/2 full would be 10, and completely full would be 11. It’s doable, but your measurements need to be more precise— if there was a little water leftover in the empty cup, you might get confused whether or not it’s empty (00) or 1/4 full (01). Add in TLC, needing to have 3 bits in a single cell, and the need for precision gets even more demanding.
So, if flash wear is a big deal for you, SLC is the way to go. You’ll pay for it though, it can be up to 5x more expensive and typically tops out at a lower drive capacity.
|
Cell Type |
Lifespan per Cell (number of erase cycles) |
|
SLC |
100,000 |
|
MLC |
10,000 |
|
TLC |
5,000 |
RAID
It’s not necessary to use RAID on your slave servers (since we don’t need the drives to sustain failure- we just replace the drive and rebuild the slave), but you can use it to increase your disk space or improve performance.
It’s often cheaper to buy 2x smaller high-end SSDs then 1x larger high-end SSDs. For example, if you need 400GB of SSD storage, you could either buy a single 400GB drive or 2x 200GB drives and put them in a RAID-0.
You can also use this technique to squeeze more IOPS out of your SSDs. Two SSDs in a RAID-0 will offer almost 2x the number IOPS when compared to a single drive.
Network Card
Wait, really? Having a fast network card is important on a MySQL server? Yeah it is! Our MySQL slaves can easily push out over 100mbps of traffic during peak hours, so it’s important to get the fastest ones your network can support (1000mbps in our case). Additionally, I recommend bonding the cards together to handle network failure and increase throughput.
What if you don’t have as much MySQL traffic? I still recommend getting the fastest network cards that your network can support. You’ll thank me when you have to restore a slave with your 500GB MySQL backup. On gigabit, that’s only about an hour but over 12 hours on your standard 100mbps LAN.
Online Schema Changes
A big weakness of MySQL is that it’s very difficult to make schema changes (add/remove columns or indexes) on tables when they get very large.
The reason for the slowness is twofold- MySQL has to scan and modify every row in the database to add a new column. It does this by copying the data into a temporary table, which causes high I/O usage and takes a significant amount of time (hours to days on hundred-million row tables that use hundreds of GBs of disk space). On top of that, while the data is being copied, MySQL holds an exclusive write-lock on the table, meaning that no new data can be added or changed in the table during this (extremely) long process.
This limitation is one of the reasons why companies are moving towards schema-less databases like MongoDB and Cassandra - you can add columns at will without having to painstakingly alter the database.
Reddit has talked about how they work around this issue by structuring their database differently. This is a solution I really dislike, but what they essentially do is turn MySQL into a key-value store.
Imagine you had a normalized database that looked like this:
|
id |
username |
name |
location |
|
1 |
steve |
Steve Corona |
Charleston, SC |
|
2 |
rob |
Robert Johnson |
New York, NY |
Using Reddit’s structure, they would store it as denormalized:
|
id |
key |
value |
|
1 |
username |
steve |
|
1 |
name |
Steve Corona |
|
1 |
location |
Charleston, SC |
|
2 |
username |
rob |
|
2 |
name |
Robert Johnson |
|
2 |
location |
New York, NY |
The advantage is simple: You can create a new column by simply using it. You don’t have to modify your MySQL table at all.
There are a bunch of things wrong with this design- The data is denormalized, so it’s going to use way more disk space because you have to store the key text for every “row”, and you can’t enforce database constraints like foreign keys, default values, or types. I’m sure if you spent more time thinking about it you could probably find 10 other reasons why this is wrong.
But none of that matters. The real reason why storing your data this way is a bad design is because you’re using the wrong tool for the job. If you want to use a key-value store or a schema-less database, USE A KEY-VALUE STORE OR SCHEMA-LESS DATABASE. We don’t use hammers to put screws into the wall, and likewise, we shouldn’t use MySQL for something it’s not designed to be. Use the right tool.
The least frustrating way to make schema changes
If you’re stuck with MySQL, what’s the easiest way to make schema changes without locking up your entire database cluster and subsequently taking down your entire website? I’m going to outline the best approach below.
Pretend you have a table, foobar, and you want to add a new column to it, username. Our database cluster has five MySQL slaves and a single master.
The SQL for making the changes to foobar is ALTER TABLE foobar ADD COLUMN username VARCHAR(25).
We want to add the username column to foobar completely seemlessly, without causing any downtime for our users. If we were to run the ALTER TABLE statement on the master server, it would get replicated to the slaves immediately, completely locking the foobar table. To make matters worse, MySQL Replication is single-threaded, so the slaves would start to lag behind while they were waiting for the ALTER TABLE to finish. Obviously, this is not acceptable given our constraints.
The best way to handle the schema change is to take each slave, one-by-one, and cut off all traffic to it by removing it from our HAProxy pool. Once a slave is removed from service, we turn off MySQL replication, run the ALTER TABLE on it individually, wait for it to finish, restart replication, and put it back into the pool. It’s a time-consuming process, but prevents any website downtime.
But there’s still the little matter of making the change to the master server. The process here is similar, though. We manually promote one of the database slaves to be the master, demote the master to a slave, and run the ALTER TABLE command. When it’s done, the old master is promoted again and your entire database cluster now has the new schema without any downtime.
This process is extremely painstaking and time consuming, but it’s really the only way to make the schema changes without locking the table in production. It also gives you good practice for getting comfortable with master/slave promotion and demotion outside of a crisis.
If you’re locked into MySQL but absolutely need instant schema changes, there’s a commercial storage engine for MySQL called TokuDB that can add new columns and indexes without locking your table and degredating performance. TokuDB can also compress your data up to 25x and reduce I/O usage- in my tests a billion row 160GB InnoDB table only weighed in at 30GB in TokuDB, with better performance. Downsides? It costs $2500/server/year (but is free to try) and doesn’t work with Percona.
Further Topics
Writing this chapter was like going down a rabbit hole. As I was writing and researching topics, I’d constantly run into other sections that I wanted to talk about. In order to prevent myself from going on a thousand tangents and actually finish the damn thing, I had to limit the amount of topics that I covered.
Here’s a list of the other topics that I wanted to cover. I might add a section for some in future edits or revisions of the book, so if you’re particularly interested in one, send me an email to cast your vote.
mysqlproxy
Proxy server for MySQL that lets you write scripts in Lua to inject behavior. It can be used for MySQL R/W splitting, slave load balancing, etc. More information here.
Optimizing Queries with explain
MySQL Connection Pooling w/ mysqlnd_mux
Asynchronous MySQL Queries
How to quickly bootstrap a MySQL Slave
Tumblr JetPants
Benchmarking MySQL with sysbench
All materials on the site are licensed Creative Commons Attribution-Sharealike 3.0 Unported CC BY-SA 3.0 & GNU Free Documentation License (GFDL)
If you are the copyright holder of any material contained on our site and intend to remove it, please contact our site administrator for approval.
© 2016-2026 All site design rights belong to S.Y.A.