Scaling PHP Applications (2014)
Cache Server: Using Redis
A common way to improve the performance of your PHP application is to use an in-memory object cache to speed-up expensive to calculate by calculating it once and persisting the result between HTTP requests. The data can come from any slow source- 3rd Party APIs and Filesystems just to name some, but more often than not, the data is coming from your database.
In an ideal world, the database’s query cache would handle this sort of thing for us. However, if you recall from Chapter 6, we talked about how MySQL’s query cache is all but useless. The reason is that it completely erases the query cache after every INSERT or UPDATE, making it all but useless for tables with even a moderate amount of database writes.
Another advantage of using a separate object cache layer is that with simple key hashing, you can distribute the cached objects across multiple servers, allowing you to use memory from every machine in your Memcached or Redis cluster. MySQLs cache, on the other hand, can only take advantage of the resources of a single machine. That’s not to say that tuning MySQL isn’t important, it’s just that having an object caching system complements MySQL with improved performance.
Choosing between Redis, Memcached, and APC
We have a couple of options available to us when looking for an in-memory object cache. Each one is useful and excels for different needs, so let’s talk about each of them.
APC
In the Application Server chapter, we discussed using the PECL APC Extension as a mechanism for speeding up your application by caching the compiled bytecode of your source. On top of that, APC also has an interface for storing and retrieving data between PHP requests using shared memory, which can be used as an object cache.
Here’s an example of how we can use APC. Imagine that in one script, you have this code, which you run.
1 <?php
2 $array = array("foo1", "foo2", "foo3");
3 apc_add("foobar", $array);
And in separate script, that runs independently from the code above:
1 <?php
2 // $array will contain array("foo1", "foo2", "foo3") after
3 // fetching it from APC.
4 $array = apc_fetch("foobar");
Using apc_add and apc_fetch, you’re able to store and retrieve data lasts longer than the lifecycle of a normal PHP request. Of course, there are no guarantees and data can come and go, so it should only be used for re-calculatable cache data.
APC offers atomic counters and expiration times, too, which gives it a similar feature set as Memcached.
The biggest pro of using APC is that it’s extremely fast. In fact, it’s faster (at a micro level) than Redis or Memcached. Why? It uses shared memory within the PHP process, so it doesn’t need to go out on the network or communicate with a separate server. It’s biggest asset, however, is also it’s biggest weakness. Because the shared memory is tied to a parent PHP-FPM process, each server has to maintain it’s own separate cache data, effectively making it non-distributed since all cache data needs to be re-calculated and re-stored for each server.
Furthermore, because APC relies on shared memory, it only works with PHP-FPM or mod_php. A PHP script running on the command line or in a cronjob won’t be able to see the shared memory because it doesn’t share the same parent process as your PHP-FPM workers.
Does this make APC useless? Not at all. It’s highly useful for caching small pieces of data that don’t take too long to compute. For example, I’ve used it with some success for caching configuration files. Without APC, the configuration files (stored in YAML format) would have to be re-read and parsed on every request. Instead, since the files don’t change that often, I was able to parse the YAML files once and store the result in APC. The code looked something like this:
1 <?php
2 function load_config() {
3 $config = apc_fetch("config");
4
5 if ($config === false) {
6 $config = yaml_parse_file("app/config/config.yml");
7 // Store the parsed file in APC for the next access.
8 // The 3rd parameter is an automatic expiration time.
9 apc_add("config", $config, 86400);
10 }
11
12 return $config;
13 }
It’s worth noting that the APC cache is never persisted to disk. That means if PHP-FPM crashes or gets restarted, the cache will be wiped clean.
Memcached
Memcached is the ol’reliable object cache software. It seems like all of the big guys use it- Twitter, Facebook, and 37Signals to just name a few. Memcached really pioneered the idea of a separate, distributed cache layer for your application and was really the only option a few years ago.
Memcached is similar to APC in a lot of ways, except that it runs as a threaded C server, so you need to go over the network to communicate with it. Compared to APC, communicating over the network is obviously slower but still ends up being extremely performant to the tune of 500,000+ operations per second. The major advantage is that with some simple hashing, multiple Memcached servers can effectively be grouped together to distribute your cached data and provide you with the resources of all of the servers combined. That is to say, if you had 10 Memcached servers, each with 4GB of memory, you’d effectively have a 40GB in-memory cache available to you.
Memcached provides all of the same features as APC, including CAS (check-and-set) tokens which allow you to avoid race-conditions by only allowing new values to be the written if they key hasn’t been modified.
That being said, I’m not going to cover Memcached in this chapter because Redis, which was released a couple of years ago, has far outpaced Memcached in terms of features and reliability while offering similar performance (aka, damn fast).
Stuck on Memcached?
If you like Memcached, or you’re already using it and stuck with it, I’ve included a short bonus chapter on Memcached. But you should seriously consider switching to Redis. It’s a drop in replacement.
Redis
Redis is where it’s at. If you’ve never used it before, you’re in for a treat- it’s got enough coolness to make your inner geek excited. Just like Memcached and APC, it can do key/value caching with GET and SET primitives, but it also adds other data types like lists, hashes, and sorted sets. There are literally hundreds of commands, and I won’t be able to cover them all here, so check out the Redis documentation to play with the commands. There’s even an in-line console that let’s you play with each command right on the website.
Remember, the entire dataset stored in Redis MUST fit into memory. While Redis does persist your data to disk, it only reads from disk during startup so you must always have more memory than data.
Why is Redis better?
· Memcached/APC data is never saved to disk, meaning that if a server crashes or gets restarted, you start with a blank slate. Redis, on the other hand, can be configured to sync to disk, allowing you to always have a warm cache on-hand. When you’re site becomes dependent on having a fast cache, there are serious performance implications to blowing away your entire cache because of a restart. (While you can configure Redis to sync after every write, when you’re using it as a cache it’s better to allow for some data-loss in order to keep it fast.)
· Memcached/APC only offer key/value primitives, GET and SET, and atomic counters. While you can hack extra data types, they are often unsafe and full of race conditions. Redis, on the other hand, includes lists, sets, sorted sets, hashes, master/slave replication, transactions, and even lua scripting. Since I won’t go over every single Redis command, you can check out the full documentation here.
· Lastly, Depending on which version of libmemcached you’re using (mainly older versions that were bundled with Ubuntu 10.04), there are some serious bugs with the way that timeouts are handled. As in, they are completely broken. This bit us hard, a single instance of Memcached going down would block all of our PHP-FPM processes and take down the site. The C hiredis library that most Redis client use, on the other hand, has been reliability solid because it’s written by antirez, the creator of Redis.
Redis Commands
Redis offers way more than just the typical set and get operations that we’ve seen with Memcached and APC. I’ll briefly cover them here with some examples and common use-cases. The full command list is available here.
Simple Operations
The most basic features give us exactly what APC and Memcached have- simple GET and SET operations.
1 <?php
2
3 $r = new Redis;
4 $r->connect("127.0.0.1");
5
6 $r->set('key', 'foobar');
7 $r->get('key'); // returns foobar
8
9 $r->setex('key', 100, 'foobar'); // set with 100 second expiration
10 $r->psetex('key', 100, 'foobar'); // set with a 100ms expiration
11
12 $r->setnx('key', 'foobar'); // set only if key doesn't exist
13 $r->delete('key');
We have atomic counters, too!
1 $r->incr('views'); // 1
2 $r->incr('views'); // 2
3 $r->incrby('views', 10); // 12
4 $r->decr('views'); // 11
Other single key commands worth exploring- ttl, expire, exists, expireat, rename, type, and persist.
GET and SET commands are great for storing singular data. The increment and decrement commands are atomic (meaning, you don’t have to worry about race conditions.)
Hashes
Redis can store hashes, which are pretty much like a PHP associative array, and can be used to group information together by key.
1 <?php
2
3 $r->hset('user:1', 'name', 'Steve');
4 $r->hset('user:1', 'username', 'scorona');
5
6 $r->hset('user:2', 'name', 'John');
7 $r->hset('user:2', 'username', 'jdoe123');
8
9 $r->hget('user:2', 'name'); // returns John
10 $r->hlen('user:2'); // returns number of keys (2)
Other hash commands worth exploring- hgetall, hexists, hvals, hkeys, hincrby, hmset, hmget, hdel, and hsetnx.
Hashes can be used just like SET and GET, but are great (and more efficient+convenient) for storing data that can be grouped together by a common key. For example, if we were storing user data in Redis, it makes sense to use a hash because the data can be grouped together by the user id.
Lists
A Redis List is like a numerically indexed array in PHP.
1 <?php
2
3 $r->lpush('key', 'foo'); // returns 1
4 $r->lpush('key', 'bar'); // returns 2
5 $r->rpush('key', 'test'); // returns 3
6 $r->lsize('key'); // returns 3
7 $r->lindex('key', 0); // returns bar
8 $r->lset('key', 1, 'testiest');
Other list commands- lpushx, lpop, lsize, ltrim, lrange, lrem, and more.
Lists are great for storing, well, lists of data. You can add, remove, trim, push, and pop items from the list all atomically. I love to use lists for time ordered data, because they are naturally sorted by insertion time when you use lpush.
A great use case is for notification feeds, where you have a list for every user and push new notifications to the front of the list.
Lists are also the basic primitive that our queuing system, Resque, uses as it’s underlying data structure.
Sets and Sorted Sets
Sets are similar to lists in that you can store a bunch of data in single key. The main differences are that sets are completely unordered and can not contain any duplicate data. Unlike lists, sets give you more robust features- checking to see if a value is inside of a set, unioning sets together and even calculating intersections and differences. There is a lot of power here.
1 <?php
2
3 $r->sadd("names", "steve", "john", "alice");
4 $r->scard("names"); // returns 3
5 $r->sismember("names", "steve"); // returns true
On top of sets, we also have sorted sets which are slower but allow you to order your set as they are normally completely unordered.
One use case for sets is storing lists of data that you want to guarantee is unique- usernames, category names, or titles. You can quickly use sismember to determine if a value is part of your set.
Transactions
You can also group commands together into a transaction. Transactions are faster for issuing a lot of commands because it only involves one roundtrip to Redis.
1 <?php
2
3 $r->multi()
4 ->set("key", "value")
5 ->set("foo", "bar");
6 ->hset("user:2", "name", "Steve")
7 ->exec();
Transactions also run as an atomic unit, but you can disable that by passing Redis::PIPELINE to multi(), which transmits the commands to the server in one block, but doesn’t guarantee that the commands will execute atomically.
Pub/Sub
Redis includes a really cool publish and subscribe feature that’s great for doing cross-process, asynchronous communication.
Imagine we had two scripts, in the subscriber:
1 <?php
2
3 $r->subscribe(array('updates'), function($r, $channel, $data) {
4 echo "Received {$data}\n";
5 });
And in the publisher:
1 <?php
2
3 $r->publish('updates', "Some new data");
The subscriber would receive our message from the publisher, like magic. Multiple subscribers can listen into the same channel and you can have multiple channels. It’s pretty powerful and can be leveraged for backend script communication, implementing a chat room, and for streaming services over websockets.
The importance of Atomic Operations
All commands in Redis are atomic. What that means is that each command is isolated and doesn’t impact the state of any other commands. Let’s look at an example of where this matters (and why atomic counters are important).
The niave way of counting might look like this:
1 $v = $r->get("key"); // $v is 1
2 $r->set("key", $v+1); // Now setting "key" as 2
That would be wrong, though, because if another process changed the value of key to 2 between our get and set commands running, we’d set it at 2 again and lose the increment.
In Redis (and Memcached and APC), we can solve this by using atomic counters. Effectively, we tell the counter how much we want to increase the counter by, and it does the math on the server.
1 $v = $r->incr("key"); // Returns the new value of "key"
With Redis, the watch() command lets you do check-and-set operations, so while using incr() is preferred, you could fix the first example like this:
1 $ret = false;
2 while ($ret == false) {
3 $r->watch("key");
4 $v = $r->get("key");
5
6 // Will return false if "key" was modified by another client
7 // between watch() and exec().
8 $ret = $r->multi()->set("key", $v+1)->exec();
9 }
Performance Limitations of Redis
Unlike Memcached (which is multi-threaded), Redis is single-threaded and is evented. What that means is that each Redis server can only take advantage of a single CPU core. This isn’t usually a problem because most Redis commands are O(1) or O(n), so they don’t burn up much CPU. In the case of needing to scale your Redis CPU usage, you can run multiple Redis daemons, using different ports, on the same server.
Redis uses more memory to store the same data on a 64-bit system than on 32-bit system because pointers are 8 bytes on 64-bit systems and 4 bytes on 32 bit systems. Each item that you store in Redis uses atleast one pointer (3 for lists, 8+ for a sorted set), so if you have lots of small keys the memory difference can become significant.
One way around it is to run your system in 32-bit mode with PAE (Physical Address Extension), which allows your kernel to address 36-bits of address space (64GB of memory). Even with PAE, each process can only see 4GB of memory, so you’d have to run 16 separate Redis daemons to use all of the free memory.
In practice, does it matter? Not really. Suck it up, use a 64-bit system, and just add more memory. PAE is a kludgy kernel hack anyways.
Installing Redis from Dotdeb
Ubuntu bundles an old version of Redis and the Redis website only provides the source code, so we need to install it from Dotdeb. Of course, you could compile Redis from scratch, but I prefer to use packages when possible.
Setting up Dotdeb is as easy as adding another apt source (you can skip this if you already used DotDeb for installing PHP 5.4).
1 > vi /etc/apt/sources.list.d/dotdeb.list
2
3 deb http://packages.dotdeb.org squeeze all
4 deb-src http://packages.dotdeb.org squeeze all
5
6 > wget http://www.dotdeb.org/dotdeb.gpg
7 > cat dotdeb.gpg | sudo apt-key add -
8 > apt-get update
Installing Redis is as easy as running apt-get.
1 > apt-get install redis-server
2 > service redis-server start
At the time of writing, Redis 2.6 was just released. It’s preferable to always run the latest release because new features and optimizations are always being added between versions.
Installing the phpredis C extension
There are some pure PHP redis libraries, like Predis and Redisent that do a good job of implementing a Redis library without any C code, but it comes at a cost- they’re 3-4x slower.
The best C extension for connecting PHP to Redis is phpredis- it’s frequently updated and works very consistently. Unfortunately, it doesn’t use hiredis yet, but it still works very well.
Note: PHPRedis is not included in the PECL Repository. You may skip the installation steps below by just using pecl install redis.
Installing it takes a tiny bit more work than usual, because it’s not in the official PHP PECL repository.
1 # You might not need these if you already have them
2 > apt-get install git build-essential
3
4 # First install igbinary
5 > pecl install igbinary
6
7 > git clone git://github.com/nicolasff/phpredis.git
8 > cd phpredis
9 > phpize
10 > ./configure --enable-redis-igbinary
11 > make && make install
12 > vi /etc/php5/conf.d/phpredis.ini
13 extension=redis.so
After that, you’ll need to restart PHP-FPM.
|
|
What’s igbinary? Igbinary is a replacement for the out-of-the-box PHP serializer. Normally, PHPs serializer is string based and serializes objects into an ASCII-based format. Not only is this slow, but it’s also not space efficient, which makes a big difference when you’re storing PHP objects (such as arrays, database results, and models in your cache). Igbinary, instead, replaces the serializer with one that outputs binary instead. |

Tuning Redis for Performance
Luckily, Redis has a very well documented configuration file in /etc/redis.conf, so I don’t need to go over each and every option here. You can just read the configuration file (the entire version is available here). I will cover the most important settings, but luckily there aren’t many.
Redis Persistence
Redis has a very unique persistence setup and stores data to disk in a very different way than a traditional database like MySQL. In fact, Redis actually has two methods of persistence that can be used by themselves or together (recommended). Because Redis stores the entire dataset in memory at all times, and the unique way it stores data to disk, it’s less dependent on disk speed than traditional databases.
RDB
The RDB persistence method is used to snapshot the entire dataset stored in Redis and put it on disk. When a RDB snapshot is taken, it snapshots the data into a new file and deletes the old RDB file. That is to say, RDB files are never updated, so saving a new snapshot only uses very fast sequential I/O. However, because taking a new snapshot requires copying the entire dataset to disk, it needs to happen in the background since the dataset can often be several gigabytes in size. Because of the limiting factor, when using purely RDB snapshots as your persistence method, it’s possible to lose data if Redis restarts before the most up-to-date snapshot can be written to disk.
Redis can create RDB snapshots manually with the save or bgsave command and will also create one when properly shutdown with the shutdown command. Likewise, we use the save setting in redis.conf to turn on automatic snapshotting. The default setting looks like this:
1 save 900 1
2 save 300 10
3 save 60 10000
The save setting takes two parameters, # of seconds and # of changes. With the settings above, it will cause Redis to create a snapshot after 900 seconds if more than 1 key has changed, after 300 seconds if more than 10 keys have changed, and after 60 seconds if more than 10,000 keys have changed.
RDB is convenient because it’s fast and space-efficient- great for taking backups. To take a backup, you just make a copy of the dump.rdb file. Super easy. The disadvantage, though, is that you can lose data- up to 15 minutes with the default settings.
AOF
AOF persistence, or append-only file, is similar to the InnoDB log file in MySQL. Any write command (set, hset, lpush, etc) sent to Redis is written into a log file which can be replayed in case of crash. Redis allows you configure how it handles calling fsync on the AOF via theappendfsync setting. It can always fsync, which is safest but performs the worst because fsync is an expensive system call. That being said, when appendfsync is set as always, you will not lose any data in the event of a crash. If you’re okay with losing up to second of data, you can setappendfsync to everysec and Redis will fsync the AOF around once every second. You can also set it to no, which relies on Linux syncing the AOF to disk whenever it decides to. everysec is usually the best option if some dataloss during a crash is okay.
Before Redis 2.4, the AOF would just grow and grow unless you manually told Redis to rewrite it. Now it will handle this for you automatically. Lastly, if you use AOF with RDB, during an AOF rewrite, Redis will truncate the starting point of the AOF to the last RDB snapshot and keep the AOF small.
Tuning Linux
We can tune Linux for Redis similarly to how we tuned it for MySQL. I won’t repeat them here since they’re exactly the same.
1. Turn off Filesystem Access Times
2. Use XFS
3. Increase Open Files
4. Tune Swapiness
5. Change I/O Scheduler to anything but CFQ
Notable redis.conf Settings
maxclients
The maximum amount of concurrently connected clients. Set to 10,000 by default. Usually enough. Increase it if you have a very, very busy Redis server.
maxmemory
The maximum amount of memory for Redis to use. It’s always a good idea to gives your Redis server a hard cap, I recommend 95-97% of your servers memory.
maxmemory-policy
The behavior that Redis should use when it hits maxmemory. There are a couple of different settings, but volatile-lru is almost always what you want. It will remove the less-frequently used keys that have an expiration time, but never remove keys without an expiration time. This is why you should always attach an expiration time to data that can be regenerated, even if the expiration is years in the future.
|
maxmemory-policy |
Behavior |
|
volatile-lru |
Removes only keys w/ an expiration, least recently used |
|
allkeys-lru |
Removes any key, lease recently used |
|
volatile-random |
Removes only keys w/ an expiration, randomly |
|
allkeys-random |
Removes any key, randomly |
|
volatile-ttl |
Removes only keys w/ an expiration, closest to expiring |
|
noeviction |
Don’t remove any data, just return an error on writes |
appendonly
By default set as no, it’s almost always a win to use both RDB and AOF, so set it to yes.
Choosing the right hardware
Redis will benefit from a few smart hardware choices. Memory is the biggest factor because all of the data must be able to fit into memory. As far as CPU, you want to choose a modern, high frequency CPU. Cores make little to no difference (because Redis runs as a single process), so choose more GHz over more cores.
If you’re using the persistence feature in Redis (you should), you’ll benefit from having your data file on a RAID 1 or RAID 10, but SSDs aren’t necessary. Redis syncs the datafile to disk in the background, so slower disks won’t really impact performance.
It’s helpful to use a second disk for the appendonly log file, since it will use a steady stream of sequential write IOPS. Again, not necessary to have an SSD here if you’re using appendfsync everysec. If you use appendfsync always, a SSD or Hardware RAID w/ Battery Backup for the log file will be beneficial due to faster fsyncing, which subsequently speeds up writes to Redis.
Our standard setup is a Xeon 1270 (3.4GHz) with 64GB of Memory and a RAID 1.
Scaling Redis to Multiple Servers
There are two common ways of scaling Redis past a single machine, Master/Slave Replication and Sharding. Both methods allow you to scale to multiple machines, but they scale differently depending on your use of Redis. Both techniques, however, can be used together to provide the best case scenario of fast reads, writes, and redundancy. Redis Cluster is going to be released sometime in the future and will make scaling Redis even easier, but don’t hold your breath- it’s been pushed back 2 or 3 times already.
Replication
The easiest way to scale is by using the built-in Master/Slave replication. It’s similar to MySQL- one Redis server is designated as a master and all writes must be sent to it, which get replicated to multiple read-only slaves. Replication solves two problems- it scales reads (but not writes), useful if you have a read heavy workload or heavily use the expensive functions in Redis (like SORT, SINTER, etc). On top of that, Replication also adds a layer of redundancy and failover, since you’re dataset is available on multiple machines.
The nice thing about Redis replication is that it’s extremely easy to setup and use.
On your slave, you just need to add slaveof 192.51.100.10 6379 to your redis.conf file (of course, replace 192.51.100.10 with the Master’s IP address) and the slave will bootstrap itself when it’s restarted. Yes, this includes syncing itself with the master, so you don’t need to worry about migrating or transferring data manually. Way easier than MySQL!
On your slave, make sure you have slave-read-only set to yes, so you don’t accidentally write any data to the slave directly.
Sharding
Sharding is a common technique for splitting up data across multiple servers by using a consistent hash algorithm to determine where a specific piece of data is stored on a cluster of servers. By sharding your data, you’re able to split your data across multiple servers and scale horizontally. Since each shard in your cluster is only handling a subset of your entire dataset, the amount of server resources available to your cluster grows as your add more machines. For example, if you sharded your data across two Redis servers, each with 16GB of memory, you will effectively be able to store up to 32GB of data in Redis.
Sharding is done on a per-key basis. Each key that you use to store a piece of data is hashed and the value of that hash is used to determine which server to send the data to. Likewise, when you want to retrieve a piece of data using its key, the key is hashed and the value is used to determine which server to get the data from. Because of this, a single key, even if it’s a set or a list, will always be stored on a single server. Even if the list has a million values in it. One key, one server. Keys are split up, not data.
How consistent hashing works
A quick sidetrack, in case you aren’t familiar with consistent hashing. Pretend you had 5 servers and you wanted to shard your data across them. How can we store data to these 5 servers and later retrieve the data from them without knowing where the data is stored? Of course, we could pick one randomly and later ask all of them for the data, but that’s inefficient and doesn’t scale to thousands of servers.
What we can do, however, is create a hashing algorithm that uses the key to figure out where to store the data. A simple algorithm might use the first letter of the key to determine which server should store the data. If the key starts with a-e, send the data to server01, f-j to server02, k-o toserver03, etc. When you want to retrieve the data, you’d run the same algorithm on the key and it’d tell you which server to pull the data from. Obviously, real-life hashing algorithms are more complicated, but the concept is the same.
Sharding with phpredis
With Redis, Sharding is handled purely on the client-side by the library being used. phpredis supports sharding using the RedisArray class. It’s pretty easy to use, you just pass in array of hosts to the constructor:
1 <?php
2 $r = new RedisArray(array("192.51.100.11",
3 "192.51.100.12",
4 "192.51.100.13"));
5
6 $r->set("foobar", "some_value");
7 $r->get("foobar");
8
9 $r->lpush("list", "some_data");
You can use all of the normal Redis commands on a RedisArray, the key will be hashed and the command will be automatically be sent to the correct server.
Transactions are run on a single host
You can no longer use transactions that work on multiple keys if the keys are going to be located on multiple servers. When you use multi(), you have to pass in the Redis host to use by using the _target() function.
1 <?php
2 $r = new RedisArray(array("192.51.100.11",
3 "192.51.100.12",
4 "192.51.100.13"));
5 $host = $r->_target("foobar")
6
7 $r->multi($host)
8 ->get("foobar")
9 ->set("foobar", "123")
10 ->set("another_key", "123")
11 ->exec();
See how we lookup the host of the foobar key by using _target()? Everything in that transaction will get run on whatever value is returned for $host, even set("another_key", "123"), which may not normally hash to the value of $host.
“The Dogpile”

Creative Commons Image, from http://www.flickr.com/photos/85622685@N08/7934519880/
When you use Redis to cache data that’s database intensive to calculate, it’s important to avoid a common “gotcha” called the dogpile. Let’s setup a scenario.
Imagine you have a busy site and on the homepage you show the latest photos from your most popular users. Unfortunately, as the amount of users and photos grows, the query to show the most popular photos becomes slower and slower, because the amount of data the query has to process grows into the millions and tens-of-millions. Now, the query takes over 10 seconds to run and it not only significantly slows down the speed of your homepage (which gets blocked waiting for the query), but also hammers your database servers.
At first, you solve this problem naively! Let’s just cache it! Your solution might look something like this:
1 <?php
2
3 $r = new Redis;
4 $r->connect("127.0.0.1");
5
6 $popular_photos = $r->get("popular_photos");
7
8 if ($popular_photos === false) {
9 // Calculate the popular photos from MySQL
10 $popular_photos = expensive_database_call();
11
12 // Store the data with a 10 minute expiration
13 $r->setex("popular_photos", 600, $popular_photos);
14 }
And this would work great- if you only had exactly one person accessing your site at a given time. We set an expiration, so after the first run, the popular photos get stored in Redis for 10 minutes. Once they expire, the if statement gets run and we regenerate the popular photos. But remember- this query takes 10 seconds to run. While expensive_database_call() is running, every incoming web request is going to jump through and also call expensive_database_call(), since the data isn’t in Redis yet. Hence the dogpile.
The easiest way to solve the problem is just to remove the if statement entirely and call expensive_database_call() from a cronjob. It removes the dogpile problem completely.
It’s not always possible to solve this problem with a cronjob, though, so an alternative solution is to create a Redis lock (using setnx), which only permits one client to run expensive_database_call().
1 <?php
2
3 $r = new Redis;
4 $r->connect("127.0.0.1");
5
6 $expiration = 600;
7 $recalculate_at = 100;
8 $lock_length = 20;
9
10 $value = $r->get("popular_photos");
11 $ttl = $r->ttl("popular_photos");
12
13 if ($recalculate_at >= $ttl && $r->setnx("lock:popular_photos", true)) {
14 $r->expire("lock:key", $lock_length);
15
16 $value = expensive_database_call();
17
18 $r->setex("popular_photos", $expiration, $value);
19 }
Here’s how it works:
1. We pull from the popular_photos key as normal, but also retrieve the TTL, which returns the number of seconds left before the key expires.
2. The expiration is set at 600 seconds, but when popular_photos is 500 seconds old and only has 100 seconds before it expires, we kick off the process of refreshing the data.
3. $r->setnx("lock:popular_photos", true) tries to create a key to use as a lock. setnx returns false if the key already exists, so only one client will get a true value and enter the if statement.
4. We use the expire command to set a 20 second expiration on the lock- that way, if PHP crashes or times out while the lock is being held, another process can eventually regenerate the data.
5. We call expensive_database_call() and put the refreshed data back into the popular_photos key as normal.
As you can tell, it requires a little bit more leg work than the naive solution, but it alleviates the dogpile entirely- very necessary when you’re going to caching long-running queries.
Russian Doll Caching

Creative Commons Image: http://www.flickr.com/photos/7604548@N07/2577737283/
When I first started using a cache in my web stack, Memcached was still very new and the only option available. Redis wasn’t even in existence at that point, so I didn’t have the luxury of using it. The way I tackled the problem was to cache as many database queries as possible, freeing up MySQL to work on harder queries.
I tackled the problem in a pretty naive way- let’s pretend I had a User model through my ORM. The ORM handled all of the querying and just returned a nice object. The code looked something like this:
1 <?php
2
3 $id = $_GET['id'];
4 $user = $r->get("user:{$id}");
5
6 if ($user === false) {
7 $user = User::find($id); // This issues the SQL
8 $r->setex("user:{$user->id}", 86400, $user);
9 }
Caching this way is called read-thru caching. It relies on expirations to clear out stale data and writing straight to the database will cause there to be stale (possibly, invalid) data inside of our cache.
We can solve the stale data problem by either deleting the user:{$user->id} key when updating the record or updating it.
Deleting the record
1 <?php
2
3 $username = $_GET['username'];
4 $user = User::find_by_username($username);
5
6 $user->city = "New York";
7 $user->save();
8
9 $r->delete("user:{$user->id}");
Updating the record
1 <?php
2
3 $username = $_GET['username'];
4 $user = User::find_by_username($username);
5
6 $user->city = "New York";
7 $user->save();
8
9 $r->setex("user:{$user->id}", 86400, $user);
This isn’t a great solution for all but the simplest cases, though. Reason being- any other cached queries that refer specifically to our User record are going to still be stuck with stale data. Imagine you had a page that showed a list of all the users. You’d use a query like, SELECT * FROM users. If you cached that query and changed one of the users individually, your cached SELECT * FROM users would give you stale data.
Obviously, you can overcome this by purging all of the related cache keys when saving your User model, but that’s gross. You’d need to remember and keep track of all places where the User model can get cached.
Key-based Expiration
Russian Doll Caching, a term made popular by 37signals in this blog post, is a fancy name for Key-based expiration. 37signals caches views (aka rendered HTML) instead of database queries, but the technique is the same. Caching views is less prevalent in PHP because it’s slightly more complex and rendering views is much less expensive in PHP than Rails.
Anyways, Key-based expiration is technique for expiring a group of related cache keys by changing a timestamp in the key anytime data in that group changes, forcing it to be re-fetched from the database. You might be asking yourself- but what about all of that extra data? Since we’re not manually purging old data, won’t it eventually all build up? We rely on Redis’ maxmemory-policy setting, which will remove the most unused keys when it needs to free up memory.
|
|
Configuring the maxmemory-policy setting In the redis.conf file (discussed later in the chapter), you’ll need to configure the maxmemory-policy setting to tell Redis how it should handle an out-of-memory situation. There a few different strategies, buy volatile-lru is the best for key-based expiration. When set as volatile-lru, only keys that have expirations set will be eligible for removal, with the least recently used ones getting booted first. |

It works by building the timestamp into the key-
1 <?php
2
3 $id = $_GET['id'];
4 $slug = $r->get("slug:user:{$id});
5 $user = $r->get("{$slug}:user:{$id}");
6
7 if ($user === false) {
8 $user = User::find($id); // This issues the SQL
9 $r->setex("{$slug}:user:{$id}", 86400, $user);
10 }
In the above example, you’ll notice that we make an extra cache lookup to find the value of slug:user:{$id}. That returns the timestamp of the last time the record was modified. Since we use the return value of that lookup to build our main cache key, {$slug}:user:{$id}, every time it changes, it will stop us from using stale data, and force a pull from the database.
This is what our modified code that updates the database would now look like. Notice that it updates slug:user:{$id} with the latest timestamp, but does not delete any data from the cache.
1 <?php
2
3 $username = $_GET['username'];
4 $user = User::find_by_username($username);
5
6 $user->city = "New York";
7 $user->save();
8
9 $r->set("slug:user:{$user->id}", time());
The power in key-based expiration is that you no longer need to manually manage your keys. You just make sure to update the slugs every time you change data that the group relies on, and it’ll force an expiration. This technique works equally well on both Memcached and Redis.
Taking advantage of Redis
You can take advantage of Redis’ feature set by using it’s hash datatype to use Russian Doll caching without having to deal with the complexities of Key-based expiration.
It’s easier to show you how it works, so let me show you an example. Pretend that in our code, we have three related queries.
1. SELECT * FROM images WHERE id = {$image_id} AND user_id = {$user_id}
2. SELECT * FROM images WHERE location_id = {$location_id} AND user_id = {$user_id}
3. SELECT * FROM images WHERE user_id = {$user_id}
These queries are all based around the $user_id. Here’s how one of the queries’ code would look using hash-based expiration instead of key-based.
1 <?php
2
3 // For Images @ at a Location
4
5 $loc_id = $_GET['location_id'];
6 $user_id = $_GET['user_id]'
7
8 $image = $r->hget("user:{$user_id}", "location_id:{$location_id}");
9 $query = "SELECT * FROM images WHERE location_id = {$loc_id} AND user_id = {$u\
10 ser_id}";
11
12 if ($image === false) {
13 $image = Image::where($query);
14 $r->hset("user:{$user_id}", "location_id:{$location_id}");
15 $r->expire("user:{$user_id}", 86400);
16 }
Two things worth noting here- The first is that we’re caching the query inside of a hash, user:{$user_id}, instead of regular key. The second is that we have to manually call expire because hset doesn’t support adding an expiration to the hash in one command.
Now, when updating the Image model, instead of updating a slug, we simply delete the user:{$user_id} hash, which will wipe out the cache for that user.
1 <?php
2 $id = $_GET['id'];
3 $image = Image::find($id);
4
5 $image->title = $_GET['title'];
6 $image->save();
7
8 $r->del("user:{$image->user_id}");
Clearing out stale data this way gives you all of the advantages of the timestamp/slug method discussed earlier with none of the hassle of having to manage a separate key.
Redis Bitmaps
Redis has a nifty feature that’s been talked about quiet a bit frequently, but on the surface doesn’t seem very useful or interesting. Redis Bitmaps! So basically, in Redis you can use the setbit and getbit commands to individually toggle bits inside of a string stored in Redis.
Woohoo, how is this useful? Well it turns out, it’s great for collecting stats in your application. The classic example that I like is using Bitmaps for tracking user activity in your application. For example, let’s say you wanted to count how many unique users logged in your app each day.
We’re going to use a bitmap stored in the key logins:2012-Nov-04 to track the logins.
1 <?php
2
3 function login() {
4 // do your user authentication here
5 $user = User::authenticate($_POST['username'], $_POST['password']);
6
7 if ($user->invalid()) {
8 return false;
9 }
10
11 $key = "logins:" . date("Y-M-d", strtotime("today"));
12
13 $r = new Redis;
14 $r->setbit($key, $user->id, 1);
15 }
What this is doing is changing the bit at offset $user->id to 1 (from the default of 0) when the user logs in. This ends up being a very memory efficient way of storing true/false values for millions of users- even if you had a million users, logins:2012-Nov-04 would be less than 1MB in size.
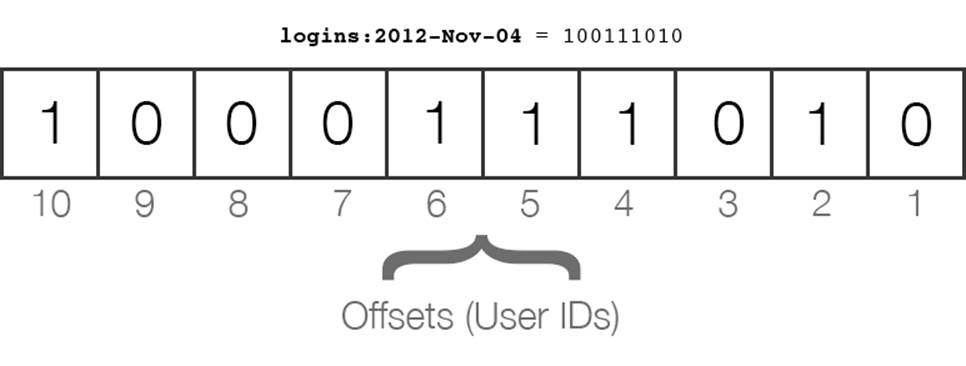
The user IDs are mapped to the offsets, and the operations are very fast. In the image above, we can see that User #10, User #6, User #5, User #4, and User #2 have logged in on November 4th, 2012.
You’re probably saying- that’s great, but how’s that better than just storing a hash or a counter? The power comes in the bit operations that you can perform.
Population Count
Using the bitcount we can perform a population count- that is, count the number of bits that we flipped to 1, and very quickly count how many users logged in on a specific day.
1 <?php
2
3 $r->bitcount("logins:2012-Nov-04"); // Returns 5
Bitwise Operations
Here is the real power with Bitmaps. You can run any bitwise operations on two different bitmaps and see the results. Imagine you wanted to know which users logged in to both your desktop AND mobile apps on a specific day?
The data would look like:
1 web:logins:2012-Nov-04 => 001001001
2 mobile:logins:2012-Nov-04 => 101110001
The code would look like this:
1 <?php
2
3 $r->bitop("and", "both:logins:2012-Nov-04",
4 "web:logins:2012-Nov-04",
5 "mobile:logins:2012-Nov-04");
6
7 $r->bitcount("both:logins:2012-Nov-04"); // Returns 2
On top of that, you have or, xor, and not at your disposal, which you can use to create all sorts of different aggregations very quickly and without using much data.
Redis Notification Feeds
Another popular use of Redis is to create a notification feed for your application. Why use Redis instead of the database? Well notifications tend to be write-heavy throwaway data- once the user views them, there’s no point in storing them anymore. Plus they are essentially just lists. A beautiful fit for Redis.
Imagine you wanted to notify a user everytime someone liked a comment that they wrote. You might implement the notifications for it like this:
1 <?php
2
3 function notify_of_like($comment, $current_user) {
4 $r = new Redis;
5 $r->lpush("notifications:{$comment->user->id}", "{$current_user->username} l\
6 ikes your comment.");
7 }
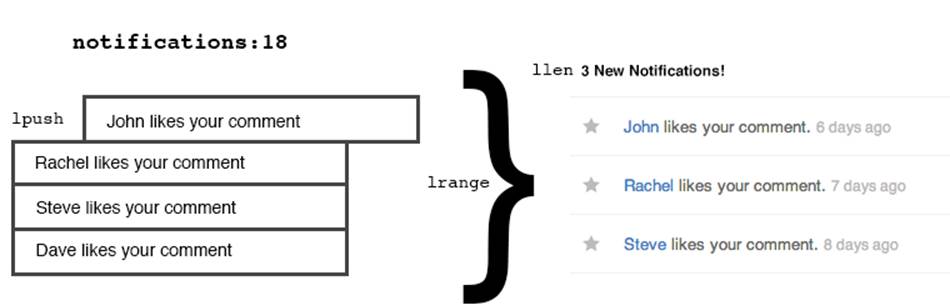
Using lpush, we can quickly prepend new notifications into the list of notifications so that they are in a LIFO (last-in, first-out) queue, effectively ordered by creation time.
To pull the latest 20 notifications for a particular user, we just need to use lrange(notifications:user_id, 0, 20). What about a little counter that shows how many notifications they have? That’s as simple as llen(notifications:user_id). And once the notifications have been viewed, we can trash them with ltrim(notifications:user_id, 0, 20).
All materials on the site are licensed Creative Commons Attribution-Sharealike 3.0 Unported CC BY-SA 3.0 & GNU Free Documentation License (GFDL)
If you are the copyright holder of any material contained on our site and intend to remove it, please contact our site administrator for approval.
© 2016-2026 All site design rights belong to S.Y.A.