OpenGL SuperBible: Comprehensive Tutorial and Reference, Sixth Edition (2013)
Part I: Foundations
Chapter 6. Shaders and Programs
What You’ll Learn in This Chapter
• The fundamentals of the OpenGL shading language
• How to find out if your shaders compiled, and what went wrong if they didn’t
• How to retrieve and cache binaries of your compiled shaders and use them later for rendering
By this point in the book, you have read about the OpenGL pipeline, written some simple OpenGL programs, and seen some rendering. We have covered basic computer graphics fundamentals, some 3D math, and more. Modern graphics applications spend most of their time executing shaders, and graphics programmers spend a lot of their time writing shaders. Before you can write really compelling programs, you’ll need to understand shaders, the OpenGL programming model, and the types of operations that a graphics processor does well (and those that it does poorly). In this chapter, we’ll take a deeper dive into The OpenGL Shading Language, also known as GLSL. We’ll discuss a number of its features and subtleties and provide you with a strong foundation with which you can put your ideas into practice.
Language Overview
GLSL is in the class of languages that can be considered “C-like.” That is, its syntax and model are much like that of C with a number of differences that make it more suitable for graphics and parallel execution in general. One of the major differences between C and GLSL is that matrix and vector types are first class citizens. That means that they are built into the language. Another major difference between GLSL and C is that GLSL is designed to be run on massively parallel implementations — most graphics processors will run thousands of copies (or invocations) of your shaders at the same time. GLSL also has several limitations to make allowances for these types of implementations. For example, recursion is not allowed in GLSL, and precision requirements for floating-point numbers are not as strict as the IEEE standards that govern most C implementations.
Data Types
GLSL supports both scalar and vector data types, arrays and structures, and a number of opaque data types that represent textures and other data structures.
Scalar Types
The scalar data types supported in GLSL are 32- and 64-bit floating point, 32-bit signed and unsigned integers, and Boolean values. No support is provided for other commonly used types available in C such as short, char, or strings. Also, GLSL doesn’t support pointers or integer types larger than 32 bits. The scalar types supported are shown in Table 6.1.
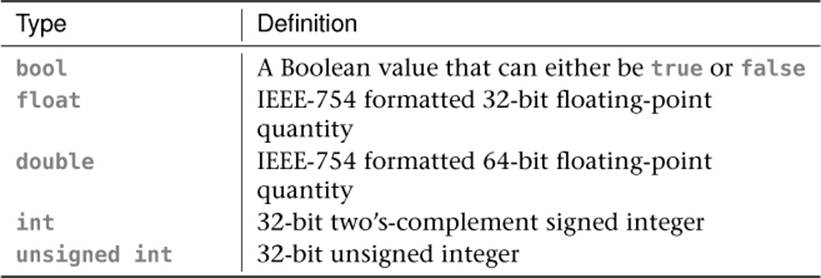
Table 6.1. Scalar Types in GLSL
Signed and unsigned integers behave as would be expected in a C program. That is, signed integers are stored as two’s complement and have a range from -2,147,483,648 to 2,147,483,647, and unsigned integers have a range from 0 to 4,294,967,295. If you add numbers together such that they overflow their ranges, they will wrap around.
Floating-point numbers are effectively defined as they are in the IEEE-754 standard. That is, 32-bit floating-point numbers have a sign bit, 8 exponent bits, and 23 mantissa bits. The sign bit is set if the number is negative and clear if it is positive. The 8 exponent bits represent a number between -127 and +127, which is biased into the range 0 to 254 by adding 127 to its value. The mantissa represents the significant digits of the number, and there are 23 of them, plus an implied binary 1 digit in the 24th position. Given the sign bit, s, exponent, e, and manitissa, m, the actual value of a 32-bit floating-point number is given by

Similarly, double-precision numbers also follow the IEEE-754 standard with a sign bit, 11 exponent bits, and 52 mantissa bits. The sign bit is defined as in 32-bit floating point, the exponent represents a value between -1022 and 1023, and the 52-bit mantissa represents the significant digits of the number, with an additional implied 1 in the 53rd position. The actual value of the 64-bit double-precision floating-point number is

GLSL is not required to adhere strictly to the IEEE-754 standard for everything. For most operations the precision will be good enough and behavior is well defined. However, for some operations such as propagation of NaNs (Not a Number) and behavior of infinities and denormals, some deviation is allowed for. In general, though, writing code that relies on exact behavior of NaNs and infinities is not a good idea as many processors perform poorly on these types of values. For built-in functions such as trigonometric functions, even more leeway is given by GLSL. Finally, GLSL has no support for exceptions. That means that if you do something unreasonable such as dividing a number by zero, you won’t know until you see unexpected results come out of your shader.
Vectors and Matrices
Vectors of all supported scalar types and matrices of single- and double-precision floating-point types are supported by GLSL. Vector and matrix type names are decorated with their underlying scalar type’s name, except for floating-point vectors and matrices, which have no decoration. Table 6.2 shows all of the vector and matrix types in GLSL.
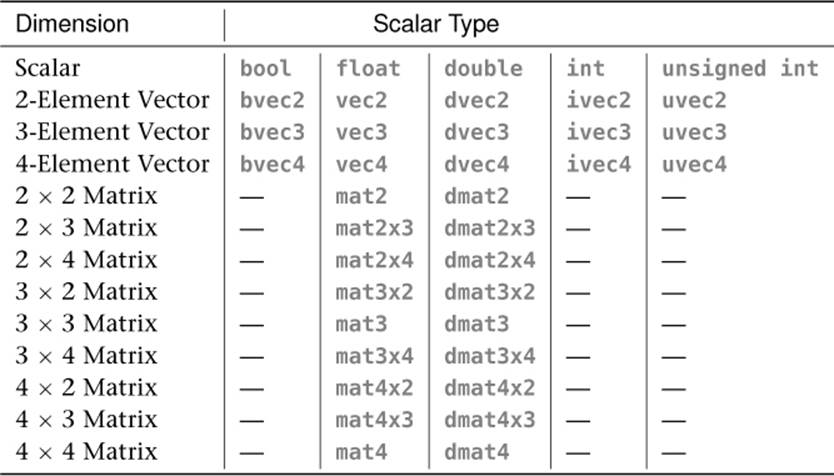
Table 6.2. Vector and Matrix Types in GLSL
Vectors may be constructed from other vectors, a single scalar, from sequences of scalars, or from any combination of scalars and vectors of the appropriate type, so long as there are enough fields in total to fill the destination. Thus, the following are all legal constructors:
vec3 foo = vec3(1.0);
vec3 bar = vec3(foo);
vec4 baz = vec4(1.0, 2.0, 3.0, 4.0);
vec4 bat = vec4(1.0, foo);
The components of a vector may be accessed as if it were an array. That is, the four components of
vec4 foo;
may be accessed as
float x = foo[0];
float y = foo[1];
float z = foo[2];
float w = foo[3];
In addition to accesses as an array, vectors may be accessed as if they were structures with fields representing their components. The first component can be accessed through the .x, .s, or .r field. The second component is accessed through the .y, .t, or .g field. The third is accessed through the .z, .p, or .b field, and finally, the fourth component can be accessed through the .w, .q, or .a field. This seems confusing, but x, y, z, and w are often used to denote positions or directions, r, g, b, and a are often used to represent colors, and s, t, p,1 and q2 are used to denote texture coordinates. If you were to write the vector’s structure in C, it would look something like this:
1. p is used as the third component of a texture coordinate because r is already taken for color.
2. q is used for the fourth component of a texture coordinate because it comes after p.
typedef union vec4_t
{
struct
{
float x;
float y;
float z;
float w;
};
struct
{
float s;
float t;
float p;
float q;
};
struct
{
float r;
float g;
float b;
float a;
};
} vec4;
However, this isn’t the end of the story — vectors also support what is called swizzling. This is the stacking of fields into vectors of their own. For example, the first three components of foo (which is a vec4) could be extracted by writing foo.xyz (or foo.rgb or foo.stp). The powerful thing is that you can also specify these fields in any order you wish, and you can repeat them. So, foo.zyx would produce a three-element vector with the x and z fields of foo swapped, and foo.rrrr would produce a four-element vector with the r component of foo in every field. Note that you can’t mix and match the conceptually separate x, y, z, and w fields with the s, t, p, and q or r, g, b, and a fields. That is, you can’t write foo.xyba, for example.
Matrices also first-class types in GLSL and may be treated like arrays. In GLSL, matrices appear as if they are arrays of vectors, and each element of that array (which is therefore a vector) represents a column of the matrix. Because each of those vectors can also be treated like an array, a column of a matrix behaves as an array, effectively allowing matrices to be treated like two-dimensional arrays. For example, if we declare bar as a mat4 type, then bar[0] is a vec4 representing its first column, and bar[0][0] is the first component of that vector (as is bar[0].x), bar[0][1] is the second component of the vector (which is equivalent to bar[0].y), and so on. Continuing, bar[1] is the second column, bar[2] is the third, and so on. Again, if you were to write this in C, it would look something like
typedef vec4 mat4[4];
Standard operators, such as + and -, are defined for vectors and matrices. The multiplication operator (*) is defined between two vectors to be component-wise, and between two matrices or a matrix and a vector as a matrix-matrix or matrix-vector multiplication operation. Division of vectors and matrices by scalars behaves as expected, and division of vectors and matrices by other vectors and matrices is executed component-wise, therefore requiring the two operands to be of the same dimension.
Arrays and Structures
You can build aggregate types both as arrays and structures, including arrays of structures and structures of arrays. Structure types are declared much as they would be in C++, and in particular, there is no typedef keyword in GLSL but rather structure definitions in GLSL implicitly declare a new type as they do in C++. Structure types may be forward declared by simply writing struct my_structure;, where my_structure is the name of the new structure type being declared.
There are two ways to declare an array in GLSL. The first is similar to that of C or C++, where the array size is appended to the variable name The following are examples of this type of declaration:
float foo[5];
ivec2 bar[13];
dmat3 baz[29];
The second syntax is to implicitly declare the type of the whole array by appending the size to the element type rather than the variable name. The above declaration could equivalently be written
float[5] foo;
ivec2[13] bar;
dmat3[29] baz;
To a C programmer, this may seem odd. However, it’s actually a very powerful feature as it allows types to be implicitly defined without the typedef keyword, which GLSL lacks. One example use of this is to declare a function that returns an array:
vec4[4] functionThatReturnsArray()
{
vec4[4] foo = ...
return foo;
}
Declaring array types in this form also implicitly defines the constructor for the array. This means that you can write
float[6] var = float[6](1.0, 2.0, 3.0, 4.0, 5.0, 6.0);
However, in this case, recent versions3 of GLSL also allow the traditional, C-style array initializer syntax to be used, as in
3. Curly brace {...} style initializer lists were introduced in GLSL 4.20 along with OpenGL 4.2. If you are writing shaders that might need to run in an earlier version of GLSL, you may want to stick to the implicit array type initialization by construction.
float var[6] = { 1.0, 2.0, 3.0, 4.0, 5.0, 6.0 };
Arrays may be included in structures, and you can build arrays of structure types (which may themselves include structures). So, for example, the following structure and array definitions are legal in GLSL:
struct foo
{
int a;
vec2 b;
mat4 c;
};
struct bar
{
vec3 a;
foo[7] b;
};
bar[29] baz;
In this listing, baz is an array of 29 instances of bar, which contains one vec3 and 7 instances of foo, which contains an int, a vec2, and a mat4.
Arrays also include a special method4 called .length(), which returns the number of elements in the array. This allows, for example, loops to be constructed that iterate over all the elements in array. It’s also interesting to note that because there is a duality between vectors and arrays in GLSL, the .length() function works on vectors (giving their size, naturally) and that because matrices are essentially arrays of vectors, .length() when applied to a matrix gives you the number of columns it has. The following are a few examples of applications of the .length() function:
4. GLSL doesn’t support member functions in the traditional C++ sense, but an exception is made in this case.
float a[10]; // Declare an array of 10 elements
float b[a.length()]; // Declare an array of the same size
mat4 c;
float d = float(c.length()); // d is now 4
int e = c[0].length(); // e is the height of c (4)
int i;
// This loop iterates 10 times
for (i = 0; i < a.length(); i++)
{
b[i] = a[i];
}
Although GLSL doesn’t officially support multi-dimensional arrays, it does support arrays of arrays. This means that you can put array types into arrays — when you index into the first array, you get back an array, into which you can index, and so on. So, consider the following:
float a[10]; // "a" is an array of 10 floats
float b[10][2]; // "b" is an array of 2 arrays of 10 floats
float c[10][2][5]; // "c" is an array of 5 arrays of 2 arrays of 10 floats
Here, a is a regular, one-dimensional array. b may look like a two-dimensional array, but it’s actually a one-dimensional array of arrays, each of which has ten elements. There is a subtle difference here. In particular, if you were to write b[1].length(), you would get 10. Following on then, c is a one-dimensional array of five one-dimensional arrays of two elements, each of which is a one-dimensional array of ten elements. c[3].length() produces 2, and c[3][1].length() produces 10.
Built-In Functions
There are literally hundreds of built-in functions in GLSL. Many of them are used to work with textures and memory and will be covered in detail in those contexts. In this subsection, we’re going to look at functions that deal strictly with data — basic math, matrix, vector, and data packing and unpacking functions will be covered here.
Terminology
Given the very large number of types in GLSL, the language includes support for function overloading, which means that functions can have multiple definitions, each with a different set of parameters. Rather than enumerate all of the types supported for each of the functions, some standard terminology is used in the GLSL Specification to group classes of data types together such that families of functions can be referred to more concisely. We will sometimes use those terms here to refer to groups of types also. The following are terms that are used both in the GLSL Specification and in this book:
• genType means any single-precision floating-point scalar or vector, or one of float, vec2, vec3, or vec4.
• genUType means any unsigned integer scalar or vector, or one of uint, uvec2, uvec3, or uvec4.
• genIType means any signed integer scalar or vector, or one of int, ivec2, ivec3, or ivec4.
• genDType means any double-precision floating-point scalar or vector, or one of double, dvec2, dvec3, or dvec4.
• mat means any single-precision floating-point matrix. For example, mat2, mat3, mat4, or any of the non-square matrix forms.
• dmat means any double-precision floating-point matrix. For example, dmat2, dmat3, dmat4, or any of the non-square matrix forms.
Built–In Matrix and Vector Functions
As has been discussed in some detail, vectors and matrices are first-class citizens in GLSL, and where it makes sense, built-in operators such as +, -, *, and / work directly on vector and matrix types. However, a number of functions are provided to deal specifically with vectors and matrices.
The matrixCompMult() function performs a component-wise multiplication of two matrices. Remember, the * operator for two matrices is defined to perform a traditional matrix multiplication in GLSL. Clearly, the two matrix parameters to matrixCompMult() must be the same size.
Matrices may be transposed using the built-in transpose() function. If you transpose a non-square matrix, its dimensions are simply swapped.
To find the inverse of a matrix, GLSL provides the inverse() built-in function for the mat2, mat3, and mat4 types as well as their double-precision equivalents, dmat2, dmat3, and dmat4. Be aware though, that finding the inverse of a matrix is fairly expensive, and so if the matrix is likely to be constant, calculate the inverse in your application and load it into your shader as a uniform. Non-square matrices do not have inverses and so are not supported by the inverse() function. Similarly, the determinant() function calculates the determinant of any square matrix. For ill-conditioned matrices, the determinant and inverse do not exist, and so calling inverse() or determinant() on such a matrix will produce an undefined result.
The outerProduct() function performs an outer product of two vectors. Effectively, this takes two vectors as input, treats the first as a 1 × N matrix and the second as an N × 1 matrix, and then multiplies them together. The resulting N × N matrix is returned.
If you need to compare two vectors to one another, a number of built-in functions will do this for you in a component-by-component manner. These are lessThan(), lessThanEqual(), greaterThan(), greaterThanEqual(), equal(), and notEqual(). Each of these functions takes two vectors of the same type and size, applies the operation that their name suggests, and returns a Boolean vector of the same size of the function’s parameters (that is, a bvec2, bvec3, or bvec4). Each component of this Boolean vector contains the result of the comparison for the corresponding components in the source parameters.
Given a Boolean vector, you can test it to see if any of its components are true using the any() function, or to see if all of its components are true with the all() function. You can also invert the value of a Boolean vector using the not() function.
A large number of built-in functions for dealing with vectors are provided by GLSL. These include length(), which returns the length of a vector, and distance(), which returns the distance between two points (which is the same as the length of the vector produced by subtracting one point from the other). The normalize() function divides a vector by its own length, producing a vector that has a length of one, but points in the same direction as the source. The dot() and cross() functions can be used to find the dot and cross products of two vectors, respectively.
The reflect() and refract() functions take an input vector, a normal to a plane, and calculate the reflected or refracted vector that results. refract() takes the index of refraction, eta, as a parameter in addition to the incoming and normal vectors. The math behind this is explained in “Reflection and Refraction” in Chapter 4, “Math for 3D Graphics.”
Likewise, the faceforward() function takes an input vector and two surface normals — if the dot product of the input vector and the second normal vector is negative, then it returns the first normal vector; otherwise, it returns the negative of the first normal vector. As you might have guessed from its name, this can be used to determine whether a plane is front- or back-facing with respect to a particular view direction. Facingness was covered in Chapter 3, “Following the Pipeline.”
Built–In Math Functions
GLSL supports many built-in functions to perform mathematical operations and to manipulate data in variables. The common math functions include abs(), sign(), ceil(), floor(), trunc(), round(), roundEven(), fract(), mod(), modf(), min(), and max(). For the most part, these functions operate on vectors as well as scalars, but otherwise behave as their counterparts in the C standard libraries. The roundEven() function doesn’t have a direct equivalent in C — this function rounds its argument to the nearest integer, but breaks ties when there is a fractional part of 0.5 by rounding to the nearest even number. That is, 7.5 and 8.5 will both round to 8, 42.5 will round to 42 and 43.5 will round to 44.
Two implicit declarations of the clamp() function are
vec4 clamp(vec4 x, float minVal, float maxVal);
vec4 clamp(vec4 x, vec4 minVal, vec4 maxVal);
This function clamps the incoming vector x to the range specified by minVal and maxVal (which may be scalars or vectors). For example, specifying minVal to be 0.0 and maxVal to be 1.0 constrains x to be in the range 0.0 to 1.0. This is such a common range to which to clamp numbers that graphics hardware often has a special case for this range, and some shading languages even include a built-in function specifically to clamp inputs to this range.
A few more special functions are mix(), step(), and smoothstep(). mix() performs a linear interpolation between two of its inputs using the third as a weighting factor. It can effectively be implemented as
vec4 mix(vec4 x, vec4 y, float a)
{
return x + a * (y - x);
}
Again, this is such a common operation in graphics that it is a built-in function in the shading language, and graphics hardware may have special functionality to implement this directly.
The step() function generates a step function (a function that has a value of either 0.0 or 1.0) based on its two inputs. It is defined as
vec4 step(vec4 edge, vec4 x);
and it returns 0.0 if x < edge and 1.0 if x >= edge. The smoothstep() function is not as aggressive and produces a smooth fade between two of its inputs based on where the value of its third lies between the first two. It is defined as
vec4 smoothstep(vec4 edge0, vec4 edge1, vec4 x);
smoothstep() can effectively be implemented as
vec4 smoothstep(vec4 edge0, vec4 edge1, vec4 x)
{
vec4 t = clamp((x - edge0) / (edge1 - edge0), 0.0, 1.0);
return t * t * (vec4(3.0) - 2.0 * t);
}
The shape produced by smoothstep() is known as a Hermite curve, and the operation it performs is Hermite interpolation. The general shape of the curve is shown in Figure 6.1.
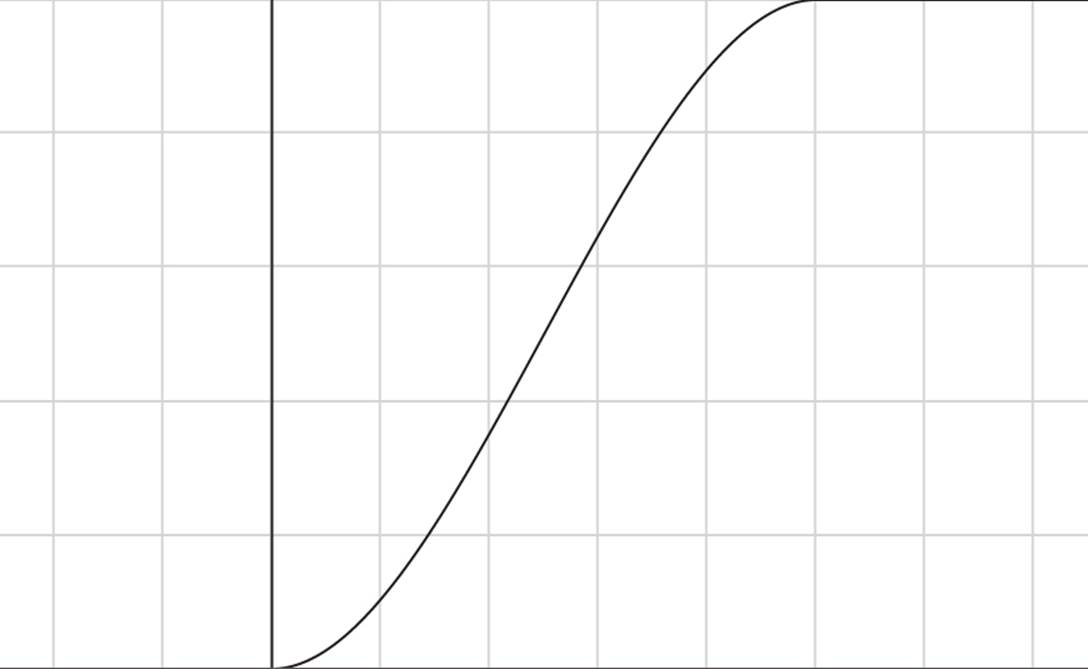
Figure 6.1: Shape of a Hermite curve
The fma() function performs a fused multiply-add operation. That is, it multiplies the first two of its parameters together and then adds the third. The intermediate result of the operation is generally kept at a higher precision than the source operands, producing a more accurate result than if you were to write those two operations directly in your code. In some graphics processors, the fused multiply-add function may be more efficient than a sequence of a multiplication followed by a separate addition operation.
Most of the math functions in GLSL presume that you are using floating-point numbers in the majority of your shader code. However, there are a few cases where you might be using integers, and GLSL includes a handful of functions that are designed to help you perform arithmetic on very large integer (or fixed-point) numbers. In particular, uaddCarry() and usubBorrow() allow you to perform add with carry and subtract with borrow operations, and imulExtended() and umulExtended() allow you to multiply a pair of 32-bit signed- or unsigned-integer values together, respectively, producing a 64-bit result as a further pair of 32-bit values.
In addition to all this low-level arithmetic functionality, GLSL also includes support for all of the expected trigonometry functions, such as sin(), cos(), and tan(); their inverses, asin(), acos() and atan(); and the hyperbolic forms of those functions, sinh(), cosh(), tanh(), asinh(), acosh(), and atanh(). Exponential functions are also included. These are pow(), exp(), log(), exp2(), log2(), sqrt(), and inversesqrt(). Because most of the GLSL functions dealing with angles work in radians, even though sometimes it might be convenient to work in degrees, GLSL also includes the radians() function (which takes an angle in degrees and converts it to radians) and the degrees() function (which takes an angle in radians and converts it into degrees).
Built-In Data Manipulation Functions
In addition to all of the functions that do real processing work, GLSL includes a lot of built-in functions that allow you to get at the innards of your data. For example, the frexp() allows you to break apart a floating-point number into its mantissa and exponent parts, and ldexp() allows you to build a new floating-point number from a mantissa and exponent that you supply. This allows some direct manipulation of the values of floating-point numbers.
If you need even more control over floating-point numbers, intBitsToFloat() and uintBitsToFloat() allow you to take a signed- or unsigned-integer number, respectively, and reinterpret its raw bits as a 32-bit floating-point number. To go the opposite way, floatBitsToInt() andfloatBitsToUint() take a floating-point number and hand it back to you as either a signed- or unsigned-integer value, respectively. These four functions let you literally tear a floating-point number apart, mess with its bits, and put it back together again. You need to be careful when doing this, however, as not all bit combinations form valid floating-point numbers, and it’s quite possible to generate NaNs (Not-a-Number), denormals or infinities. To test whether a floating-point number represents a NaN or an infinity, you can call isnan() or isinf().
In addition to being able to tear apart floating-point numbers and then put them back together again, GLSL includes a number of functions to take floating-point vectors, scale them to various bit depths (such as 8- or 16-bit values), and pack them together into a single 32-bit quantity. For example, the packUnorm4x8() and packSnorm4x8() functions pack a vec4 value into four unsigned- or signed- 8-bit integer values, respectively, and then pack those four 8-bit values together into a single uint. The unpackUnorm4x8() and unpackSnorm4x8() go the other way. The packUnorm2x16(),packSnorm2x16(), unpackUnormx16(), and unpackSnorm16() functions are the equivalents that handle vec2 variables, packing and unpacking them as 16-bit quantities into a uint.
The term norm in these functions refers to normalized. In this context, normalization essentially means scaling a value to map it onto a new range. Here, floating-point values are either in the range 0.0 to 1.0 for unsigned normalized data, or −1.0 to 1.0 for signed normalized data. The ends of the input range are mapped to the lower and upper bounds of the output range. This means that for unsigned normalized 8-bit data, for example, an unsigned byte with a value of 0 corresponds to 0.0 in floating point, and an unsigned byte with a value of 255 (the maximum value representable by an unsigned 8-bit number) maps to 1.0.
The packDouble2x32() and unpackDouble2x32() functions perform similar operations on double variables, and the packHalf2x16() functions perform these operations on 16-bit floating-point quantities. It should be noted that GLSL does not include direct support for 16-bit floating-point variables, although data can be stored in memory in that format, and so GLSL includes functionality to unpack it into usable data types in the shading language.
If you just want to get at a subsection of the bits in a signed or unsigned integer, you can use the bitfieldExtract() function to pull a specified chunk of bits out of an unsigned integer (or vector of unsigned integers). If the input value to the function is a signed integer, then the result is sign extended, otherwise it is zero extended. Once you have manipulated the bits, you can put them back into the integer using the bitfieldInsert() function.
Other bitfield operations supported by GLSL include bitfieldReverse(), bitCount(), findLSB(), and findMSB() functions, which reverse the order of a subset of bits in an integer, count the number of set bits in an integer, and find the index of the least significant or most significant bit that is set in an integer, respectively.
Compiling, Linking, and Examining Programs
Each OpenGL implementation has a compiler and linker built in that will take your shader code, compile it to an internal binary form, and link it together so that it can be run on a graphics processor. This process may fail for various reasons, and so it is important to be able to figure out why. The compilation or link stage may have failed, and even if they succeed, it may be that some other factor has changed the way that your program behaves.
Getting Information from the Compiler
To this point in the book, all of the shaders we’ve presented have been perfect, tested and bug free. We’ve done very little, if any error checking and have just blasted ahead assuming that everything will work fine. However, in the real world, at least during development, your shaders will have bugs, typos, or errors in them, and the shader compiler can help you find problems and squash them. The first step is to determine whether a shader compiled or not. Once you have set the shader’s source code and called glCompileShader(), you can get the compilation status back from OpenGL by calling glGetShaderiv(). Its prototype is
void glGetShaderiv(GLuint shader,
GLenum pname,
GLint * params);
Here, shader is the name of the shader object you’d like to know about, pname is the parameter you want to get from the shader object, and params is the address of a variable where OpenGL should put the result. To find out if a shader compiled successfully, you can set pname toGL_COMPILE_STATUS. The variable pointed to by params will be set to zero if the shader failed to compile and to one if it compiled successfully. Incidentally, one and zero are the numerical values of GL_TRUE and GL_FALSE, so you can test against those defines if you wish.
Other values for pname that can be passed to glGetShaderiv() are
• GL_SHADER_TYPE, which returns the type of shader that the object is (GL_VERTEX_SHADER, GL_FRAGMENT_SHADER, etc.),
• GL_DELETE_STATUS, which will return GL_TRUE or GL_FALSE to indicate whether glDeleteShader() has been called on the shader object,
• GL_SHADER_SOURCE_LENGTH, which returns the total length of the source code associated with the shader object, and
• GL_INFO_LOG_LENGTH, which returns the length of the information log contained in the shader object.
This last token, GL_INFO_LOG_LENGTH, tells you the length of the information log that the shader object contains. This log is generated when the shader is compiled. Initially, it’s empty, but as the shader compiler parses and compiles the shader, it generates a log that contains output similar to what you might be familiar with in the regular compiler world. You can then go ahead and retrieve the log from the shader object by calling glGetShaderInfoLog(), whose prototype is
void glGetShaderInfoLog(GLuint shader,
GLsizei bufSize,
GLsizei * length,
GLchar * infoLog);
Again, shader is the name of the shader object whose log you want to get at. infoLog should be pointed at a buffer that will have the log written into it by OpenGL. The buffer should be big enough to hold the entire log — the size of which you can get through the glGetShaderiv() function that we just introduced. If you only care about the first few lines of the log, you can use a fixed size buffer for infoLog, but regardless, the size of the buffer you’re using should be in bufSize. The actual amount of data written into infoLog will be written into the variable pointed to by lengthby OpenGL. Listing 6.1 shows an example of how to retrieve the log from a shader object.
// Create, attach source to, and compile a shader...
GLuint fs = glCreateShader(GL_FRAGMENT_SHADER);
glShaderSource(fs, 1, &source, NULL);
glCompileShader(fs);
// Now, get the info log length...
GLint log_length;
glGetShaderiv(fs, GL_INFO_LOG_LENGTH, &log_length);
// Allocate a string for it...
std::string str;
str.reserve(log_length);
// Get the log...
glGetShaderInfoLog(fs, log_length, NULL, str.c_str());
Listing 6.1: Retrieving the compiler log from a shader
If your shader contains errors or suspect code that might generate compiler warnings, then OpenGL’s shader compiler will tell you about it in the log. Consider the following shader, which contains deliberate errors:
#version 430 core
layout (location = 0) out vec4 color;
uniform scale;
uniform vec3 bias;
void main(void)
{
color = vec4(1.0, 0.5, 0.2, 1.0) * scale + bias;
}
Compiling this shader produces the following log on this author’s machine. You will likely see something similar on your own.
ERROR: 0:5: error(#12) Unexpected qualifier
ERROR: 0:10: error(#143) Undeclared identifier: scale
WARNING: 0:10: warning(#402) Implicit truncation of vector from
size: 4 to size: 3
ERROR: 0:10: error(#162) Wrong operand types: no operation "+" exists
that takes a left-hand operand of type "4-component vector of vec4" and
a right operand of type "uniform 3-component vector of vec3" (or there
is no acceptable conversion)
ERROR: error(#273) 3 compilation errors. No code generated
As you can see, several errors and a warning have been generated and recorded in the shader’s information log. For this particular compiler, the format of the error messages is ERROR or WARNING followed by the string index (remember, glShaderSource() allows you to attach multiple source strings to a single shader object), followed by the line number. Let’s look at the errors one by one:
ERROR: 0:5: error(#12) Unexpected qualifier
Line 5 of our shader is this:
uniform scale;
It seems that we have forgotten the type of the scale uniform. We can fix that by giving scale a type (it’s supposed to be vec4). The next three issues are on the same line:
ERROR: 0:10: error(#143) Undeclared identifier: scale
WARNING: 0:10: warning(#402) Implicit truncation of vector from
size: 4 to size: 3
ERROR: 0:10: error(#162) Wrong operand types: no operation "+" exists
that takes a left-hand operand of type "4-component vector of vec4" and
a right operand of type "uniform 3-component vector of vec3" (or there
is no acceptable conversion)
The first one says that scale is an undefined identifier — that is, the compiler doesn’t know what scale is. This is because of that first error on line 5, and that because of that, we haven’t actually defined scale yet. Next is a warning that we are attempting to truncate a vector from a four-component type to a three-component type. This might not be a serious issue, given that the compiler might be confused as a result of another error on the very same line. This one is saying that there is no version of the + operator that can add a vec3 and a vec4. This is because, even once we’ve given scale its vec4 type, bias has been declared as a vec3 and therefore can’t be added to a vec4 variable. A potential fix is to change the type of bias to a vec4. If we apply our now known fixes to the shader (shown in Listing 6.1), we have
#version 430 core
layout (location = 0) out vec4 color;
uniform vec4 scale;
uniform vec4 bias;
void main(void)
{
color = vec4(1.0, 0.5, 0.2, 1.0) * scale + bias;
}
Once we compile this updated shader, we should have success, calling glGetShaderiv() with pname set to GL_COMPILE_STATUS should return GL_TRUE, and the new info log should either be empty or simply indicate success.
Getting Information from the Linker
Just as compilation may fail, linking of programs may also fail or not go exactly the way you planned. Just as the compiler will produce an info log when you call glCompileShader(), when you call glLinkProgram(), the linker can also produce a log that you can query to figure out what went on. Also, a program object has several properties, including its link status, resource usage, and so on that you can retrieve. In fact, a linked program has quite a bit more status than a compiled shader, and you can retrieve it all by using glGetProgramiv(), whose prototype is
void glGetProgramiv(GLuint program,
GLenum pname,
GLint * params);
You’ll notice that glGetProgramiv() is very similar to glGetShaderiv(). The first parameter, program, is the name of the program object whose information you want to retrieve, and the last parameter, params, is the address of a variable where you would like OpenGL to write that information. Just like glGetShaderiv(), glGetProgramiv() takes a parameter called pname, which indicates what you would like to know about the program object. There are actually many more valid values for pname for program objects, and these are a few that we can look at now:
• GL_DELETE_STATUS, as with the same property of shaders, indicates whether glDeleteProgram() has been called for the program object.
• GL_LINK_STATUS, similarly to the GL_COMPILE_STATUS property of a shader, indicates the success of linking the program.
• GL_INFO_LOG_LENGTH returns the info log length for the program.
• GL_ATTACHED_SHADERS returns the number of shaders that are attached to the program.
• GL_ACTIVE_ATTRIBUTES returns the number of attributes that the vertex shader in the program actually5 uses.
5. More precisely, that the compiler thinks the vertex shader uses.
• GL_ACTIVE_UNIFORMS returns the number of uniforms used by the program.
• GL_ACTIVE_UNIFORM_BLOCKS returns the number of uniform blocks used by the program.
You can tell whether a program has been successfully linked by calling glGetProgramiv() with pname set to GL_LINK_STATUS, and if it returns GL_TRUE in params, then linking worked. You can also get the information log from a program just like you can from a shader. To do this, you can callglGetProgramInfoLog(), whose prototype is
void glGetProgramInfoLog(GLuint program,
GLsizei bufSize,
GLsizei * length,
GLchar * infoLog);
The parameters to glGetProgramInfoLog() work just the same as they do for glGetShaderInfoLog(), except that in place of shader, we have program, which is the name of the program object whose log you want to read. Now, consider the shader shown in Listing 6.2.
#version 430 core
layout (location = 0) out vec4 color;
vec3 myFunction();
void main(void)
{
color = vec4(myFunction(), 1.0);
}
Listing 6.2: Fragment shader with external function declaration
Listing 6.2 includes a declaration of an external function. This works similarly to C programs where the actual definition of the function is contained in a separate source file. OpenGL expects that the function body for myFunction is defined in one of the fragment shaders attached to the program object (remember, you can attach multiple shaders of the same type to the same program object and have them link together). When you call glLinkProgram(), OpenGL will go looking in all the fragment shaders for a function called myFunction, and if it’s not there, will generate a link error. The result of trying to link just this fragment shader into a program object is
Vertex shader(s) failed to link, fragment shader(s) failed to link.
ERROR: error(#401) Function: myFunction() is not implemented
To resolve this error, we can either include the body of myFunction in the shader of Listing 6.2, or we can attach a second fragment shader to the same program object that includes the function body.
Separate Programs
So far, all of the programs you have used have been considered monolithic program objects. That is, they contain a shader for each stage that is active. You have attached a vertex shader, a fragment shader, and possibly tessellation or geometry shaders to a single program object and then have called glLinkProgram() to link the program object into a single representation of the entire pipeline. This type of linking might allow a compiler to perform inter-stage optimizations such as eliminating code in a vertex shader that contributes to an output that is never used by the subsequent fragment shader, for example. However, this scheme comes at a potential cost of flexibility and possibly performance to the application. For every combination of vertex, fragment, and possibly other shaders, you need to have a unique program object, and linking all those programs doesn’t come cheap.
For example, consider the case where you want to change only a fragment shader. With a monolithic program, you would need to link the same vertex shader to two or more different fragment shaders, creating a new program object for each combination. If you have multiple fragment shaders and multiple vertex shaders, you now need a program object for each combination of shaders. This problem gets worse as you add more and more shaders and shader stages to the mix. You end up with a combinatorial explosion of shader combinations that can quickly balloon into thousands of permutations, or more.
To alleviate this, OpenGL supports linking program objects in separable mode. A program linked this way can contain shaders for only a single stage in the pipeline or for just a few of the stages. Multiple program objects, each representing a section of the OpenGL pipeline can then be attached to a program pipeline object and matched together at run-time rather than at link time. Shaders attached to a single program object can still benefit from inter-stage optimizations, but the program objects attached to a program pipeline object can be switched around at will with relatively little cost in performance.
To use a program object in separable mode, you need to tell OpenGL what you plan to do before you link it by calling glProgramParameteri() with pname set to GL_PROGRAM_SEPARABLE and value set to GL_TRUE. This tells OpenGL not to eliminate any outputs from a shader that it thinks aren’t being used. It will also arrange any internal data layout such that the last shader in the program object can communicate with the first shader in another program object with the same input layout. Next, you should create a program pipeline object with glGenProgramPipelines(), and then attach programs to it representing the sections of the pipeline you wish to use. To do this, call glUseProgramStages(), passing the name of the program pipeline object, a bitfield indicating which stages to use, and the name of a program object that contains those stages.
An example of how to set up a program pipeline object with two programs, one containing only a vertex shader and one containing only a fragment shader, is shown in Listing 6.3.
// Create a vertex shader
GLuint vs = glCreateShader(GL_VERTEX_SHADER);
// Attach source and compile
glShaderSource(vs, 1, vs_source, NULL);
glCompileShader(vs);
// Create a program for our vertex stage and attach the vertex shader to it
GLuint vs_program = glCreateProgram();
glAttachShader(vs_program, vs);
// Important part - set the GL_PROGRAM_SEPARABLE flag to GL_TRUE *then* link
glProgramParameteri(vs_program, GL_PROGRAM_SEPARABLE, GL_TRUE);
glLinkProgram(vs_program);
// Now do the same with a fragment shader
GLuint fs = glCreateShader(GL_FRAGMENT_SHADER);
glShaderSource(fs, 1, fs_source, NULL);
glCompileShader(fs);
GLuint fs_program = glCreateProgram();
glAttachShader(fs_program, vs);
glProgramParameteri(fs_program, GL_PROGRAM_SEPARABLE, GL_TRUE);
glLinkProgram(fs_program);
// The program pipeline represents the collection of programs in use:
// Generate the name for it here.
GLuint program_pipeline;
glGenProgramPipelines(1, &program_pipeline);
// Now, use the vertex shader from the first program and the fragment shader
// from the second program.
glUseProgramStages(program_pipeline, GL_VERTEX_SHADER_BIT, vs_program);
glUseProgramStages(program_pipeline, GL_FRAGMENT_SHADER_BIT, fs_program);
Listing 6.3: Configuring a separable program pipeline
Although this simple example only includes two program objects, each with only a single shader in it, it’s possible to have more complex arrangements where more than two program objects are used, or where one or more of the program objects contain more than one shader. For example, tessellation control and tessellation evaluation shaders are often tightly coupled, and one does not make much sense without the other. Also, very often when tessellation is used, it is possible to use a pass-through vertex shader and do all of the real vertex shader work either in the tessellation control shader or in the tessellation evaluation shader. In those cases, it may make sense to couple a vertex shader and both tessellation shaders in one program object, and still use separable programs to be able to switch the fragment shader on the fly.
If you really do want to create a simple program object with exactly one shader object in it, you can take a shortcut and call
GLuint glCreateShaderProgramv(GLenum type,
GLsizei count,
const char ** strings);
The glCreateShaderProgramv() function takes the type of shader you want to compile (GL_VERTEX_SHADER, GL_FRAGMENT_SHDAER, etc.), the number of source strings, and a pointer to an array of strings (just like glShaderSource()), and compiles those strings into a new shader object. Then, it internally attaches that shader object to a new program object, sets its separable hint to true, links it, deletes the shader object, and returns the program object to you. You can then go ahead and use this program object in your program pipeline objects.
Once you have a program pipeline object with a bunch of shader stages compiled into program objects and attached to it, you can make it the current pipeline by calling glBindProgramPipeline():
void glBindProgramPipeline(GLuint pipeline);
Here, pipeline is the name of the program pipeline object that you wish to use. Once the program pipeline object is bound, its programs will be used for rendering or compute operations.
Interface Matching
GLSL provides a specific set of rules for how the outputs from one shader stage are matched up with the corresponding inputs in the next stage. When you link a set of shaders together into a single program object, OpenGL’s linker will tell you if you didn’t match things up correctly. However, when you use separate program objects for each stage, the matching occurs when you switch program objects, and not lining things up correctly can cause effects from subtle failures of your program to things not working at all. It is therefore very important to follow these rules to avoid these kind of issues, especially when you are using separate program objects.
In general, the output variables of one shader stage end up connected to the inputs of the subsequent stage if they match exactly in name and type. The variables must also match in qualification. For interface blocks, the two blocks on either side of the interface must have the same members, with the same names, declared in the same order. The same applies for structures (either used as inputs and outputs, or as members of interface blocks). If the interface variable is an array, both sides of the interface should declare the same number of elements in that array. The only exception is for the inputs and outputs for tessellation and geometry shaders that change from single elements to arrays along the way.
If you link shaders for multiple stages together in a single program object, OpenGL may realize that an interface member isn’t required and that it can eliminate it from the shader(s). As an example, if the vertex shader only writes a constant to a particular output and the fragment shader then consumes that data as an input, OpenGL might remove the code to produce that constant from the vertex shader and instead use the constant directly in the fragment shader. When separate programs are used, OpenGL can’t do this and must consider every part of the interface to be active and used.
It can be a pain to remember to name all of your input and output variables the same way in every shader in your application, especially as the number of shaders grows or as more developers start contributing shaders. However, it is possible to use a layout qualifier to assign a location to each input and output in a set of shaders. Where possible, OpenGL will use the locations of each input and output to match them together. In that case, the names of the variables don’t matter, and they only need match in type and qualification.
It is possible to query the input and output interfaces of a program object by calling glGetProgramInterfaceiv() and glGetProgramResourceiv(), whose prototypes are
void glGetProgramInterfaceiv(GLuint program,
GLenum programInterface,
GLenum pname,
GLint * params);
and
void glGetProgramResourceiv(GLuint program,
GLenum programInterface,
GLuint index,
GLsizei propCount,
const Glenum * props,
GLsizei bufSize,
GLsizei * length,
GLint * params);
Here, program is the name of the program object you want to discover the interface properties of, and programInterface should be GL_PROGRAM_INPUT or GL_PROGRAM_OUTPUT to specify that you want to know about the inputs or outputs of the program, respectively.
For glGetProgramInterfaceiv(), pname should be GL_ACTIVE_RESOURCES, and the number of separate inputs or outputs of program will be written into the variable pointed to by params. You can then read from this list of inputs or outputs by passing the index of the resource in the indexparameter of glGetProgramResourceiv(). glGetProgramResourceiv() returns multiple properties in a single function call, and the number of properties to return is given in propCount. props is an array of tokens specifying which properties you’d like to retrieve. Those properties will be written to the array whose address is given in params and the size of which (in elements) is given in bufSize. If length is not NULL, then the actual number of properties will be written into the variable that it points at.
The values in the props array can be any of the following:
• GL_TYPE returns the type of the interface member in the corresponding element of params.
• GL_ARRAY_SIZE returns the length of the interface array if it is an array, or zero if it is not.
• GL_REFERENCED_BY_VERTEX_SHADER, GL_REFERENCED_BY_TESS_CONTROL_SHADER, GL_REFERENCED_BY_TESS_EVALUATION_SHADER, GL_REFERENCED_BY_GEOMETRY_SHADER, GL_REFERENCED_BY_FRAGMENT_SHADER, and GL_REFERENCED_BY_COMPUTE_SHADER return zero or non-zero depending on whether the input or output is referenced by the vertex, tessellation control or evaluation, geometry, fragment, or compute shader stages, respectively.
• GL_LOCATION returns the shader-specified or OpenGL-generated location for the input or output in the corresponding element of params.
• GL_LOCATION_INDEX can be used only when programInterface specifies GL_PROGRAM_OUTPUT, and it returns the index of the output of a fragment shader.
• GL_IS_PER_PATCH lets you know if an output of a tessellation control shader or an input to a tessellation evaluation shader is declared as a per-patch interface.
You can determine the name of an input or output by calling glGetProgramResourceName():
void glGetProgramResourceName(GLuint program,
GLenum programInterface,
GLuint index,
GLsizei bufSize,
GLsizei * length,
char * name);
Again, program, programInterface, and index have the same meaning as they do for glGetProgramResourceiv(). bufSize is the size of the buffer pointed to by name, and, if it is not NULL, length points to a variable that will have the actual length of the name written into it. As an example,Listing 6.4 shows a simple program that will print information about the active outputs of the program object.
// Get the number of outputs
GLint outputs;
glGetProgramInterfaceiv(program, GL_PROGRAM_OUTPUT,
GL_ACTIVE_RESOURCES, &outputs);
// A list of tokens describing the properties we wish to query
static const GLenum props[] = { GL_TYPE, GL_LOCATION };
// Various local variables
GLint i;
GLint params[2];
GLchar name[64];
const char * type_name;
for (i = 0; i < outputs; i++)
{
// Get the name of the output
glGetProgramResourceName(program, GL_PROGRAM_OUTPUT, i,
sizeof(name), NULL, name);
// Get other properties of the output
glGetProgramResourceiv(program, GL_PROGRAM_OUTPUT, i,
2, props, 2, NULL, params);
// type_to_name() is a function that returns the GLSL name of
// type given its enumerant value
type_name = type_to_name(params[0]);
// Print the result
printf("Index %d: %s %s @ location %d.\n",
i, type_name, name, params[1]);
}
Listing 6.4: Printing interface information
Look at the output declarations in the following snippet of a fragment shader:
out vec4 color;
layout (location = 2) out ivec2 data;
out float extra;
Given these declarations, the code shown in Listing 6.4 prints the following:
Index 0: vec4 color @ location 0.
Index 1: ivec2 data @ location 2.
Index 2: float extra @ location 1.
Notice that the listing of the active outputs appears in the order that they were declared in. However, since we explicitly specified output location 2 for data, the GLSL compiler went back and used location 1 for extra. We are also able to correctly tell the types of the outputs using this code. Although in your applications, you will likely know the types and names of all of your outputs, this kind of functionality is very useful for development tools and debuggers that may not know the origin of the shaders that they are working with.
Shader Subroutines
Even when your programs are linked in separable mode, switching between program objects can still be fairly expensive from a performance perspective. As an alternative, it may be possible to use subroutine uniforms. These are a special type of uniform that behaves something akin to a function pointer in C. To use a subroutine uniform, we declare a subroutine type, declare one or more compatible subroutines (which are essentially just functions with a special declaration format), and then “point” our subroutine uniforms at these functions. A simple example is shown inListing 6.5.
#version 430 core
// First, declare the subroutine type
subroutine vec4 sub_mySubroutine(vec4 param1);
// Next declare a couple of functions that can be used as subroutine...
subroutine (sub_mySubroutine)
vec4 myFunction1(vec4 param1)
{
return param1 * vec4(1.0, 0.25, 0.25, 1.0);
}
subroutine (sub_mySubroutine)
vec4 myFunction2(vec4 param1)
{
return param1 * vec4(0.25, 0.25, 1.0, 1.0);
}
// Finally, declare a subroutine uniform that can be "pointed"
// at subroutine functions matching its signature
subroutine uniform sub_mySubroutine mySubroutineUniform;
// Output color
out vec4 color;
void main(void)
{
// Call subroutine through uniform
color = mySubroutineUniform(vec4(1.0));
}
Listing 6.5: Example subroutine uniform declaration
When you link a program that includes subroutines, each subroutine in each stage is assigned an index. If you are using version 430 of GLSL or newer (this is the version shipped with OpenGL 4.3), you can assign the indices yourself in shader code using the index layout qualifier. So, we could declare the subroutines from Listing 6.5 as follows:
layout (index = 2)
subroutine (sub_mySubroutine)
vec4 myFunction1(vec4 param1)
{
return param1 * vec4(1.0, 0.25, 0.25, 1.0);
}
layout (index = 1);
subroutine (sub_mySubroutine)
vec4 myFunction2(vec4 param1)
{
return param1 * vec4(0.25, 0.25, 1.0, 1.0);
}
If you are using a version of GLSL earlier than 430, then OpenGL will assign indices for you and you have no say in the matter. Either way, you can find out what those indices are by calling
GLuint glGetProgramResourceIndex(GLuint program,
GLenum programInterface,
const char * name);
Here, program is the name of the linked program containing the subroutine; programInterface is one of GL_VERTEX_SUBROUTINE, GL_TESS_CONTROL_SUBROUTINE, GL_TESS_EVALUATION_SUBROUTINE, GL_GEOMETRY_SUBROUTINE, GL_FRAGMENT_SUBROUTINE, or GL_COMPUTE_SUBROUTINE to indicate which shader stage that you’re asking about; and name is the name of the subroutine. If a subroutine with the name name is not found in the appropriate stage of the program, then this function returns GL_INVALID_VALUE. Going the other way, given the indices of subroutines in a program, you can get their names by calling
void glGetProgramResourceName(GLuint program,
GLenum programInterface,
GLuint index,
GLsizei bufSize,
GLsizei * length,
char * name);
Here, program is the name of the program object containing the subroutines, programInterface is one of the same tokens accepted by glGetProgramResourceIndex(), index is the index of the subroutine within the program, bufsize is the size of the buffer whose address is in name, and lengthis the address of a variable that will be filled with the actual number of characters written into name. The number of active subroutines in a particular stage of a program can be determined by calling glGetProgramStageiv():
void glGetProgramStageiv(GLuint program,
GLenum shadertype,
GLenum pname,
GLint *values);
Again, program is the name of the program object containing the shader, and shadertype indicates which stage of the program you’re asking about. To get the number of active subroutines in the relevant stage of the program, pname should be set to GL_ACTIVE_SUBROUTINES. The result is written into the variable whose address you place in values. When you call glGetActiveSubroutineName(), index should be between zero and one less than this value. Once you know the names of the subroutines in a program object (either because you wrote the shader or because you queried the names), you can set their values by calling
void glUniformSubroutinesuiv(GLenum shadertype,
GLsizei count,
const GLunit *indices);
This function sets count subroutine uniforms in the shader stage given by shadertype in the active program to point at the subroutines whose indices are given in the first count elements of the array pointed to by indices. Subroutines uniforms are a little different from other uniforms in several ways:
• The state for subroutine uniforms is stored in the current OpenGL context rather than in the program object. This allows subroutine uniforms to have different values within the same program object when it’s used in different contexts.
• The values of subroutine uniforms are lost when the current program object is changed using glUseProgram(), when you call glUseProgramStages() or glBindProgramPipeline(), or if you re-link the current program object. This means that you need to reset them every time you use a new program or new program stages.
• It is not possible to change the value of a subset of the subroutine uniforms in a stage of a program object. glUniformSubroutinesuiv() sets the value of count uniforms, starting from zero. Any uniforms beyond count will be left with their previous value. Remember, though, that the default value of subroutine uniforms is not defined, and so not setting them at all and then calling them could cause bad things to happen.
In our simple example, after linking our program object, we can run the following code to determine the indices of our subroutine functions as we haven’t assigned explicit locations to them in our shader code:
subroutines[0] = glGetProgramResourceIndex(render_program,
GL_FRAGMENT_SHADER_SUBROUTINE,
"myFunction1");
subroutines[1] = glGetProgramResourceIndex(render_program,
GL_FRAGMENT_SHADER_SUBROUTINE,
"myFunction2");
Now, our rendering loop is shown in Listing 6.6.
void subroutines_app::render(double currentTime)
{
int i = (int)currentTime;
glUseProgram(render_program);
glUniformSubroutinesuiv(GL_FRAGMENT_SHADER, 1, &subroutines[i & 1]);
glDrawArrays(GL_TRIANGLE_STRIP, 0, 4);
}
Listing 6.6: Setting values of subroutine uniforms
This function draws a quad using a simple vertex shader that was also linked into our program object. After setting the current program with a call to glUseProgram(), it resets the values of the only subroutine uniform in the program. Remember, the values of all of the subroutine uniforms “go away” when you change the current program. The subroutine at which we point the uniform changes every second. Using the fragment shader shown in Listing 6.5, the window will be rendered red for one second, then blue for a second, then red again, and so on.
In general, you can expect that setting the value of a single subroutine uniform to take less time than changing a program object. Therefore, if you have several similar shaders, it may be worthwhile combining them into one and using a subroutine uniform to choose between which path to take. You can even declare multiple versions of your main() function (with different names), create a subroutine uniform that can point at any of them, and then call it from your real main() function.
Program Binaries
Once you have compiled and linked a program, it is possible to ask OpenGL to give you a binary object that represents its internal version of the program. At some point in the future, your application can hand that binary back to OpenGL and bypass the compiler and linker. If you wish to use this feature, you should call glProgramParameteri() with pname set to GL_PROGRAM_BINARY_RETRIEVABLE_HINT set to GL_TRUE before calling glLinkProgram(). This tells OpenGL that you plan to get the binary data back from it and that it should hang on to that binary and have it ready to pass to you.
Before you can retrieve the binary for a program object, you need to figure out how long it’s going to be and allocate memory to store it. To do this, you can call glGetProgramiv() and set pname to GL_PROGRAM_BINARY_LENGTH. The resulting value written into params is the number of bytes you will need to set aside for the program binary.
Next, you can call glGetProgramBinary() to actually retrieve the binary representation of the program object. The prototype of glGetProgramBinary() is
void glGetProgramBinary(GLuint program,
GLsizei bufsize,
GLsizei * length,
GLenum * binaryFormat,
void * binary);
Given the name of a program object in program, it will write the binary representation of the program into the memory pointed to by binary, and write a token representing the format of that program binary into binaryFormat. The size of this region of memory is passed in bufsize and must be large enough to store the entire program binary, which is why it is necessary to query the binary size with glGetProgramiv() first. The actual number of bytes written is stored in the variable whose address is passed in length. The format of the binary is likely to be proprietary and specific to the vendor that made your OpenGL drivers. However, it’s important to keep hold of the value written to binaryFormat because you’ll need to pass this back to OpenGL later along with the contents of the binary to load it back up again. Listing 6.7 shows a simple example of how to retrieve a program binary from OpenGL.
// Create a simple program containing only a vertex shader
static const GLchar source[] = { ... };
// First create and compile the shader
GLuint shader;
shader = glCreateShader(GL_VERTEX_SHADER);
glShaderSource(shader, 1, suorce, NULL);
glCompileShader(shader);
// Create the program and attach the shader to it
GLuint program;
program = glCreateProgram();
glAttachShader(program, shader);
// Set the binary retrievable hint and link the program
glProgramParameteri(program, GL_PROGRAM_BINARY_RETRIEVABLE_HINT, GL_TRUE);
glLinkProgram(program);
// Get the expected size of the program binary
GLint binary_size = 0;
glGetProgramiv(program, GL_PROGRAM_BINARY_SIZE, &binary_size);
// Allocate some memory to store the program binary
unsigned char * program_binary = new unsigned char [binary_size];
// Now retrieve the binary from the program object
GLenum binary_format = GL_NONE;
glGetProgramBinary(program, binary_size, NULL, &binary_format,
program_binary);
Listing 6.7: Retrieving a program binary
Once you have the program binary, you can save it to disk (possibly compressed) and use it next time your program starts. This can save you the time taken to compile shaders and link programs before you can start rendering. It should be noted that the program binary format is probably6going to be specific to your graphics card vendor and is not portable from machine to machine, or even from driver to driver on the same machine. This feature is not currently designed as a distribution mechanism, but as more of a caching mechanism.
6. It is conceivable that one or more OpenGL vendors could get together and define a standard binary format in an extension that is understood by multiple parties. At time of writing, that has not happened.
This may seem like a fairly large limitation and as if program binaries are not of much use — and with relatively simple applications like those outlined in this book. However, consider a very large application such as a video game. It may include hundreds or thousands of shaders, and may compile multiple variants of those shaders. The startup time on many video games is very long, and using program binaries to cache compiled shaders from run-to-run of a game can save a lot of time. However, another issue that plagues complex application is run-time recompilation of shaders.
Most features of OpenGL are supported directly by modern graphics processors. However, some of them require some level of work in a shader. When your application compiles shaders, the OpenGL implementation will assume the most common case for most states and compile the shaderassuming that is the way it will be used. If it is used in a way that is not handled by this default compilation of the shaders, the OpenGL implementation may need to at least partially recompile parts of the shader to deal with the changes. That can cause a noticeable stutter in the execution of the application.
For this reason, it’s strongly recommended that you compile your shaders and then link your program with the GL_PROGRAM_BINARY_RETRIEVABLE_HINT set to GL_TRUE, but wait until you’ve used them a few times for real rendering before retrieving the binaries. This will give the OpenGL implementation a chance to recompile any shaders that need it and store a number of versions of each program in a single binary. Next time you load the binary and the OpenGL implementation realizes that it needs a particular variant of the program, it will find it already compiled in the binary blob you just handed it.
Once you’re ready to give the program binary back to OpenGL, call glProgramBinary() on a fresh program object, and with binaryFormat and length set to the values you got back from glGetProgramBinary() and with the data loaded into the buffer that you pass in binary. This will reload the program object with the data it contained when you queried the binary on the last run of your application. If the OpenGL driver doesn’t recognize the binary you give it or can’t load it for some reason, the glProgramBinary() call will fail. In this case, you’ll need to supply the original GLSL source for the shaders and recompile them.
Summary
This chapter discussed shaders, how they work, the GLSL programming language, how OpenGL uses them, and where they fit within the graphics pipeline. You should have a good understanding of the basic concepts involved in writing the shaders you’ll need for your programs. You also learned how to retrieve binary shaders from OpenGL so that your applications can cache them and store them away for later. When your shaders don’t work (which is inevitable during the development of any application), you should be able to get information from OpenGL that will help you figure out why. With a little practice, and with the topics covered earlier in this book, you should be in good stead to write some interesting OpenGL programs.
All materials on the site are licensed Creative Commons Attribution-Sharealike 3.0 Unported CC BY-SA 3.0 & GNU Free Documentation License (GFDL)
If you are the copyright holder of any material contained on our site and intend to remove it, please contact our site administrator for approval.
© 2016-2025 All site design rights belong to S.Y.A.