Creating E-Learning Games with Unity (2014)
Chapter 9. Synthesis of Knowledge
In this chapter, we will develop the third level in our e-learning game. This will be the final level in our game; the purpose of which is to help the user consolidate their learning by synthesizing new knowledge. The objective of this level is for the player, having now been promoted to ranger, to walk around the park tending to the needs of the visitors. The visitors will ask various questions or give hints about what they are thinking; the player needs to use higher-order reasoning to successfully interact with the game NPCs in suggesting an answer that has to do with state trivia. If the player answers correctly, we will reward the player in the game to promote learning.
We will reuse significant portions of technology from the first two missions to develop this chapter. In this chapter, we will cover the following topics:
· Understanding the mission three GameObjects
· Applying learning theory to mission three
· Creating the structure for mission three
· Modifying the pop-up system
· Creating the NpcLocators Prefab
· Creating the CorrectResponse Prefabs
· Modifying the quiz cards
· Adding another data condition
· Using the setupLevel3 Prefab
· Creating the AddScore condition
· Creating the ShowLevel3Results response
· Creating the Time object
· Modifying the LevelLogicObj object
· Rewarding the player
Understanding the mission three GameObjects
In this level, we will implement a number of GameObjects and update others. Some of the game objects are listed as follows:
· MissionMgr: This GameObject will be present in this level, but we will not use a new mission to track the level progress. The missionMgr GameObject should still stick around in case we want to add secondary missions or side-quests to the game in the future.
· Player: The Player GameObject will need to have a working playerData component script attached to it. Since this level is completed upon achieving a certain score, and since scores (along with other statistics) are tracked in this data structure, we are required to implement playerData.
· LevelLogicObj : The LevelLogicObj GameObject is the main logic object that will track the players' score and the number of points that have been earned in this level, and will dispatch the pass condition pop up at the end of the level, assuming enough points have been acquired.
· QuizCard : The QuizCard GameObject creates a number of quiz cards (one for each state) that show the user a unique question or hint that the NPC will present to the player. The NPC will ask the player to choose a state that addresses their statement. If the correct answer is given, 500 points will be awarded to the player.
· CorrectResponse: The CorrectResponse GameObject creates a number of response cards that show your response (as the player) to the NPC when you give a correct response. These form the second half of the player to NPC interaction system in this level.
· SetupLevel3: The SetupLevel3 GameObject is the Prefab that does the setup for Mission 3 and starts the level.
· Time : The Time GameObject is a clock object. In this mission the pressure element will be provided by the race against the clock. If the clock reaches zero before 2,500 points are acquired, this class activates the failure condition pop-up dialog window.
Applying learning theory to mission three
The choice of a tourism-themed race against the clock was made to fill a number of e-learning game design requirements shown in the following diagram:
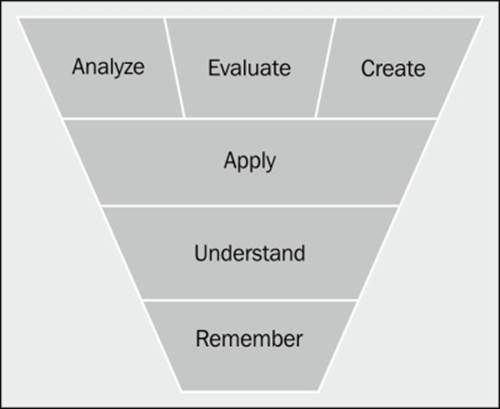
Effective learning requires manipulation of the subject matter at various levels of cognitive complexity. Hence, one powerful way to design mission content for our e-learning game is to deliver content that requires the player to interact with the subject matter in a variety of ways. Bloom's Taxonomy (aptly named after American educational psychologist Benjamin Bloom) gives us a pyramid heuristic that illustrates this concept. Relevant to this text; this taxonomy is a set of descriptive words that may be used to classify the different levels of cognitive complexity at which learning can occur.
Having used remembering as the underlying instructional mode in mission one (find the flags) and applying as the underlying instructional mode in mission two (quiz race), we increase the level of interaction with the subject matter in mission three to analysis andevaluation of the NPC's statements. We do this in order to encourage the player to synthesize an appropriate, subject-relevant reply. Through working with the same material on multiple levels, the player is naturally encouraged to remember, retain, and consolidate the learning that has taken place.
Note
For more information on Bloom's Taxonomy, feel free to review the information at http://www.bloomstaxonomy.org/Blooms%20Taxonomy%20questions.pdf and http://www.learningandteaching.info/learning/bloomtax.htm.
Creating the structure for mission three
To begin, use LEVEL2 as a basis for developing LEVEL3 by performing the following instructions:
1. Copy and paste TESTBED2, and rename the copy TESTBED3.
2. Make sure that the _global GameObject from the original stays in the copy and that it is positioned at (0, 0, 0).
3. Rename the _level2 GameObject _level3.
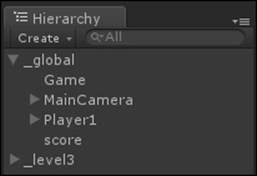
4. Under _global, ensure that the player (named Player1), camera (named MainCamera), and Game (named Game) child objects can be found. Also, make sure that a GameObject of type GuiTexture named score is present.
5. Under _level3, we will add the following level three-specific objects:
· Terrain
· setupLevel3
· Time
· NpcLocators
· LevelLogicObj
· Directional Light
Modifying the terrain
It is not necessary to modify the terrain from LEVEL2 to LEVEL3, but feel free to do so if you wish to add variety. The only constraint is that NpcLocators that you place need to be above the ground as before. This is because the NPCs precisely follow the path formed by the locators.
Adding visitors to the park
The primary interactions for this mission will come from the user talking with the NPCs. We will use a modified copy of the QuizNpc prefab from LEVEL2 to populate the final level. To implement this system, perform the following steps:
1. Copy the QuizNPC prefab from the Chapter7 folder into the Chapter 9 folder of the Project view.
2. Rename the new copy Npc.
Modifying the pop-up system
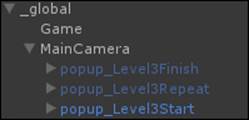
You will find three pop ups attached to the MainCamera object from the process of copying LEVEL2. These will need to be renamed and updated.
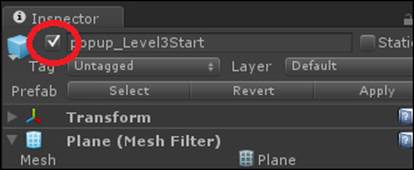
1. Rename popup_Level2Start to popup_Level3Start.
2. Update the text to read You have been promoted to Park Ranger. Walk through the park and help the patrons by answering their questions. You must answer all questions correctly and earn 2500 points to win. Good luck!
3. Ensure that this GameObject start behavior is enabled by default. The results of the steps performed so far are shown in the following screenshot:
4. Rename popup_Level2Finish to popup_Level3Finish.
5. Update the text to read Congratulations! Your state trivia knowledge is great! Your park is a success, and you WIN! Click okay to return to main menu.
6. Ensure that the GameObject start behavior is disabled by default by unchecking it in the Inspector window.
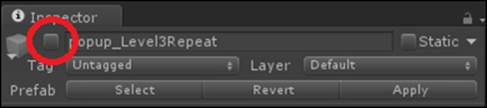
7. Rename popup_Level3Repeat to popup_Level3Repeat in the Inspector window.
8. Update the text to read Level 3. Your knowledge of state trivia is lacking. Try again! Click okay to reload. We will connect the reload in Chapter 10, An Extensible Game Framework Pattern in Unity.
9. As usual, ensure this GameObject starts disabled by default by unchecking it in the Inspector window.
Congratulations! You have updated the pop ups that will appear at the start and completion of the level (for both success and failure conditions).
Creating the NpcLocators Prefab
The NpcLocators Prefab will hold a collection of locator GameObjects that the setupLevel3 prefab will use to pick locations for the NPCs. This should be a child of the _level3 object and can be constructed from the FlagLocators GameObject from LEVEL 2.
1. Locate the FlagLocators objects beneath the hierarchy of the _level3 object.
2. Rename the object to NpcLocators as shown in the following screenshot:
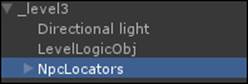
3. Feel free to mix up the locations of the objects to various places in the scene; this way, the player will not memorize the locations from LEVEL2. For variety, consider placing some on top of the mountains in the middle or around the periphery of the level.
Creating the CorrectResponse Prefabs
The CorrectResponse Prefabs are the pop ups that will be instantiated from the npcDialog (quiz cards) for LEVEL3. Create these according to the following steps:
1. Copy and paste the popup_QuizSuccessQuestion Prefab into a new folder in the folder named Chapter 9.
2. Create 50 unique CorrectResponse cards—one for each state/NPC dialog interaction.
3. We do not need to pass missionToken into missionMgr when this pop up destructs itself, so ensure that there is no missionToken attached (it will do no harm, but it is redundant).
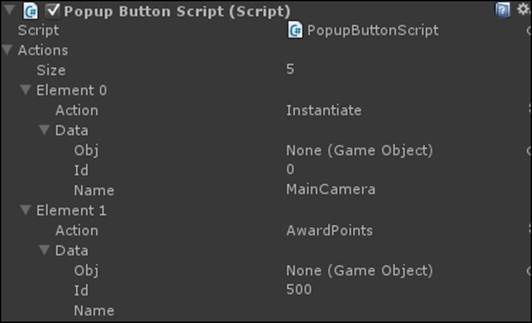
4. Modify PopupButtonScript.cs and add an AwardPoints action. Make sure that when the button is clicked on each of these Prefabs, 500 points are awarded to the user. When the button is clicked, we simply find the player class and the playerData component, and then add these values to the score member variable as shown in the following code. Don't forget to add the action to the enumeration at the top of the file:
5. // inside Dispatch()
6. case(popupAction.AwardPoints):
7. {
8. GameObject p = GameObject.Find ("Player1");
9. if (p)
10. {
11. PlayerData pd = p.GetComponent<PlayerData>();
12. if (pd)
13. {
14. pd.AddScore (r.data.id);
15. }
16. }
17. break;
}
Modifying the quiz cards
The QuizCard pop-up window Prefab is the class that permits user interaction with an NPC; upon selecting the button corresponding to the correct response, the CorrectResponse window pop up will be instantiated.
1. Copy and paste a QuizCard Prefab from Chapter7 into a new folder in Chapter9. Name the new folder NpcQuestions.
2. Implement 50 unique NPC Dialog cards based on this Prefab, which in turn is based on the trivia content embedded in the Flag pop ups from LEVEL1; they will form the basis for the dialog in this mission.
3. Keep the associations to the popup_QuizFailedQuestion Prefab for the incorrect answers on these cards. For the correct selection, instantiate a unique and appropriate CorrectResponse Prefab.
4. Each QuizCard should have a unique CorrectResponse card. In this way, the player can see a contextually relevant response from you as you reply to the player. This gives an excellent opportunity to reinforce the learning material because it gives you a way to rephrase, restate, and reinforce the facts.
5. Make sure that each CorrectResponse card has an action to add points for every correct button click. Not only is this required for the mission to have an end condition, but this is also another way in which we reward the player for performing correctly. Remember, we can build a positive response in the learner with simple positive reinforcement with points and a dialog that furthers the story.
Congratulations! Associating each QuizNpc's Instantiate button action with the corresponding CorrectResponse card forms the brunt of the labor in creating mission three. Remember that Prefabs can only store associations with other Prefabs; be prudent to not drag-and-drop associations with actual instances of these classes themselves.
Adding another data condition
Just as we saw in Chapter 7, Mission Two – Testing a Player's Learning, when we created listData npcCondition which wrapped a list of GameObjects used to track racers in the race, we will need to create another type of wrapper in this mission; one for the initial score of the player. We can create this list with the following steps:
1. Copy and paste listData.cs into the folder named Chapter9. Rename the copy floatData as shown in the following screenshot:

2. Update the declaration in the script to match the new name of the file.
3. Replace the list<GameObject> _listData variable with the following line of code:
public float _floatData;
Congratulations! You have now created a second npcCondition data wrapper. An instance of this will be required by the logic of this level to compute the points scored.
Using the setupLevel3 Prefab
The setupLevel3 Prefab will be activated when the user presses the popup_Level3Start button. It will initialize the NPCs for the level, place them in random locations in the world, and set up the state tracking logic that determines if the player achieves success. Perform the following steps to use the setupLevel3 Prefab:
1. Locate the Prefab named setupLevel2 beneath _level2, and rename it setupLevel3. Duplicate the SetupMissionTwo script from mission two, and rename the duplicate to SetupMissionThree. Place the duplicate in the folder named Chapter9 to keep your assets organized.
2. Add an instance of this script to the setupLevel3 object.
3. Inside MonoDevelop, change the class declaration to SetupMissionThree so that it matches the name of the script as shown in the following code:
public class SetupMissionThree : MonoBehavior
4. We will use the same pattern to choose random NPC locators as we did for the QuizNpc locators in mission two. We will remove the CorrectPopups list, because each pop up will have a unique, correct pop up already associated with it in the editor.
5. At this point, open up PopupPanel.cs, and add the following line of code:
Public int id;
6. This ID will be used by the pop up to locate the NPC that dispatched it so that its animation can be updated on success.
7. In LEVEL3, we note the successful pass condition is when 2,500 points have been earned in addition to the points from levels one and two. In order to determine this, we need to remember the score at the beginning of the level so that we can calculate the delta.
8. At the top of SetupMissionThree, add an initialScore variable of type npcCondition. Since the level's complete processing will be handled by npcDecisionMgr, we need to store the score in a datatype that this system can operate on:
public npcCondition initialScore;
9. If a Player class can be found, extract the score from the playerData component, and store it in the initialScore component. Note that we need to cast the npcComponent base reference to floatData in order to access the _floatData member for storage.
10. The body of this method works in a manner similar to SetupMissionTwo, where it creates backups of the QuizPrefab and SpawnPoint lists. It diverges, however, when five random quiz cards are selected from the QuizPrefab list. We directly associate the card Prefab with the NPC to be instantiated as shown in the following code:
11.objectInteraction objInteraction = Npc.GetComponent<objectInteraction>();
12. if (objInteraction)
objInteraction.prefab = quizPrefab;
13. We also pass the ID value from the QuizPrefab card into the ID of QuizNpcHelper. We use this later when the CorrectAnswer pop up looks up the NPC that instantiated the card. At that time, we locate the NPC by ID and then pass doSuccess into its animator to make it dance as done in level two.
Congratulations! The setupLevel3 Prefab is complete. We now have a class that will randomly pick a state quiz card and randomly spawn NPCs in the world to interact with the player.
Creating the AddScore condition
The AddScore condition will be used by levelLogicObj to track the points earned in this mission. Once the requisite number of points have been earned, this script will return true. This, in turn, will dispatch the response of showing the Success pop up via theShowLevel3Results response script. Writing this script requires the following steps to be performed:
1. Create a new script named condition_scoreAdded. Change the base class from MonoBehavior to npcCondition as done with the other condition classes.
2. Add an instance of this script to LevelLogicObj.
3. Drag-and-drop this script instance into the second slot of decisionMgr on LevelLogicObj as shown in the following code:
4. Inside the script, add an int datatype for scoreAdded; this is the number of points necessary for the condition to return true:
public int scoreAdd;
5. Add an npcCondition called initialScore. Drag-and-drop the instance of this script from setupLevel3 (remember the object that first stored the score on level start) into this reference as shown in the following code:
public npcCondition initialScore {
6. If there is a playerData component on the player, then compute the score delta as the absolute value of the score minus the original score as shown in the following code:
7. if (p != null)
8. {
9. float playerScore = Mathf.Abs (p.GetComponent<playerData>().score - (initialScore as floatData)._floatData);
10. if ((int)playerScore >= scoreAdded )
11. rval = true;
}
Congratulations! You have now created the condition for npcDecisionMgr, which will check for the number of points that have been earned in a given level.
Creating the ShowLevel3Results response
The ShowLevel3Results class will be used to show the success pop up (and some associated cleanup) if the user achieves enough points. It will be dispatched by npcDecisionMgr of LevelLogicObj in this level. Perform the following steps to create the ShowLevel3Resultsresponse:
1. Create a new npcResponse class named response_ShowLevel3Results. Change the parent class from MonoBehavior to npcResponse.
2. Open the scene file from the last gameplay level TESTBED1.
3. Copy the popup_Level1Finished Prefab by pressing Ctrl + C.
4. Open the scene file from the last gameplay level TESTBED3.
5. Paste this GameObject beneath the hierarchy of MainCamera. Rename the popup_Level3Finish object as shown in the following code:
6. Add an instance of the response_ShowLevel3Results script to LevelLogicObj.
7. Drag-and-drop a reference to this script into the Response field beside condition_addScore in decisionMgr for LevelLogicObj.
8. Drag-and-drop a reference from popup_Level3Finish (inside the MainCamera hierarchy) into the passPopup field of the response_ShowLevel3Results script instance. In the dispatch() method of this script, enable the passPopup if it is valid, as shown in the following code:
9. if (passPopup != null)
passPopup.SetActive(true);
10. Then, on the MainCamera, invoke the lookup() method, to make sure the pop up is presented in a visually pleasing way, as follows:
11.GameObject camObj = Camera.main.gameObject
12.if ( camObj )
13.{
14. camObj.GetComponent<GameCam>().LookUp();
}
15. Lastly, find the clock object named Time, and disable it with the following code. This is done to make sure the game doesn't show the out-of-time pop up while waiting for the success pop up:
16.GameObject clock = GameObject.Find("Time");
17.if (clock)
18.{
19. clock.SetActive(false);
}
Creating the Time object
The Time object will implement the game's clock functionality in this level. If the time ever reaches zero, this class will display the mission failed pop up. Recall that the source of the added pressure this time around is the clock ticking down to zero. We want this because a little pressure makes the game fun and encourages cognitive flow. Perform the following steps to create the Time object:
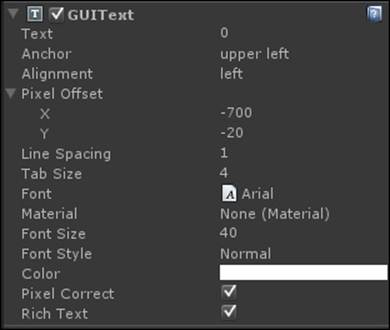
1. Create a new script named TimeScript.cs. Add an instance of it to a new GameObject of type GUIText. Place GUIText on the left-hand side of the screen opposite the score. Note, this is done by adjusting the PixelOffset field of the GUIText component, and not by moving the transform (this is one of the few exceptions to the rule when placing objects in Unity).
2. A pixel inset of -60, -20 looks good at a screen resolution of 1024 x 768. Some of the settings for the GUIText component are shown in the following screenshot:
3. Add the following four variables to the script:
· public GameObject failPopup: This variable will hold the reference to the pop up that is displayed if the user fails the mission by letting time run out.
· public float starting_time: This variable will store the time when the timer should start before the level ends. Let's remember to set this to 120 seconds.
· private float t: This variable will be used to store the current elapsed time.
· public boolean timeElapsed = false: This Boolean variable will store whether or not this timer has reached zero at this time through the level.
These variables can be declared in the following manner:
public GameObject failPopup;
public float starting_time;
private float t;
public boolean timeElapsed = false;
4. Inside the update() loop, we subtract the actual amount of time elapsed from t each time update() is called as shown in the following code:
t -= Time.deltaTime;
5. Once the time has elapsed, we tell the camera to look up and then show the fail pop up by setting its enabled flag to true. We set the local timeElapsed Boolean to true as well so that this response cannot show multiple times in a row accidentally:
6. if (t < 0.0f)
7. {
8. GameObject camObj = Camera.main.gameObject;
9. if (camObj) {
10. camObj.GetComponent<GameCam>().LookUp();
11. failPopup.SetActive(true);
12. timeElapsed = true; }
}
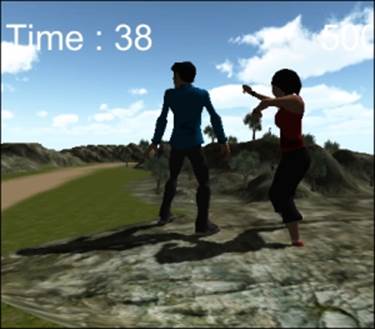
13. Each time update() is called, the Time script will set the text of the GUIText component to be the string concatenation of Time and the elapsed time left (cast as an integer). We cast it to an integer to remove the trailing decimal points as shown in the following code:
this.gameObject.GetComponent<GUIText>().text = "Time : "+((int)t).ToString ();
Congratulations! We now have a working game clock to add just enough game-play pressure to the player in the level. Consider adjusting the amount of time you give to the player based on a difficulty setting in your game, the age of the player, or perhaps on how well the player is actually playing in the game. Remember, flow is achieved not only when the task at hand is somewhat challenging, but also in a scenario of moderate pressure.
Modifying the LevelLogicObj object
The LevelLogicObj object will track the condition when the player has achieved a high score that is enough to earn the level finished pop up and to win the game. To implement this with the technology we already have, we will perform the following steps:
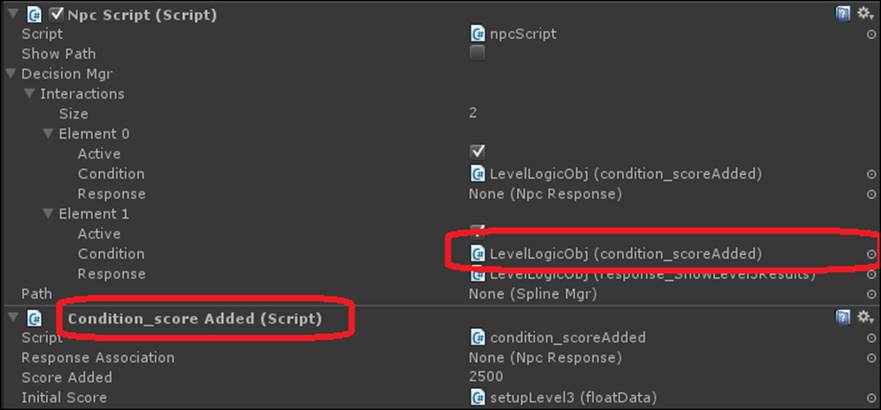
1. In decisionMgr of npcScript on LevelLogicObj, set the number of interactions to 2. This is required because the LevelLogicObj object will process two interactions each frame.
2. Create an instance of a floatData condition on LevelLogicObj. Drag-and-drop this into the first condition. Make sure there is only one instance of this script on this object in the editor.
3. Create an instance of the condition_addScore condition on LevelLogicObj. Drag-and-drop this into the second condition. Set the scoreAdded variable on the condition to 2500, and drag-and-drop the setupLevel3 object into the initalValue reference to associate theinitialValue condition component attached there into this component.

4. Create an instance of the response_ShowLevel3Results script on LevelLogicObj. Set the passPopup reference to the popup_Level3Finished pop up on the MainCamera.
5. Drag-and-drop this reference into the reference slot on the second interaction in npcDecisionMgr of the NPC script of LevelLogicObj.
At this point, npcDecisionMgr on the LevelLogicObj object should look something like the following:
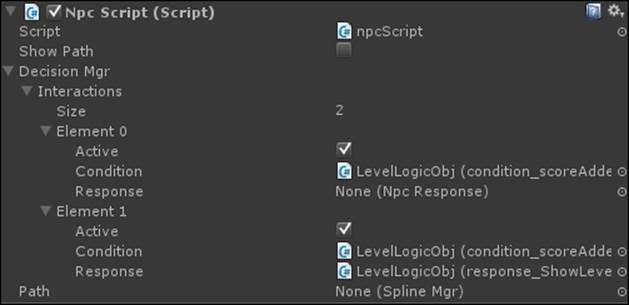
Congratulations! You have created the GameObject that implements the level logic of tracking the player's score and showing the finished Prefab if enough points are achieved on time.
Rewarding the player
We know that the more the positive responses and positive reinforcement we give to the player for performing well (showing that the material has been retained), the better will he or she retain and be able to recall it on demand. In this mission, we use a number of reinforcement techniques:
· The score is central to the player's success in this level. We give the player 500 points for each question that is answered correctly.
· The player is rewarded for further dialog from the player when he or she gives the correct answer. This further immerses the player with positive feedback and helps solidify a positive response.
· As with mission two, we make the NPC dance after the player gives a correct response. This is another example of a feel-good moment that helps condition a positive response in the player.
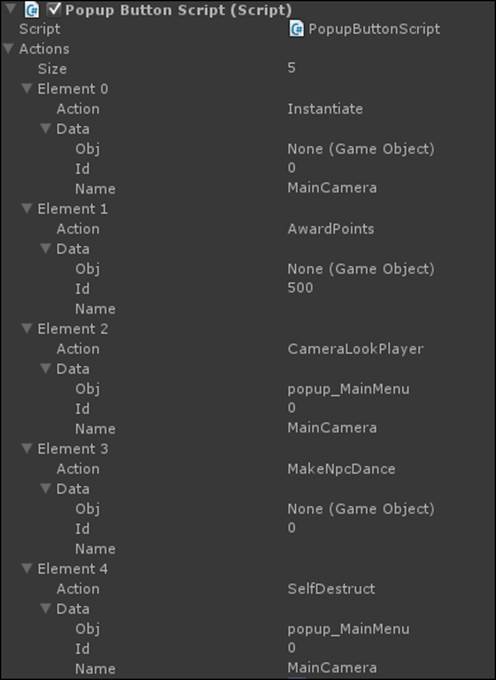
· Much of this feedback happens inside the Action parameter of the CorrectResponse pop up that is displayed for a particular trivia question, so make sure that you have the following actions in each of your Response Prefabs:
Summary
In this chapter, we applied learning theory and applied our existing technology from previous chapters in the development of the final level in our game. We developed the third mission of the three in our game, and by applying Bloom's Taxonomy to our learning outcomes, we developed content that encouraged the user to interact with the content at a high level, thus encouraging learning. This completes the final stage in our e-learning game. In the final chapter, we will tie these three levels together with the rest of the game framework while refactoring some systems during the process.