Creating E-Learning Games with Unity (2014)
Chapter 6. NPCs and Associated Technology
To increase the level of immersion in our e-learning game, we will want to increase the amount of user interaction scenarios. To do this, we will populate the game world with some non-player characters (otherwise known as NPCs) for the user to interact with. These are characters or actors in your game scene that the player can interact with during gameplay, but not control directly. You may find these referred to as AI Characters in other texts; however, these terms are synonymous.
In this chapter, we will build an NPC class to handle the choreography of these actors and their actions. To support the NPC system, we will develop a framework to define a smooth curve for the actors to travel on. We will also apply the FSM concepts from Chapter 4, Mission One – Future Proofing the Code, as we implement a data-driven behavior system; this will enable fast design and tweaking of NPC behavior inside the Unity Editor. Lastly, we will integrate these classes and construct Prefab objects to make the task of populating the world quick and simple.
The following topics will covered in this chapter:
· Creating the NPC GameObject
· Implementing the SplineMgr class
· Connecting SplineMgr to npcScript
· Implementing the NPC decision system
· Building a collection of NPC conditions and responses
· Putting it all together
Creating the NPC GameObject
To develop and test our NPC systems, we need a simple Prefab to represent our NPC character. Once this is working, we will be able to add polish to the game by replacing it with a more visually appealing model and by adding animation. To begin with, create a capsule with a scaled hat similar to the player Prefab placeholder.
Implementing the npcScript class
The npcScript class will encode the base state machine for NPCs. To develop a robust non-player character system requires a model of the behavior we want to present to the player. Once we have a model, we can build an FSM that meets our functional needs. We shall list these requirements in the following part.
In our e-learning game, the non-player characters will need to do the following:
· Travel about the world in a smooth, realistic way
· When approached by the player, the NPC should stop and face the player to interact
· When the player leaves the NPC or finishes the interaction, it should continue moving about the world
Based on these requirements, it is clear that we will need a number of states that we can encode in a public enumeration. To prove that the NPC framework works and meets our design needs, we will implement the patrol and turnToPlayer states as a minimum viable product for the NPC system. Once these are working, it will be clear that the system works and that the reader can then extend the system with more behaviors:
public enum npcState
{
invalid = -1, //enum to encode error npc state
none = 0,// enum to encode npc having no state
idle = 1,// enum encoding npc waiting idly
patrol = 2,// enum for npc patrolling about
turnToPlayer = 3,// enum for npc to face player
InteractWithPlayer = 4,// enum for npc interacting with player
Celebrate = 5,// enum for npc celebrating
Disappointed = 6 //enum for npc acting disappointed
};
Perform the following steps to implement the npcScript class:
1. A private variable of the type npcState, named state, will track the value of this enum for each NPC instance:
private npcState state;
2. In order for our NPC to be able to follow a parametric curve when patrolling, we give the npcScript class a SplineMgr class to interpolate a user-defined path. A public showPath Boolean is also provided for debugging:
3. public bool showPath;
public SplineMgr path;
4. An instance of a data-driven system for detecting scenarios and dispatching responses at runtime is also added to the npcScript class. This class will act as the brain of the NPC, deciding when to change states based on the state of the game world:
public npcDecisionMgr decisionMgr;
5. Each time an in-game NPC is activated, the start() script will first compute the debug path visualization for the spline and then set the NPC into the patrol mode so that it will start walking. The computeDebugPath method will walk through the spline from the start to the end and store a series of line segments that the debug line renderer can use to draw the spline when we need to visualize it. The second line of code sets the NPC into the patrol state, which tells the NPC to follow the spline path. We will discuss splines later in this chapter:
6. path.computeDebugPath();
SetState(npcState.patrol);
7. The npcScript class implements a SetState(newstate s) method to allow the client code to change the state of the NPC. A switch statement implementation provides a means of specializing one-off code that executes once when the state actually switches. This is how we implement the OnEnter event for each state in the enumeration.
8. When entering the patrol state, we set the head of the SplineMgr class to the NPC GameObject. This permits the SplineMgr class to attach the NPC to the curve and update its position each frame. We also set the playback mode on the SplineMgr class to loop so that when the NPC reaches the end of the curve, it will loop back to the start; other modes exhibit different playback behavior along the curve:
9. path.HeadObj = this.gameObject;
path.SetPlaybackMode(splineMgr.ePlaybackMode.loop);
10. When entering the turnToPlayer state, we set the playback mode of the SplineMgr class to none. This has the effect of stopping the velocity of the NPC model:
path.SetPlaybackMode (SplineMgr.ePlaybackMode.none);
11. The npcScript class implements an Update() method, (which all classes that inherit from MonoBehavior need to implement), which has four logical segments that are computed for each frame.
12. First, the distance from the player and the NPC is calculated. This quantity is stored for later processing:
13.if (player)
14.{
15. Vector3 v = h.transform.position -
16. this.transform.position;
17. distanceToHero = v.magnitude;
}
18. A switch statement permits specialization of the code that the NPC needs to perform for each frame. In the patrol state, the NPC looks at the point in front of itself; this is a quantity that the SplineMgr class conveniently returns for us by evaluating the spline at a point slightly further ahead on the curve than the HeadObj itself:
this.transform.LookAt(path.TargetObj.transform.position);
19. While in the turnToPlayer state, the NPC looks at the player position:
this.transform.LookAt (player.transform.position);
20. If there is a decisionMgr class instance attached to the NPC, the npcScript allows it to evaluate all of its conditions for potential dispatch:
21.if (decisionMgr != null)
decisionMgr.eval ();
22. Lastly, depending on the state of the showPath Boolean, we either enable or disable the lineRenderer component for the spline curve:
this.GetComponent<LineRenderer>().enabled = showPath;
Congratulations! You have just written the npcScript base framework for a non-player character class. As you can see, the power of this choreography class is derived from the FSM, and the work is delegated to the DecisionMgr and SplineMgr classes.
Implementing the SplineMgr class
Recall from our requirements that our NPC needs to be able to walk about the world along an arbitrary path. A convenient way to author the curve information would be by placing waypoints in the scene in the Unity3D Editor. Then, by interpolating between these points, we can apply smooth motion to the NPC object. It turns out that our SplineMgr is able to generate a curve that interpolates through all of the waypoints (or ControlPoints) in a set. Great news!
There are numerous types of splines in the mathematical world; each one has its own unique properties. Some of them don't interpolate any but get really close. Others will interpolate the first and the last, and approximate the middle two. By using a specific type of spline in our calculations (Catmull-Rom to be precise—named after the scientists who invented the formulation), we can guarantee that our curve will always interpolate all waypoints; the math inside our GetPointOnCurve() function returns a point on the Catmull-Rom spline curve.
We can implement the SplineMgr class using the following steps:
1. Our SplineMgr keeps a list of control points / waypoints for processing. These can be added to this list individually or in a batch via splineNodeRoot (this is simply an empty GameObject with a collection of control points in its hierarchy—a convenient way to encapsulate control point data).
2. The SplineMgr class has two types of playback. One of them evaluates the curve at a constant frame rate, and the other at a constant (more or less) arc length. The first way is good for curves that need to start and stop at a precise time. The tradeoff is that the curve may accelerate and decelerate as the control points move closer and farther away from one another.
3. The second playback mode is useful when the nature of the motion needs to be of constant velocity. However, the tradeoff with this playback type is that the total time to evaluate the curve is stretched:
4. public enum ePlaybackType
5. {
6. invalid = -1,
7. none = 0,
8. const_dt = 1, //interpolate spline at constant speed
9. const_dist = 2 //interpolate spline at constant distance steps
};
10. A single variable of the type ePlayback encodes the type of interpolation that the spline will use to generate points on the curve:
public ePlaybackType type = ePlaybackType.const_dt;
11. A second enumeration encodes the playback mode that the SplineMgr class will use to generate points on the curve. The loop will continue the playback in an infinite cycle. The oneShot mode will play the spline once and then finish. The ComputingDebugPath andComputingDebugPath_Finished modes are used while evaluating the spline to generate points on the lineRenderer component:
12.public enum ePlaybackMode
13.{
14. invalid = -1, //error spline interpolation
15. none = 0, //not spline interpolation
16. oneshot = 1, //play once and finish
17. loop = 2, //loop continuously
18. oneshot_finished = 4,//when oneshot is done
19. computingDebugPath = 5, //internal
20. computingDebugPath_finished = 6 //internal
};
21. The start() method in the SplineMgr class performs two primary tasks:
· It allocates a new GameObject to move along the curve in front of the HeadObj object. This is to facilitate looking ahead of the curve when the NPC is in the patrol mode and walking along the spline.
· It also checks if a splineNodeRoot has been assigned to the spline. If it has, this triggers an automatic waypoint / control point installation into the SplineMgr class:
· TargetObj = new GameObject();
· nHead = 0;
· if (splineNodeRoot)
InstallSplineNodes();
22. The InstallSplineNodes() method is an internal private method that takes a GameObject, extracts all child game objects, and then populates the ControlPoints list with these GameObjects as waypoints. The algorithm has three steps.
0. First, the ControlPoints list is cleared:
ControlPoints.Clear ();
1. Using an internal function in Unity, we return an array of all the child objects of the splineRootNode:
Transform[] allChildren = splineNodeRoot.GetComponentsInChildren<Transform>();
2. We iterate over this list of child nodes (as they are the waypoints in our spline) and add them to the ControlPoints list. Note that this list will include the splineNodeRoot, so we need to check that we don't add this to the waypoints:
3. foreach (Transform child in allChildren)
4. {
5. // do what you want with the transform
6. if (child != splineNodeRoot.transform)
7. ControlPoints.Add(child.gameObject);
}
23. The ComputeDebugPath() method iterates over the waypoints array before the game starts and fills in the lineRenderer component on the NPC. The lineRenderer component is then used to display the path if the showPath flag is set.
0. Before the method starts, it caches the playback mode and playback type that the user sets in the editor. We do this so that the system can set playbackMode to ComputePath while the debugPath is calculated:
1. // store settings
2. ePlaybackMode pbm = this.playbackMode;
ePlaybackType pbt = this.type;
3. We then loop over a preset number of samples in the lineRenderer component, sampling the splinePath and storing these samples in the debugPath:
4. SetPlaybackMode(splineMgr.ePlaybackMode.computingDebugPath);
5. for (int i = 0 ; i < 1024; i++)
6. {
7. Vector3 p = getPointOnCurve();
8. debugPath.SetPosition(i, p);
9. if (IsFinished() == true)
10. {
11. debugPath.SetVertexCount(i-1);
12. break;
13. }
}
14. Once the path is calculated and the lineRenderer component is filled with values of line segments (from the debugPath.SetPosition() call earlier), we restore playbackMode and playbacktype from the user:
15.// restore values
16.playbackMode = pbm;
17.Playbacktype = pbt;
vOut = 0.5f * ((2.0f*p1) + (-p0+p2)*t + (2.0f*p0 - 5.0f*p1 + 4.0f*p2 - p3)*t2 + (-p0 + 3.0f*p1 - 3.0f*p2 + p3)*t3);
Tip
The PointOnCurve() method is the workhorse of the SplineMgr class. It takes four control points as input (p0, p1, p2, p3), and given a value of t from (0, 1), it returns a point on the curve. The polynomial equation in this function is derived from the Catmull-Rom spline basis matrix (other splines would have a different formula for computing a point on the curve; the important point is that our formula derived from that matrix).
24. In the FixedUpdate() method, we call a custom eval() method, which evaluates the spline. We call this during FixedUpdate() to simplify the t calculations in PointOnCurve(), eliminating the need to multiply by elapsed time. Had we decided to evaluate the spline during Update(), we would need to evaluate the curve on a point that was also a factor of the elapsed time:
25.// Update is called once per frame
26.void FixedUpdate ()
27.{
28. if ((playbackMode != ePlaybackMode.computingDebugPath) && (playbackMode != ePlaybackMode.none))
29. eval ();
}
30. The eval() method is where the SplineMgr system evaluates the curve from being called every FixedUpdate(). Depending on the playback mode, it will either evaluate every frame or pause.
31. Recall that SplineMgr supports two playback types, const_dt and const_distance. In the const_dt mode, the spline is evaluated at t+dt every time FixedUpdate() is called:
32.if (type == ePlaybackType.const_dt)
t += dt;
33. If the playback type is const_dist, the SplineMgr class will dynamically adjust the dt value for each frame so that the distance from the previous point on the curve to the next point on the curve is approximately equal to target_arclength. We use sequential search instead of binary search because it is less prone to getting stuck in high curvature segments.
34. Recall that a spline curve is defined over four control points. To build a longer curve composed of more points, we use a sliding window technique and construct tangent curves.
Every frame, we update t by dt (or dynamic dt) and find a point on the curve for the relevant four control points. The four points that we pass into the spline evaluation method are the four points around the current moving windows view of the ControlPoints list:
// extract interpolated point from spline
//Vector3 vOut = new Vector3(0.0f, 0.0f, 0.0f);
vOut = Vector3.zero;
Vector3 p0 = ControlPoints[nHead].transform.position;
Vector3 p1 = ControlPoints[nHead+1].transform.position;
Vector3 p2 = ControlPoints[nHead+2].transform.position;
Vector3 p3 = ControlPoints[nHead+3].transform.position;
35. Once t exceeds 1.0, this signals to slide nHead (the start of the window) up by 1. Then, based on the playback mode, we either loop, stop, or handle the end of curve scenario in another appropriate way. Rather than setting t back to zero on a rollover, we subtract 1.0 instead. This way, we can capture the difference if t ever ends up slightly greater than 1.0 but less than dt; it happens more than you'd think, and doing this results in a smoother and more accurate curve:
36.if (t > 1.0f)
37.{
38. t -= 1.0f;
39. nHead++;
}
40. The SplineMgr class then translates the GameObject reference in headObj to the new position on the curve:
41.// update headObj
42.vOut = PointOnCurve(t, p0, p1, p2, p3);
43.if (HeadObj)
HeadObj.transform.position = vOut;
44. The SplineMgr class also translates a second GameObject along the curve. The TargetObj object gets updated slightly in front of headObj and is used by the NPC to face forward when walking along the curve:
45.// update lookObj
46.if (TargetObj)
47.{
48. Vector3 tgtPos = Vector3.zero;
49. tgtPos = PointOnCurve (t+dt, p0, p1, p2, p3);
50. TargetObj.transform.position = tgtPos;
}
Congratulations, we have now written a robust spline system for our NPCs and other moving objects! But how do we use it?
Connecting SplineMgr to NPCScript
To prepare a spline curve to be used by the splineMgr class, we can perform the following steps:
1. Create an empty GameObject, and set its position to (0,0,0). This will be the parent node to the collection of waypoints. Name it something appropriate, such as curve1.
2. Create a series of spheres named waypoint1, waypoint2, and so on. Note, we use GameObjects instead of empty objects so that we can enable the mesh renderer on the nodes if debugging or visualization is necessary. Our system will require a minimum of five points and two segments.
3. Arrange these points in the editor so that they form an appealing curve that meets your needs. Note that we interpolate the position of the waypoints only, so rotating them will not impact the trajectory of the interpolation.
4. Create a GameObject that will be used to interpolate the curve. Name it SplineObj and assign it to the headObj reference of the SplineMgr class.
5. Create a lineRenderer component, and attach it to the headObj object. Give the lineRenderer component 1024 position fields to start with so that it has enough pre-allocated segments to draw our curves.
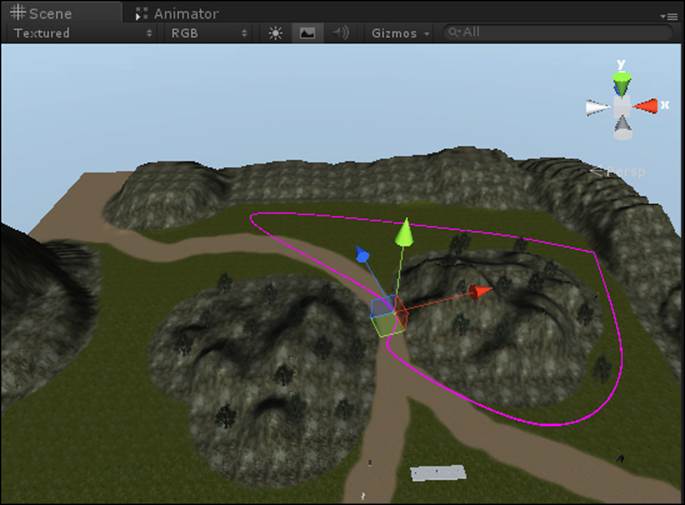
6. Your curve should look something like the one in the following screenshot:
7. To playback the spline, create an instance of the SplineMgr class, and attach it to a GameObject. Set the dt variable and playback type to 0.1 and loop.
8. Assign curve1 to the SplineNodeRoot field of the splineMgr class.
9. Create an instance of npcScript, and attach it to the headObj object as well. Assign the SplineMgr component on the headObj object to the path reference in the npcScript class.
10. The DecisionMgr reference will remain empty for the time being. Not to worry! This just means that the NPC will have no way to change its internal state or react to the player. We will develop this system in the subsequent segment.
11. Once you have this system working, feel free to create another curve and another NPC to follow it. By following the same pattern, you can populate your game right away with simple moving objects.
12. Note that by switching from the const_dt playback to the const_dist playback, you can get a curve that either moves at a constant speed or finishes in a predictable amount of time. The first is useful for character motion, while the latter is for projectiles, animated objects, and other gameplay elements.
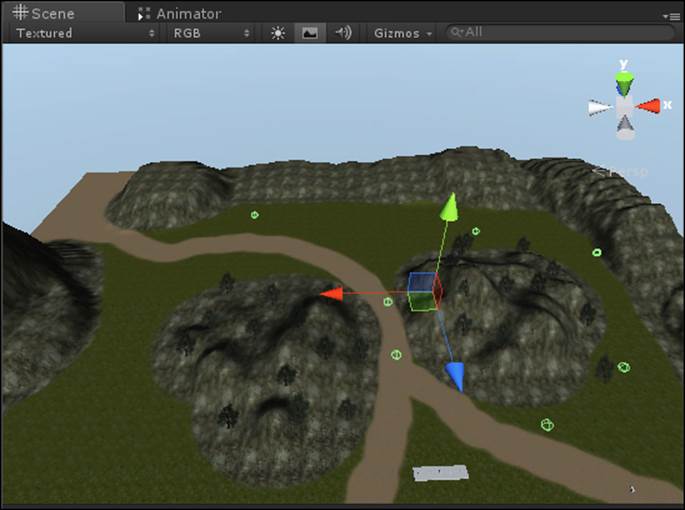
Congratulations! Your NPC can now walk along the path. Make sure you have selected the NPC in the editor to show the translation gizmo on the character while it moves; having a large frame of reference can help to debug the motion.
By ensuring that showPath is enabled on the NPC Script, your path should look as follows:
Implementing the NPC decision system
The NPCs in our e-learning game will need to be able to interact with the player and the world in addition to following a user-defined path. While the path-following code was easily encapsulated in one file, we will see that a general purpose solution to the first problem requires a more intricate design.
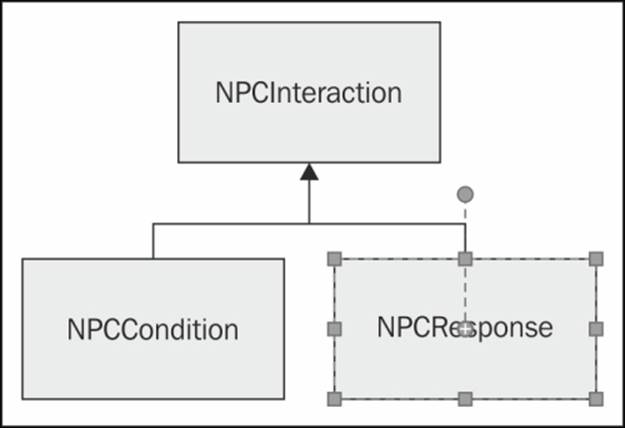
Our solution will be modeled around and function similarly to a question-and-answer system. A number of classes will be required for implementation:
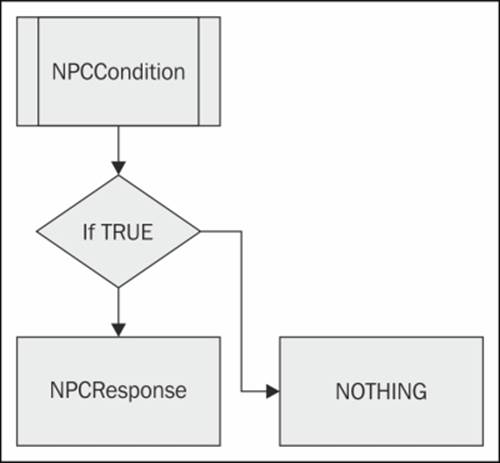
· npcCondition: This is the base class for a question that the NPCs logic will ask about the player or the world.
· npcResponse: This is the base class for a response that the NPCs logic will invoke if a condition is found to be true.
· npcInteraction: This container class will house the association of a condition with a response. It will be responsible for testing if the condition is true (whatever the condition may be) and for invoking the appropriate response when that happens.
· npcDecisionMgr: This class is the brain of the NPC. It will house a collection of interactions and will ask these interactions to evaluate themselves. Since each interaction responds to the state of the world individually, the brain only needs to delegate this responsibility to each interaction! Simple, right?
To prove that our DecisionMgr system works, we will need a few more specialization helper classes. These will help us see the system in action and validate its behavior.
· condition_closerThanThresh: This is a condition script that checks if the distance from object A to object B is less than a parameter. If it is, it returns true.
· condition_fartherThanThresh: This is a condition script that checks if the distance from object A to object B is greater than a parameter. If it is, it returns true.
· response_changeState: This is a response script that changes the state of an NPC to the state parameter.
Implementing the npcCondition script
The npcCondition class is the base class for all questions that an NPC might ask about the player or the state of the world.
1. Create a new class in the editor using the new class wizard. Name it npcCondition.
2. Open the script in MonoDevelop, and change the class declaration. Add the word abstract in front of public so that it reads the following. We use the keyword abstract because this class will be used to just declare an interface. We will use this class as a common base for all of the condition classes our game will have for NPCs:
abstract public class npcCondition : MonoBehaviour{
3. Using the abstract keyword, declare an interface method named eval() with the following syntax:
abstract public bool eval();
4. By designing npcCondition as an interface class, we are telling Unity that there will be a base class named npcCondition. Other conditions will be added to the game, and they will have different behaviors for sure, but one common element is that they all have a method named eval(), which they all implement in a unique way. In this way, each condition class can specialize its behavior through the eval() method, and no matter what is being evaluated, by returning true, we can pass a message to the DecisionMgr class that a condition has become true and that we need to invoke a response script.
In this way, we will need only to call eval() on npcCondition in the code, without the need to know specifically the type of condition being evaluated. This simplifies our code complexity immensely, allowing our condition code to be polymorphic, which is a good thing!
Implementing the npcResponse script
The npcResponse class is the base class for all responses that an NPC might invoke when a condition is found to be true.
1. Create a new class in the editor using the new class wizard. Name it npcResponse.
2. As seen previously, open the script in MonoDevelop, and change the class declaration; add the world abstract in front of the public so that it reads the following:
abstract public class npcResponse : MonoBehaviour{
3. Using the abstract keyword, declare an interface method named dispatch() with the following syntax:
abstract public bool dispatch();
4. As seen previously, by designing npcResponse as an interface class, we are telling Unity that there will be a base class named npcResponse. Other responses will be added to the game, and they will have different behaviors for sure, but one common element is that they all have a method named dispatch(), which they all implement in a unique way.
In this way, we will need only to call dispatch() on npcResponse in the code, without the need to know specifically the implementation of response that is being dispatched. This simplifies our code complexity immensely and allows our response code to be polymorphic as with the conditions.
Implementing the npcInteraction script
The npcInteraction class forms an association between a condition and a response; it is in fact a container for both a condition to test and a response to invoke if the condition is true. Remember, it could be any specific condition or response since those two classes are interfaces.
Perform the following steps to implement the npcInteraction script:
1. Create a new class in the editor. Name it npcInteraction.
2. Unlike the npcCondition, npcReponse classes, and most other classes to date, we will not derive this class from MonoBehaviour. Inheriting from MonoBehaviour is useful when you want to place your script onto a GameObject, and in most cases this is desired. For this script, we will not want to do that (you will see why in a moment). So remove the MonoBehavior line from the class declaration, and add the [System.Serializable] tag so that it resembles the following:
3. [System.Serializable]
public class npcInteraction {
Adding the Serializable attribute is necessary when we don't inherit from MonoBehaviour because serialization is one of many features that MonoBehaviour provides to the child classes. We explicitly tag this class as serializable because we want to be able to save the instances of our class data in the editor. The difference here is that this script will not be attachable as a component on a GameObject but rather will appear in place in other classes as a member variable.
4. Add a public reference to npcCondition and npcResponse. Whenever this condition evaluates to true, the interaction class will dispatch the response:
5. public npcCondition condition;
public npcResponse response;
6. We also add an activated Boolean to allow us to selectively enable and disable interactions based on the state of the game:
public bool active;
7. The method eval() is where the brunt of the work in the interaction class is performed. It first checks if the interaction is active. If it is, and if there is a condition, it will evaluate the condition and check if that condition is true or not:
8. if (active == true)
9. {
10. if (condition != null)
11. {
12. if (condition.eval() == true)
{ ...
13. Recall that the npcCondition reference could be any specialization of npcCondition so that the implementation of the eval() function could appear in any child class as long as it has been assigned in the inspector.
14. If the condition returns true, we check if a response class has been associated in the inspector. If it has been dispatched, we dispatch the response!
15.if (response != null)
rval = response.dispatch();
Congratulations! We have implemented a container class that associates a generic condition with a generic response. We use the abstract keyword in the base class so that child classes that derive from npcCondition and npcResponse can all freely be connected tonpcInteraction. Now let's look at how to connect our interactions together.
Implementing the npcDecisionMgr script
This class is the brain of the NPC. It contains a collection of the interactions that are constantly evaluated. If any condition is determined to be true, the appropriate response is dispatched. To construct it, we need to perform the following steps:
1. Create a new script named npcDecisionMgr.
2. As with npcInteraction, edit the class declaration to remove the inheritance from MonoBehaviour, and add explicit serialization so that the class data can be saved in the editor:
3. [System.Serializable]
public class npcDecisionMgr{
4. A public list of npcInteraction is exposed to the inspector. In here, a collection of condition/response pairs can be added for later evaluation. In this way, a whole set of logical interactions can be added to a character—all from within the editor!
public List<NpcInteraction> interactions;
5. The eval() method is used to visit each NPC interaction in the list, where each one is evaluated in turn; recall this checks the condition.eval() method for the condition member of the interaction:
6. foreach (npcInteraction e in interactions)
7. {
8. e.eval();
}
Congratulations! You have completed writing the DecisionMgr class for the NPC. This is the class that will contain all of the logic for the NPC—what it will query in the world, and how it will respond to those queries.
Building a collection of NPC conditions and responses
To specialize how the NPC will respond, we need to write specific conditions and response classes and then populate the DecisionMgr for the NPC by placing these components in the editor. To prove this, let's develop a test case for an NPC that will perform the following logic:
1. Patrol on a curve, facing forward.
2. When the NPC gets close enough to the player, stop and face the player.
3. When the NPC is far enough away from the player, follow the path and face forward.
To implement this logic, we will need two conditions and one response.
Implementing the condition_closerThanThresh script
Let's create a condition to check if the NPC is close enough to the player. This will be used by the npcDecisionMgr to determine when to stop patrolling and face the player.
1. Create a new script called condition_closerThanthresh.
2. In MonoDevelop, edit the signature of the class declaration so that it inherits from npcCondition rather than MonoBehaviour. Also, add the explicit serialization tag to this class so the editor can save it:
3. [System.Serializable]
public class condition_closerThanThresh : npcCondition {
4. This class will need three parameters to perform its tasks. A float to represent the target threshold, and two GameObject references for the two objects whose distance we will check:
5. public float thresh;
6. public GameObject trackObj;
public GameObject baseObj;
7. We want to provide an implementation for the eval() method that was declared in the NPC base. To do this, note the syntax public override bool, which is as follows:
public override bool eval()
8. The eval() method will check the distance between the two GameObjects trackObj and baseObj for each frame. Don't forget these need to be set in the inspector; they can be the NPCs and the player or any two GameObjects for that matter (objects that have a transform):
9. bool rval = false;
10.Vector3 vDisp = (this.baseObj.transform.position -trackObj.transform.position);
11.float dist = vDisp.magnitude;
12.if ( dist < thresh)
13. rval = true;
return rval;
Congratulations, you have written a condition script that tests whether two GameObjects are closer than a set threshold.
Implementing the condition_fartherThanThresh script
Let's create a condition to check if the NPC is far enough from the player.
1. Create a new script called condition_fartherThanthresh.
2. In MonoDevelop, edit the signature of the class declaration so that it inherits from npcCondition rather than MonoBehaviour. Also add the explicit serialization tag to this class so the editor can save it:
3. [System.Serializable]
public class condition_fartherThanThresh : npcCondition {
4. The eval() method will have the same signature and implementation as the closer condition script explained previously, except that instead of checking if the distance is less than the threshold, you will check if the distance is greater than the threshold:
5. bool rval = false;
6. Vector3 vDisp = (this.baseObj.transform.position - trackObj.transform.position);
7. float dist = vDisp.magnitude;
8. if ( dist > thresh)
9. rval = true;
return rval;
Congratulations! You have combined the complement-condition script with the closer-than script. With both of these combined, we will be able to make the NPC start and stop a behavior based on proximity.
We need one more script to make the NPC respond to these proximity changes. Since the NPC knows how to behave in the patrol and turnToPlayer states, we want to make the NPC change the internal state as a response.
Implementing the response_changeState script
Let's create a response script that will change the internal state on the associated npcScript class to a specified value. This helper script will prove very useful as it will allow our NPC to react to conditions in the world by changing the npcScript state to response.
1. Create a new script in the editor, and name it response_changeState.
2. As with the previous two cases, modify the class signature to make it inherit from npcResponse (not npcCondition), and be sure to add the explicit serialization tag as well:
3. [System.Serializable]
public class response_changeState : npcResponse {
4. This class will have two members, an npcState enumeration and a reference to the npcScript class. When fired, the script will set the state on the npcScript reference to the value set in the local enumeration:
5. public npcScript.npcState newstate;
public npcScript npc;
6. As with classes that derive from npcCondition, we need to override the abstract method provided in the base class. Instead of eval(), we will override dispatch():
public override bool dispatch()
7. If this response class has an NPC reference, it will set the value of newState on to NPC through the SetState() setter method that npcScript implements:
8. if (npc != null)
9. {
10. npc.SetState (newstate);
11. rval = true;
12.}
return rval;
Congratulations! We now have all the pieces to finally develop an npcDecisionMgr class that can tell the NPC to patrol or face the play when close enough. While it's true that we invest resources into developing a generic decision handling system, let's see how this pays dividends when implementing the logic in the editor.
Putting it all together
Let's test our DecisionMgr class by integrating these custom conditions and responses into an NPC instance.
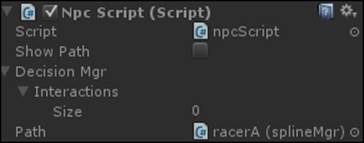
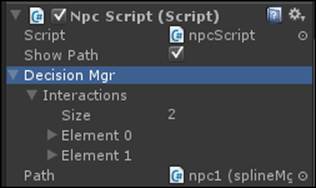
1. Find the NPC instance from earlier, and select the npcScript class.
2. Note that the DecisonMgr reference is embedded in the class (instead of waiting for a reference to the GameObject). Click on the triangle, and notice that you can see the public interactions list that this class contains. By setting the size member variable, we can design and tailor the interactions for this NPC's DecisionMgr to perfectly match our gameplay needs.
3. Click on the size field of the interactions list, and set it to 2. We will have two interactions on this NPC.
4. Click on the Element 0 field. Make sure its active checkbox is set to true; this ensures that this interaction is always evaluated. Note that the Condition and Response fields are waiting for a reference to be set.
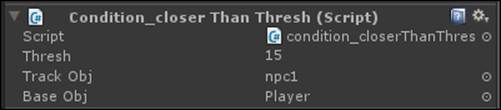
5. Drag-and-drop an instance of condition_closerthanThresh, and add it to the NPC.
6. Set the thresh to 15 units, the trackObj to the npc, and the baseObj to Player.
7. Drag-and-drop this component from the NPC into the condition field of interaction of Element 0. This associates this condition with the required interaction code. Note that if we forget to add the component to the DecisionMgr as we have done, the condition component will never get evaluated.
8. Drag-and-drop an instance of response_changeState, and add it to the NPC.
9. Set the NPC reference to the NPC that owns the component, and set the new state to turnToPlayer.

10. Drag-and-drop this component from the NPC into the response field of the interaction of Element 0. This associates the response with the required interaction code.
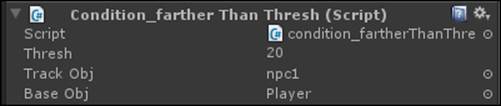
11. Drag-and-drop an instance of condition_fartherThanThresh, and add it to the NPC.
12. Set the thresh to 20 units, trackObj to the npc, and baseObj to Player.
13. Drag-and-drop this component from the NPC into the condition field of the Interaction tab of Element 1. This associates this condition with the second interactions code.
14. Drag-and drop-another instance of response_setState onto the NPC. Set the NPC to the parent NPC and the state to patrol.

Congratulations, we have configured the NPC DecisionMgr component to stop when it is close enough and turn to face the player. When the player leaves, the NPC will continue on its way. Adding further interactions to the NPC is as simple as increasing the size of the interactions array and creating the references.
Programming new interactions is a cinch, too! So long as we inherit from the correct base class, we see that gameplay code programming is now reduced to developing a library of query and interface classes. We no longer need to deal with the interactions and sequencing of logic, just the concrete behaviors themselves. This is a big win!
Summary
We developed a data-driven dispatch system of condition and response classes. We extended these bases to build a library of behaviors from which we can construct NPC behaviors. We then developed a decision-manage class that can evaluate these conditions and dispatch responses. This extendible pipeline can be specialized and quickly iterated upon in the Unity3D Editor. In the next chapter, we will put this to good use as we write the second level of our e-learning game. This level will take the knowledge learned fromChapter 1, Introduction to E-Learning and the Three Cs of 3D Games, and will test the player's recall in a fun and engaging way.