Creating E-Learning Games with Unity (2014)
Chapter 7. Mission Two - Testing a Player's Learning
In this chapter, we will program the second mission for our e-learning game. The objective of this level will be to test the learning that occurred in the first flag-collecting level. The theme of the level will be a race against two other NPCs through a park, where the player will have to answer trivia questions from NPCs placed randomly along the path. The player will have to achieve 100 percent accuracy and be placed first in the race in order to advance to level three.
In this chapter, we will cover the following topics:
· Exploring the structure of mission two
· Defining the framework for mission two
· Adding a mission to the missionMgr script
· Extending the GameCam script
· Modifying the terrain
· Adding NpcRacers to the mission
· Creating the start and finish line flags
· Creating the LevelStart and LevelFinished pop ups
· Creating the setupLevel2 Prefab
· Creating the raceStartup Prefab
· Implementing the LevelLogicObj GameObject
Exploring the structure of mission two
The choice of a quiz race for mission two's gameplay was made to fill a number of e-learning game design requirements.
Recall that learning does not occur in a vacuum. Without testing for player comprehension, we cannot assess quantitatively how much learning has occurred, so a form of player interaction is necessary; the NPCs presenting the quiz cards fills this role. This is the source of challenge in the game.
The other racers chasing the player through the course add a level of pressure on the player. This is the source of intensity or pressure in the game.
Recall that testing and pressure are the two parameters necessary to create a learning environment that encourages cognitive flow. Having constructed our level according to this model, we can adjust the difficulty of the quiz questions and the speed of the other players to influence the fun and learning effectiveness of the game.
Defining the framework for mission two
As with mission one, we will organize our game objects into hierarchies as shown in the following screenshot:
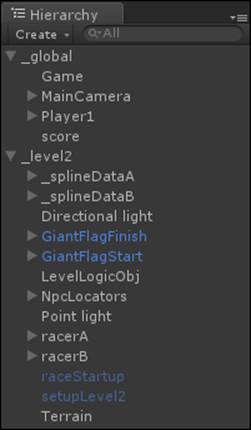
The _global GameObject hierarchy will contain objects that persist for the entire lifespan of the game, and we will develop other hierarchies for objects that persist during a specific level.
To begin, let's create a new scene file for the level. Name the scene TESTBED2. Inside this scene, let's add two empty game objects at the root level, placed at (0,0,0) as with the first level. Name them _global and _level2.
1. Under _global, add the layer, camera, and GameObject. Recall that these objects and their scripts persist across all levels.
2. Under _level2, we will add level 2's specific GameObjects. As we create them throughout this chapter, we will add them to the hierarchy formed with the object named _level2 as the root.
The following objects will be placed in this hierarchy:
· _splineDataA and _splineDataB: These are two collections of control points for the spline systems that racerA and racerB will use to follow smooth paths during the race.
· GiantFlagFinish: This is the large two-poled flag object representing the finish line.
· LevelLogicObj: This is the GameObject that contains the logic that will track the player's progress in the mission and dispatch either a success or failure condition based on this. This GameObject will also have a GiantFlagStart GameObject as a child, representing the starting line in the scene.
· NpcLocators: This is a collection of positions where NPCs will be randomly placed at the start of the mission. This operates similarly to the flag locators in mission one.
· racerA: This is an NPC GameObject that will race against the player.
· racerB: This is an NPC GameObject that will race against the player.
· Terrain: This is the terrain mesh that represents the park grounds in this level (mission two).
· setupLevel2: This is the GameObject instance that configures the level for play on start and starts the race.
· raceStarter: This is the GameObject instance that controls the start time of the race.
· TriviaCards: A number of trivia cards (one for each state) will be made that show the four flags to the player and ask him or her to pick the correct one for the given state name.
Adding a mission to the missionMgr script
Recall the missionMgr script attached to the GameObject (a child of _global). This is the class that manages tracking objectives in the game. In order to create a new mission for level two, let's perform the following steps:
1. Select the missionMgr script, and set the size of the mission's component to 1, telling the system we will have one mission in this level.
2. Set the mission to activated, visible, and MS_ACQUIRED so that the level starting with this mission is ready to be processed from the start.
3. Set the display name to win the race and the description to achieve 100% accuracy and first place in the race.
4. Set the token component size to 0. Another script will fill these dynamically, but eventually it will be filled with the randomly chosen flags from Chapter 1, Introduction to E-Learning and the Three Cs of 3D Games.
5. Set the points to 2500 and the reward object to null.
This is a sufficient setup for the mission on initialization.
Extending the GameCam script
The GameCam script's logic needs to be extended for this mission to support the ability to look up in the sky and back down at the player. To do this, a couple of simple methods need to be added to adjust the lookat GameObject.
A public method named LookUp will find the object named lookUpTarget and swap the lookObj in the script with the following code snippet:
public void LookUp()
{
GameObject go = GameObject.Find("lookupTarget");
if (go)
lookObj = go;
}
Note
lookUpTarget is an empty GameObject parented to the player, placed 100 units above him or her in Y—a simple and effective way of looking up above the player.
A second method, named LookPlayer, will restore the lookObj back to the player object. This resets the camera back to third person functionality as shown in the following code snippet:
public void LookPlayer()
{
if (trackObj)
lookObj = trackObj;
}
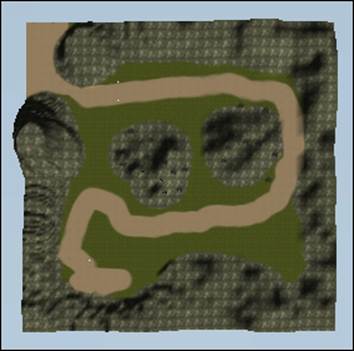
Modifying the terrain
Since the theme of this level is a race, we need to create a nice winding path through the level. Select the terrain editor and paint a path from start to finish that loops around the mountains. At one end, we will place the racer, and at the end we will create a trigger to detect the end of the race, as you can see in the following screenshot:
Adding NpcRacers to the mission
To make the race compelling and interesting, we will create two NPC racers to challenge the player. If it turns out well, we can build most of these with the technology we have already developed.
Each racer will need a spline to follow. Recall from the previous chapter that we developed a system for placing waypoints in the scene and using the SplineMgr script to generate a smooth curve for an NPC to follow. This will define the smooth path they traverse from start to finish. To implement the other racers in the level, carry out the following steps:
1. Create an empty GameObject, and name it _splineDataA. Create a series of sphere game objects, and place them in a path from start to finish. Disable the mesh renderer of these objects, and then parent them all to _splineDataA.
2. Create a second _splineData object with different path nodes so that the second racer will follow a similar but not identical route through the course. Name it _splineDataB.
3. Parent these two _splineData objects to the _level2 root level object's container to ensure our level loading strategy remains simple and elegant.
4. As with the player, create a placeholder model for the racers, which is composed of a capsule with a rectangular hat parented to the top. Name them RacerA and RacerB respectively.
5. To RacerA, add an instance of npcScript (created in Chapter 6, NPCs and Associated Technology). Associate _splineDataA to the path reference on this script. Make sure the DecisionMgr member is empty; we won't be using it for the racers' logic. The structure of RacerA should then resemble the following figure:
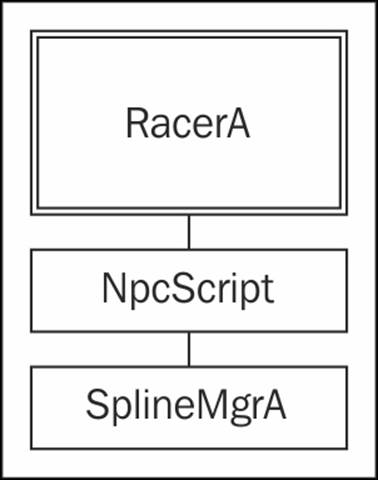
6. To RacerA, add an instance of the SplineMgr script. Set the splineNodeRoot to _splineDataA to install these control points into the manager class. Set the playbackMode to paused and the playback type to const_dt so that the splineObject startsstationary, but will move along the path with some natural looking acceleration and deceleration.
7. Follow steps 6 and 7 for RacerB, but associate _splineDataB instead of _splineDataA.
8. Set the speeds of racers (dt value) to 0.0015 and 0.001 respectively. This will set the racers' speeds to sufficiently similar values to make the race competitive.
9. Congratulations! You have implemented two racer NPCs that will compete with the player for first place in the race. Note that they don't have to wait to answer the quiz questions as the player does.
Creating the start and finish line flags
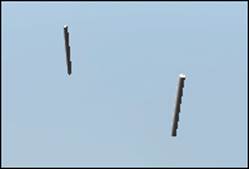
To mark the starting and ending location of the race, we will create a giant flag Prefab and instance it in both places. The banner of the flag will have cloth physics to give it an interesting motion. If you are targeting a lightweight device such as a phone, feel free to simply replace the cloth object with a flat plane if performance is an issue in your application. In order to create the start and finish line flags, we need to perform the following steps:
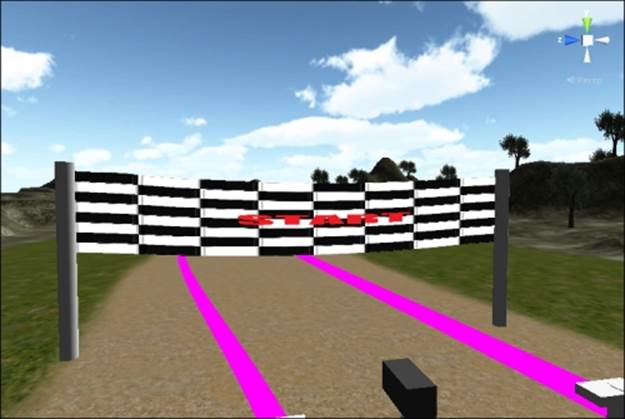
1. Create two cylindrical game objects. Set them three units apart from one another, and scale them up to a y value of 6. Name these as pole1 and pole2. In the scene view, you should see something like the following figure:
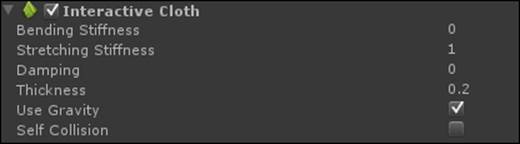
2. Create a cloth GameObject. It will appear as a flat plane in its initial position in the editor, but when you play the game, the cloth simulation will apply the motion.
3. Scale and rotate the cloth object so that it faces the ground at right angles. Scale the object so that it penetrates both poles. This will allow us to attach the cloth to the poles so that the physics simulation results in a draping banner.
4. Create an empty GameObject, and place it at ground level between the two poles. Name it GiantFlag.
5. Select the cloth object, and make sure the Use Gravity checkbox is selected.
6. Select the AttachedColliders member of the cloth object. Set the size to 2. Drag-and-drop the first pole into the first collider reference and the second pole into the second collider reference. This will bind the banner to both poles.
7. Create a material with a nice checkerboard material, and attach it to the cloth component.
8. Drag-and-drop this object to the project tab, and name the Prefab GiantFlag.
9. Create two instances of this GiantFlag Prefab—one at the starting line and one at the finish line of the path. Your flag should look something like the following screenshot:
Congratulations, you have created two banners for the game to mark the start and finish lines of the race! Click on the cloth simulation component of the GiantFlag Prefab, and experiment with the external acceleration, random acceleration, and friction variables to achieve different levels of motion in the banners themselves.
Creating the LevelStart and LevelFinished pop ups
Our level will use three pop-up windows to communicate with the start and finish scenarios of the level. One of them will show the start details, and the other one will explain whether you have passed or failed the objectives. We will use the Prefabs from Chapter 5,User Interfaces in Unity, as a basis for these pop ups. In order to create these pop ups, let's perform the following steps:
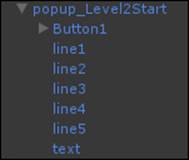
1. Create a new Prefab named popup_Level2Start from the popup_info Prefab, which we created in Chapter 5, User Interfaces in Unity.
2. Change the five lines of text on the Prefab to detail the instructions for the level: "You are in a trivia race against two other racers. Run from start to finish and answer the trivia questions. You must achieve 100 percent accuracy and place first in the race to move on to level 3. Good Luck.".
3. On Popup Button Script, add three actions in the editor as shown in the following screenshot:
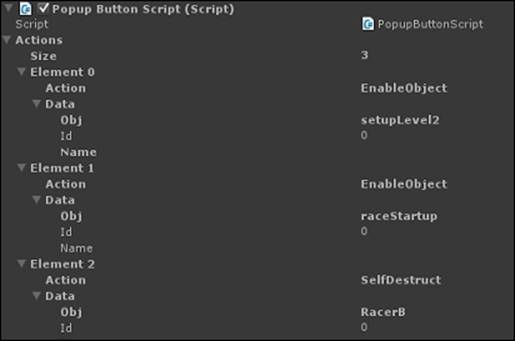
· On the first element of the actions array, set the action to EnableObject and the object reference to setupLevel2 (a new GameObject parented to _level2). This object will set up the mission once it is instantiated.
· On the second element of the actions array, set the action to EnableObject and the object reference to raceStarter (a new GameObject parented to _level2). This object will commence the start-up of the racers themselves, resulting in their starting to run.
· On the third element of the actions array, add a SelfDestruct action so that the last task the button does is to destroy the panel itself.
4. Create a new Prefab named popup_Level2Finish from the popup_info Prefab, which we created in Chapter 5, User Interfaces in Unity.
5. Change the five lines of text on the Prefab to present a nice message to the user for winning the game. This panel will be enabled when the user wins the race with 100 percent accuracy.
6. Give the confirm button two actions: LoadLevel3 and SelfDestruct. This will result in the button loading the next level and then destroying itself. In Chapter 10, An Extensible Game Framework Pattern in Unity, we will connect this pop-up window to theGameMgr class when we integrate the level transitions together.
7. Create a new Prefab named popup_Level2Repeat from the popup_info Prefab, which we created in Chapter 5, User Interfaces in Unity.
8. Change the five lines of text on the Prefab to present a message to the user for not winning the game. This panel will be enabled when the user doesn't win.
9. Give the confirm button two actions: LoadLevel2 and SelfDestruct. LoadLevel2 will have the effect of reloading the level once we integrate the level transitions together.
10. Set the popup_Level2Repeat and popup_Level2Finish pop ups to disabled in the editor, and keep the popup_Level2Start pop up enabled when the level starts.
Congratulations! The pop-up communication system for this mission is complete. Let's implement the Prefab that initializes the mission on start.
Creating the setupLevel2 Prefab
The setupLevel2 Prefab will be activated when the user presses the start button on popup_Level2Start. It will finish the initialization of the mission for the level in the missionMgr script. Let's perform the following steps to create the setupLevel2 Prefab:
1. Create a new Prefab named setupLevel2. Duplicate the SetupMissionOne script from mission one, and rename the duplicate SetupMissionTwo. Add an instance to setupLevel2.
2. Inside MonoDevelop, change the class declaration to SetupMissionTwo as shown in the following line of code:
public class SetupMissionTwo : MonoBehavior {
3. We will use the same pattern for choosing random QuizNpc locators as we did for the flag locators in mission one. In addition to the QuizNpc Prefabs and the spawnPoints lists, add a list of CorrectPopups to the class.
4. This class will hold the pop ups that are shown to the user when a correct answer is given for a particular quiz question. This will be populated by the user in the editor, and it will hold a number of unique pop ups, which will give the user a mission token when clicked through. We will store these unique pop ups in a list, as declared in the following line of code:
public List<GameObject> CorrectPopups
5. Add a public reference to QuizNpc Prefab. This is the model (and eventually animations) for the QuizNpc class on the path giving the questions. Once the locations are randomly chosen, instances of this model will be placed around the track. This can be done with the following line of code:
public GameObject QuizNpc;
6. We will also keep a reference to the raceStarterObj so that we can enable it when the setupLevel2 class is enabled. This will have the effect of starting the racers' movement. This can be done with the following line of code:
public GameObject RaceStarterObj;
This script works largely in the same way as SetupMissionOne, with some subtle changes due to the different design needs. As five random quiz cards are selected (rather than flags), we instantiate QuizNpc to stand that location:
GameObject QuizNpcInstance = (GameObject)Instantiate(QuizNpc, QuizPos, new Quaternion(0,0,0,1));
7. As we loop over the selected questions, we hand off the correct answer pop up for each NPC question to the QuizNpc class itself. The NPC will then hand this off when the quiz question is actually activated (when player is close enough to NPC). The NPC stores the reference to the correct answer pop up through a QuizNpcHelper script attached to it as shown in the following code snippet:
8. QuizNpcIstance.GetComponent<QuizNpcHelper>().SetPrefabReference( CorrectPopups[k]);
QuizNpcInstance.SetActive(true);
9. We install the QuizCard itself into NPC's ObjectInteraction inside the Prefab member variable of the setupLevel2 class. This allows interactiveObject to display the QuizCard when the player is close enough as shown in the following code snippet:
10.ObjectInteraction oo = QuizNpc.GetComponent<objectInteraction>();
11.if (oo)
oo.prefab = quizPrefab;
12. Then we add MissionToken from the current chosen pop up and add it to missionTokens of the mission for this level. This way, the mission can track the randomly chosen quiz questions from this method as shown in the following code snippet:
mm.missions[0].tokens.Add(CorrectPopups[k].GetComponent<MissionToken>();
13. Congratulations! SetupMissionTwo is finished. When the setupLevel2 Prefab is enabled (by clicking on Okay on popup_Level2Start), the setupMissionTwo script will choose five random quiz locations from a group of ten and five random quiz cards from a group of 50. It will then place instances of quizNpc at each location for the player to interact with.
Creating the raceStartup Prefab
Recall that the second Prefab that is enabled when the popup_Level2Start windows is clicked, is the raceStartup Prefab. This object will commence the start of the other racers, leaving room for an eventual countdown clock. Let's start creating the raceStartupPrefab by performing the following steps:
1. Create a new empty GameObject named RaceStartup.
2. Create a new script named RaceStarterScript, and add an instance of it to the raceStartup class.
3. This class should have a number of public variables to permit the tweaking of the race start.
4. In the following line of code, stageTime is the amount of time each stage lasts:
public float stageTime = 2.0f;
5. In the following line of code, numStates is the number of states (of duration stageTime) that need to pass before the NPCs are activated:
public int numStages = 4;
6. In the following line of code, currentState tracks which actual state is currently elapsing:
public int currentState = 0;
7. Add a float t to track elapsed time as shown in the following line of code:
public float t;
8. Add two GameObject references to NPCs to activate as shown in the following lines of code:
9. public GameObject npcA;
public GameObject npcB;
10. The core logic for this class happens in the Update() method each time Unity invokes this function and we track total elapsed time in t as shown in the following line of code:
t += time.deltaTime;
11. Once the final state is completed, we tell each NPC to change state to patrol. This has the effect of making them start to follow their spline paths via their component SplineMgrs as shown in the following code snippet:
12.if (currentState == numStates + 1)
13.{
14. ncpA.GetComponent<npcScript>().SetState(npcScript.npcState.patrol);
npcB.GetComponent<npcScript>().SetState(npcScript.npcState.patrol);
15. If the elapsed time exceeds the state time, we reset the stageTime to zero plus any fractional difference beyond the stageTime that has been incurred and then increase the stage count by 1. This is slightly more accurate than simply setting t to 0 for each stage and is prone to fewer errors over many stages. This can be accomplished with the following code snippet:
16.if (t > stageTime)
17.{
18. currentState++;
19. t -= stageTime;
}
Congratulations! Now, the raceStartup Prefab will activate the NPCs after an appropriate time has passed. Conveniently, this delay is adjustable inside the Unity Editor. This is a good thing as it lets the player to get a small head start on the other racers.
Implementing the LevelLogicObj GameObject
When instantiated, the LevelLogicObj object will be detected as soon as the player and racers enter the LevellogicObj's trigger volume. When three racers have crossed the finish line, it will determine if the player has met the objectives of the race or not, and it will enable either the pass or fail retry pop up. In order to implement the LevelLogicObj object, we need to perform the following steps:
1. Create a cube game object named LevelLogicObj. Scale, orient, and position it so that it surrounds the finish line in the level as shown in the following screenshot:
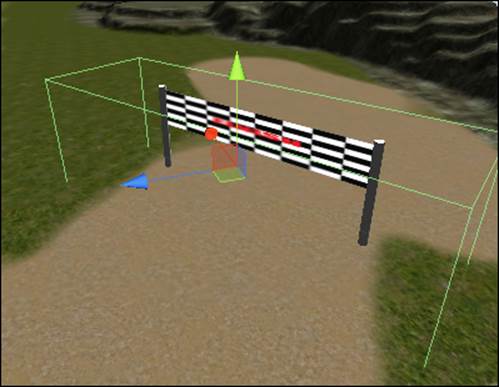
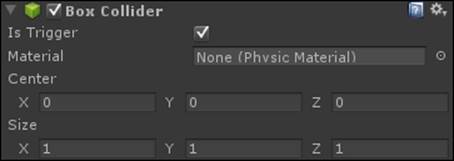
2. Make sure it has a Box Collider component and that the Is Trigger checkbox is checked as shown in the following screenshot:
3. We want to use the DecisionMgr class to track the progress of the racers, which means we need to add an instance of npcScript to this object.
4. Don't worry about the fact that the LevelLogicObj object is not specifically an NPC; if an existing tool is appropriate, don't reinvent the wheel!
5. Create a new script called listData. Modify it so that it inherits from npcCondition (just as the rest of the conditions we have developed so far). Add a public list of GameObjects called _ListData as shown in the following line of code:
public List<GameObject> _ListData;
6. By inheriting from npcCondition, we now have a designer tweakable array that can be associated with DecisionMgr at runtime. Just don't forget to add the additional using directive for the list as shown in the following line of code:
using System.Collections.Generic;
7. Add an instance of listData to the LevelLogicObj object, and then drag-and-drop the script component into the first interaction's condition reference field.
8. The first logical operation that LevelLogicObj needs to do is, when a character or the player enters the triggerVolume, a reference to that GameObject should be stored in the data container. In our example, that container is listData. We need to implement a way to detect and insert. So, create a new script named condition_OnEnter, and add an instance of it to the LevelLogicObj object.
9. Modify the condition_OnEnter condition script so that it inherits from npcCondition rather than monobehavior as with the rest of our condition classes as shown in the following line of code:
public class condition_onEnter : npcCondition;
10. Give the condition_OnEnter class a public reference to a GameObject called trackObj. This will hold a reference to the most recent GameObject that enters the trigger volume. This can be done with the following line of code:
public GameObject trackObj;
11. Add a private Boolean variable named hasEntered, and initialize it to false. This will be used to track whether an object is actually inside the volume (rather than only having entered this frame):
private bool hasEntered = false;
12. Now recall that the OnTriggerEnter/OnTriggerExit callbacks are returned from the physics system rather than our DecisionMgr system. In order to interface the two, we will implement OnTriggerEnter and OnTriggerExit and then pass the relevant information outward.
13. The OnTriggerEnter method should simply set hasEntered to true, and it should set trackObj to other.gameObject as shown in the following code snippet:
14.void OnTriggerEnter(collider other)
15.{
16. hasEntered = true;
17. trackObj = other.gameObject;
}
18. The OnTriggerEnter method should conversely set hasEntered to false, and it should nullify trackObj as shown in the following code snippet:
19.void OnTriggerExit(Collider other)
20.{
21. hasEntered = false;
22. trackObj = null;
}
23. Lastly, the eval() method for this condition should be implemented to return the hasEntered variable. Recall from when we first developed the npcCondition system that the keyword override is used when declaring this eval() method to tell the Unity C# compiler that this implementation of the method corresponds to the interface declared in the npcCondition base class. In this way, we have now paired the PhysX trigger system with our DecisionMgr. When the Is Trigger checkbox fires the OnTriggerEnter() method even when the player or racer crosses the finish line, it will pass the reference from the GameObject that entered the trigger to this condition class. This can be accomplished with the following code snippet:
24.public override bool eval()
25.{
26. return hasEntered;
}
27. Setting our attention on the response we need to write, let's create a new script named response_insert and add an instance of it to LeveLLogicObj.
28. Modify the script so that it inherits from npcResponse rather than Monobehavior. Don't forget to add the [System.Serializable] flag to the script.
29. Add a public npcCondition variable named data, as shown in the following line of code:
public npcCondition data
30. At this point, we recognize that in our base npcReponse and npcCondition classes, we need to track the paired response or condition from the interaction. As such, go into these classes now, and add a public conditionAssociation to npcResponse and add a publicresponseAssociation to npcCondition.
31. Switching back to response_Insert, we start to implement the dispatch() method. We first get condition_OnEnter() associated with this response's interaction and check if the GameObject that actually entered is an NPC racer or the player. We determine this by checking the tag on the object that entered as shown in the following code snippet:
32.condition_onEnter cOE = (conditionAssciation as condition_onEnter);
33. bool bIsPlayer = (cOE).trackObj.CompareTag("Player");
bool bIsRacer = (cOE).trackObj.CompareTag("Character");
34. If the object that entered is either a racer or player, insert the GameObject reference into the listData condition wrapper. For safety, we only insert a GameObject if it has not already been inserted into the list as shown in the following code snippet:
35.listData rlist = (data as listData);
36. if (!rlist._a.Contains(coe.trackObj))
rlist._listData.Add(cOE.trackObj);
37. If a racer (not the player) entered the finish line, we set the racer to paused so that it doesn't keep traversing its SplinePath as shown in the following code snippet:
38. (if bIsRacer)
39. {
(cOE).trackObj.GetComponent<npcScript>().SetState(npcScript.npcState.pause);
40. Now that reponse_insert has been implemented, drag-and-drop the listData script from the LevelLogicObj object to the data field on this script. Then, drag-and-drop the instance of this script from LevelLogicObj to the second response field of LevelLogicObj's DecisionMgr.
41. For the third condition, we need to create a new condition script called condition_listFull. Go ahead and make a new script; change its base class to npcCondition and add an instance to LevelLogicObj as usual.
42. Add a public variable to this script to track the number of entries that will represent full, and a public npcCondition called data, as shown in the following code snippet:
43.public int numEntries;
public npcCondition data;
44. Drag-and-drop listData from the LevelLogicObj GameObject to the data field on condition_listFull.
45. Inside the implementation of eval(), condition_isFull does its work. If data is not null, it extracts the number of entries from the listData's list through its count member as shown in the following code:
46.if (data != null)
47.{
int count = (data as listData)._listData.Count;
48. If the count of the listData component's list array equals the numEntries value on this script, the return value is set to true. Otherwise, it remains false as shown in the following code snippet:
49.if (count == numEntries)
rval = true;
50. Now that condition_listFull is complete, let's create the response that will occur when the list is found to be true—response_ShowRaceResultsPopup. This script will check the status of the mission, and enable the correct pop up on the main camera to achieve the desired gameflow.
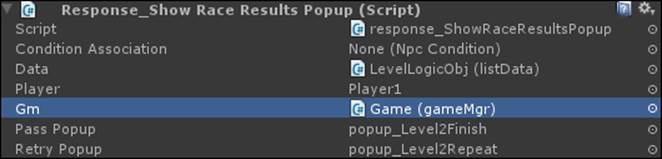
51. Create a new script named response_ShowRaceResultsPopup, change its base class to npcResponse, and add an instance of it to LevelLogicObj.
52. Add the following five public member variables to this script:
· An npcCondition named data
· A GameObject named player
· A gameMgr named gm
· A GameObject named passPopup
· A GameObject named retryPopup
The response_ShowRaceResultsPopup class will use the GameManager reference, and based on the data condition and result, it will enable either passPopup or retryPopup.
53. Edit response_ShowRaceResultsPopup so that its base is npcResponse.
54. Drag-and-drop the listData component from LevelLogicObj to the data field of this script.
55. Drag-and-drop the GameMgr script from the GameObject to the Gm field of this script. Recall that this GameObject lives as a child of the _global GameObject.
56. Drag-and-drop the player1 reference from beneath _global to the player reference in this response script.
57. Drag-and-drop the popup_Level2Finish pop up from beneath MainCamera (which is beneath _global) to the pass reference field of this script.
58. Drag-and-drop the popup_Level2Repeat pop up from beneath MainCamera to the fail reference field of this script. At this point your component should look somewhat like the following screenshot:
59. Inside this script, the dispatch() method does the brunt of the work. We compute if the player is first by checking if the player reference is equal to the first cell in the listData component's list array, as shown in the following code snippet:
bool playerIsFirst = (data as listData)._listData[0] == player;
60. If the player is first, and we can locate the missionMgr script from the game, we point the camera looking up (to make sure the pop up is shown with a nice effect) as shown in the following code snippet:
61. if (mm)
Camera.main.Getcomponent<GameCam>().LookUp();
62. We then check the missionMgr script for the status of the first mission. At this point, we know the game is done because the list is full, but the player may or may not have got 100 percent. If the player achieved 100 percent on the quiz, it means that the first mission is complete, and hence we should activate the pass pop up as shown in the following code snippet:
63. if (mm.isMissionComplete(0) == true)
64. {
65. passPopup.SetActive(true);
}
66. Otherwise, we activate the fail pop up as shown in the following code snippet:
67.else
68.{
69. fail.Popup.SetActive(true)
}
70. Excellent! At this point, DecisionMgr is fully populated and should look somewhat like the following screenshot:
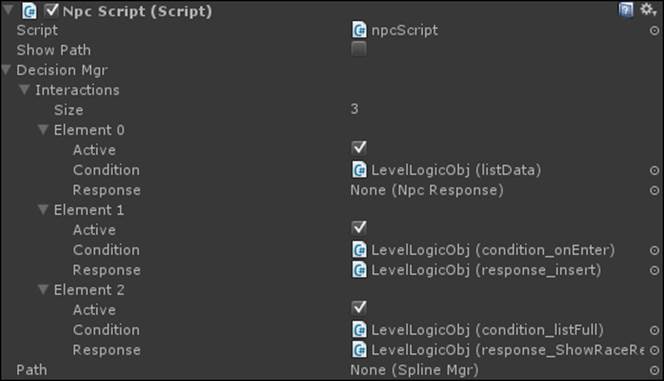
71. Congratulations! The LevelLogicObj evaluates the conditions of inserting a character during the OnEnter() method and of displaying the correct pop up when the list is full. We use DecisionMgr rather than the mission system to show how a pipeline can be built that allows complex game logic to be developed simply from parts that can be manipulated inside of Unity.
Summary
We have finished mission two in our e-learning game, which tests the user on the learning that occurred in mission one by developing a race-based quiz game. The elements of fun and pressure are deliberate design considerations as they allow the designer a way to adjust the fun factor of the game to enhance learning.
In the next chapter, we will change focus and learn about how to add models and animations to the placeholder characters and objects in our game in order to make them more visually appealing.