Python in Practice: Create Better Programs Using Concurrency, Libraries, and Patterns (2014)
Chapter 2. Structural Design Patterns in Python
The primary concern of structural design patterns is how objects are composed together to form new, larger objects. Three themes stand out in structural design patterns: adapting interfaces, adding functionality, and handling collections of objects.
2.1. Adapter Pattern
The Adapter Pattern is a technique for adapting an interface so that one class can make use of another class—that has an incompatible interface—without changing either of the classes being used. This is useful, for example, when we want to use a class that cannot be changed, in a context it wasn’t originally designed for.
Let’s imagine that we have a simple Page class that can be used to render a page given its title, paragraphs of body text, and an instance of a renderer class. (This section’s code is all taken from the render1.py example.)
class Page:
def __init__(self, title, renderer):
if not isinstance(renderer, Renderer):
raise TypeError("Expected object of type Renderer, got {}".
format(type(renderer).__name__))
self.title = title
self.renderer = renderer
self.paragraphs = []
def add_paragraph(self, paragraph):
self.paragraphs.append(paragraph)
def render(self):
self.renderer.header(self.title)
for paragraph in self.paragraphs:
self.renderer.paragraph(paragraph)
self.renderer.footer()
The Page class does not know or care what the renderer’s class is, only that it provides the page renderer interface; that is, the three methods header(str), paragraph(str), and footer().
We want to ensure that the renderer passed in is a Renderer instance. A simple but poor solution is: assert isinstance(renderer, Renderer). This has two weaknesses. First, it raises an AssertionError rather than the expected and more specific TypeError. Second, if the user runs the program with the -O (“optimize”) option, the assert will be ignored and the user will end up getting an Attribute-Error raised later on, in the render() method. The if not isinstance(...) statement used in the code correctly raises a TypeError and works regardless of the -O option.
One apparent problem with this approach is that it would seem that we must make all our renderers subclasses of a Renderer base class. Certainly, if we were programming in C++, this would be the case; and we could indeed create such a base class in Python. However, Python’s abc(abstract base class) module provides us with an alternative and more flexible option that combines the interface checkability benefit of an abstract base class with the flexibility of duck typing. This means that we can create objects that are guaranteed to meet a particular interface (i.e., to have a specified API) but need not be subclasses of any particular base class.
class Renderer(metaclass=abc.ABCMeta):
@classmethod
def __subclasshook__(Class, Subclass):
if Class is Renderer:
attributes = collections.ChainMap(*(Superclass.__dict__
for Superclass in Subclass.__mro__))
methods = ("header", "paragraph", "footer")
if all(method in attributes for method in methods):
return True
return NotImplemented
The Renderer class reimplements the __subclasshook__() special method. This method is used by the built-in isinstance() function to determine if the object it is given as its first argument is a subclass of the class (or any of the tuple of classes) it is passed as its second argument.
The code is rather subtle—and Python 3.3-specific—because it uses the collections.ChainMap() class.* The code is explained next, but understanding it isn’t important since all the hard work can be done by the @Qtrac.has_methods class decorator supplied with the book’s examples (and covered later; ![]() 36).
36).
*The render1.py example and the Qtrac.py module used by render2.py includes both Python 3.3-specific code and code that works with earlier Python 3 versions.
The __subclasshook__() special method begins by checking to see if the class instance it is being called on (Class) is Renderer; otherwise, we return NotImplemented. This means that the __subclasshook__ behavior is not inherited by subclasses. We do this because we assume that a subclass is adding new criteria to the abstract base class, rather than adding behavior. Naturally, we can still inherit behavior if we wish, simply by calling Renderer.__subclasshook__() explicitly in our __subclasshook__() reimplementation.
If we returned True or False, the abstract base class machinery would be stopped in its tracks and the bool returned. But by returning NotImplemented, we allow the normal inheritance functionality to operate (subclasses, subclasses of explicitly registered classes, subclasses of subclasses).
If the if statement’s condition is met, we iterate over every class inherited by the Subclass (including itself), as returned by its __mro__() special method, and access its private dictionary (__dict__). This provides a tuple of __dict__s that we immediately unpack using sequence unpacking (*), so that all the dictionaries get passed to the collections.ChainMap() function. This function takes any number of mappings (such as dicts) as arguments, and returns a single map view as if they were all in the same mapping. Now, we create a tuple of the methods we want to check for. Finally, we iterate over all the methods and check that each one is in the attributes mapping whose keys are the names of all the methods and properties of the Subclass and all its Superclasses, and return True if all the methods are present.
Note that we check only that the subclass (or any of its base classes) has attributes whose names match the required methods—so even a property will match. If we want to be certain of matching only methods, we could add to the method in attributes test an additional and callable(method) clause; but in practice this is so rarely a problem that it isn’t worth doing.
Creating a class with a __subclasshook__() to provide interface checking is very useful, but writing ten lines of complex code for every such class when they vary only in the base class and the supported methods is just the kind of code duplication we want to avoid. In the next section (§2.2, ![]() 34), we will create a class decorator that means that we can create interface checking classes with just a couple of unique lines of code each time. (The examples also include the render2.py program that makes use of this decorator.)
34), we will create a class decorator that means that we can create interface checking classes with just a couple of unique lines of code each time. (The examples also include the render2.py program that makes use of this decorator.)
class TextRenderer:
def __init__(self, width=80, file=sys.stdout):
self.width = width
self.file = file
self.previous = False
def header(self, title):
self.file.write("{0:^{2}}\n{1:^{2}}\n".format(title,
"=" * len(title), self.width))
Here is the start of a simple class that supports the page renderer interface.
The header() method writes the given title centered in the given width, and on the next line writes an = character below every character in the title.
def paragraph(self, text):
if self.previous:
self.file.write("\n")
self.file.write(textwrap.fill(text, self.width))
self.file.write("\n")
self.previous = True
def footer(self):
pass
The paragraph() method uses the Python standard library’s textwrap module to write the given paragraph, wrapped to the given width. We use the self.previous Boolean to ensure that each paragraph is separated by a blank line from the one before. The footer() method does nothing, but must be present since it is part of the page renderer interface.
class HtmlWriter:
def __init__(self, file=sys.stdout):
self.file = file
def header(self):
self.file.write("<!doctype html>\n<html>\n")
def title(self, title):
self.file.write("<head><title>{}</title></head>\n".format(
escape(title)))
def start_body(self):
self.file.write("<body>\n")
def body(self, text):
self.file.write("<p>{}</p>\n".format(escape(text)))
def end_body(self):
self.file.write("</body>\n")
def footer(self):
self.file.write("</html>\n")
The HtmlWriter class can be used to write a simple HTML page, and it takes care of escaping using the html.escape() function (or the xml.sax.saxutil.escape() function in Python 3.2 or earlier).
Although this class has header() and footer() methods, they have different behaviors than those promised by the page renderer interface. So, unlike the Text-Renderer, we cannot pass an HtmlWriter as a page renderer to a Page instance.
One solution would be to subclass HtmlWriter and provide the subclass with the page renderer interface’s methods. Unfortunately, this is rather fragile, since the resultant class will have a mixture of the HtmlWriter’s methods plus the page renderer interface’s methods. A much nicer solution is to create an adapter: a class that aggregates the class we need to use, that provides the required interface, and that handles all the mediation for us. How such an adapter class fits in is illustrated in Figure 2.1 (![]() 34).
34).
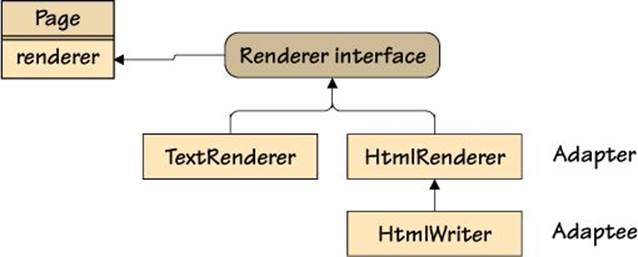
Figure 2.1 A page renderer adapter class in context
class HtmlRenderer:
def __init__(self, htmlWriter):
self.htmlWriter = htmlWriter
def header(self, title):
self.htmlWriter.header()
self.htmlWriter.title(title)
self.htmlWriter.start_body()
def paragraph(self, text):
self.htmlWriter.body(text)
def footer(self):
self.htmlWriter.end_body()
self.htmlWriter.footer()
This is our adapter class. It takes an htmlWriter of type HtmlWriter at construction time, and it provides the page renderer interface’s methods. All the actual work is delegated to the aggregated HtmlWriter, so the HtmlRenderer class is just a wrapper providing a new interface for the existing HtmlWriter class.
textPage = Page(title, TextRenderer(22))
textPage.add_paragraph(paragraph1)
textPage.add_paragraph(paragraph2)
textPage.render()
htmlPage = Page(title, HtmlRenderer(HtmlWriter(file)))
htmlPage.add_paragraph(paragraph1)
htmlPage.add_paragraph(paragraph2)
htmlPage.render()
Here are a couple of examples showing how instances of the Page class are created with their custom renderer. In this case we’ve given the TextRenderer a default width of 22 characters. And we have given the HtmlWriter that’s used by the HtmlRenderer adapter an open file to write to (whose creation isn’t shown) that overrides the default of sys.stdout.
2.2. Bridge Pattern
The Bridge Pattern is used in situations where we want to separate an abstraction (e.g., an interface or an algorithm) from how it is implemented.
The conventional approach without using the Bridge Pattern would be to create one or more abstract base classes and then provide two or more concrete implementations of each of the base classes. But with the Bridge Pattern the approach is to create two independent class hierarchies:the “abstract” one defining the operations (e.g., the interface and high-level algorithms) and the concrete one providing the implementations that the abstract operations will ultimately call. The “abstract” class aggregates an instance of one of the concrete implementation classes—and this instance serves as a bridge between the abstract interface and the concrete operations.
In the previous section’s Adapter Pattern, the HtmlRenderer class could be said to have used the Bridge Pattern, since it aggregated an HtmlWriter to provide its rendering.
For this section’s example, let’s suppose that we want to create a class for drawing bar charts using a particular algorithm, but we want to leave the actual rendering of the charts to other classes. We will look at a program that provides this functionality and that uses the Bridge Pattern:barchart1.py.
class BarCharter:
def __init__(self, renderer):
if not isinstance(renderer, BarRenderer):
raise TypeError("Expected object of type BarRenderer, got {}".
format(type(renderer).__name__))
self.__renderer = renderer
def render(self, caption, pairs):
maximum = max(value for _, value in pairs)
self.__renderer.initialize(len(pairs), maximum)
self.__renderer.draw_caption(caption)
for name, value in pairs:
self.__renderer.draw_bar(name, value)
self.__renderer.finalize()
The BarCharter class implements a bar chart drawing algorithm (in its render() method) that depends on the renderer implementation it is given meeting a particular bar charting interface. The interface requires the initialize(int, int), draw_caption(str), draw_bar(str,int), and finalize() methods.
Just as we did in the previous section, we use an isinstance() test to ensure that the passed-in renderer object supports the interface we require—and without forcing bar renderers to have any particular base class. However, rather than creating a ten-line class as we did before, we have created our interface-checking class with just two lines of code.
@Qtrac.has_methods("initialize", "draw_caption", "draw_bar", "finalize")
class BarRenderer(metaclass=abc.ABCMeta): pass
This code creates a BarRenderer class that has the necessary metaclass for working with the abc module. This class is then passed to the Qtrac.has_methods() function, which returns a class decorator. This decorator then adds a custom __subclasshook__() class method to the class. And this new method checks for the given methods whenever a BarRenderer is passed as a type to an isinstance() call. (Readers not familiar with class decorators may find it helpful to skip ahead and read §2.4, ![]() 48, and especially §2.4.2,
48, and especially §2.4.2, ![]() 54, and then return here.)
54, and then return here.)
def has_methods(*methods):
def decorator(Base):
def __subclasshook__(Class, Subclass):
if Class is Base:
attributes = collections.ChainMap(*(Superclass.__dict__
for Superclass in Subclass.__mro__))
if all(method in attributes for method in methods):
return True
return NotImplemented
Base.__subclasshook__ = classmethod(__subclasshook__)
return Base
return decorator
The Qtrac.py module’s has_methods() function captures the required methods and creates a class decorator function, which it then returns. The decorator itself creates a __subclasshook__() function, and then adds it to the base class as a class method using the built-inclassmethod() function. The custom __subclasshook__() function’s code is essentially the same as we discussed before (31 ![]() ), only this time, instead of using a hard-coded base class, we use the decorated class (Base), and instead of a hard-coded set of method names, we use those passed in to the class decorator (methods).
), only this time, instead of using a hard-coded base class, we use the decorated class (Base), and instead of a hard-coded set of method names, we use those passed in to the class decorator (methods).
It is also possible to achieve the same kind of method checking functionality by inheriting from a generic abstract base class. For example:
class BarRenderer(Qtrac.Requirer):
required_methods = {"initialize", "draw_caption", "draw_bar",
"finalize"}
This code snippet is from barchart3.py. The Qtrac.Requirer class (not shown, but in Qtrac.py) is an abstract base class that performs the same checks as the @has_methods class decorator.
def main():
pairs = (("Mon", 16), ("Tue", 17), ("Wed", 19), ("Thu", 22),
("Fri", 24), ("Sat", 21), ("Sun", 19))
textBarCharter = BarCharter(TextBarRenderer())
textBarCharter.render("Forecast 6/8", pairs)
imageBarCharter = BarCharter(ImageBarRenderer())
imageBarCharter.render("Forecast 6/8", pairs)
This main() function sets up some data, creates two bar charters—each with a different renderer implementation—and renders the data. The outputs are shown in Figure 2.2, and the interface and classes are illustrated in Figure 2.3.
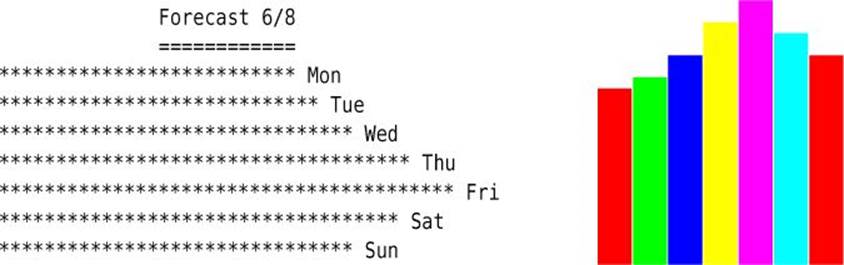
Figure 2.2 Examples of text and image bar charts

Figure 2.3 The bar charter interface and classes
class TextBarRenderer:
def __init__(self, scaleFactor=40):
self.scaleFactor = scaleFactor
def initialize(self, bars, maximum):
assert bars > 0 and maximum > 0
self.scale = self.scaleFactor / maximum
def draw_caption(self, caption):
print("{0:^{2}}\n{1:^{2}}".format(caption, "=" * len(caption),
self.scaleFactor))
def draw_bar(self, name, value):
print("{} {}".format("*" * int(value * self.scale), name))
def finalize(self):
pass
This class implements the bar charter interface and renders its text to sys.stdout. Naturally, it would be easy to make the output file user-definable, and for Unix-like systems, to use Unicode box drawing characters and colors for more attractive output.
Notice that although the TextBarRenderer’s finalize() method does nothing, it must still be present to satisfy the bar charter interface.
Although Python’s standard library is very wide ranging (“batteries included”), it has one surprisingly major omission: there is no package for reading and writing standard bitmap and vector images. One solution is to use a third-party library—either a multi-format library like Pillow (github.com/python-imaging/Pillow), or an image-format–specific library, or even a GUI toolkit library. Another solution is to create our own image handling library—something we will look at later (§3.12, ![]() 124). If we are willing to confine ourselves to GIF images (plus PNG once Python ships with Tk/Tcl 8.6), we can use Tkinter.*
124). If we are willing to confine ourselves to GIF images (plus PNG once Python ships with Tk/Tcl 8.6), we can use Tkinter.*
*Note that image handling in Tkinter must be done in the main (i.e., GUI) thread. For concurrent image handling we must use another approach, as we will see later (§4.1, ![]() 144).
144).
In barchart1.py, the ImageBarRenderer class uses the cyImage module (or failing that, the Image module). We will refer to them as the Image module when the difference doesn’t matter. These modules are supplied with the book’s examples and are covered later (Image in §3.12, ![]() 124; cyImage in §5.2.2,
124; cyImage in §5.2.2, ![]() 193). For completeness, the examples also include barchart2.py, which is a version of barchart1.py that uses Tkinter instead of cyImage or Image; we don’t show any of that version’s code in the book, though.
193). For completeness, the examples also include barchart2.py, which is a version of barchart1.py that uses Tkinter instead of cyImage or Image; we don’t show any of that version’s code in the book, though.
Since the ImageBarRenderer is more complex than the TextBarRenderer, we will separately review its static data and then each of its methods in turn.
class ImageBarRenderer:
COLORS = [Image.color_for_name(name) for name in ("red", "green",
"blue", "yellow", "magenta", "cyan")]
The Image module represents pixels using 32-bit unsigned integers into which are encoded four color components: alpha (transparency), red, green, and blue. The module provides the Image.color_for_name() function that accepts a color name—either an X11 rgb.txt name (e.g.,"sienna") or an HTML-style name (e.g., "#A0522D")—and returns the corresponding unsigned integer.
Here, we create a list of colors to be used for the bar chart’s bars.
def __init__(self, stepHeight=10, barWidth=30, barGap=2):
self.stepHeight = stepHeight
self.barWidth = barWidth
self.barGap = barGap
This method allows the user to set up some preferences that influence how the bar chart’s bars will be painted.
def initialize(self, bars, maximum):
assert bars > 0 and maximum > 0
self.index = 0
color = Image.color_for_name("white")
self.image = Image.Image(bars * (self.barWidth + self.barGap),
maximum * self.stepHeight, background=color)
This method (and the ones that follow), must be present since it is part of the bar charter interface. Here, we create a new image whose size is proportional to the number of bars and their width and maximum height, and which is initially colored white.
The self.index variable is used to keep track of which bar we are up to (counting from 0).
def draw_caption(self, caption):
self.filename = os.path.join(tempfile.gettempdir(),
re.sub(r"\W+", "_", caption) + ".xpm")
The Image module has no support for drawing text, so we use the given caption as the basis for the image’s filename.
The Image module supports two image formats out of the box: XBM (.xbm) for monochrome images and XPM (.xpm) for color images. (If the PyPNG module is installed—see pypi.python.org/pypi/pypng—the Image module will also support PNG (.png) format.) Here, we have chosen the color XPM format, since our bar chart is in color and this format is always supported.
def draw_bar(self, name, value):
color = ImageBarRenderer.COLORS[self.index %
len(ImageBarRenderer.COLORS)]
width, height = self.image.size
x0 = self.index * (self.barWidth + self.barGap)
x1 = x0 + self.barWidth
y0 = height - (value * self.stepHeight)
y1 = height - 1
self.image.rectangle(x0, y0, x1, y1, fill=color)
self.index += 1
This method chooses a color from the COLORS sequence (rotating through the same colors if there are more bars than colors). It then calculates the current (self.index) bar’s coordinates (top-left and bottom-right corners) and tells the self.image instance (of type Image.Image) to draw a rectangle on itself using the given coordinates and fill color. Then, the index is incremented ready for the next bar.
def finalize(self):
self.image.save(self.filename)
print("wrote", self.filename)
Here, we simply save the image and report this fact to the user.
Clearly, the TextBarRenderer and the ImageBarRenderer have radically different implementations. Yet, either can be used as a bridge to provide a concrete bar-charting implementation for the BarCharter class.
2.3. Composite Pattern
The Composite Pattern is designed to support the uniform treatment of objects in a hierarchy, whether they contain other objects (as part of the hierarchy) or not. Such objects are called composite. In the classic approach, composite objects have the same base class for both individual objects and for collections of objects. Both composite and noncomposite objects normally have the same core methods, with composite objects also having additional methods to support adding, removing, and iterating their child objects.
This pattern is often used in drawing programs, such as Inkscape, to support grouping and ungrouping. The pattern is useful in such cases because when the user selects components to group or ungroup, some of the components might be single items (e.g., a rectangle), while others might be composite (e.g., a face made up of many different shapes).
To see an example in practice, let’s look at a main() function that creates some individual items and some composite items, and then prints them all out. The code is quoted from stationery1.py, with the output shown after it.
def main():
pencil = SimpleItem("Pencil", 0.40)
ruler = SimpleItem("Ruler", 1.60)
eraser = SimpleItem("Eraser", 0.20)
pencilSet = CompositeItem("Pencil Set", pencil, ruler, eraser)
box = SimpleItem("Box", 1.00)
boxedPencilSet = CompositeItem("Boxed Pencil Set", box, pencilSet)
boxedPencilSet.add(pencil)
for item in (pencil, ruler, eraser, pencilSet, boxedPencilSet):
item.print()
$0.40 Pencil
$1.60 Ruler
$0.20 Eraser
$2.20 Pencil Set
$0.40 Pencil
$1.60 Ruler
$0.20 Eraser
$3.60 Boxed Pencil Set
$1.00 Box
$2.20 Pencil Set
$0.40 Pencil
$1.60 Ruler
$0.20 Eraser
$0.40 Pencil
Every SimpleItem has a name and a price, while every CompositeItem has a name and any number of contained SimpleItems—or CompositeItems—so composite items can be nested without limit. The price of a composite item is the sum of its contained items’ prices.
In this example, a pencil set consists of a pencil, ruler, and eraser. For the boxed pencil set we begin by creating it with a box and a nested pencil set, and then add an extra pencil. The boxed pencil set’s hierarchy is illustrated in Figure 2.4 (![]() 42).
42).
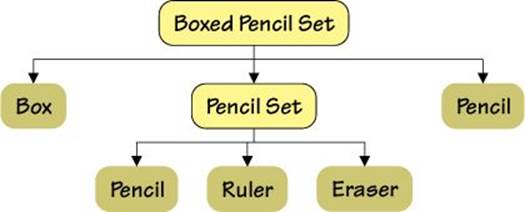
Figure 2.4 A hierarchy of composite and noncomposite items
We will review two different implementations of the Composite Pattern, the first using the classic approach, and the second using a single class for representing both composites and noncomposites.
2.3.1. A Classic Composite/Noncomposite Hierarchy
The classic approach is based on having an abstract base class for all kinds of items (i.e., whether composite or not) and an additional abstract base class for composites. The class hierarchy is shown in Figure 2.5 (![]() 43). We will begin by looking at the AbstractItem base class.
43). We will begin by looking at the AbstractItem base class.
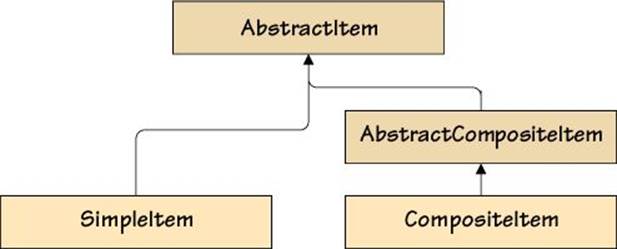
Figure 2.5 A composite and noncomposite class hierarchy
class AbstractItem(metaclass=abc.ABCMeta):
@abc.abstractproperty
def composite(self):
pass
def __iter__(self):
return iter([])
We want all subclasses to say whether or not they are composite. Also, we want all subclasses to be iterable, with a default behavior of returning an iterator to an empty sequence.
Since the AbstractItem class has at least one abstract method or property, we cannot create AbstractItem objects. (Incidentally, from Python 3.3 it is possible to write @property @abstractmethod def method(...): ... instead of @abstractproperty defmethod(...): ....)
class SimpleItem(AbstractItem):
def __init__(self, name, price=0.00):
self.name = name
self.price = price
@property
def composite(self):
return False
The SimpleItem class is used for noncomposite items. In this example, SimpleItems have name and price properties.
Since SimpleItem inherits AbstractItem, it must reimplement all the abstract properties and methods—in this case, just the composite property. Since the AbstractItem’s __iter__() method is not abstract and we don’t reimplement it here, we get the base class version that safely returns an iterator to an empty sequence. This makes sense because SimpleItems are noncomposite, and yet this still allows us to treat both SimpleItems and CompositeItems uniformly (at least for iteration); for example, by passing a mixture of such items to a function likeitertools.chain().
def print(self, indent="", file=sys.stdout):
print("{}${:.2f} {}".format(indent, self.price, self.name),
file=file)
We have provided a print() method to facilitate the printing of composite and noncomposite items, with nested items using successive levels of indentation.
class AbstractCompositeItem(AbstractItem):
def __init__(self, *items):
self.children = []
if items:
self.add(*items)
This class serves as the base class for CompositeItems and provides the machinery for adding, removing, and iterating composites. It isn’t possible to instantiate AbstractCompositeItems, because the class inherits the abstract composite property but doesn’t provide an implementation for it.
def add(self, first, *items):
self.children.append(first)
if items:
self.children.extend(items)
This method accepts one or more items (both plain SimpleItems and CompositeItems) and adds them to this composite item’s list of children. We could not have dropped the first parameter and just used *items, because that would have allowed zero items to be added, which, although harmless here, would probably be masking a logical error in the user’s code. (For more about unpacking—e.g., *items—see the “Sequence and Mapping Unpacking” sidebar, 13 ![]() ). Incidentally, no checks are made to disallow circular references; for example, to prevent adding a composite item to itself.
). Incidentally, no checks are made to disallow circular references; for example, to prevent adding a composite item to itself.
Later on, we’ll implement this method using a single line of code (![]() 46).
46).
def remove(self, item):
self.children.remove(item)
For removing items, we have used a simple approach that allows us to remove only one item at a time. Of course, a removed item might be composite, in which case removing it will remove all its child items, their child items, and so on.
def __iter__(self):
return iter(self.children)
By implementing the __iter__() special method we allow composite items’ child items to be iterated over in for loops, comprehensions, and generators. In many cases we would write the method’s body as for item in self.children: yield item, but sinceself.children is a sequence (a list) we can use the built-in iter() function to do the job for us.
class CompositeItem(AbstractCompositeItem):
def __init__(self, name, *items):
super().__init__(*items)
self.name = name
@property
def composite(self):
return True
This class is used for concrete composite items. It has its own name property but leaves all the composite-handling work (adding, removing, and iterating child items) to the base class. Instances of CompositeItem can be created because the class provides an implementation of the abstract composite property, and there are no other abstract properties or methods.
@property
def price(self):
return sum(item.price for item in self)
This read-only property is slightly subtle. It calculates this composite item’s price by accumulating the sum of its child items’ prices—and their child items’ prices, in the case of composite child items—recursively, using a generator expression as argument to the built-in sum() function.
The for item in self expression causes Python to in effect call iter(self) to get an iterator for self. This results in the __iter__() special method being called, and this method returns an iterator to self.children.
def print(self, indent="", file=sys.stdout):
print("{}${:.2f} {}".format(indent, self.price, self.name),
file=file)
for child in self:
child.print(indent + " ")
Again we have provided a convenient print() method, although, unfortunately, the first statement is just a copy of the SimpleItem.print() method’s body.
In this example, the SimpleItem and CompositeItem are designed to serve most use cases. However, it is possible to subclass them—or their abstract base classes—if a finer-grained hierarchy is desired.
The AbstractItem, SimpleItem, AbstractCompositeItem, and CompositeItem classes shown here all work perfectly well. However, the code seems to be longer than necessary and doesn’t have a uniform interface, since composites have methods (add() and remove()) that noncomposites don’t have. We will address these issues in the next subsection.
2.3.2. A Single Class for (Non)composites
The previous subsection’s four classes (two abstract, two concrete), seemed like quite a lot of work. And they don’t provide a completely uniform interface because only composites support the add() and remove() methods. If we are willing to accept a small overhead—one empty list attribute per noncomposite item, and one float per composite item—we can use a single class to represent both composite and noncomposite items. This brings with it the benefit of a completely uniform interface, since now we can call add() and remove() on any item, not just on composites, and get sensible behavior.
In this subsection we will create a new Item class that can be either composite or noncomposite, without needing any other class. The code quoted in this subsubsection is from stationery2.py.
class Item:
def __init__(self, name, *items, price=0.00):
self.name = name
self.price = price
self.children = []
if items:
self.add(*items)
The __init__() method’s arguments aren’t very pretty, but this is fine since, as we will see in a moment, we do not expect callers to call Item() to create items.
Each item must be given a name. Every item also has a price, for which we provide a default. In addition, an item may have zero or more child items (*items), which are stored in self.children—this is an empty list for noncomposites.
@classmethod
def create(Class, name, price):
return Item(name, price=price)
@classmethod
def compose(Class, name, *items):
return Item(name, *items)
Instead of creating items by calling class objects, we have provided two convenience factory class methods that take nicer arguments and return an Item. So, now, instead of writing things like SimpleItem("Ruler", 1.60) and CompositeItem("Pencil Set", pencil, ruler, eraser), we write Item.create("Ruler", 1.60) and Item.compose("Pencil Set", pencil, ruler, eraser). And now, of course, all our items are of the same type: Item. Naturally, users can still use Item() directly if they prefer; for example,Item("Ruler", price=1.60) and Item("Pencil Set", pencil, ruler, eraser).
def make_item(name, price):
return Item(name, price=price)
def make_composite(name, *items):
return Item(name, *items)
We have also provided two factory functions that do the same thing as the class methods. Such functions are convenient when we are using modules. For example, if our Item class was in the Item.py module we could replace, say, Item.Item.create("Ruler", 1.60) withItem.make_item("Ruler", 1.60).
@property
def composite(self):
return bool(self.children)
This property is different from before, since any item may or may not be composite. For the Item class, a composite item is one whose self.children list is nonempty.
def add(self, first, *items):
self.children.extend(itertools.chain((first,), items))
We have done the add() method slightly differently from before (43 ![]() ), using an approach that should be more efficient. The itertools.chain() function accepts any number of iterables and returns a single iterable that is effectively the concatenation of all the iterables passed to it.
), using an approach that should be more efficient. The itertools.chain() function accepts any number of iterables and returns a single iterable that is effectively the concatenation of all the iterables passed to it.
This method can be called on any item, whether or not it is composite. And in the case of noncomposite items, the call causes the item to become composite.
One subtle side effect of changing a noncomposite item into a composite is that the item’s own price is effectively hidden, since its price now becomes the sum of its child items’ prices. Other design decisions—such as keeping the price—are possible, of course.
def remove(self, item):
self.children.remove(item)
If a composite item’s last child is removed, the item simply becomes noncomposite. One subtle aspect of such a change is that the item’s price then becomes the value of its private self.__price attribute, rather than the sum of its (now nonexistent) childrens’ prices. We set an initial price for all items in the __init__() method to ensure that this always works (45 ![]() ).
).
def __iter__(self):
return iter(self.children)
This method returns an iterator to a composite’s list of children, or in the case of a noncomposite, to an empty sequence.
@property
def price(self):
return (sum(item.price for item in self) if self.children else
self.__price)
@price.setter
def price(self, price):
self.__price = price
The price property must work for both composites (where it is the sum of the child items’ prices) and for noncomposites (where it is the item’s price).
def print(self, indent="", file=sys.stdout):
print("{}${:.2f} {}".format(indent, self.price, self.name),
file=file)
for child in self:
child.print(indent + " ")
Again, this method must work for both composites and noncomposites, although the code is identical to the previous section’s CompositeItem.print() method. When we iterate over a noncomposite, it returns an iterator to an empty sequence, so there is no risk of infinite recursion when we iterate over an item’s children.
Python’s flexibility makes it straightforward to create composite and noncomposite classes—either as separate classes to minimize storage overhead, or as a single class to provide a completely uniform interface.
We will see a further variation of the Composite Pattern when we review the Command Pattern (§3.2, ![]() 79).
79).
2.4. Decorator Pattern
In general, a decorator is a function that takes a function as its sole argument and returns a new function with the same name as the original function but with enhanced functionality. Decorators are often used by frameworks (e.g., web frameworks) to make it easy to integrate our own functions within the framework.
The Decorator Pattern is so useful that Python has built-in support for it. In Python, decorators can be applied to both functions and methods. Furthermore, Python also supports class decorators: functions that take a class as their sole argument and that return a new class with the same name as the original class but with additional functionality. Class decorators can sometimes be used as an alternative to subclassing.
Python’s built-in property() function can be used as a decorator, as we have seen already (e.g., the composite and price properties from the previous section; 46 ![]() and 47
and 47 ![]() ). And Python’s standard library includes some built-in decorators. For example, the@functools.total_ordering class decorator can be applied to a class that implements the __eq__() and __lt__() special methods (which provide the == and < comparison operators). This will result in the class being replaced with a new version of itself that includes all the other comparison special methods, so that the decorated class supports the full range of comparison operators (i.e., <, <=, ==, !=, =>, and >).
). And Python’s standard library includes some built-in decorators. For example, the@functools.total_ordering class decorator can be applied to a class that implements the __eq__() and __lt__() special methods (which provide the == and < comparison operators). This will result in the class being replaced with a new version of itself that includes all the other comparison special methods, so that the decorated class supports the full range of comparison operators (i.e., <, <=, ==, !=, =>, and >).
A decorator may accept only a single function, method, or class as its sole argument, so in theory it isn’t possible to parameterize decorators. Nonetheless, this isn’t any limitation in practice, since, as we will see, we can create parameterized decorator factories that can return a decorator function—which can in turn be used to decorate a function, method, or class.
2.4.1. Function and Method Decorators
All function (and method) decorators have the same overall structure.First, they create a wrapper function (which in this book we always call wrapper()). Inside the wrapper we should call the original function. However, we are free to do any preprocessing we like before the call; we are free to acquire the result and do any postprocessing we like after the call; and we are free to return whatever we like—the original result, a modified result, or anything else we choose. Finally, we return the wrapper function as the decorator’s result—and this function replaces the original function using the original function’s name.
A decorator is applied to a function, method, or class by writing an @ (“at” symbol) at the same level of indentation as the def or class statement, immediately followed by the decorator’s name. It is perfectly possible to stack decorators—that is, to apply a decorator to a decorated function, and so on—as illustrated in Figure 2.6; we will see an example shortly.
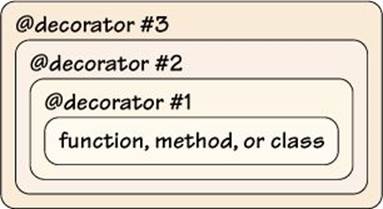
Figure 2.6 Stacked decorators
@float_args_and_return
def mean(first, second, *rest):
numbers = (first, second) + rest
return sum(numbers) / len(numbers)
Here, we have used the @float_args_and_return decorator (shown in a moment) to decorate the mean() function. The undecorated mean() function takes two or more numeric arguments and returns their mean as a float. But the decorated mean() function—which we call asmean() since it has replaced the original—can accept two or more arguments of any kind that will convert to a float. Without the decorator the call mean(5, "6", "7.5") would have raised a TypeError, because we cannot add ints and strs, but this works fine with the decorated version, since float("6") and float("7.5") produce valid numbers.
Incidentally, the decorator syntax is really just syntactic sugar. We could have written the above as:
def mean(first, second, *rest):
numbers = (first, second) + rest
return sum(numbers) / len(numbers)
mean = float_args_and_return(mean)
Here, we have created the function without a decorator and then replaced it with a decorated version by calling the decorator ourselves. Although using decorators is very convenient, sometimes it is necessary to call them directly. We will see an example toward the end of this section when we call the built-in @property decorator in the ensure() function (![]() 56). We also did this earlier when we called the built-in @classmethod decorator in the has_methods() function (36
56). We also did this earlier when we called the built-in @classmethod decorator in the has_methods() function (36 ![]() ).
).
def float_args_and_return(function):
def wrapper(*args, **kwargs):
args = [float(arg) for arg in args]
return float(function(*args, **kwargs))
return wrapper
The float_args_and_return() function is a function decorator, and so takes a single function as its sole argument. It is conventional for wrapper functions to take *args and **kwargs; that is, any arguments at all. (See the “Sequence and Mapping Unpacking” sidebar, 13 ![]() .) Any constraints on the arguments will be handled by the original (wrapped) function, so we must just ensure that all the arguments are passed.
.) Any constraints on the arguments will be handled by the original (wrapped) function, so we must just ensure that all the arguments are passed.
In this example, inside the wrapper function we replace the passed-in positional arguments with a list of floating-point numbers. Then we call the original function with the possibly modified *args and convert its result to a float, which we then return.
Once the wrapper has been created, we return it as the decorator’s result.
Unfortunately, as written, the returned decorated function’s __name__ attribute is now set to "wrapper" instead of the original function’s name, and has no docstring—even if the original function has a docstring. So the replacement isn’t perfect. To address this deficiency, Python’s standard library includes the @functools.wraps decorator, which can be used to decorate a wrapper function inside a decorator and ensures that the wrapped function’s __name__ and __doc__ attributes hold the original function’s name and docstring.
def float_args_and_return(function):
@functools.wraps(function)
def wrapper(*args, **kwargs):
args = [float(arg) for arg in args]
return float(function(*args, **kwargs))
return wrapper
Here is another version of the decorator. This version uses the @functools.wraps decorator to ensure that the wrapper() function created inside the decorator has its __name__ attribute correctly set to the passed-in function’s name (e.g., "mean") and has the original function’s docstring (which is empty in this example). It is best to always use @functools.wraps, since this will ensure that in tracebacks decorated functions’ names will appear correctly (rather than all being called "wrapper") and that we have access to the original functions’ docstrings.
@statically_typed(str, str, return_type=str)
def make_tagged(text, tag):
return "<{0}>{1}</{0}>".format(tag, escape(text))
@statically_typed(str, int, str) # Will accept any return type
def repeat(what, count, separator):
return ((what + separator) * count)[:-len(separator)]
The statically_typed() function used to decorate the make_tagged() and repeat() functions is a decorator factory; that is, a decorator-making function. It isn’t a decorator because it doesn’t take a function, method, or class as its sole parameter. But here we need to parameterize the decorator, since we want to specify the number and types of positional arguments that a decorated function may accept (and optionally specify the type of its return value), and this will vary from function to function. So we have created a statically_typed() function that takes the parameters we need—one type per positional argument and an optional keyword argument for specifying the return type—and returns a decorator.
So, when Python encounters @statically_typed(...) in the code, it calls the function with the given arguments and then uses the function that is returned as a decorator for the following function (in this example, make_tagged() or repeat()).
Creating decorator factories follows a pattern. First, we create a decorator function, and inside that function we create a wrapper function; the wrapper follows the same pattern as before. As usual, at the end of the wrapper, the (possibly modified or replaced) result of the original function is returned. And at the end of the decorator function the wrapper is returned. Finally, at the end of the decorator factory function, the decorator is returned.
def statically_typed(*types, return_type=None):
def decorator(function):
@functools.wraps(function)
def wrapper(*args, **kwargs):
if len(args) > len(types):
raise ValueError("too many arguments")
elif len(args) < len(types):
raise ValueError("too few arguments")
for i, (arg, type_) in enumerate(zip(args, types)):
if not isinstance(arg, type_):
raise ValueError("argument {} must be of type {}"
.format(i, type_.__name__))
result = function(*args, **kwargs)
if (return_type is not None and
not isinstance(result, return_type)):
raise ValueError("return value must be of type {}".format(
return_type.__name__))
return result
return wrapper
return decorator
Here we begin by creating a decorator function. We have called it decorator(), but the name doesn’t matter. Inside the decorator function we create the wrapper—just as we did before. In this particular case the wrapper is rather involved, because it checks the number and types of all the positional arguments before calling the original function, and then it checks the type of the result if a specific return type was specified. And at the end it returns the result.
Once the wrapper has been created, the decorator returns it. And then, at the very end, the decorator itself is returned. So, when Python reaches, say, @statically_typed(str, int, str) in the source code, it will call the statically_typed() function. This will return thedecorator() function it has created—having captured the arguments passed to the statically_typed() function. Now, back at the @, Python executes the returned decorator() function, passing it the function that follows—either a function created with a def statement or the function returned by another decorator. In this case, the function is repeat(), so that function is passed as the sole argument to the decorator() function. The decorator() function now creates a new wrapper() function parameterized by the captured state (i.e., by the arguments that were given to the statically_typed() function) and returns the wrapper, which Python then uses to replace the original repeat() function.
Notice that the wrapper() function created when the decorator() function created by the statically_typed() function is called has captured some of its surrounding state—in particular, the types tuple and the return_type keyword argument. When a function or method captures state like this, it is said to be a closure. Python’s support for closures is what makes it possible to create parameterized factory functions, decorators, and decorator factories.
Using a decorator to enforce the static type checking of arguments, and optionally of a function’s return value, may be appealing to those coming to Python from a statically typed language (e.g., C, C++, or Java), but they add a runtime performance penalty that isn’t paid by compiled languages. Furthermore, checking types when we have a dynamically typed language isn’t very Pythonic, but it does show how flexible Python is. (And if we really want compile-time static typing, we can use Cython, as we will see in a later chapter; §5.2, ![]() 187.) What is probably more useful is parameter validation, something we will look at in the following subsection.
187.) What is probably more useful is parameter validation, something we will look at in the following subsection.
Although it can take a bit of getting used to, the patterns for writing decorators are straightforward. For an unparameterized function or method decorator, simply create a decorator function that creates and returns a wrapper. This pattern is shown by the @float_args_and_returndecorator we saw earlier (50 ![]() ) and by the @Web.ensure_logged_in decorator that we will look at next. For a parameterized decorator, create a decorator factory that creates a decorator (that in turn creates a wrapper), following the pattern used for the statically_typed()function (51
) and by the @Web.ensure_logged_in decorator that we will look at next. For a parameterized decorator, create a decorator factory that creates a decorator (that in turn creates a wrapper), following the pattern used for the statically_typed()function (51 ![]() ).
).
@application.post("/mailinglists/add")
@Web.ensure_logged_in
def person_add_submit(username):
name = bottle.request.forms.get("name")
try:
id = Data.MailingLists.add(name)
bottle.redirect("/mailinglists/view")
except Data.Sql.Error as err:
return bottle.mako_template("error", url="/mailinglists/add",
text="Add Mailinglist", message=str(err))
This code snippet is taken from a web application for managing mailing lists that uses the lightweight bottle web framework (bottlepy.org). The @application.post decorator is provided by the framework and is used to associate a function with a URL. For this particular example, we only want users to access the mailinglists/add page if they are logged in—and to be redirected to the login page otherwise. Rather than putting in every function that produces a web page the same code to check whether the user is logged in, we have created the@Web.ensure_logged_in decorator, which handles this matter and means that none of our functions needs to be cluttered up with login-related code.
def ensure_logged_in(function):
@functools.wraps(function)
def wrapper(*args, **kwargs):
username = bottle.request.get_cookie(COOKIE,
secret=secret(bottle.request))
if username is not None:
kwargs["username"] = username
return function(*args, **kwargs)
bottle.redirect("/login")
return wrapper
When the user logs in to the web site, the code behind the login page verifies their username and password, and if these are valid, sets a cookie in the user’s browser that has a lifetime of a single session.
When the user requests a page whose associated function is protected by the @ensure_logged_in decorator, such as the mailinglists/add page’s person_add_submit() function, the wrapper() function defined here gets called. The wrapper begins by trying to retrieve the username from the cookie. If this fails, the user isn’t logged in, so we redirect them to the web application’s login page. But if the user is logged in, we add the username to the keyword arguments, and return the result of calling the original function. This means that when the original function is called, it can safely assume that the user is validly logged in, and it has access to their username.
2.4.2. Class Decorators
It is quite common to create classes that have lots of read-write properties. Such classes often have a lot of duplicate or near-duplicate code for the getters and setters. For example, imagine we had a Book class that held a book’s title, ISBN, price, and quantity. We would need four@property decorators, all with basically the same code (e.g., @property def title(self): return title). We would also need four setter methods, each with its own validation—although the code for validating the price and quantity properties would be identical apart from the actual minimum and maximum amounts allowed. If we had a lot of classes like this we could end up with a great deal of near-duplicate code.
Fortunately, Python’s support of class decorators makes it possible to eliminate such duplication. For example, earlier in this chapter, we used a class decorator to create custom interface-checking classes without the need to duplicate ten lines of code each time (§2.2, 36 ![]() ). And here is another example, an implementation of a Book class that includes four fully validated properties (plus a read-only computed property):
). And here is another example, an implementation of a Book class that includes four fully validated properties (plus a read-only computed property):
@ensure("title", is_non_empty_str)
@ensure("isbn", is_valid_isbn)
@ensure("price", is_in_range(1, 10000))
@ensure("quantity", is_in_range(0, 1000000))
class Book:
def __init__(self, title, isbn, price, quantity):
self.title = title
self.isbn = isbn
self.price = price
self.quantity = quantity
@property
def value(self):
return self.price * self.quantity
The self.title, self.isbn, and so on are all properties, so the assignments that take place in the __init__() method are all validated by the relevant property setter. But instead of having to manually write the code for creating these properties with their getters and setters, we have used a class decorator—four times—to provide all of this functionality for us.
The ensure() function accepts two parameters—a property name and a validator function—and returns a class decorator. The class decorator is then applied to the following class.
So, here, the bare Book class is created, then the first (quantity) ensure() call is made, after which the returned class decorator is applied. This results in the Book class being augmented with a quantity property. Next, the (price) ensure() call is made, and after the returned class decorator is applied, the Book class is now augmented with both quantity and price properties. This process is repeated twice more, until we end up with a final version of the Book class that has all four properties.
Although the process sounds like it is happening backwards, here is effectively what is going on:
ensure("title", is_non_empty_str)( # Pseudo-code
ensure("isbn", is_valid_isbn)(
ensure("price", is_in_range(1, 10000))(
ensure("quantity", is_in_range(0, 1000000))(class Book: ...))))
The class Book statement must be executed first since the resulting class object is needed as the parameter to the (quantity) ensure() call’s call, and the class object returned by this is needed by the one before, and so on.
Notice that both price and quantity use the same validator function, only with different parameters. In fact, the is_in_range() function is a factory function that makes and returns a new is_in_range() function that has the given minimum and maximum values hard-coded into it.
As we will see in a moment, the class decorator returned by the ensure() function adds a property to the class. This property’s setter calls the validator function for the given property and passes into the validator two arguments: the name of the property and the new value for the property. The validator should do nothing if the value is valid; otherwise it should raise an exception (e.g., a ValueError). Before looking at ensure()’s implementation, let’s look at a couple of validators.
def is_non_empty_str(name, value):
if not isinstance(value, str):
raise ValueError("{} must be of type str".format(name))
if not bool(value):
raise ValueError("{} may not be empty".format(name))
This validator is used for a Book’s title property to ensure that the title is a nonempty string. As the ValueErrors show, the name of the property is useful for error messages.
def is_in_range(minimum=None, maximum=None):
assert minimum is not None or maximum is not None
def is_in_range(name, value):
if not isinstance(value, numbers.Number):
raise ValueError("{} must be a number".format(name))
if minimum is not None and value < minimum:
raise ValueError("{} {} is too small".format(name, value))
if maximum is not None and value > maximum:
raise ValueError("{} {} is too big".format(name, value))
return is_in_range
This function is a factory function that creates a new validator function that checks that the value it is given is a number (using the abstract base class numbers.Number) and that the number is in range. Once the validator has been created, it is returned.
def ensure(name, validate, doc=None):
def decorator(Class):
privateName = "__" + name
def getter(self):
return getattr(self, privateName)
def setter(self, value):
validate(name, value)
setattr(self, privateName, value)
setattr(Class, name, property(getter, setter, doc=doc))
return Class
return decorator
The ensure() function creates a class decorator parameterized by a property name, a validator function, and an optional docstring. So, each time a class decorator returned by ensure() is used for a particular class, that class is augmented by the addition of a new property.
The class decorator() function receives a class as its sole argument. The decorator() function begins by creating a private name; the property’s value will be stored in an attribute with this name. (Thus, in the Book example, the self.title property’s value will be stored in the private self.__title attribute.) Next, it creates a getter function that will return the value stored in the attribute with the private name. The built-in getattr() function takes an object and an attribute name and returns the attribute’s value—or raises an AttributeError. The function then creates a setter that calls the captured validate() function, and then (assuming that validate() didn’t raise an exception) sets the value stored in the attribute with the private name to the new value. The built-in setattr() function takes an object, an attribute name, and a value and sets the attribute’s value to the given value, creating a new attribute if necessary.
Once the getter and setter have been created, they are used to create a new property that is added as an attribute to the passed-in class, under the given (public) property name, using the built-in setattr() function. The built-in property() function takes a getter, and optionally a setter, deleter, and docstring, and returns a property; it can also be used as a method decorator, as we have seen. The modified class is then returned by the decorator() function, and the decorator() function itself is returned by the ensure() class decorator factory function.
2.4.2.1. Using a Class Decorator to Add Properties
In the previous example (54 ![]() ), we had to use the @ensure class decorator for every attribute we wanted to validate. Some Python programmers don’t like stacking lots of class decorators like this and prefer combining a single class decorator with attributes in a class’s body to produce more readable code.
), we had to use the @ensure class decorator for every attribute we wanted to validate. Some Python programmers don’t like stacking lots of class decorators like this and prefer combining a single class decorator with attributes in a class’s body to produce more readable code.
@do_ensure
class Book:
title = Ensure(is_non_empty_str)
isbn = Ensure(is_valid_isbn)
price = Ensure(is_in_range(1, 10000))
quantity = Ensure(is_in_range(0, 1000000))
def __init__(self, title, isbn, price, quantity):
self.title = title
self.isbn = isbn
self.price = price
self.quantity = quantity
@property
def value(self):
return self.price * self.quantity
This is a new version of the Book class that uses a @do_ensure class decorator in conjunction with Ensure instances. Each Ensure takes a validation function, and the @do_ensure class decorator replaces each Ensure instance with a validated property of the same name. Incidentally, the validation functions (is_non_empty_str() etc.) are the same as those shown earlier.
class Ensure:
def __init__(self, validate, doc=None):
self.validate = validate
self.doc = doc
This tiny class is used to store the validation function that will end up being used in the property’s setter, and optionally, the property’s doc string. For example, the Book class’s title attribute starts out as an Ensure instance, but once the Book class has been created, the @do_ensuredecorator replaces every Ensure with a property. So, the title attribute ends up being a title property (whose setter uses the original Ensure instance’s validation function).
def do_ensure(Class):
def make_property(name, attribute):
privateName = "__" + name
def getter(self):
return getattr(self, privateName)
def setter(self, value):
attribute.validate(name, value)
setattr(self, privateName, value)
return property(getter, setter, doc=attribute.doc)
for name, attribute in Class.__dict__.items():
if isinstance(attribute, Ensure):
setattr(Class, name, make_property(name, attribute))
return Class
This class decorator has three parts. In the first part we define a nested function (make_property()). The function takes a name (e.g., "title") and an attribute of type Ensure, and creates and returns a property that stores its value in a private attribute (e.g., "__title"). Furthermore, when the property’s setter is accessed, it calls the validation function. In the second part we iterate over all the class’s attributes and replace any Ensures with a new property. In the third part we return the modified class.
Once the decorator has finished, the decorated class has had every one of its Ensure attributes replaced by a validated property of the same name.
In theory, we could have avoided the nested function and simply put that code after the if isinstance() test. However, that doesn’t work in practice due to problems with late binding, so having a separate function here is essential. This issue isn’t uncommon when creating decorators or decorator factories, but using a separate—possibly nested—function is usually a sufficient solution.
2.4.2.2. Using a Class Decorator Instead of Subclassing
Sometimes we create a base class with some methods or data purely so that we can subclass this base class two or more times. This avoids having to duplicate the methods or data and scales well if we create additional subclasses. However, if the inherited methods or data are never modified in the subclasses, it is possible to use a class decorator to achieve the same end.
For example, later on we will make use of a Mediated base class that provides a self.mediator data attribute and an on_change() method (§3.5, ![]() 100). This class is inherited by two classes, Button and Text, which make use of the data and method but don’t modify them.
100). This class is inherited by two classes, Button and Text, which make use of the data and method but don’t modify them.
class Mediated:
def __init__(self):
self.mediator = None
def on_change(self):
if self.mediator is not None:
self.mediator.on_change(self)
This is the base class quoted from mediator1.py. It is inherited using the usual syntax; that is, class Button(Mediated): ...and class Text(Mediated): .... But since no subclass will ever need to modify the inherited on_change() method, we can use a class decorator instead of subclassing.
def mediated(Class):
setattr(Class, "mediator", None)
def on_change(self):
if self.mediator is not None:
self.mediator.on_change(self)
setattr(Class, "on_change", on_change)
return Class
This code is from mediator1d.py. The class decorator is applied like any other; that is, @mediated class Button: ... and @mediated class Text: .... The decorated classes have exactly the same behavior as the subclass versions.
Function and class decorators are a very powerful yet reasonably easy-to-use Python feature. And as we have seen, class decorators can sometimes be used as an alternative to subclassing. Creating decorators is a simple form of metaprogramming, and class decorators can often be used instead of more complex forms of metaprogramming, such as metaclasses.
2.5. Façade Pattern
The Façade Pattern is used to present a simplified and uniform interface to a subsystem whose interface is too complex or too low-level for convenient use.
Python’s standard library provides modules for handling gzip-compressed files, tarballs, and zip files, but they all have different interfaces. Let’s imagine that we would like to be able to access the names in an archive file, and extract its files, using a simple uniform interface. One solution is to use the Façade Pattern to provide a very simple high-level interface that defers most of the real work to the standard library.
Figure 2.7 (![]() 60) shows the interface we want to provide to users (a filename property and names() and unpack() methods) and the interfaces that we are providing a façade for. An Archive instance will hold one archive file’s name, and only when asked for the archive’s names or to unpack the archive will it actually open the archive file. (The code quoted in this section is from Unpack.py.)
60) shows the interface we want to provide to users (a filename property and names() and unpack() methods) and the interfaces that we are providing a façade for. An Archive instance will hold one archive file’s name, and only when asked for the archive’s names or to unpack the archive will it actually open the archive file. (The code quoted in this section is from Unpack.py.)
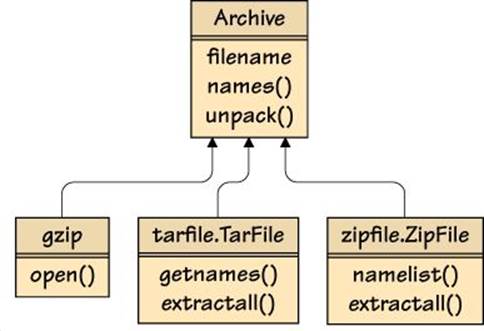
Figure 2.7 The Archive façade
class Archive:
def __init__(self, filename):
self._names = None
self._unpack = None
self._file = None
self.filename = filename
The self._names variable is expected to hold a callable that will return a list of the archive’s names. Similarly, the self._unpack variable is for holding a callable that will extract all the archive’s files into the current directory. The self._file is for holding a file object that has been opened on the archive. And self.filename is a read-write property holding the archive file’s filename.
@property
def filename(self):
return self.__filename
@filename.setter
def filename(self, name):
self.close()
self.__filename = name
If the user changes the filename (e.g., using archive.filename = newname), the current archive file is closed (if it is open). We do not immediately open the new archive, though, since the Archive class uses lazy evaluation and so only opens the archive when necessary.
def close(self):
if self._file is not None:
self._file.close()
self._names = self._unpack = self._file = None
In theory, users of the Archive class are expected to call the close() method when they have finished with an instance. The method closes the file object (if one is open) and sets the self._names, self._unpack, and self._file variables to None to invalidate them.
We have made the Archive class a context manager (as we will see in a moment) so, in practice, users don’t need to call close() themselves, providing they use the class in a with statement. For example:
with Archive(zipFilename) as archive:
print(archive.names())
archive.unpack()
Here we create an Archive for a zip file, print its names to the console, and then extract all its files in the current directory. And because the archive is a context manager, archive.close() is called automatically when the archive goes out of the with statement’s scope.
def __enter__(self):
return self
def __exit__(self, exc_type, exc_value, traceback):
self.close()
These two methods are sufficient to make an Archive into a context manager. The __enter__() method returns self (an Archive instance), which is assigned to the with ... as statement’s variable. The __exit__() method closes the archive’s file object (if one is open), and since it (implicitly) returns None, any exceptions that have occurred will be propagated normally.
def names(self):
if self._file is None:
self._prepare()
return self._names()
This method returns a list of the archive’s filenames, opening the archive and setting self._names and self._unpack to appropriate callables (using self._prepare()) if it isn’t open already.
def unpack(self):
if self._file is None:
self._prepare()
self._unpack()
This method unpacks all the archive’s files, but as we will see, only if all of their names are “safe”.
def _prepare(self):
if self.filename.endswith((".tar.gz", ".tar.bz2", ".tar.xz",
".zip")):
self._prepare_tarball_or_zip()
elif self.filename.endswith(".gz"):
self._prepare_gzip()
else:
raise ValueError("unreadable: {}".format(self.filename))
This method delegates the preparation to suitable methods. For tarballs and zip files the necessary code is very similar, so they are prepared in the same method. But gzipped files are handled differently and so have their own separate method.
The preparation methods must assign callables to the self._names and self._unpack variables, so that these can be called in the names() and unpack() methods we have just seen.
def _prepare_tarball_or_zip(self):
def safe_extractall():
unsafe = []
for name in self.names():
if not self.is_safe(name):
unsafe.append(name)
if unsafe:
raise ValueError("unsafe to unpack: {}".format(unsafe))
self._file.extractall()
if self.filename.endswith(".zip"):
self._file = zipfile.ZipFile(self.filename)
self._names = self._file.namelist
self._unpack = safe_extractall
else: # Ends with .tar.gz, .tar.bz2, or .tar.xz
suffix = os.path.splitext(self.filename)[1]
self._file = tarfile.open(self.filename, "r:" + suffix[1:])
self._names = self._file.getnames
self._unpack = safe_extractall
This method begins by creating a nested safe_extractall() function that checks all the archive’s names and raises a ValueError if there are any unsafe names, as defined by the is_safe() method. If all the names are safe the tarball.TarFile.extractall() orzipfile.ZipFile.extractall() method is called.
Depending on the archive filename’s extension, we open a tarball.TarFile or zipfile.ZipFile and assign it to self._file. We then set self._names to the corresponding bound method (namelist() or getnames()), and self._unpack to thesafe_extractall() function we just created. This function is a closure that has captured self and so can access self._file and call the appropriate extractall() method. (See the “Bound and Unbound Methods” sidebar.)
![]() Bound and Unbound Methods
Bound and Unbound Methods
A bound method is a method that is already associated with an instance of its class. Let’s imagine we have a Form class with an update_ui() method. Now, if we write bound = self.update_ui inside one of the Form class’s methods, bound is assigned an object reference to the Form.update_ui() method that is bound to a particular instance of the form (self). A bound method can be called directly; for example, bound().
An unbound method is a method with no associated instance. For example, if we write unbound = Form.update_ui, unbound is assigned an object reference to the Form.update_ui() method, but with no binding to any particular instance. This means that if we want to call the unbound method, we must provide a suitable instance as its first argument; for example, form = Form(); unbound(form). (Strictly speaking, Python 3 doesn’t actually have unbound methods, so unbound is really the underlying function object, although this only makes a difference in some metaprogramming corner cases.)
def is_safe(self, filename):
return not (filename.startswith(("/", "\\")) or
(len(filename) > 1 and filename[1] == ":" and
filename[0] in string.ascii_letter) or
re.search(r"[.][.][/\\]", filename))
A maliciously created archive file that is unpacked could overwrite important system files with nonfunctional or sinister replacements. In view of this, we should never open archives that contain files with absolute paths or with relative path components, and we should always open archives as an unprivileged user (i.e., never as root or Administrator).
This method returns False if the filename it is given starts with a forward slash or a backslash (i.e., an absolute path), or contains ../ or ..\ (a relative path that could lead anywhere), or starts with D: where D is a Windows drive letter.
In other words, any filename that is absolute or that has relative components is considered to be unsafe. For any other filename the method returns True.
def _prepare_gzip(self):
self._file = gzip.open(self.filename)
filename = self.filename[:-3]
self._names = lambda: [filename]
def extractall():
with open(filename, "wb") as file:
file.write(self._file.read())
self._unpack = extractall
This method provides an open file object for self._file and assigns suitable callables to self._names and self._unpack. For the extractall() function, we have to read and write the data ourselves.
The Façade Pattern can be very useful for creating simplified and convenient interfaces. The upside is that we are insulated from low-level details; the downside is that we may have to give up fine control. However, a façade doesn’t hide or do away with the underlying functionality, so we can always use the façade most of the time, and just drop down to lower-level classes if we need more control.
The Façade and Adapter Patterns have a superficial similarity. The difference is that a façade provides a simple interface on top of a complicated interface, whereas an adapter provides a standardized interface on top of another (not necessarily complicated) interface. Both patterns can be used together. For example, we might define an interface for handling archive files (tarballs, zip files, Windows .cab files, and so on), use an adapter for each format, and layer a façade on top so that users would not need to know or care about which particular file format was being used.
2.6. Flyweight Pattern
The Flyweight Pattern is designed for handling large numbers of relatively small objects, where many of the small objects are duplicates of each other. The pattern is implemented by representing each unique object only once, and by sharing this unique instance wherever it is needed.
Python takes a naturally flyweight approach because of its use of object references. For example, if we had a long list of strings—many of which were duplicates—so long as we stored object references (i.e., variables) rather than literal strings, we would make significant memory savings.
red, green, blue = "red", "green", "blue"
x = (red, green, blue, red, green, blue, red, green)
y = ("red", "green", "blue", "red", "green", "blue", "red", "green")
In the previous code snippet, the x tuple stores 3 strings using 8 object references. The y tuple stores 8 strings using 8 object references, since what we have written is in effect syntactic sugar for _anonymous_item0 = "red", ..., _anonymous_item7 = "green"; y = (_anonymous_item0, ... _anonymous_item7).
Probably the easiest way to take advantage of the Flyweight Pattern in Python is to use a dict, with each unique object held as a value identified by a unique key. For example, if we are creating lots of HTML pages with fonts specified by CSS (Cascading Style Sheets), rather than creating a new font every time one is needed, we could create the ones we need in advance (or as required) and keep them in a dict. Then, whenever we required a font, we could take it from the dict. This would ensure that each unique font would be created only once, no matter how many times it was used.
In some situations we may have a large number of not necessarily small objects, where all or most of them are unique. One easy way to reduce the memory footprint in such cases is to use __slots__.
class Point:
__slots__ = ("x", "y", "z", "color")
def __init__(self, x=0, y=0, z=0, color=None):
self.x = x
self.y = y
self.z = z
self.color = color
Here is a simple Point class that holds a three-dimensional position and a color. Thanks to the __slots__, no Point has its own private dict (self.__dict__). However, this also means that no arbitrary attributes can be added to individual points. (This class is quoted frompointstore1.py.)
On one test machine it took around 2½ seconds to create a tuple of one million of these points, and the program (which did little else) occupied 183 MiB of RAM. Without the slots, this program ran a fraction of a second faster but occupied 312 MiB of RAM.
By default, Python always sacrifices memory for the sake of speed, but we can often reverse this trade-off if doing so suits us better.
class Point:
__slots__ = ()
__dbm = shelve.open(os.path.join(tempfile.gettempdir(), "point.db"))
Here is the beginning of our second Point class (quoted from pointstore2.py). It uses a DBM (key–value) database that is stored in a file on disk to store its data. An object reference to the DBM is stored in the static (i.e., class-level) Point.__dbm variable. All Points share the same underlying DBM file. We begin by opening the DBM file ready for use. The shelve module’s default behavior is to automatically create the DBM file if it doesn’t already exist. (We’ll see how we ensure that the DBM file is properly closed later.)
The shelve module pickles the values we store and unpickles the values we retrieve. (Python’s pickle format is inherently insecure because the unpickling process in effect executes arbitrary Python code. In view of this we should never use pickles from untrusted sources or for data to which untrusted access is possible. Alternatively, if we want to use pickles in such circumstances, we should apply our own security measures, such as checksums and encryption.)
def __init__(self, x=0, y=0, z=0, color=None):
self.x = x
self.y = y
self.z = z
self.color = color
This method is exactly the same as the one in pointstore1.py, but under the hood the values are assigned into the underlying DBM file.
def __key(self, name):
return "{:X}:{}".format(id(self), name)
This method provides the key string for any of the x, y, z, and color Point attributes. The key is made up of the instance’s ID (a unique number returned by the built-in id() function) in hexadecimal and the attribute name. For example, if we had a Point with an ID of, say, 3 954 827, its x attribute would be stored using the key "3C588B:x", its y attribute using the key "3C588B:y", and so on.
def __getattr__(self, name):
return Point.__dbm[self.__key(name)]
This method is called whenever a Point attribute is accessed (e.g., x = point.x).
DBM databases’ keys and values must be bytes. Fortunately, Python’s DBM modules will accept either str or bytes keys, converting the former to bytes using the default encoding (UTF-8) under the hood. And if we use the shelve module (as we have done here), we can store any pickleable values we like, relying on the shelve module to convert to and from bytes as required.
So, here, we get the appropriate key and retrieve the corresponding value. And thanks to the shelve module, the retrieved value is converted from (pickled) bytes to the type originally set (e.g., to an int or None for a point color).
def __setattr__(self, name, value):
Point.__dbm[self.__key(name)] = value
Whenever a Point attribute is set (e.g., point.y = y), this method is called. Here, we get the appropriate key and set its value, relying on the shelve module to convert the value to (pickled) bytes.
atexit.register(__dbm.close)
At the end of Point class, we register the DBM’s close() method to be called when the program terminates, using the atexit module’s register() function.
On the test machine, it took about a minute to create a database of a million points, but the program only occupied 29 MiB of RAM (plus a 361 MiB disk file), compared with 183 MiB of RAM for the first version. Although the time taken to populate the DBM is considerable, once this is done, lookup speed should be fast, since most operating systems will cache a disk file that’s frequently used.
2.7. Proxy Pattern
The Proxy Pattern is used when we want one object to stand in for another. Four use cases are presented in the Design Patterns book. The first is a remote proxy where a local object proxies a remote object. The RPyC library is a perfect example of this: it allows us to create objects on a server and proxies for those objects on one or more clients. (This library is introduced in Chapter 6; §6.2, ![]() 219.) The second is a virtual proxy that allows us to create lightweight objects instead of heavyweight objects, only creating the heavyweight objects if they are actually needed. We will review an example of this in this section. The third is a protection proxy that provides different levels of access depending on a client’s access rights. And the fourth is a smart reference that “performs additional actions when an object is accessed”. We can use the same coding approach for all proxies, although the fourth use case’s behavior could also be achieved using a descriptor (e.g., replacing an object with a property using the @property decorator).*
219.) The second is a virtual proxy that allows us to create lightweight objects instead of heavyweight objects, only creating the heavyweight objects if they are actually needed. We will review an example of this in this section. The third is a protection proxy that provides different levels of access depending on a client’s access rights. And the fourth is a smart reference that “performs additional actions when an object is accessed”. We can use the same coding approach for all proxies, although the fourth use case’s behavior could also be achieved using a descriptor (e.g., replacing an object with a property using the @property decorator).*
*Descriptors are covered in Programming in Python 3, Second Edition (see the Selected Bibliography for details; ![]() 287), and in the online documentation: docs.python.org/3/reference/datamodel.html#descriptors.
287), and in the online documentation: docs.python.org/3/reference/datamodel.html#descriptors.
This pattern can also be used in unit testing. For example, if we need to test some code that accesses a resource that isn’t always available, or a class that is being developed but is incomplete, we could create a proxy for the resource or class that provided the full interface, but with stubs for missing functionality. This approach can be so useful that Python 3.3 includes the unittest.mock library for creating mock objects and for adding stubs in place of missing methods. (See docs.python.org/py3k/library/unittest.mock.html.)
For this section’s example, we will assume that we need to create multiple images speculatively, with only one of them actually used in the end. We have an Image module and a faster near-equivalent cyImage module (covered in §3.12, ![]() 124 and §5.2.2,
124 and §5.2.2, ![]() 193), but these modules create their images in memory. Since we will need only one of the speculatively created images, it would be better if we created lightweight image proxies and only when we knew which image we were really going to need go on to create an actual image.
193), but these modules create their images in memory. Since we will need only one of the speculatively created images, it would be better if we created lightweight image proxies and only when we knew which image we were really going to need go on to create an actual image.
The Image.Image class’s interface consists of ten methods in addition to the constructor: load(), save(), pixel(), set_pixel(), line(), rectangle(), ellipse(), size(), subsample(), and scale(). (This doesn’t include some additional static convenience methods that are also available as module functions, such as Image.Image.color_for_name() and Image.color_for_name().)
For our proxy class we will only implement the subset of the Image.Image’s methods that is sufficient for our needs. Let’s begin by looking at how the proxy is used. The code is quoted from imageproxy1.py; the image produced is shown in Figure 2.8.
Figure 2.8 A drawn image
YELLOW, CYAN, BLUE, RED, BLACK = (Image.color_for_name(color)
for color in ("yellow", "cyan", "blue", "red", "black"))
First, we create some color constants using the Image module’s color_for_name() function.
image = ImageProxy(Image.Image, 300, 60)
image.rectangle(0, 0, 299, 59, fill=YELLOW)
image.ellipse(0, 0, 299, 59, fill=CYAN)
image.ellipse(60, 20, 120, 40, BLUE, RED)
image.ellipse(180, 20, 240, 40, BLUE, RED)
image.rectangle(180, 32, 240, 41, fill=CYAN)
image.line(181, 32, 239, 32, BLUE)
image.line(140, 50, 160, 50, BLACK)
image.save(filename)
Here, we create an image proxy, passing in the image class we want it to use. Then we draw on it, and at the end we save the resultant image. This code would work just as well had we created the image using Image.Image() rather than ImageProxy(). However, by using an image proxy, the actual image is not created until the save() method is called—so the cost of creating the image prior to saving it is extremely low (both in memory and processing), and if we end up discarding the image without saving it, we have lost very little. Compare this with using anImage.Image where we pay a high price up front (i.e., by effectively creating a width × height array of color values) and do expensive processing when drawing (e.g., setting every pixel in a filled rectangle, as well as computing which ones to set), even if we end up discarding the image.
class ImageProxy:
def __init__(self, ImageClass, width=None, height=None, filename=None):
assert (width is not None and height is not None) or \
filename is not None
self.Image = ImageClass
self.commands = []
if filename is not None:
self.load(filename)
else:
self.commands = [(self.Image, width, height)]
def load(self, filename):
self.commands = [(self.Image, None, None, filename)]
The ImageProxy class can stand in for an Image.Image (or any other image class passed to it that supports the Image interface), providing that the incomplete interface that the image proxy provides is sufficient. An ImageProxy does not store an image; instead, it keeps a list of command tuples where the first item in each tuple is a function or an unbound method and the remaining items are the arguments to be passed when the function or method is called.
When an ImageProxy is created, it must be given a width and height (to create a new image of the given size) or a filename. If it is given a filename, it stores the same commands as when an ImageProxy.load() call is made: the Image.Image() constructor, and, as argumentsNone and None for the width and height and the filename. Notice that if ImageProxy.load() is called at any later time, all previous commands are discarded and the load command becomes the first and only command in self.commands. If a width and height are given, theImage.Image() constructor is stored, along with the width and height as arguments.
If any unsupported method is called (e.g., pixel()), the method won’t be found and Python will automatically do what we want: raise an AttributeError. An alternative approach for handling methods that can’t be proxied is to create an actual image as soon as one of these methods is called, and from then on, use the actual image. (The examples’ imageproxy2.py program—not shown—takes this approach.)
def set_pixel(self, x, y, color):
self.commands.append((self.Image.set_pixel, x, y, color))
def line(self, x0, y0, x1, y1, color):
self.commands.append((self.Image.line, x0, y0, x1, y1, color))
def rectangle(self, x0, y0, x1, y1, outline=None, fill=None):
self.commands.append((self.Image.rectangle, x0, y0, x1, y1,
outline, fill))
def ellipse(self, x0, y0, x1, y1, outline=None, fill=None):
self.commands.append((self.Image.ellipse, x0, y0, x1, y1,
outline, fill))
The Image.Image class’s drawing interface consists of the four methods: line(), rectangle(), ellipse(), and set_pixel(). Our ImageProxy class fully supports this interface, only instead of executing these commands, it simply adds them—along with their arguments—to the self.commands list.
def save(self, filename=None):
command = self.commands.pop(0)
function, *args = command
image = function(*args)
for command in self.commands:
function, *args = command
function(image, *args)
image.save(filename)
return image
Only if we choose to save the image, do we have to actually create a real image and pay the price in processing and memory consumption. The design of the ImageProxy means that the first command is always one that creates a new image (either one of a given width and height, or by loading one). So, we treat the first command specially by saving its return value, which we know will be an Image.Image (or a cyImage.Image). Then, we iterate over the remaining commands, calling each one in turn, and passing in the image as the first (self) argument, since they are really unbound method calls. And at the end, we save the image using the Image.Image.save() method.
The Image.Image.save() method has no return value (although it can raise an exception if an error occurs). However, we have modified its interface slightly for the ImageProxy by returning the Image.Image that has been created, in case it was needed for further processing. This should be a harmless change since if the return value is ignored (as it would be if we were calling Image.Image.save()), it will be silently discarded. The imageproxy2.py program doesn’t require this modification, since it has an image property of type Image.Image that forces the image to be created (if it hasn’t been already) when it is accessed.
Storing up commands, as we have done here, has the potential for adaptation to support do–undo; for more on that, see the Command Pattern (§3.2, ![]() 79). See, also, the State Pattern (§3.8,
79). See, also, the State Pattern (§3.8, ![]() 111).
111).
The structural design patterns can all be implemented in Python. The Adapter and Façade Patterns make it straightforward to reuse classes in new contexts, and the Bridge Pattern makes it possible to embed the sophisticated functionality of one class inside another. The Composite Pattern makes it easy to create hierarchies of objects—although there is less need for this in Python, since using dicts is often sufficient for this purpose. The Decorator Pattern is so useful that the Python language has direct support for it and even extends the idea to classes. Python’s use of object references means that the language itself uses a variation of the Flyweight Pattern. And the Proxy Pattern is particularly easy to implement in Python.
All materials on the site are licensed Creative Commons Attribution-Sharealike 3.0 Unported CC BY-SA 3.0 & GNU Free Documentation License (GFDL)
If you are the copyright holder of any material contained on our site and intend to remove it, please contact our site administrator for approval.
© 2016-2026 All site design rights belong to S.Y.A.