CCNP Security SISAS 300-208 Official Cert Guide (2015)
Part III: Cisco Identity Services Engine
Chapter 10. Authentication Policies
This chapter covers the following exam topics:
![]() Describe Identity Store Options (i.e., LDAP, AD, PKI, OTP, Smart Card, local)
Describe Identity Store Options (i.e., LDAP, AD, PKI, OTP, Smart Card, local)
![]() Implement Wired/Wireless 802.1X
Implement Wired/Wireless 802.1X
![]() EAP Types
EAP Types
![]() Implement MAB
Implement MAB
![]() Describe the MAB Process Within an 802.1X Framework
Describe the MAB Process Within an 802.1X Framework
![]() ISE Authentication/Authorization Policies
ISE Authentication/Authorization Policies
![]() ISE Endpoint Identity Configuration
ISE Endpoint Identity Configuration
An authentication is simply the validating of a credential. It is an important step in the process of performing any sort of secure network access control. When thinking about authentication, it often helps to relate the topic to something that occurs within your day-to-day life
Consider when a highway patrol officer has a driver pull his car over to the side of the road. The officer will walk up to the driver’s window and ask for his driver’s license and proof of insurance (at least that is what happens in the United States). The driver will hopefully hand over these documents for the officer to inspect.
The officer should examine the driver’s license and determine whether it appears to be real. The hologram and watermarks in the driver’s license are there, so it appears to be real. The picture on the license looks like the driver who handed over the license. The license hasn’t expired. After going back to the squad car, the officer will perform a lookup into the Department of Motor Vehicles database to determine whether the license has been suspended.
All checks have passed. This is a valid ID. The “authentication” was successful.
Authentication policies have a few goals. They drop traffic that isn’t allowed and prevent it from taking up any more processing power (the officer would immediately reject a library card because that is not an allowed form of ID for a driver). The policy will route authentication requests to the correct identity store (North Carolina DMV, or New York DMV, and so on and so on); validate the identity (was this a valid license for that driver); and finally “pass” successful authentications over to the authorization policy (was the driver allowed to exceed the speed limit and run other drivers off the road).
When thinking about authentication for network access, it often helps to relate the topic to an example such as this one, where it is something that occurs within your day-to-day life. Typically, the goals are similar, and it helps to understand the difference between authentication and authorization.
“Do I Know This Already?” Quiz
The “Do I Know This Already?” quiz enables you to assess whether you should read this entire chapter thoroughly or jump to the “Exam Preparation Tasks” section. If you are in doubt about your answers to these questions or your own assessment of your knowledge of the topics, read the entire chapter. Table 10-1 lists the major headings in this chapter and their corresponding “Do I Know This Already?” quiz questions. You can find the answers in Appendix A, “Answers to the ‘Do I Know This Already?’ Quizzes.”
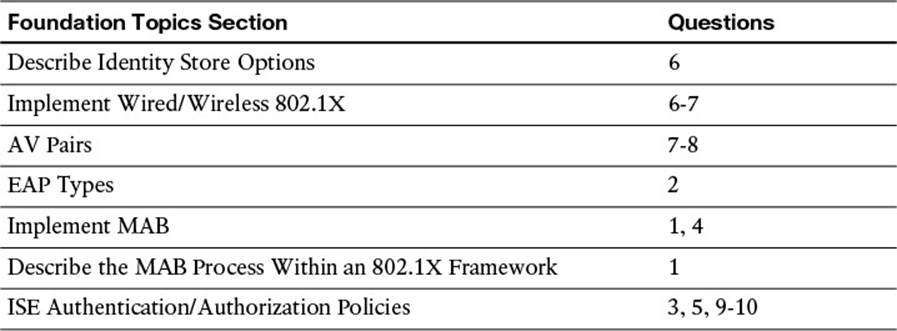
Table 10-1 “Do I Know This Already?” Section-to-Question Mapping
Caution
The goal of self-assessment is to gauge your mastery of the topics in this chapter. If you do not know the answer to a question or are only partially sure of the answer, you should mark that question as wrong for purposes of the self-assessment. Giving yourself credit for an answer you correctly guess skews your self-assessment results and might provide you with a false sense of security.
1. Which of the following is required to perform MAB from a Cisco network device?
a. The RADIUS packet must have the service-type set to login and the called-station-id populated with the MAC address of the endpoint.
b. The RADIUS packet must have the service-type set to Call-Check and the calling-station-id populated with the MAC address of the endpoint.
c. The RADIUS packet must have the service-type set to Call-Check and the called-station-id populated with the MAC address of the endpoint
d. The RADIUS packet must have the service-type set to login and the calling-station-id populated with the MAC address of the endpoint
2. Which EAP type is capable of performing EAP chaining?
a. PEAP
b. EAP-FAST
c. EAP-TLS
d. EAP-MD5
3. Which of the following choices are purposes of an authentication policy?
a. To permit or deny access to the network based on the incoming authentication request
b. To apply access control filters, such as dACL or security group tags (SGTs), to the network device to limit traffic
c. To drop requests using an incorrect authentication method, route authentication requests to the correct identity store, validate the identity, and “pass” successful authentications over to the authorization policy
d. To terminate encrypted tunnels for purposes of remote access into the network
4. True or False? You must select Detect PAP as Host Lookup to enable MAB requests for Cisco nNetwork devices.
a. True
b. False
5. True or False? Policy conditions from attribute dictionaries can be saved as conditions inline while building authentication policies.
a. True
b. False
6. Which method will work effectively to allow a different Identity store to be selected for each EAP type used?
a. This is not possible because the first rule to match 802.1X will be used and no further rules can be used.
b. Create one authentication rule that matches a service type framed for each of the EAP protocols. Each authentication rule should have one subrule that matches the EapAuthentication (such as EAP-TLS, EAP-FAST, and so on).
c. This is only possible for the main EAP types. If there is an inner method of EAP-MSCHAPv2 with PEAP, it must be sent to the same identity store as the EAP-MSCHAPv2 inner method of EAP-FAST.
d. Create one sub-rule for each EAP type under the default 802.1X authentication rule that points to the appropriate identity store per rule.
7. Which RADIUS attribute is used to match the SSID?
a. calling-station-ID
b. source-wireless-SSID
c. framed-station-ID
d. called-station-ID
8. Which RADIUS attribute contains the MAC address of the endpoint?
a. calling-station-ID
b. source-wireless-SSID
c. framed-station-ID
d. called-station-ID
9. What is the purpose of the continue option of an authentication rule?
a. The continue option is used to send an authentication down the list of rules in an authentication policy until there is a match.
b. The continue option sends an authentication to the next sub-rule within the same authentication rule.
c. The continue option is used to send an authentication to the authorization policy, even if the authentication was not successful.
d. The continue option will send an authentication to the selected identity store.
10. True or False? The Drop option for an authentication rule will allow ISE to act as if it were not “alive” so the network device will no longer send authentication requests to that ISE server.
a. True
b. False
Foundation Topics
The Relationship Between Authentication and Authorization
What is authentication, and what is authorization? Many IT professionals, especially those with wireless backgrounds (versus those with a security background), will tend to confuse these terms and what they actually do. Wireless was really the first place in the network where 802.1X took hold and is still the most prevalent use case of 802.1X authentication. With that in mind, the vast majority of wireless environments would provide a user with full network access as long as their usernames and passwords were correct (meaning that authentication was successful).

An authentication is simply the validating of credentials. If you were to go into a bank and request a withdrawal from an account, the teller would ask for your ID. You would pass your driver’s license to the teller, and she would look the license over, going through a checklist of sorts:
![]() Is the license from a recognized authority (one of the United States or a military ID)?
Is the license from a recognized authority (one of the United States or a military ID)?
![]() Does the picture on the ID look like the person in front of the teller?
Does the picture on the ID look like the person in front of the teller?
Let’s say for conversation’s sake that you handed her a valid ID (authentication was successful). Does that mean you are entitled to the money you asked for?
The next step for the bank teller would be to check the account and ensure that the person requesting the withdrawal is entitled to complete that transaction. Perhaps you are allowed to withdraw up to $1,000 but no more. This is the process of authorization. Just having a successful authentication does not prove entitlement.
This is why most of the time expended working within a product like Cisco ISE is spent setting up and tuning the authorization policy. Authorization is where the bulk of the decisions are made.
Authentication Policy
Authentication policies are the first opportunity for Cisco ISE to interact with the RADIUS Access-Request coming from the network access device (NAD). The authentication policy has very specific goals, but ultimately the main goal is to process the authentication request quickly so it can be dropped (if invalid), denied immediately if the credentials were incorrect, or forwarded to be run through the authorization policies (if successful).
Goals of an Authentication Policy
Authentication policies have a few goals:
1. Drop traffic that isn’t allowed and prevent it from taking up any more processing power.
2. Route authentication requests to the correct identity store—sometimes called a policy information point (PIP).
3. Validate the identity.
4. Pass successful authentications over to the authorization policy.
Goal 1—Accept Only Allowed Protocols
By default, ISE will allow nearly all supported authentication protocols; however, it would behoove the organization to lock this down to only the ones that are expected and supported. This serves a few purposes: It keeps the load on the Policy Service Nodes down and uses the authentication protocol to help choose the right identity store. For example, think of a corporation that wants to support only EAP-TLS for its corporate SSID. When an authentication comes in for a device attempting to join the corporate SSID, the allowed protocols could be set to allow only EAP-TLS and not waste time processing PEAP requests from device that are not configured with a certificate.
Keep in mind that a company is best served to have its security policy dictate which authentication protocols meet the security requirements of the organization. This is where the less secure protocols can be disabled, ensuring that any protocol that is more easily compromised is shut off.
Allowing only certain protocols defines which set of protocols should be permitted as well as the specific tuning of those protocols. For example, EAP-FAST can be in the allowed protocol list, but it also configures the options for EAP-FAST such as whether to allow in-band PAC provisioning or to use EAP chaining.
Goal 2—Select the Correct Identity Store
After the authentication has been accepted, ISE must make an identity store selection decision; you can even consider it to be an identity routing decision. Based on the attributes of an incoming authentication, it must determine which identity store should be used. Obviously, if a certificate is being presented, ISE should not try to validate that certificate against the internal user database that is expecting usernames and passwords.
If your company has multiple lines of business, it can also have more than one Active Directory (AD) domain or more than one LDAP store. Using attributes in the authentication request, you can pick the correct domain or LDAP store.
Goal 3—Validate the Identity
After the correct identity store has been identified, ISE must make sure the credentials are valid. In the case of password-based authentications, it must determine whether:
![]() The username is valid.
The username is valid.
![]() The user’s password matches what is in the Directory Store.
The user’s password matches what is in the Directory Store.
For certificate-based authentications, it must determine whether:
![]() The digital certificate has been issued and signed by a trusted certificate authority (CA).
The digital certificate has been issued and signed by a trusted certificate authority (CA).
![]() The certificate has expired (checks both the start and end dates).
The certificate has expired (checks both the start and end dates).
![]() The certificate has been revoked.
The certificate has been revoked.
![]() The client has provided proof of possession.
The client has provided proof of possession.
![]() The certificate presented has the correct key usage, critical extensions, and extended key usage values present.
The certificate presented has the correct key usage, critical extensions, and extended key usage values present.
Goal 4—Pass the Request to the Authorization Policy
If the authentication failed, the policy can reject the request without wasting the CPU cycles comparing the request to the authorization policy. Also, if the request did not match any of the configured rules, should we send a reject message? However, when the request passes authentication, it is now time for the hand-off to the authorization policy.
Understanding Authentication Policies
Now that you understand the four main responsibilities of the authentication policy, it will be easier to understand why you are doing the things we are introducing in this section.
To understand authentication policies even more, we will now examine a few.
From the ISE GUI, navigate to Policy > Authentication. You will notice the default rules as displayed in Figure 10-1. Basic authentication policy rules are logically organized in this manner:
IF conditions THEN ALLOW PROTCOLS IN LIST AllowedProtocolList
AND CHECK THE IDENTITY STORE IN LIST IdentityStore
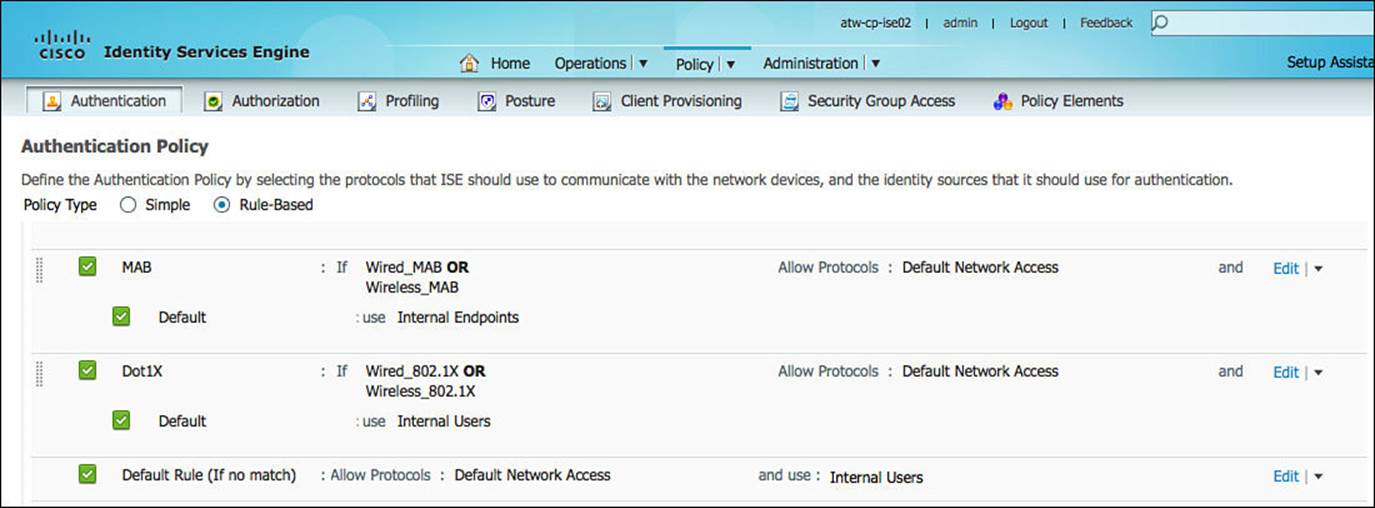
Figure 10-1 Default authentication policy.
Rules are processed in a top-down, first-match order, just like a firewall policy. So if the conditions do not match, the authentication will be compared to the next rule in the policy.
As shown in Figure 10-1, ISE is preconfigured with a default rule for MAC Authentication Bypass (MAB). MAB is used for a number of things, such as allowing nonauthenticating endpoints onto the network, guest access, BYOD, and more, that will be covered in further chapters. For now, we are going to use this rule to dig into authentication rules and how they work. If you have a live ISE system, it can help to follow along with the text.
Figure 10-2 demonstrates the MAB rule in flow chart format.
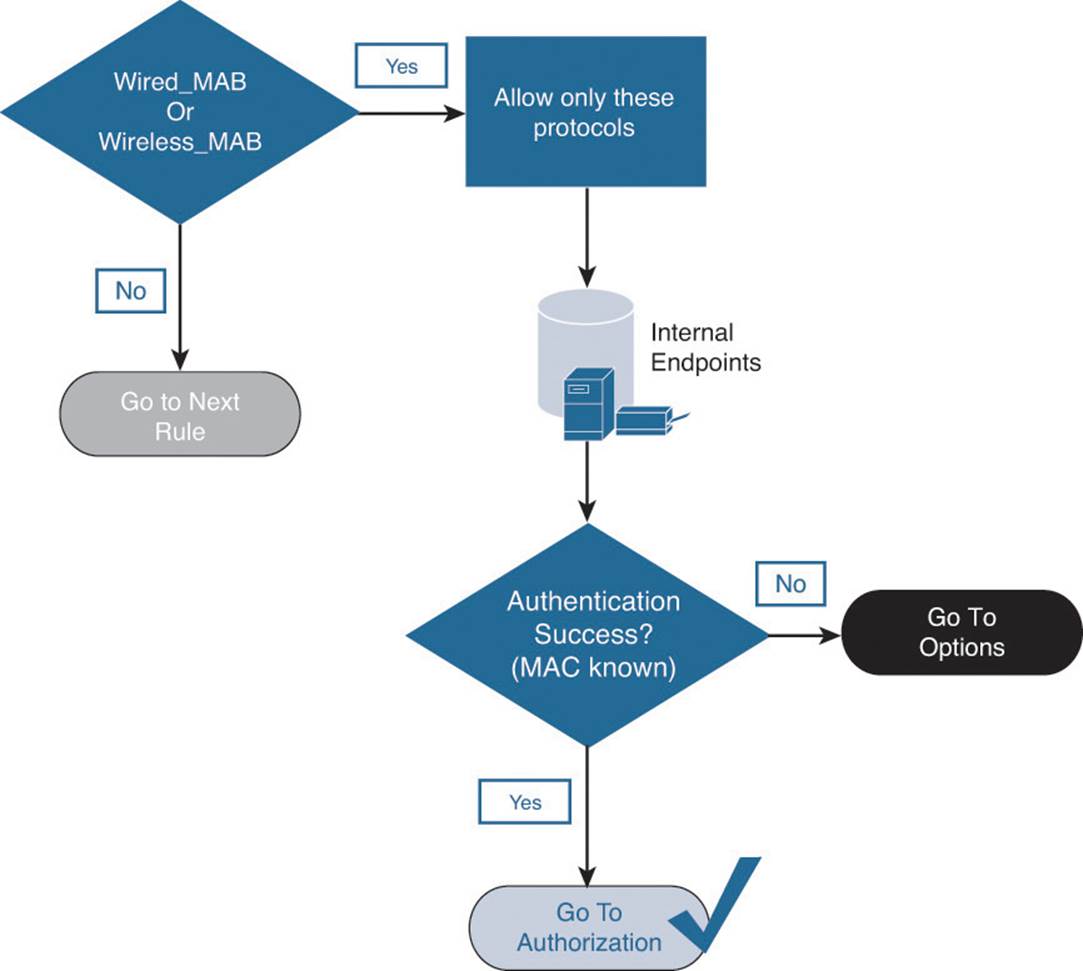
Figure 10-2 MAB rule flow chart.
Conditions
The conditions of this rule state, “If the authentication request is Wired_MAB or Wireless_MAB, it will match this rule.” We can expand these conditions by mousing over the conditions and clicking the target icon that appears or by looking directly at the authentication conditions. Here’s how:
Step 1. Navigate to Policy > Policy Elements > Conditions > Authentication > Compound Conditions.
Step 2. Select Wired_MAB.
As shown in Figure 10-3, Wired_MAB is looking for the RADIUS Service-Type to be Call-Check and the NAS-Port-Type to be Ethernet. This combination of attributes from the RADIUS authentication packet tells ISE that it is a MABs (Service-type = Call-check) request from a switch (NAS-Port-Type = Ethernet).
Figure 10-3 Wired_MAB condition.
Figure 10-4 highlights these key attributes in a packet capture of the MAB authentication request.
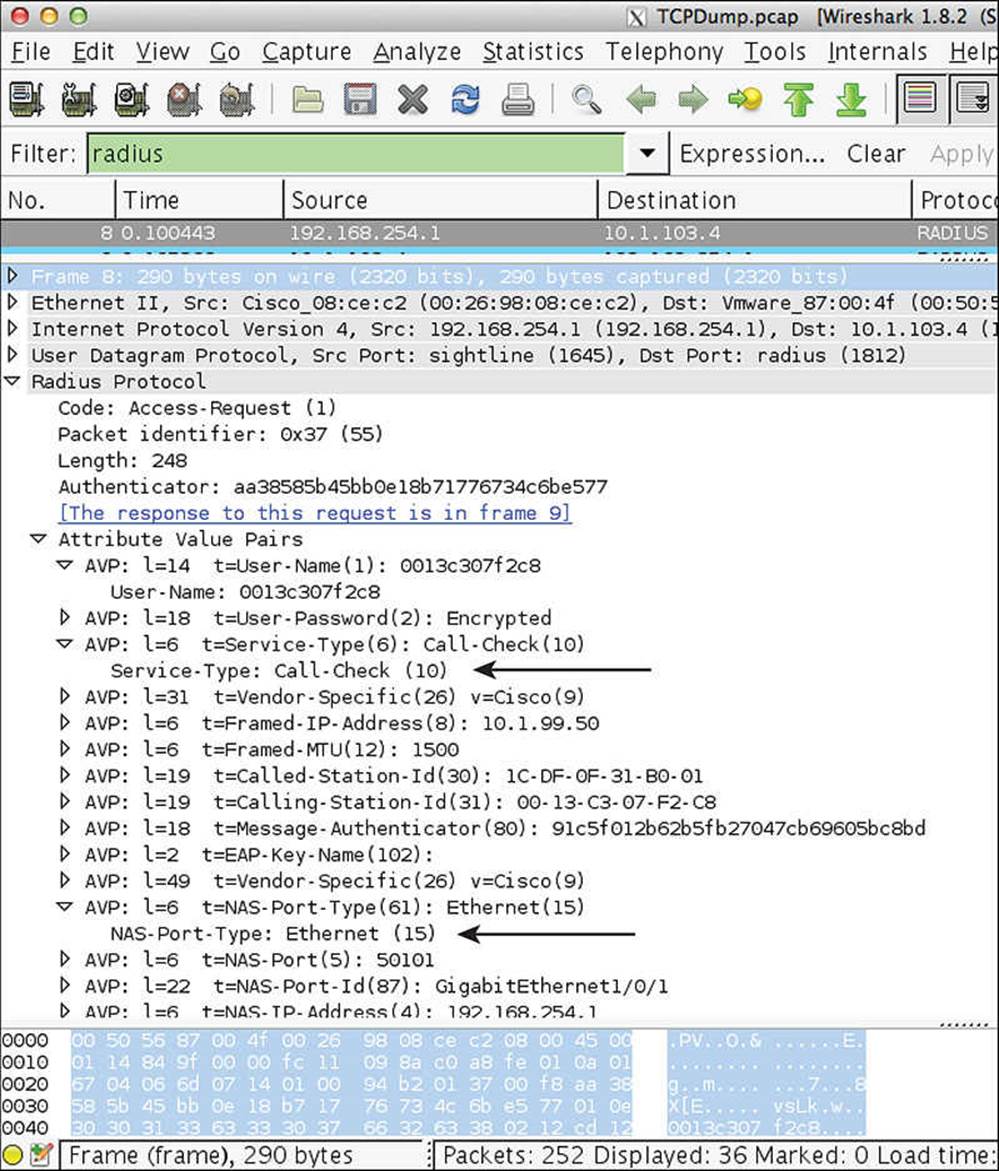
Figure 10-4 Packet capture of wired MAB.
Step 3. Navigate back to Policy > Policy Elements > Conditions > Authentication > Compound Conditions.
Step 4. Select Wireless_MAB.
As shown in Figure 10-5, Wireless MAB is similar. However, it uses a NAS-Port-Type of Wireless - IEEE 802.11. This combination of attributes from the RADIUS authentication packet tells ISE that it is a MAB request from a wireless device.
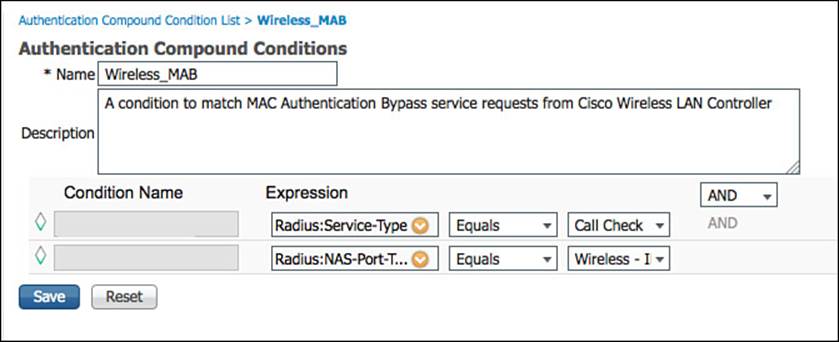
Figure 10-5 Wireless_MAB condition.
Allowed Protocols
After the conditions are matched, the rule now dictates which authentication protocols are permitted. Looking at the predefined MAB rule, this rule uses the Default Network Access list of allowed protocols (which is almost every supported authentication protocol). You can create multiple allowed protocols list, using a different one in each authentication policy rule.
Let’s examine the default allowed protocols. From the ISE GUI, do the following:
Step 1. Navigate to Policy > Policy Elements > Results > Authentication > Allowed Protocols.
Step 2. Select Default Network Access.
As Figure 10-6 shows, the list of supported protocols and their options is very extensive. This default list is inclusive with the intention of making deployments work easily for customers, but security best practice is to lock this down to only the protocols needed for that rule. Be sure to elect the protocols that are consistent with your corporate security policy, ensuring that the most secure protocol is chosen for each particular application.

Figure 10-6 Default network access.
Let’s examine the main authentication (most common) protocols and their uses, so you will be able to create a more specific list of allowed protocols for your deployment. We will follow Figure 10-6, from top down:
![]() PAP—Password Authentication Protocol. Username is sent in the clear; password is optionally encrypted. PAP is normally used with MAB, and some devices use PAP for web authentications. We recommend you enable this for the MAB rule only and disable PAP for any authentication rules for real authentications. The check box for Detect PAP as Host Lookup enables PAP authentications to access the Internal Endpoints Database. Without this check box selected, MAB would not work.
PAP—Password Authentication Protocol. Username is sent in the clear; password is optionally encrypted. PAP is normally used with MAB, and some devices use PAP for web authentications. We recommend you enable this for the MAB rule only and disable PAP for any authentication rules for real authentications. The check box for Detect PAP as Host Lookup enables PAP authentications to access the Internal Endpoints Database. Without this check box selected, MAB would not work.
![]() CHAP—Challenge Handshake Authentication Protocol. Usernames and passwords are encrypted using a challenge sent from the server. Challenge Handshake Authentication Protocol (CHAP) is not often used with network access; however, some vendors will send MAB using CHAP instead of PAP. The check box for Detect CHAP as Host Lookup enables CHAP authentications to access the Internal Endpoints Database. Without this check box selected, MAB would not work.
CHAP—Challenge Handshake Authentication Protocol. Usernames and passwords are encrypted using a challenge sent from the server. Challenge Handshake Authentication Protocol (CHAP) is not often used with network access; however, some vendors will send MAB using CHAP instead of PAP. The check box for Detect CHAP as Host Lookup enables CHAP authentications to access the Internal Endpoints Database. Without this check box selected, MAB would not work.
Extensible Authentication Protocol Types
Extensible Authentication Protocol (EAP) is an authentication framework providing for the transport and usage of identity credentials. EAP encapsulates the usernames, passwords, and certificates that a client is sending for purposes of authentication. There are many EAP types, each one with its own benefit and downside. As an interesting side note, 802.1X defines EAP over LAN. Here are the variations:
![]() EAP-MD5—Uses a message digest algorithm to hide the credentials in a HASH. The HASH is sent to the server where it is compared to a local hash to see whether the credentials were accurate. However, EAP-MD5 does not have a mechanism for mutual authentication. That means the server is validating the client, but the client does not authenticate the server (that is, it does not check to see whether it should trust the server). EAP-MD5 is common on some IP phones, and it is also possible that some switches will send MAB requests within EAP-MD5.
EAP-MD5—Uses a message digest algorithm to hide the credentials in a HASH. The HASH is sent to the server where it is compared to a local hash to see whether the credentials were accurate. However, EAP-MD5 does not have a mechanism for mutual authentication. That means the server is validating the client, but the client does not authenticate the server (that is, it does not check to see whether it should trust the server). EAP-MD5 is common on some IP phones, and it is also possible that some switches will send MAB requests within EAP-MD5.
The check box for Detect EAP-MD5 as Host Lookup enables EAP-MD5 authentications to access the Internal Endpoints Database. Without this check box selected, MAB would not work.
![]() EAP-TLS—An EAP type that uses Transport Layer Security (TLS) to provide the secure identity transaction. This is similar to SSL and the way encryption is formed between your web browser and a secure website. EAP-TLS is considered universally supported. EAP-TLS uses X.509 certificates and provides the ability to support mutual authentication, where the client must trust the server’s certificate, and vice versa. It is considered among the most secure EAP types because password capture is not an option; the endpoint must still have the private key. EAP-TLS is quickly becoming the EAP type of choice when supporting BYOD in the Enterprise.
EAP-TLS—An EAP type that uses Transport Layer Security (TLS) to provide the secure identity transaction. This is similar to SSL and the way encryption is formed between your web browser and a secure website. EAP-TLS is considered universally supported. EAP-TLS uses X.509 certificates and provides the ability to support mutual authentication, where the client must trust the server’s certificate, and vice versa. It is considered among the most secure EAP types because password capture is not an option; the endpoint must still have the private key. EAP-TLS is quickly becoming the EAP type of choice when supporting BYOD in the Enterprise.
Tunneled EAP Types
The previously mentioned EAP types transmit their credentials immediately. These next two EAP types form encrypted tunnels first and then transmit the credentials within the tunnel. Figure 10-7 illustrates the tunneled EAP.

Figure 10-7 Tunneled EAP types (PEAP and FAST).
![]() PEAP—Protected EAP. Originally proposed by Microsoft, this EAP tunnel type has quickly become the most popular and widely deployed EAP method in the world. PEAP forms a potentially encrypted TLS tunnel between the client and server using the x.509 certificate on the server in much the same way the SSL tunnel is established between a web browser and a secure website. After the tunnel has been formed, PEAP uses another EAP type as an inner method authenticating the client using EAP within the outer tunnel.
PEAP—Protected EAP. Originally proposed by Microsoft, this EAP tunnel type has quickly become the most popular and widely deployed EAP method in the world. PEAP forms a potentially encrypted TLS tunnel between the client and server using the x.509 certificate on the server in much the same way the SSL tunnel is established between a web browser and a secure website. After the tunnel has been formed, PEAP uses another EAP type as an inner method authenticating the client using EAP within the outer tunnel.
![]() EAP-MSCHAPv2—Using this inner method, the client’s credentials are sent to the server encrypted within an MSCHAPv2 session. This is the most common inner method because it enables simple transmission of usernames and passwords, or even computer names and computer passwords to the RADIUS server, which in turn will authenticate them to Active Directory.
EAP-MSCHAPv2—Using this inner method, the client’s credentials are sent to the server encrypted within an MSCHAPv2 session. This is the most common inner method because it enables simple transmission of usernames and passwords, or even computer names and computer passwords to the RADIUS server, which in turn will authenticate them to Active Directory.
![]() EAP-GTC—EAP-Generic Token Card (GTC). This inner method was created by Cisco as an alternative to MSCHAPv2 that allows generic authentications to virtually any identity store, including one-time-password (OTP) token servers, LDAP, Novell E-Directory, and more.
EAP-GTC—EAP-Generic Token Card (GTC). This inner method was created by Cisco as an alternative to MSCHAPv2 that allows generic authentications to virtually any identity store, including one-time-password (OTP) token servers, LDAP, Novell E-Directory, and more.
![]() EAP-TLS—While rarely used and not widely known, PEAP is capable of using EAP-TLS as an inner method.
EAP-TLS—While rarely used and not widely known, PEAP is capable of using EAP-TLS as an inner method.
![]() EAP-FAST—Flexible Authentication via Secure Tunnel (FAST) is similar to PEAP. FAST was created by Cisco as an alternative to PEAP that allows for faster reauthentications and support for faster wireless roaming. Just like PEAP, FAST forms a TLS outer tunnel and then transmits the client credentials within that TLS tunnel. Where FAST differs from the PEAP is the ability to use protected access credentials (PACs). A PAC can be thought of like a secure cookie, stored locally on the host as proof of a successful authentication.
EAP-FAST—Flexible Authentication via Secure Tunnel (FAST) is similar to PEAP. FAST was created by Cisco as an alternative to PEAP that allows for faster reauthentications and support for faster wireless roaming. Just like PEAP, FAST forms a TLS outer tunnel and then transmits the client credentials within that TLS tunnel. Where FAST differs from the PEAP is the ability to use protected access credentials (PACs). A PAC can be thought of like a secure cookie, stored locally on the host as proof of a successful authentication.
![]() EAP-MSCHAPv2—Using this inner method, the client’s credentials are sent to the server encrypted within an MSCHAPv2 session. This is the most common inner method because it enables simple transmission of usernames and passwords, or even computer names and computer passwords to the RADIUS server, which in turn will authenticate them to Active Directory.
EAP-MSCHAPv2—Using this inner method, the client’s credentials are sent to the server encrypted within an MSCHAPv2 session. This is the most common inner method because it enables simple transmission of usernames and passwords, or even computer names and computer passwords to the RADIUS server, which in turn will authenticate them to Active Directory.
![]() EAP-GTC—This inner method was created by Cisco as an alternative to MSCHAPv2 that allows generic authentications to virtually any identity store, including OTP token servers, LDAP, Novell E-Directory, and more.
EAP-GTC—This inner method was created by Cisco as an alternative to MSCHAPv2 that allows generic authentications to virtually any identity store, including OTP token servers, LDAP, Novell E-Directory, and more.
![]() EAP-TLS—EAP-FAST is capable of using EAP-TLS as an inner method. This became quite popular with EAP chaining.
EAP-TLS—EAP-FAST is capable of using EAP-TLS as an inner method. This became quite popular with EAP chaining.
![]() EAP Chaining with EAP-FASTv2—As an enhancement to EAP-FAST, a differentiation was made to have a user PAC and a machine PAC. After a successful machine authentication, ISE will issue a machine PAC to the client. Then when processing a user authentication, ISE will request the machine PAC to prove that the machine was successfully authenticated, too. This is the first time in 802.1X history that multiple credentials have been able to be authenticated within a single EAP transaction; it is known as EAP chaining.
EAP Chaining with EAP-FASTv2—As an enhancement to EAP-FAST, a differentiation was made to have a user PAC and a machine PAC. After a successful machine authentication, ISE will issue a machine PAC to the client. Then when processing a user authentication, ISE will request the machine PAC to prove that the machine was successfully authenticated, too. This is the first time in 802.1X history that multiple credentials have been able to be authenticated within a single EAP transaction; it is known as EAP chaining.
The IETF has recently published RFC 7170, a new open standard for Tunnel Extensible Authentication Protocol (TEAP), which is based on EAP-FASTv2. At the time of this book publishing, the RFC was brand-new and no known vendors have adopted TEAP yet. It is expected to take the industry by storm, providing the dual authentication for enterprises.
Identity Store
After processing the allowed protocols, the authentication request is then authenticated against the chosen identity store, or in this case with MAB it is compared to the internal endpoints database (list of MAC addresses stored locally on ISE).
If the MAC Address is known, meaning it’s present in the provided endpoint database, it is considered to be a successful MAB (notice this did not say successful “authentication”). MAB is exactly that—bypassing authentication—and it is not considered a secure authentication.
The selected identity source can also be an identity source sequence, which will try a series of identity stores in order. This is covered in more detail in Chapter 21, “ISE Scale and High Availability.”
Options
Every authentication rule has a set of options that are stored with the identity store selection. These options tell ISE what to do if an authentication fails, if the user/device is unknown, or if the process fails. The options are Drop, Reject, and Continue:
![]() Reject—Send Access-Reject back to the NAD
Reject—Send Access-Reject back to the NAD
![]() Continue—Continue to the authorization policy regardless of authentication pass/fail (used with web authentication)
Continue—Continue to the authorization policy regardless of authentication pass/fail (used with web authentication)
![]() Drop—Do not respond to the NAD because NAD will treat as if RADIUS server is dead
Drop—Do not respond to the NAD because NAD will treat as if RADIUS server is dead
Please see Chapters 20–23 for more on when to use these options.
Common Authentication Policy Examples
In this section, you will see a few quick examples of authentication policies based on common use case, or simply because they were interesting.
Using the Wireless SSID
One of the most common authentication policy requests is to treat authentications differently based on the SSID of the wireless network. Creating the policy is not difficult; what becomes challenging is the identification of the attribute to use because “Source-SSI” is not a field in a RADIUS packet. The attribute we need to use is called-station-id. That is the field that describes the wireless SSID name.
For this example, we will build a rule for an SSID named CiscoPress. This rule will be configured to:
![]() Only match authentications coming from that SSID
Only match authentications coming from that SSID
![]() Allow only EAP-FAST authentications
Allow only EAP-FAST authentications
![]() Utilize EAP chaining
Utilize EAP chaining
![]() Authenticate against Active Directory
Authenticate against Active Directory
From the ISE GUI, do the following:
Step 1. Navigate to Policy > Authentication.
Step 2. Insert a new rule above the preconfigured Dot1X rule.
Step 3. Provide a name for the rule. In this case, we named it CiscoPress SSID.
Step 4. For the condition, select RADIUS > Called-Station-ID.
Step 5. Select Contains.
Step 6. Type the SSID name in the text box; Figure 10-8 shows the condition.
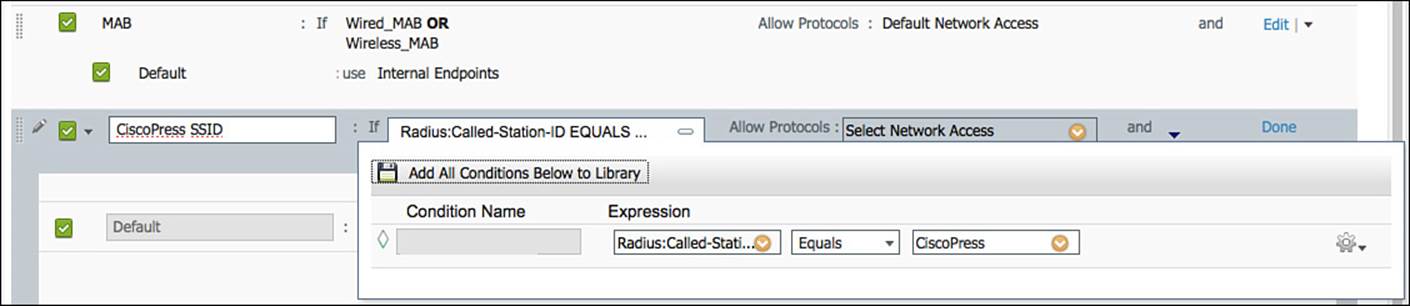
Figure 10-8 Called-Station-ID contains CiscoPress.
Step 7. Next, we will create a new allowed protocol object that allows only EAP-FAST. Select the drop-down list for Allowed Protocols.
Step 8. Click the cog in the upper-right corner, and select Create a new Allowed Protocol, as shown in Figure 10-9.

Figure 10-9 Create a new allowed protocol.
Step 9. Provide a name. In this case, we named it EAP-FAST ONLY.
Step 10. Optionally, provide a description.
Step 11. Working top-down, ensure all the check boxes are unchecked until you reach Allow EAP-FAST.
Step 12. Ensure Allow EAP-FAST is enabled.
Step 13. For ease of use, enable EAP-MS-CHAPv2, EAP-GTC, and EAP-TLS for inner methods.
Step 14. Select Use PACs as shown Figure 10-10 for faster session reestablishment and to allow EAP chaining.
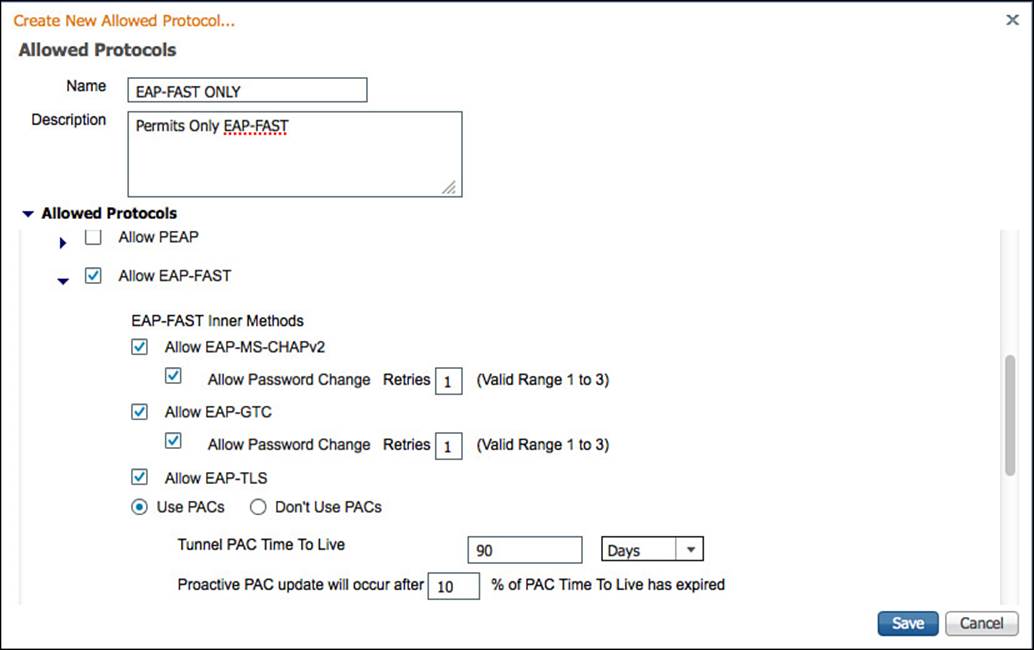
Figure 10-10 Allowed protocols.
Step 15. For ease of deployment, select Allow Anonymous in-Band PAC Provisioning and Allow Authenticated in-Band PAC Provisioning.
Step 16. Check the boxes for Server Returns Access-Accept After Authenticated Provisioning and Accept Client Certificate for Provisioning.
Step 17. Enable Allow Machine Authentication.
Step 18. Select Enable Stateless Session Resume.
Step 19. Select Enable EAP Chaining.
Steps 15–19 are displayed in Figure 10-11.
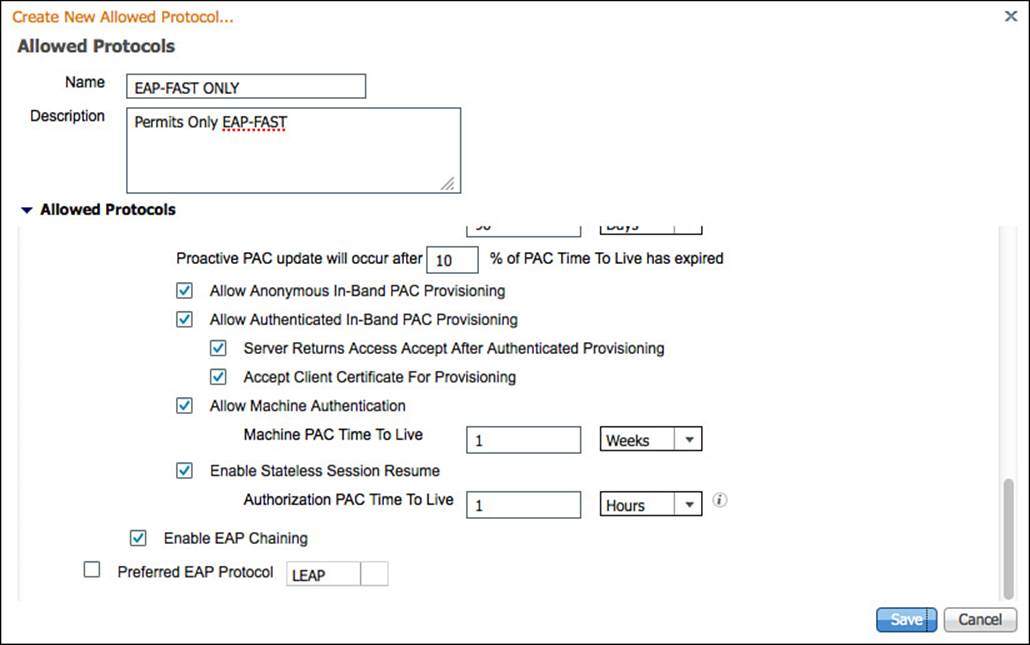
Figure 10-11 Allowed protocols, continued.
Step 20. Because we allowed only one protocol, there is no need to set a preferred EAP Protocol. Click Save.
Step 21. Even though we created the allowed protocol object for this specific authentication rule, it doesn’t automatically select it from the drop-down list. Select the drop-down list for the identity source (currently set for Internal Users).
Step 22. Select your AD source; in this case, the name is AD1, as shown in Figure 10-12.
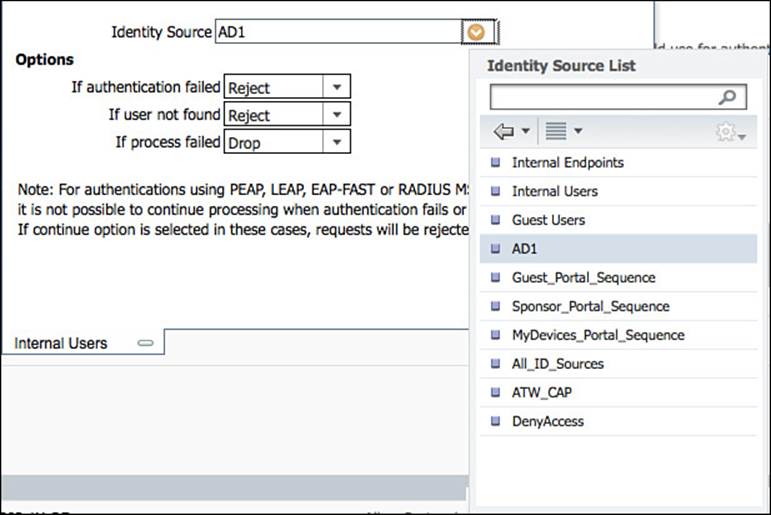
Figure 10-12 Selecting the AD identity source.
Step 23. Leave the default Options, and click Done.
Step 24. Click Save.
Figure 10-13 shows the completed authentication rule.
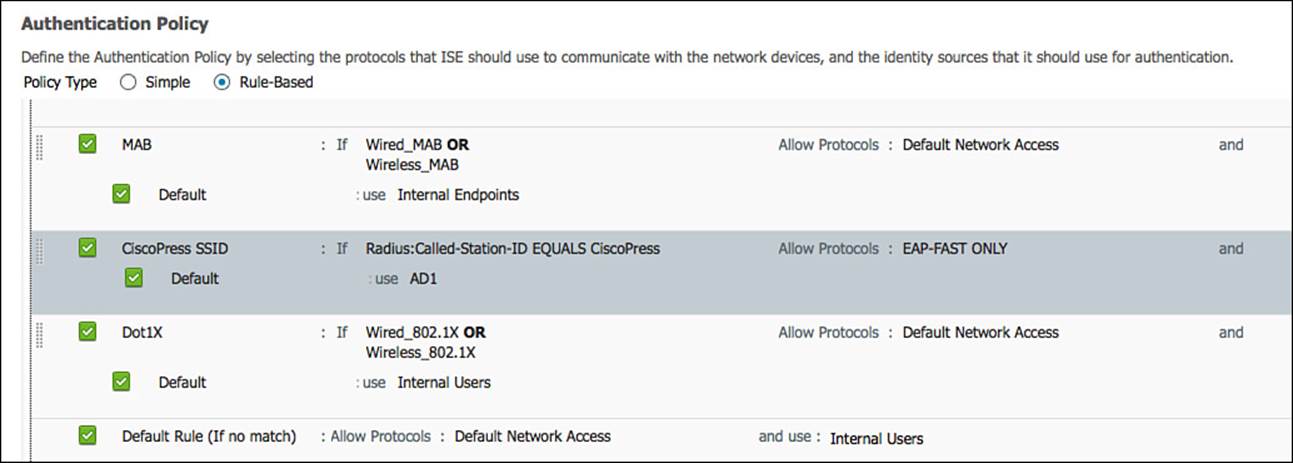
Figure 10-13 Completed authentication rule.
This completes the creation of the authentication rule. Determining which actions to take for the authentications that passed will be handled in the authorization policy.
Remote Access VPN
Often authentications for a remote access VPN connection get routed to an OTP server, such as RSAs SecureID. For this example, we will build a rule for remote access VPN authentications. This rule will be configured to:
![]() Only match authentications coming from the VPN device
Only match authentications coming from the VPN device
![]() Route that authentication to an OTP server
Route that authentication to an OTP server
From the ISE GUI, do the following:
Step 1. Navigate to Policy > Authentication.
Step 2. Insert a new rule above the preconfigured Dot1X rule.
Step 3. Provide a name for the rule. In this case, we named it RA VPN.
Step 4. For the condition, select Create New Condition (Advanced Option) > DEVICE > Device Type.
Step 5. Set the operator to Equals.
Step 6. Select the Network Device Group VPN.
Step 7. Save the selection as a condition by clicking the cog on the right side and then selecting Add Condition to Library. Name the condition VPN-Device.
Step 8. Click the green check mark.
Figure 10-14 shows the completed condition.

Figure 10-14 Device type equals VPN.
Step 9. For this example, we will just use the allowed protocol of Default Network Access. Click the drop-down list and select Allowed Protocols and then Default Network Access.
Step 10. For the identity store, we have selected the OTP server (previously configured) in Administration > Identity Management > External Identity Sources > RADIUS Token (ATW_OTP).
Step 11. We are leaving the default options; click Done.
Step 12. Click Save.
Figure 10-15 shows the completed authentication rule.
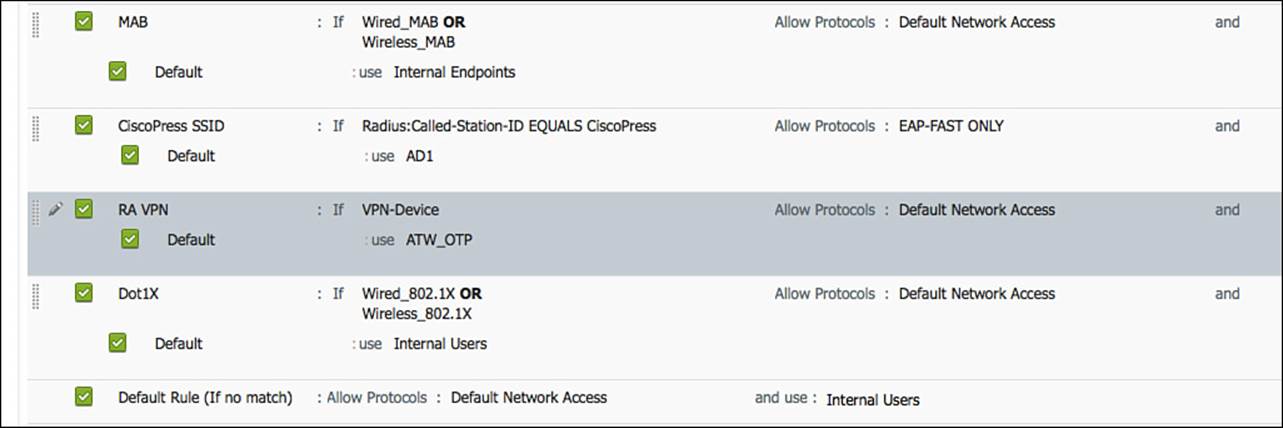
Figure 10-15 Completed authentication rule.
Alternative ID Stores Based on EAP Type
In this modern day of BYOD and mobility, it is common to have multiple user and device types connecting to the same wireless SSID. In scenarios like this, often the users with corporate laptops authenticate using EAP-FAST with EAP chaining; while BYOD-type devices must use certificates and EAP-TLS. Anyone authenticating with PEAP would be recognized as a noncorporate and nonregistered asset and be sent to a device registration portal instead of being permitted network access.
For this example, we will modify the preconfigured Dot1X rule by creating sub-rules for each EAP type. This rule will be configured to:
![]() Match wired or wireless 802.1X
Match wired or wireless 802.1X
![]() Route EAP-TLS authentications to a certificate authentication profile (CAP)
Route EAP-TLS authentications to a certificate authentication profile (CAP)
![]() Route PEAP authentications to an LDAP server
Route PEAP authentications to an LDAP server
![]() Route EAP-FAST to Active Directory
Route EAP-FAST to Active Directory
![]() Route EAP-MD5 to internal endpoints for host lookup as a MAB request
Route EAP-MD5 to internal endpoints for host lookup as a MAB request
From the ISE GUI, do the following:
Step 1. Navigate to Policy > Authentication.
Step 2. Edit the preconfigured Dot1X rule.
Step 3. Next, we will create a new allowed protocol object that allows only EAP authentications. Select the drop-down list for Allowed Protocols.
Step 4. Click the cog in the upper-right corner, and select Create a New Allowed Protocol.
Step 5. Provide a name. In this case, we named it All EAP Types.
Step 6. Optionally, provide a description.
Step 7. Working top-down, ensure all EAP types are enabled, except for LEAP (unless you need LEAP for backward compatibility).
Step 8. Enable EAP chaining, as we did previously in the wireless SSID exercise.
Step 9. Click Save.
Step 10. Select the All EAP Types allowed protocol object for this authentication rule.
Step 11. Insert a new sub-rule above the Default identity store sub-rule, and name it EAP-TLS.
Step 12. For the condition, select Create a New Condition (Advanced Option) > Network Access > EapAuthentication Equals EAP-TLS (as shows in Figure 10-16).
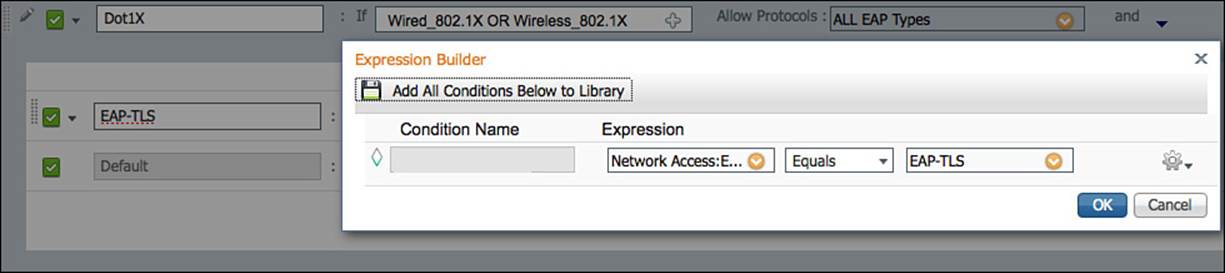
Figure 10-16 Network access: EapAuthentication equals EAP-TLS.
Step 13. For the identity source, we are choosing a preconfigured CAP. This was configured at Administration > Identity Management > External Identity Sources > Certificate Authentication Profile.
Step 14. Insert a new row above the EAP-TLS row, to insert EAP-FAST. We are placing EAP-FAST above EAP-TLS because EAP-TLS can be used as an inner method of EAP-FAST.
Step 15. Select Network Access > EapTunnel Equals EAP-FAST for the condition.
Step 16. Select the Active Directory Object for the identity source.
Step 17. Insert a new row above the EAP-TLS row to insert PEAP.
Step 18. Select Network Access > EapTunnel Equals PEAP for the condition.
Step 19. Select the LDAP object for the identity source.
Step 20. Insert a new row below the EAP-TLS row to insert EAP-MD5.
Step 21. Select Network Access > EapAuthentication Equals EAP-MD5 for the condition.
Step 22. Select Internal Endpoints for the identity source.
Step 23. Change the default identity store (bottom row) to be Deny Access.
Step 24. Click Done.
Step 25. Click Save.
Figure 10-17 shows the completed rule and sub-rules.

Figure 10-17 Completed authentication rule and Sub-rules.
More on MAB
One of the things that is often not understood, especially when looking to mix access device vendors, is MAB. There is no standard for MAB. Different vendors implement MAB in different ways. Ultimately, the goal is to allow the supplicant in the switch itself to run an authentication request for the endpoint because the endpoint obviously must not have a supplicant.
Some vendors send a RADIUS service-type of Login; some send a RADIUS service-type of Framed. Cisco uses a service-type of Call-Check for MAB. Why would Cisco use Call-Check if no other vendor does? Why does Cisco do MAB differently from everyone else? Quick answer: security.
Many years ago, before Cisco released Cisco ISE or the Cisco ACS 5.x server, there was a possible security vulnerability with MAB. That security vulnerability is still possible with other solutions and other network devices. The issue was/is the lack of differentiation between a MAB request and a local web authentication request. Both requests come from the network device with the same service type and the same format. There was no database separation of user IDs from endpoint IDs (MAC addresses). As displayed in Figure 10-18, a malicious user could enter a MAC address into the username and password fields of a web authentication or maybe even into the endpoint supplicant and gain access to the network.
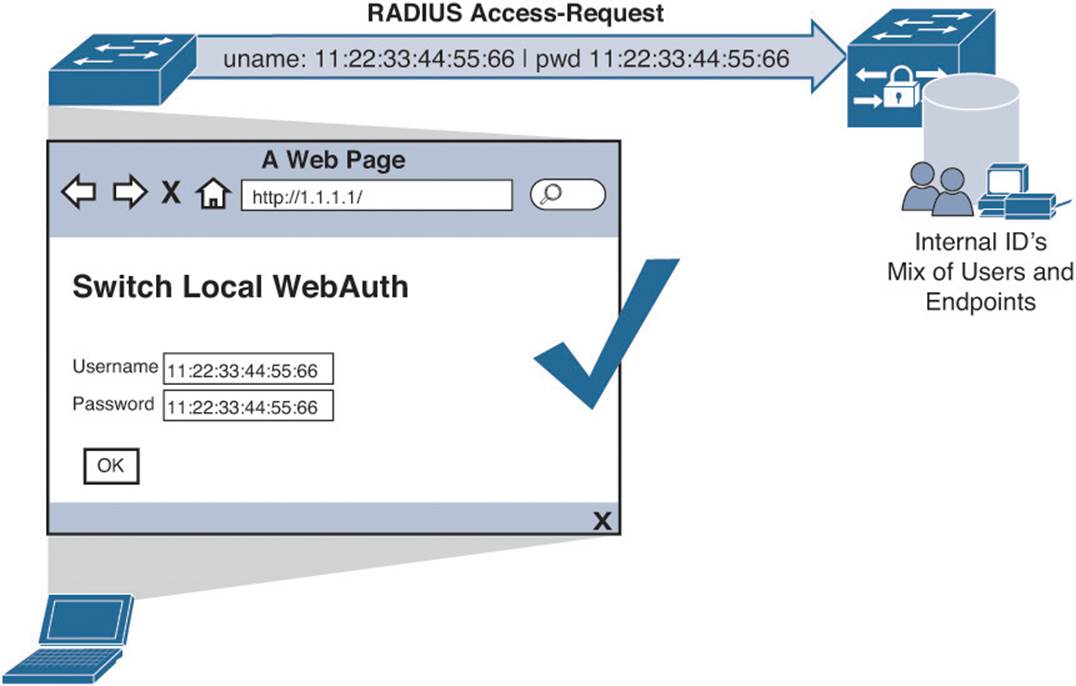
Figure 10-18 Web authentication with MAC address instead of username.
In an effort to close this security hole and make MAB a bit more secure, Cisco changed the way it does MAB. The key differences are listed here:
![]() For authentication requests to be processed as MAB (by default), the service type must be Call-Check.
For authentication requests to be processed as MAB (by default), the service type must be Call-Check.
![]() RADIUS servers (ACS and ISE) maintain a separate endpoint database.
RADIUS servers (ACS and ISE) maintain a separate endpoint database.
![]() The calling-station-id is the value that will be compared to the endpoint database, ignoring the username and password fields of the MAB request.
The calling-station-id is the value that will be compared to the endpoint database, ignoring the username and password fields of the MAB request.
All supported Cisco NADs use a service type of Call-Check for MAB requests. They also ensure the calling-station-id is populated with the MAC address of endpoint. Lastly, Cisco ISE uses a simple check box within the allowed protocols configuration as another method to permit or deny the access into the endpoint database for the MAB request, as shown in Figure 10-19.
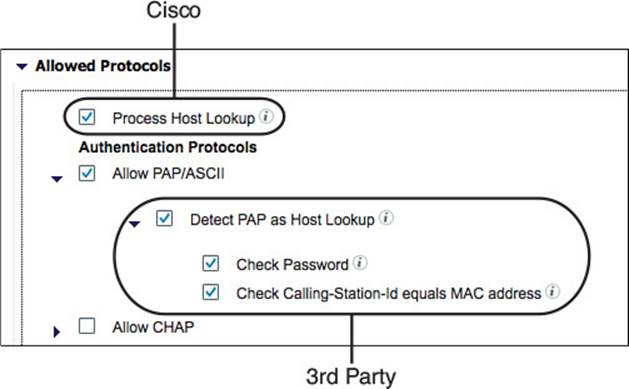
Figure 10-19 Process host lookup.
As Figure 10-19 shows, the top selection for Process Host Lookup is the one for Cisco network devices. That check box allows RADIUS authentications with a service type of Call-Check to have the RADIUS calling-station-id value compared with the contents of the endpoints database. The selection for Process Host Lookup also exists under each of the individual authentication protocols (such as PAP, CHAP, and EAP-MD5). These are there for third-party support and are the reason there are two other check boxes: Check Password and Check Calling-Station-Id Equals MAC Address.
These check boxes make an insecure mechanism such as MAB a bit more insecure, so it is recommended that you secure it as much as possible by only allowing the network devices that must use MAB in the less secure manner to use it in that manner. This topic is discussed further in the successful deployment strategies section(s) of this book.
Keep in mind that MAB is inherently not a secure technology. When implementing MAB, you are bypassing the stronger security of 802.1X by allowing specific MAC addresses to gain access without authentication. When using MAB, always follow a defense-in-depth approach. This means a device that has been authorized to use the network from a MAB request should be granted access to the networks and services that device is required to speak to only. In other words, don’t provide full access to devices that have been MAB’d; instead provide them with an authorization that is more limited. This topic is covered in more detail in the next chapter where authorization policies are covered.
Restore the Authentication Policy
In this chapter, you have created a complex and specific authentication policy. This is useful for learning how authentication policies work, but it might make things a bit too complicated for you as you navigate through the future chapters.
To keep things simple, follow these steps to restore your authentication policy to something simple that will work for all use cases remaining in this book.
From the ISE GUI, do the following:
Step 1. Navigate to Policy > Authentication.
Step 2. Delete the rule named CiscoPress SSID.
Step 3. Edit the rule named Dot1X.
Step 4. Delete the PEAP, EAP-FAST, EAP-TLS, and EAP-MD5 rules.
Step 5. Change the Dot1X > Default rule from Deny Access to All ID_Sources.
Figure 10-20 shows the final authentication policy that will enable you to support the use cases in the remainder of the book in an easy way.
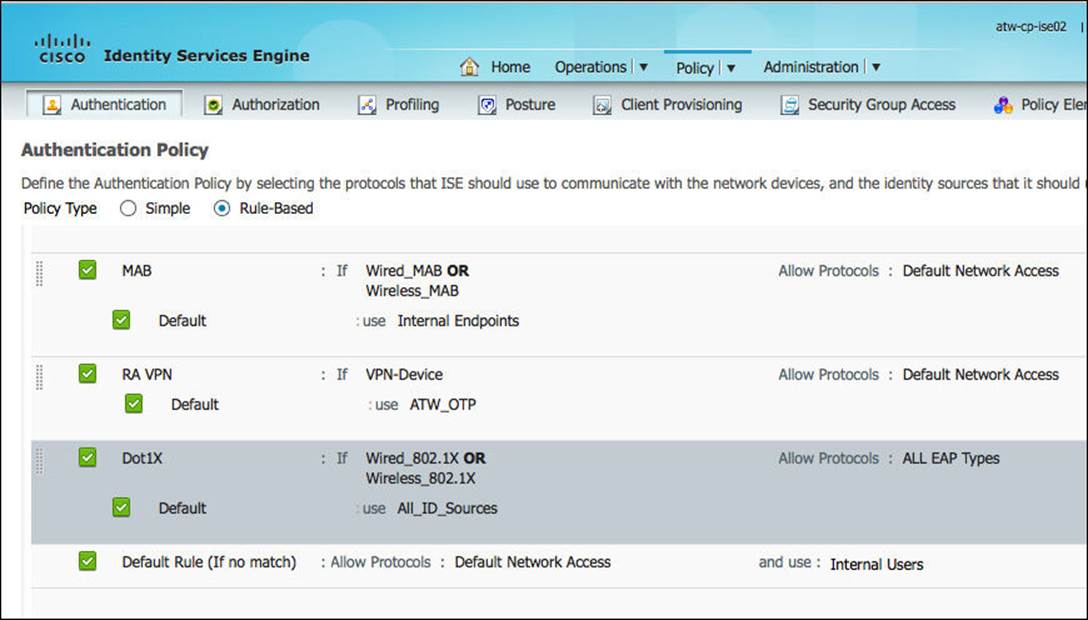
Figure 10-20 Simplified authentication policy.
This completes the authentication chapter. In the next chapter we take an in-depth look at authorization policies and common authorization rules.
Exam Preparation Tasks
Review All Key Topics
Review the most important topics in the chapter, noted with the key topics icon in the outer margin of the page. Table 10-2 lists a reference of these key topics and the page numbers on which each is found.
Table 10-2 Key Topics for Chapter 10