CCNP Security SISAS 300-208 Official Cert Guide (2015)
Part III: Cisco Identity Services Engine
Chapter 11. Authorization Policies
This chapter covers the following exam topics:
![]() Implement Wired/Wireless 802.1X
Implement Wired/Wireless 802.1X
![]() AV Pairs
AV Pairs
![]() Implement MAB
Implement MAB
![]() ISE Authentication/Authorization Policies
ISE Authentication/Authorization Policies
![]() Implement Network Authorization Enforcement
Implement Network Authorization Enforcement
![]() Network Authorization Enforcement
Network Authorization Enforcement
As discussed in Chapter 10, “Authentication Policies,” an authentication is the validation of a credential or an identity. The other major portion of secure network access control is the actual control portion. That is where authorization policies come in.
Consider the bank example: walk into a bank and provide a valid identification. It’s a government-issued passport. It checks out completely—the seal is valid, the picture matches. This was a successful authentication. However, what does this successful authentication entitle you to withdraw from the bank? Does it allow you to withdraw money from any account in the bank?
This entitlement would also be known as the authorization. In secure network access, the authorization policy determines what level of network access an incoming user or device should be granted based on the “who, what, where, when, and how” of the authentication, which is also what Cisco calls the “Security Context” of the user or device.
“Do I Know This Already?” Quiz
The “Do I Know This Already?” quiz enables you to assess whether you should read this entire chapter thoroughly or jump to the “Exam Preparation Tasks” section. If you are in doubt about your answers to these questions or your own assessment of your knowledge of the topics, read the entire chapter. Table 11-1 lists the major headings in this chapter and their corresponding “Do I Know This Already?” quiz questions. You can find the answers in Appendix A, “Answers to the ‘Do I Know This Already?’ Quizzes.”
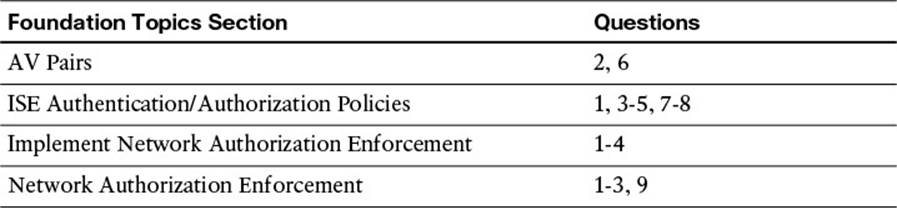
Table 11-1 “Do I Know This Already?” Section-to-Question Mapping
Caution
The goal of self-assessment is to gauge your mastery of the topics in this chapter. If you do not know the answer to a question or are only partially sure of the answer, you should mark that question as wrong for purposes of the self-assessment. Giving yourself credit for an answer you correctly guess skews your self-assessment results and might provide you with a false sense of security.
1. What is an authorization profile?
a. An authorization profile is a rule in the policy table that is formatted like “IF condition THEN result.”
b. An authorization profile is created to determine which identity store to validate the credentials with.
c. An authorization profile is a sequential list of identity stores to validate the credentials with.
d. An authorization profile is the mandatory result of an authorization rule.
2. What is the purpose of an authorization profile?
a. It contains the TACACS+ response (Access-Accept or Access-Reject) along with the additional authorization attributes to be sent to the network device for enforcement.
b. It contains the RADIUS response (Access-Accept or Access-Reject) along with the additional authorization attributes to be sent to the network device for enforcement.
c. It contains the RADIUS response (Continue or Terminate) along with additional authorization attributes to be sent to the network device for enforcement.
d. It contains the TACACS+ response (Continue or Terminate) along with additional authorization attributes to be sent to the network device for enforcement.
3. Which of the following options are part of the common tasks section of an authorization profile?
a. Access-Type (Continue or Terminate), DACL-Name, Web-Redirection, Auto Smart Port
b. Access-Type (Accept or Reject), DACL-Name, Web-Redirection, Auto Smart Port
c. DACL-Name, Role-Assignment, Local WebAuth, Auto Smart Port
d. DACL-Name, Web-Redirection, Local WebAuth, Auto Smart Port
4. Which of the following is correct?
a. An authorization policy contains authorization rules. Each rule will have at least one authorization profile.
b. An authorization rule contains authorization policies. Each policy will have at least one authorization profile.
c. An authentication policy contains authorization rules. Each rule must have an authentication result.
d. An authentication rule contains the authorization profiles. Each profile must contain one authentication result.
5. True or False? Condition attributes can be saved into a library for future use and improved readability.
a. True
b. False
6. What is special about the authorization profile required for an IP phone?
a. It contains the DNS name or IP address of the Cisco Call Manager Server.
b. It contains the voice domain permission AV pair, which authorizes the endpoint to access the voice VLAN assigned to the interface.
c. It contains the value for DHCP option 43, which provides the IP address of the Cisco Call Manager Server.
d. It contains the voice domain permission macro, which reconfigures the switch port to be a voice interface.
7. What is the difference between a simple condition and compound condition?
a. Simple conditions are easier to use than compound conditions.
b. Simple conditions are created on-the-fly within the expression builder, while compound conditions must be created separately.
c. Simple conditions contain only one attribute. Compound conditions contain multiple attributes along with an operator such as AND or OR.
d. Simple conditions and compound conditions can each contain multiple attributes, but compound conditions can mix operators such as AND or OR.
8. True or False? A compound condition can contain a mixture of simple conditions and raw attributes.
a. True
b. False
9. What should be the end goal of a Secure Access deployment?
a. To provide full access to the network, so security devices such as an ASA firewall can provide defense-in-depth
b. To provide full access to the network, as long as the authentication is successful, and provide limited access to any failed authentications
c. To secure the network by purchasing Cisco ISE, thereby increasing the stock value of the company
d. To provide very specific permissions to any authorization, providing defense-in-depth
10. What is unique about Cisco’s downloadable Access Control Lists (dACLs)?
a. Cisco dACLs allow the RADIUS server to apply ACLs that exist on the switch simply by sending the name of the ACL in the RADIUS AV pairs, while non-Cisco network devices cannot apply ACLs.
b. Cisco downloadable ACLs are created by experts at Cisco and published to Cisco.com where Cisco ISE can download the ACLs.
c. Cisco dACLs are created entirely on the RADIUS server, and the full ACL is sent down to the network device within RADIUS AV pairs, while non-Cisco network devices must create the ACL on the individual local network device.
d. Cisco dACLs are unique because they are downloaded from ISE and applied to the Cisco ASA that is in the network path, relieving the network device from the burden of traffic control.
Foundation Topics
Authentication Versus Authorization
At the beginning of the previous chapter, you examined the relationship between authentication and authorization.
An authentication is the validating of credentials. Consider the BYOD use case, in which a tablet connects to the network with a certificate via EAP-TLS. The authentication policy terminates the EAP session and validates that the certificate was signed by a trusted source and has not expired or been revoked. The authentication succeeds. However, just having a successful authentication does not prove entitlement.
There is still a process that can determine the level of access to assign to the tablet. That access can be based on virtually any attribute, such as the device type, the location, the business unit, the user identity extracted from the certificate, Active Directory group membership of that user, which certificate authority (CA) signed the certificate, the time of day, or the user’s hair and eye color even. The list can go on and on. The conglomeration of attributes is often referred to as the context of the device. A different level of access can be assigned as long as an authorization rule in the policy matches the context.
These rich policies are part of the authorization policy. The flexibility of being able to assign a different authorization per possible context is why most of the time that is expended working within a product like Cisco ISE is spent setting up and tuning the authorization policy. Authorization is where the bulk of the decisions are made.
Authorization Policies
After an endpoint has been successfully authenticated, the authentication process is passed to the authorization policy, where the policy is evaluated to determine the final access results.
Goals of Authorization Policies

Authorization policies have one main goal: to examine conditions to send an authorization result to the network access device (NAD). Which conditions? Well, what did you have in mind?
Common conditions could include internal and external attributes, such as Active Directory group membership or internal group membership within ISE. Policies can be built using attributes such as location, time, whether a device was registered, whether a mobile device has been jail-broken—nearly any attribute imaginable. Even the authentication is an attribute: Was authentication successful, which authentication protocol was used, and what is the content of specific fields of the certificate that was used?
The policy compares these conditions with the explicit goal of providing an authorization result. The result can be a standard RADIUS Access-Accept or Access-Reject message, and it can include more advanced things such as VLAN assignment, dACLs, security group tag (SGT), URL redirection, and more.
The result will allow or deny access to the network, and when it is allowed, it can include any and all restrictions for limiting network access for the user or endpoint.
Understanding Authorization Policies
Now that you understand the main responsibilities of the authorization policy, it will be easier to understand the exercises of this section. To understand authorization policies even more, we will now go through and examine a few.
Basic authorization policy rules are logically organized in this manor:
IF [conditions] THEN [AssignThesePermissions]
Just like the authentication policy, authorization policy rules are processed in a top-down, first-match order. So, if the conditions do not match, the authentication will be compared to the next rule in the policy.
ISE is preconfigured with a default rule for blacklisted devices, named Wireless Blacklist Default, Profiled Cisco IP Phones, and Profiled Non Cisco IP Phones. We are going to examine the Cisco IP phone and blacklist rules to dig into authorization rules and how they work. If you have a live ISE system, it can help to follow along with the text.
From the ISE GUI, do the following:
Step 1. Navigate to Policy > Authorization. You should notice an immediate difference between the authorization policy and the authentication policy examined earlier in this chapter (see Figure 11-1). The authorization policy attempts to display the rule logic in plain English. The bold text designates an identity group, while the standard font is a normal attribute. The operator is always “AND” when both Identity Group and Other Conditions are used in the same rule.
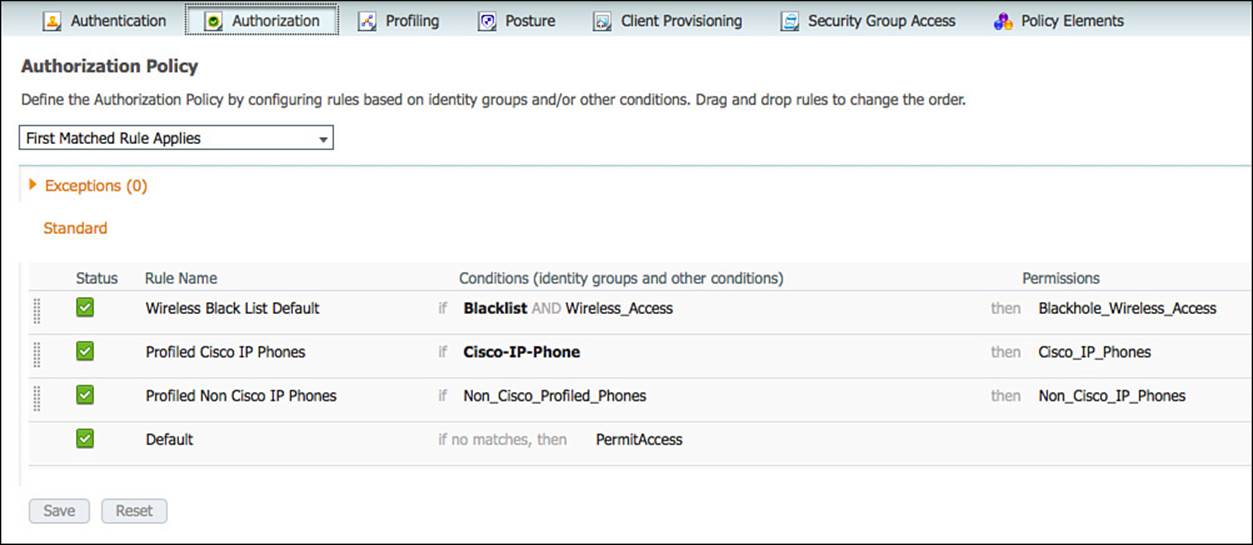
Figure 11-1 Default authorization policy.
Step 2. Edit the rule named Cisco IP Phones.
Notice the identity group is a separate list than the other conditions. In this rule, there is an identity group named Cisco-IP-Phones (see Figure 11-2). The next field is where other conditions would be selected.
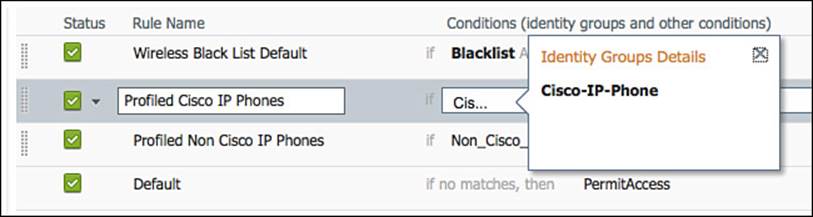
Figure 11-2 Profiled Cisco IP phones.
This particular rule is a prebuilt rule that permits any device that was profiled as a Cisco IP phone, sending an Access-Accept that also sends an attribute value pair (AVP) that permits the phone into the voice VLAN.
Step 3. Let’s examine the permissions (result) that are sent. Navigate to Policy > Policy Elements > Results > Authorization > Authorization Profiles.
Authorization profiles are a set of authorization results that should be sent together. Notice there are two other categories of authorization results: Downloadable ACLs and Inline Posture Node Profiles. Every authorization rule must have a result (see Figure 11-3).
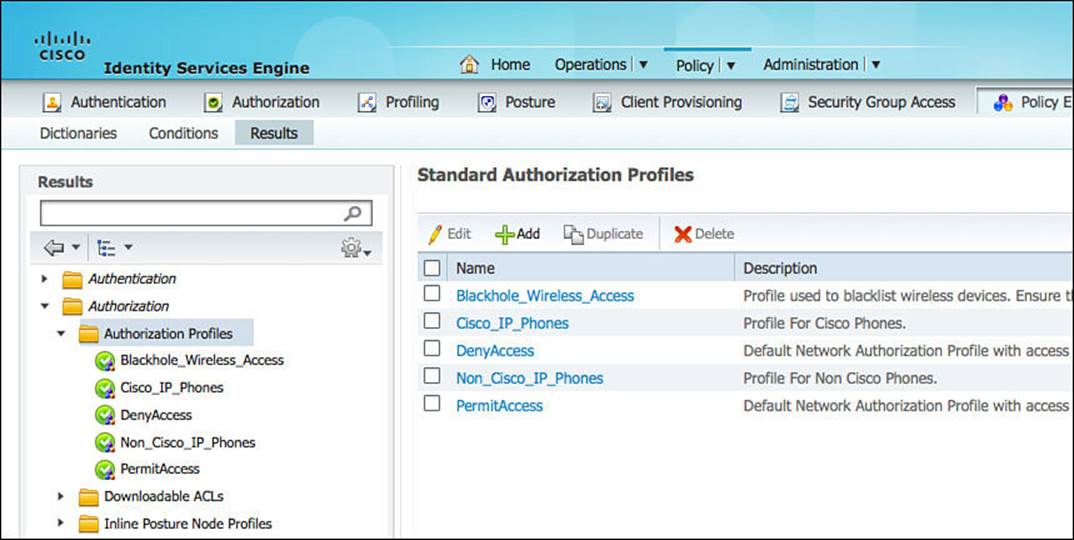
Figure 11-3 Default authorization profiles.
Step 4. Select the Cisco_IP_Phones Authorization Profiles.
The authorization result needs to be RADIUS attributes. To make that easier for the users of ISE, Cisco has included a Common Tasks section that presents the options in more of a plain-English format (see Figure 11-4). The Attributes Details section at the bottom displays the raw RADIUS result that will be sent.
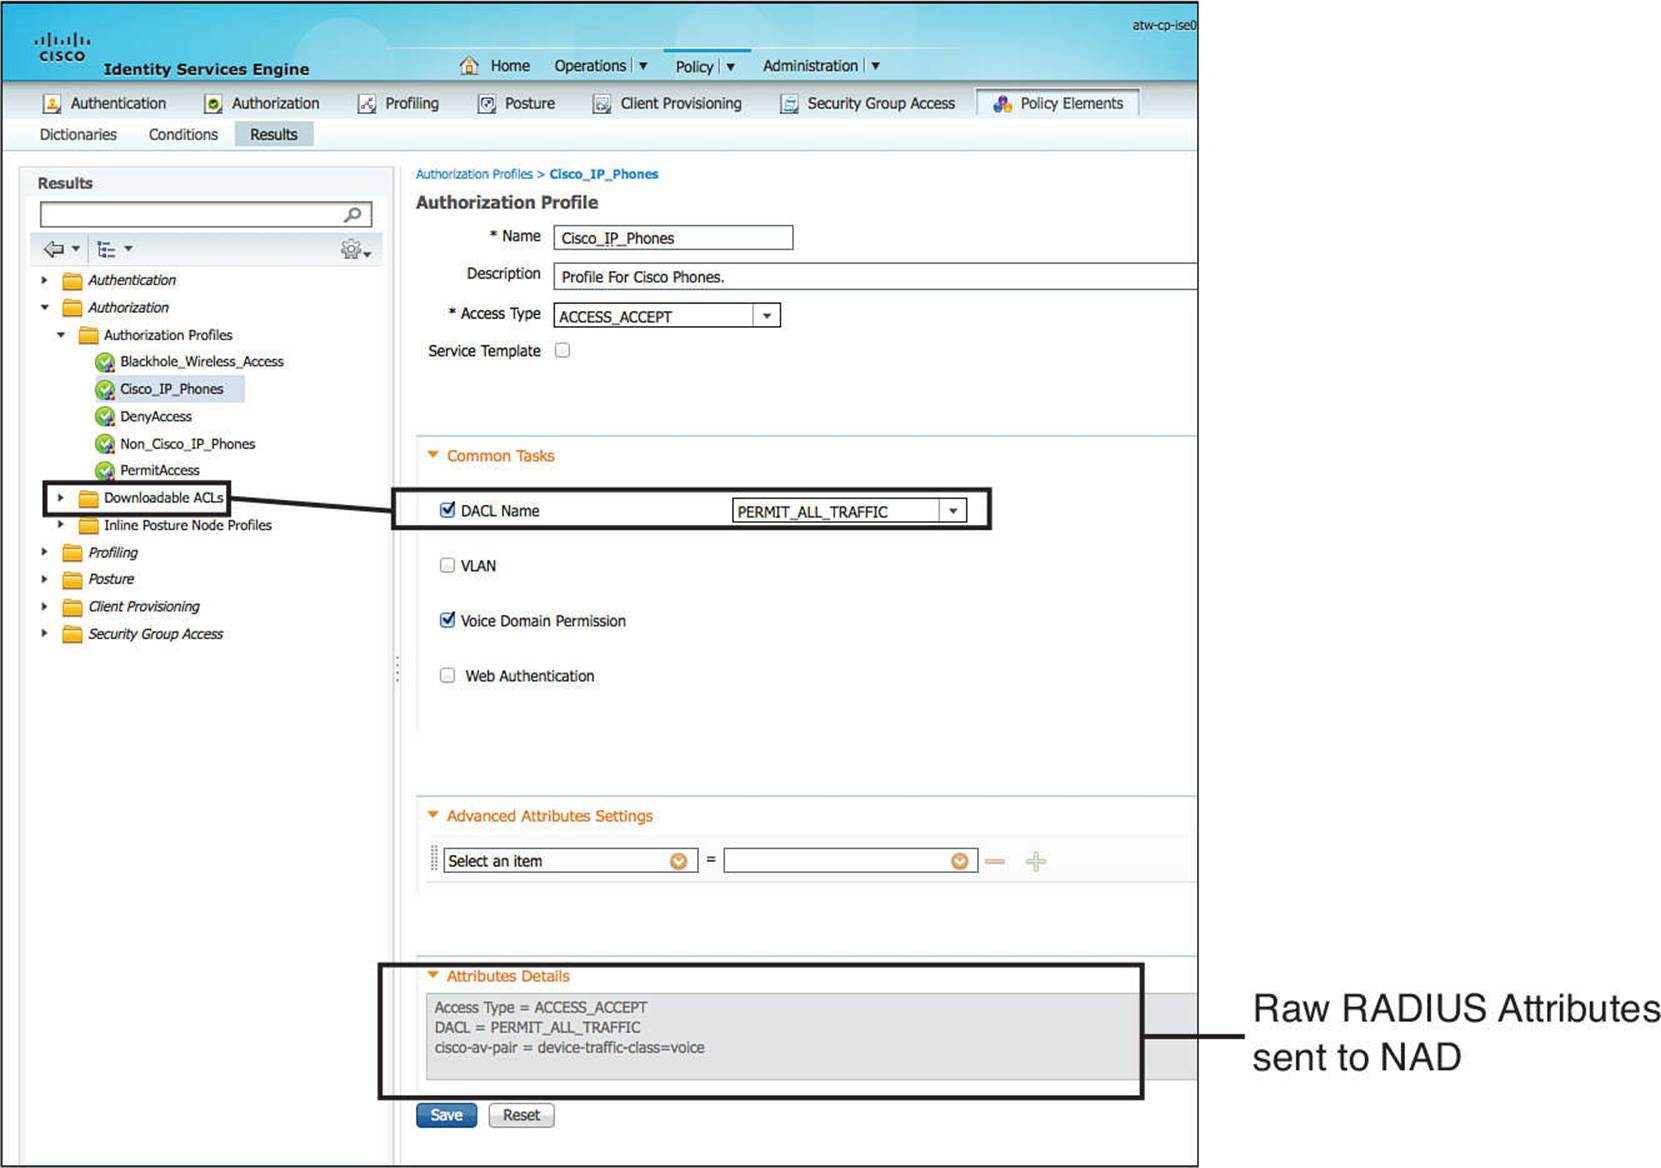
Figure 11-4 Cisco_IP_Phones authorization profile.
Take note in Figure 11-4 the DACL Name is a drop-down box where you will select a dACL that is created and stored in ISE. The Voice Domain Permission check box is required for the switch to allow the phone into the Voice VLAN on the switch.
Step 5. Notice in the Attributes Detail section that this authorization result will send a RADIUS result with an Access-Accept, a dACL that permits all traffic, and the voice domain VSA to permit the phone to join the Voice VLAN.
Next, let’s examine the Wireless Black List Default Rule:
Step 1. Navigate to Policy > Authorization.
Step 2. Edit the rule named Wireless Black List Default.
Notice the identity group is a separate list than the other conditions. In this rule, there is an identity group named Blacklist. The next field is populated with a prebuilt condition specifying wireless connections. This particular rule is built to prevent devices that have been marked lost or stolen from accessing the network.
Step 3. Let’s examine the authorization condition being used. Navigate to Policy > Policy Elements > Conditions > Authorization > Compound Conditions.
Figure 11-5 shows the default list of compound conditions. A simple condition is just a single attribute that has been saved to the library for reuse. A compound condition is the joining of more than one condition with an AND or OR operator. This compound condition can also be saved to the library for reuse.
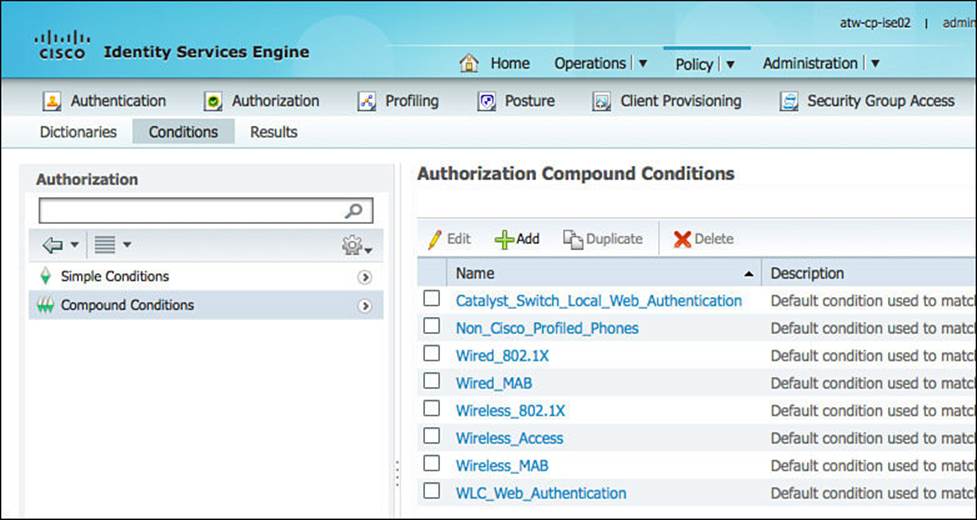
Figure 11-5 Prebuilt authorization compound conditions.
Step 4. Select Wireless_Access.
As shown in Figure 11-6, the Wireless_Access compound condition references the RADIUS attribute of NAS-Port-Type Equals Wireless – IEEE 802.11.
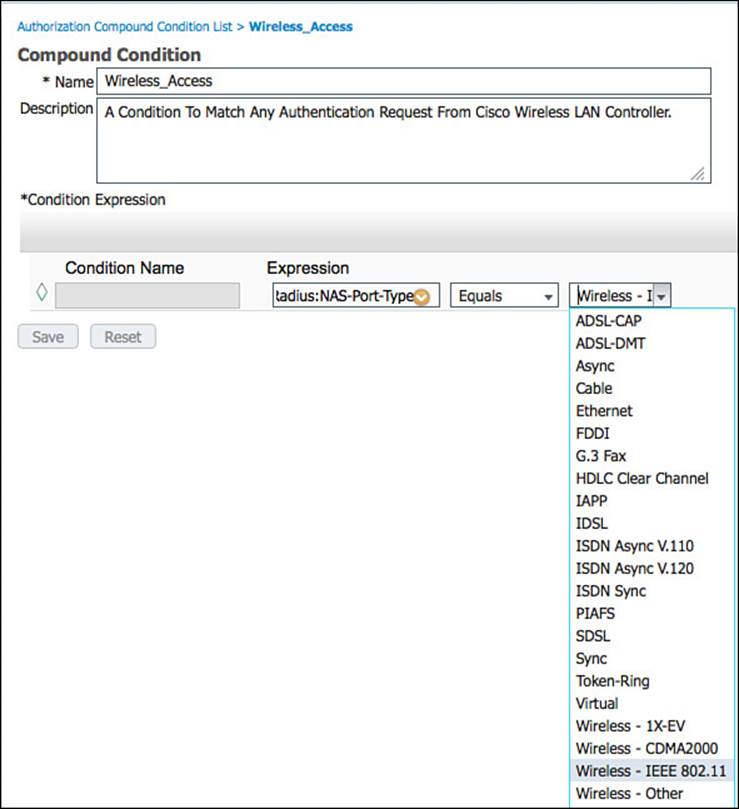
Figure 11-6 Wireless_Access compound condition.
Step 5. Now let’s examine the authorization result that is being sent for this authorization rule. Navigate to Policy > Policy Elements > Results > Authorization > Authorization Profiles.
Step 6. Select Blackhole_Wireless_Access. As shown in Figure 11-7, the Blackhole_Wireless_Access authorization profile does not use any of the common tasks. Instead, it is using the Advanced Attribute Settings to send a URL-Redirect and URL-Redirect-ACL result to the wireless LAN controller (WLC), along with an Access-Accept. So this result is allowing the devices onto the network but is forcing all traffic to redirect to a web page describing that the device was blacklisted.
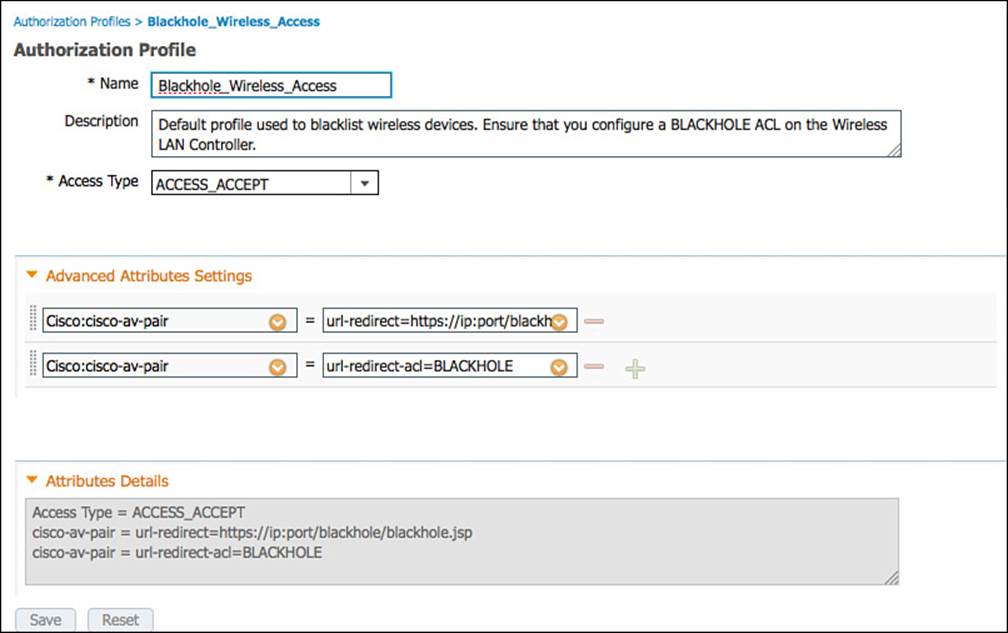
Figure 11-7 Blackhole_Wireless_Access authorization profile.
These two authorization rules demonstrate a variety of rules. Later in this chapter we will examine a few common authorization policies.
Role-specific Authorization Rules
Defense-in-depth is an important concept. Just because you have implemented 802.1X at the Access Layer with Cisco ISE as the policy controller, does not mean the network is immediately secure. Everything is dependent on the security policies built by you, the administrator.
For example, companies often use a combination of ISE profiling capabilities and MAC Authentication Bypass (MAB) to provide network access to printers. ISE profiling is used to assign a printer profile to a MAC address belonging to a device that appears to be a printer. MAB is then used for the NAD to send an authentication request containing the MAC address of the printer to ISE. From there, ISE should send down the Access-Accept result.
There was a successful MAB, and the printer needs to have access to the network, but does that mean the printer deserves full access to the network. Absolutely not! The printer should be granted only enough access to perform its necessary functions. That way, if a malicious user were to spoof the MAC address of the printer, he would not able to get to much on the network.
The end goal of a Secure Access deployment should be to provide very specific permissions to any authorization. However, that should always be handled in a staged approach to limit the impact to the end users.
Chapter 20, “Deployment Phasing,” is dedicated to this phased approach.
Authorization Policy Example
In this section, you will see an example of an authorization policy made up of numerous rules based on a common use case. This use case was selected to show multiple aspects of the authorization policy and help to solidify your working knowledge of the pieces of an authorization policy and the workflows associated with creating the policies.
For this example, we will configure three authorization rules. One assigns full access to an employee that authenticated successfully with EAP chaining followed by a rule that assigns more limited access to the same employee authenticating with a noncorporate machine. The last rule assigns Internet only access to the same employee authenticating on a mobile device.
Employee Full Access Rule
In this rule, we will assign full access permissions to an employee who is authenticating from a valid corporate asset. From the ISE GUI, do the following:
Step 1. Navigate to Policy > Authorization.
Step 2. Insert a new rule above the Default rule.
Step 3. Name the new rule Employee and CorpMachine.
Step 4. For the other conditions drop-down list, click the plus sign (+) next to Conditions and select Create New Condition.
Step 5. Select Network Access > EapChainingResult.
Step 6. Select Equals.
Step 7. Select User and Machine both Succeeded.
Step 8. Click the cog on the right side and select Add Attribute/Value.
Step 9. Select AD1 > External Groups Equals Employees (or another AD group of your choosing).
Step 10. For the AuthZ Profiles, click the plus sign (+).
Step 11. Click the cog in the upper-right corner and select Add New Standard Profile.
Step 12. Name the new authorization profile Employee Full Access (see Figure 11-8).
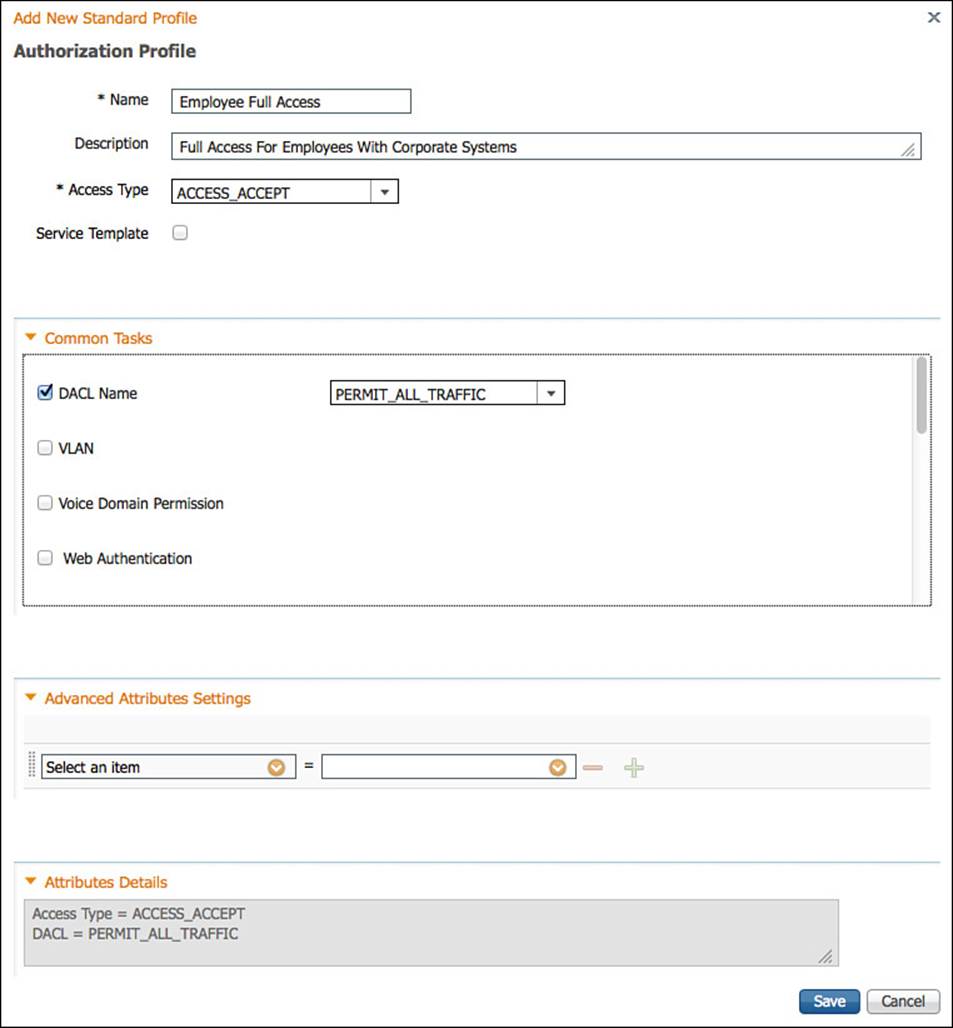
Figure 11-8 Employee full access authorization profile.
Step 13. Optionally add a description.
Step 14. Access Type = Access_Accept.
Step 15. Select DACL Name > PERMIT_ALL_TRAFFIC.
Step 16. Click Save.
Step 17. Click Done to finish editing the rule.
Step 18. Click Save to save the authorization policy.
Figure 11-9 shows the completed authorization rule.
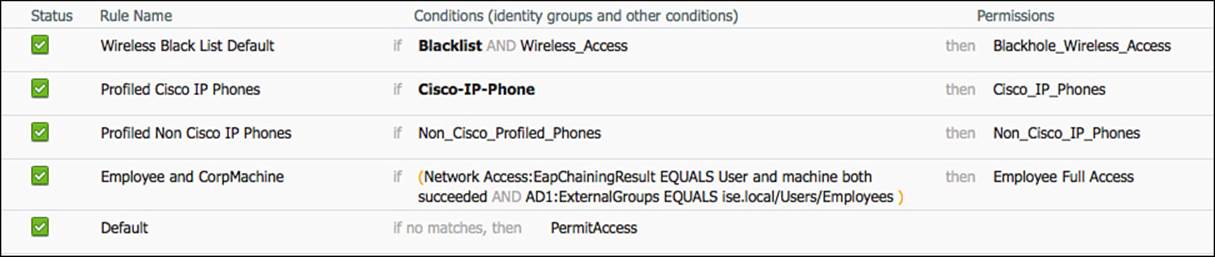
Figure 11-9 Completed employee and CorpMachine rule.
Internet Only for Smart Devices
Now the rule for employees with corporate devices has been created, we need to create the rule below it that provides Internet access only to employee authentications on mobile devices.
To begin this rule, we will first create a new dACL that will be applied to switches; then we will create the authorization result. Next, we will go back into the authorization policy and build the rule. Follow these steps:
Step 1. Navigate to Policy > Policy Elements > Results > Authorization > Downloadable ACLs.
Step 2. Click Add.
Step 3. Name the ACL Internet_Only.
Step 4. Optionally provide a description.
Step 5. Within dACL content, provide an ACL that would permit required traffic and deny traffic destined to the corporate network.
Step 6. Click Submit.
The example in Figure 11-10 is just an example; each organization might need its own customization.
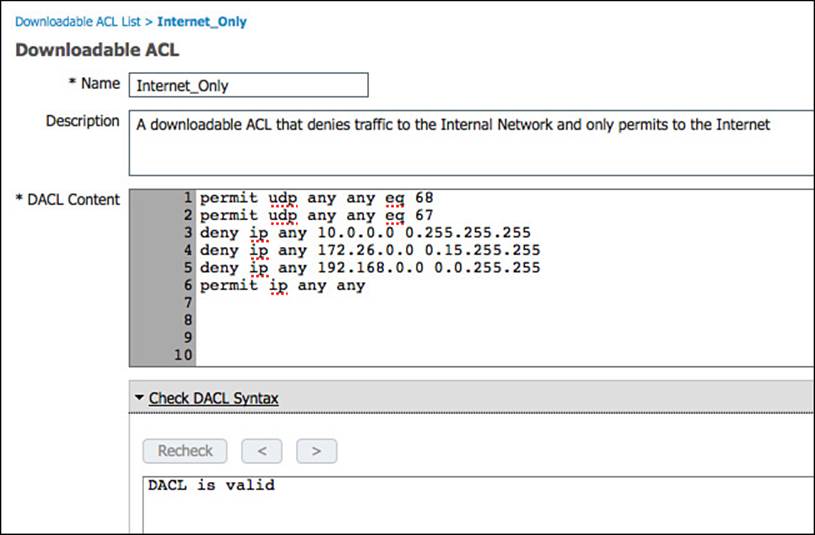
Figure 11-10 Internet-only dACL.
Now the dACL is created, it’s time to create the authorization profile.
Step 1. Navigate to Policy > Policy Elements > Results > Authorization > Authorization Profiles.
Step 2. Click Add.
Step 3. Name the authorization profile Internet Only.
Step 4. Optionally provide a description.
Step 5. The access type is ACCESS_ACCEPT.
Step 6. Select DACL Name and select Internet Only.
Step 7. Optionally provide a different VLAN assignment for the end user.
Keep in mind that this VLAN name or ID will be used for both wired and wireless devices. An alternative is to create separate rules for wired and wireless, so the user will be assigned VLAN on wireless but not wired. In either case, the VLAN must already exist on the NAD.
Step 8. Select Airespace ACL Name and fill in the name of the ACL on the controller that will provide Internet-only access. Because we are referencing this ACL by name only, this ACL must already exist on the WLC—we refer to this as a named ACL.
Step 9. Click Submit.
Figure 11-11 shows the completed authorization profile.
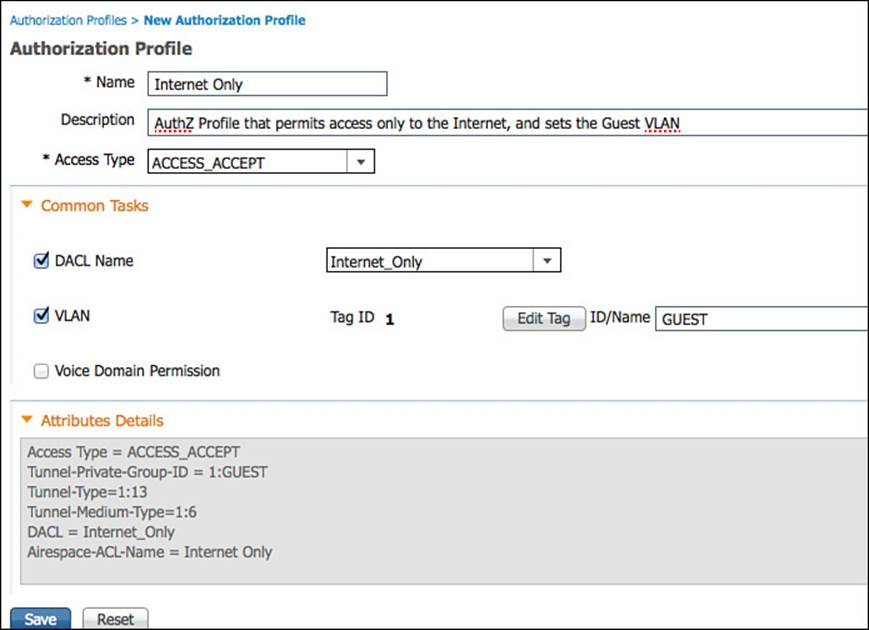
Figure 11-11 Internet-only authorization profile.
Before we build the authorization policy, we are going to create a logical profiling policy that encompasses all mobile device platforms. This will make the policy building much easier and provide a reusable policy object. Here’s how:
Step 1. Navigate to Policy > Profiling > Logical Profiles.
Step 2. Click Add.
Step 3. Name the logical policy SmartDevice (see Figure 11-12).

Figure 11-12 SmartDevice logical profile.
Step 4. Optionally provide a description.
Step 5. Select all the mobile platforms from the Available Devices side, and click the > to move them to the Assigned Policies side.
Step 6. Click Submit.
Lastly, it is now time to create the authorization rule:
Step 1. Navigate to Policy > Authorization.
Step 2. Insert a new rule above the default rule.
Step 3. Name the rule Employee SmartDevices.
Step 4. Select the + sign for Condition(s), and select Endpoints > LogicalProfile.
Step 5. Select Equals.
Step 6. Select SmartDevice.
Step 7. Click the cog on the right side and select Add Attribute/Value.
Step 8. Select AD1 > External Groups Equals “Employees” (or another AD Group of your choosing).
Step 9. For the AuthZ Profiles, click the plus sign (+).
Step 10. Select Standard > Internet Only.
Step 11. Click Done.
Step 12. Click Save.
The completed authorization rule is displayed in Figure 11-13.
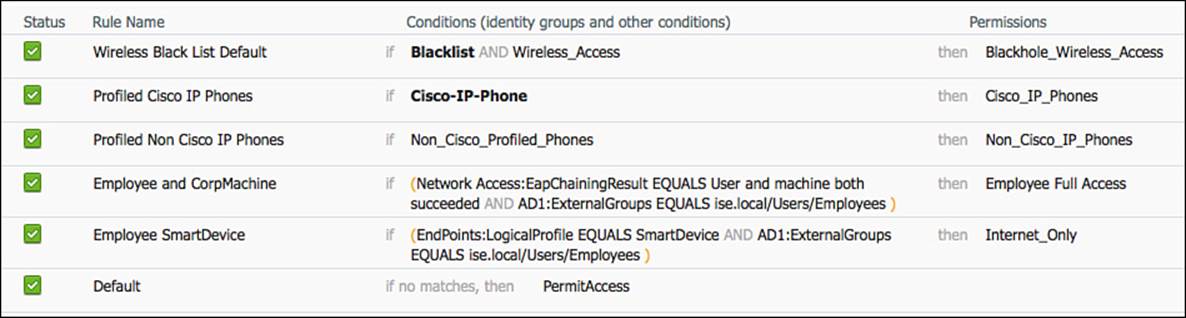
Figure 11-13 Employee SmartDevice authorization rule.
Employee Limited Access Rule
Now that the rule for employees connecting with mobile devices has been created, we need to create the rule below it that provides limited access only to employee authentications on any other device.
To begin this rule, we will first create a new dACL that will be applied to switches. Then we will create the authorization result, and then go back into the authorization policy and build the rule. Here’s how:
Step 1. Navigate to Policy > Policy Elements > Results > Authorization > Downloadable ACLs.
Step 2. Click Add.
Step 3. Name the ACL Employee_Limited (see Figure 11-14).
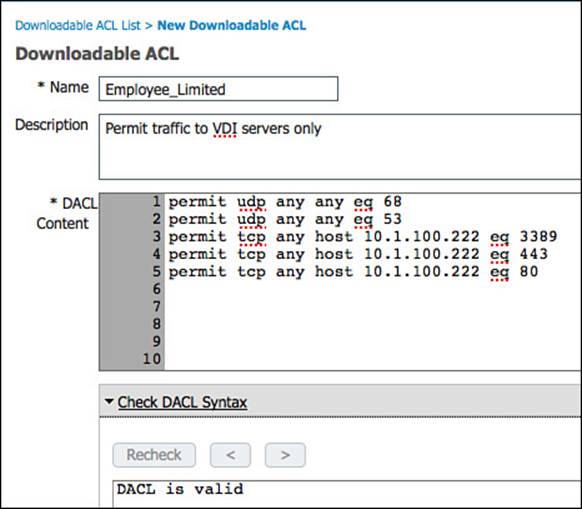
Figure 11-14 Employee limited dACL.
Step 4. Optionally provide a description.
Step 5. Within dACL content, provide an ACL that would permit required traffic and deny traffic destined to the corporate network. For our example, we will allow traffic to reach our virtual desktop infrastructure and essential services such as DNS only.
Step 6. Click Submit.
Now that the dACL is created, we will build the authorization policy to permit network access and apply that dACL. Follow these steps:
Step 1. Navigate to Policy > Policy Elements > Results > Authorization > Authorization Profiles.
Step 2. Click Add.
Step 3. Name the authorization profile Employee Limited.
Step 4. Optionally provide a description.
Step 5. The access type is ACCESS_ACCEPT.
Step 6. Select DACL Name and select Employee_Limited.
Step 7. We will not assign a different VLAN for this authorization.
Step 8. Select Airespace ACL Name and fill in the name of the ACL on the controller that will provide Internet-only access.
Step 9. Click Submit.
Figure 11-15 shows the completed authorization profile.
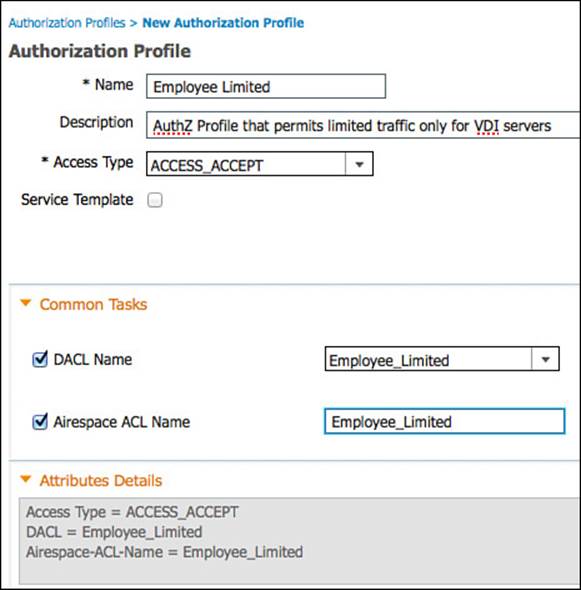
Figure 11-15 Employee limited authorization profile.
Now, create the authorization policy rule to assign that authorization profile by doing the following:
Step 1. Navigate to Policy > Authorization.
Step 2. Insert a new rule above the default rule.
Step 3. Name the rule Employee Limited.
Step 4. Select the plus sign (+) for conditions.
Step 5. Select AD1 > External Groups Equals “Employees” (or another AD Group of your choosing).
Step 6. For the AuthZ Profiles, click the plus sign.
Step 7. Select Standard > Employee Limited.
Step 8. Click Done.
Step 9. Click Save.

Figure 11-16 Employee limited authorization rule.
Saving Conditions for Reuse
ISE offers the ability to save conditions to the library to make it much easier to reuse them again in other policies. To show this, we will go back into our sample authorization policy and save a few of the conditions. Not only does it make it quicker to find the condition in the future, but it also helps clean up the policies and make them easier to read.
From the ISE GUI, do the following:
Step 1. Navigate to Policy > Authorization.
Step 2. Edit the Employee and CorpMachine rule.
Step 3. Expand the Conditions.
Step 4. Click Add All Conditions Below to Library.
This is adding the full set of conditions, including the AND operator (see Figure 11-17).
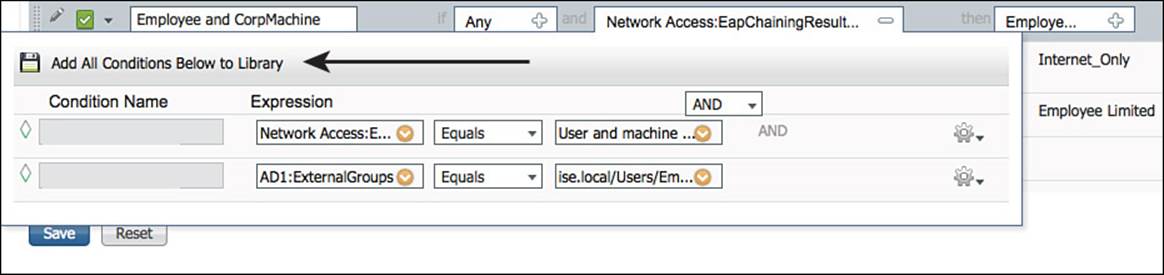
Figure 11-17 Add all conditions below to library.
Step 5. Provide a name for this new saved condition. We have called it EmployeeFullEAPChain.
Step 6. Finish editing the rule.
Step 7. Click Save.
As shown in Figure 11-18, the authorization policy text is simplified now with the name of the saved conditions instead of the raw attributes.
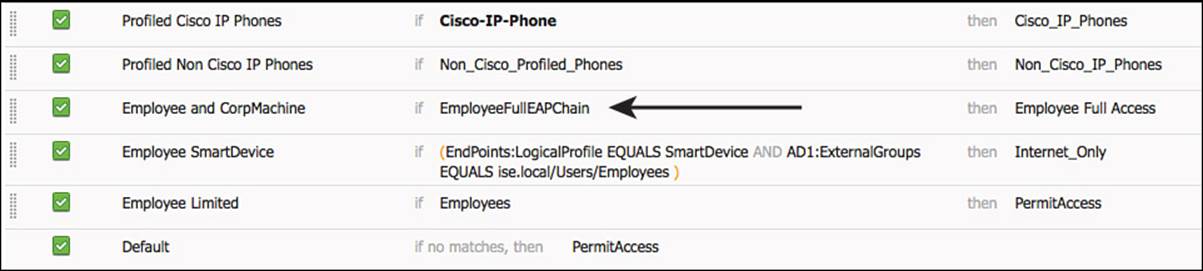
Figure 11-18 Authorization policy after saving conditions to library.
Conditions can be saved individually, unlike what is displayed in Figure 11-18. Individual conditions are often more desirable to save to the library because they can be mixed and matched with other library conditions or raw attributes, allowing for more flexibility. Next, we will save the Employees group for Active Directory as a condition because it is a common condition used in many rules, as shown in Figure 11-19. Follow these steps:
Step 1. Navigate to Policy > Authorization.
Step 2. Edit the Employee SmartDevice rule.
Step 3. Expand the Conditions.
Step 4. Click the cog on the right side of the Employees line.
Step 5. Select Add Condition to Library.
Step 6. Name the condition Employees.
Step 7. Click the green check mark.

Figure 11-19 Saving employees to library.
Step 8. Click Done to finish editing the rule.
Step 9. Click Save.
Figure 11-20 shows the final authorization policy.
Looking at Figure 11-20, it is easy to see why saving the raw attributes as simple or compound conditions can clean up the readability of the policies. These reusable conditions exist for many policies within ISE, not only the authorization policy.
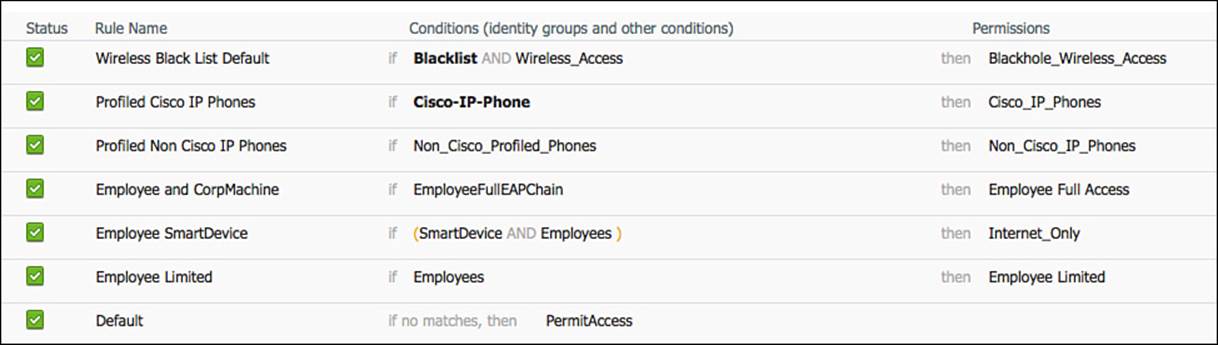
Figure 11-20 Final authorization policy.
Combining AND with OR Operators
Through the normal ISE GUI, it is not easy to see how to combine the AND operator with the OR operator. However, on some occasions a compound condition needs to blend the two operators. Cisco ISE does have the capability to create a complex compound condition made up of simple conditions and any mixture of operators. The catch is that raw attributes cannot be used—only simple conditions can.
From the ISE GUI, do the following:
Step 1. Navigate to Policy > Policy Elements > Conditions > Authorization > Simple Conditions.
At this point, you should have at least two simple conditions listed: Employees and SmartDevice. Create some new simple conditions to be used in the complex compound condition.
Step 2. Click Add.
Step 3. Name the new simple condition PostureCompliant.
Step 4. Select Session > PostureStatus under the *Attribute column.
Step 5. Select Equals under the *Operator column.
Step 6. Select Compliant under the *Value column.
Step 7. Click Submit.
Figure 11-21 shows the final values for the PostureCompliant simple condition.
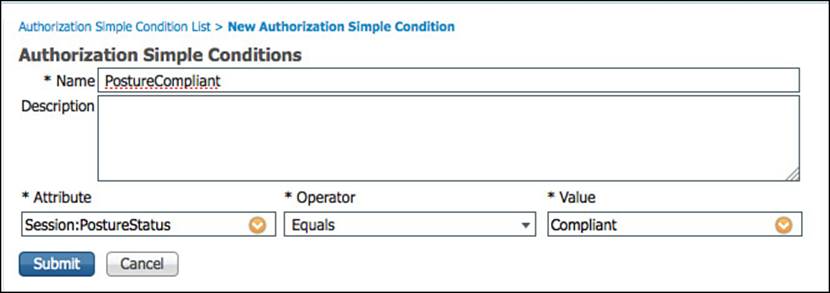
Figure 11-21 PostureCompliant simple condition.
Step 8. Click Add.
Step 9. Name the new simple condition PEAP.
Step 10. Select NetworkAccess > EapTunnel under the *Attribute column.
Step 11. Select Equals under the *Operator column.
Step 12. Select PEAP under the *Value column.
Step 13. Click Submit.
Figure 11-22 shows the final values for the PEAP simple condition.
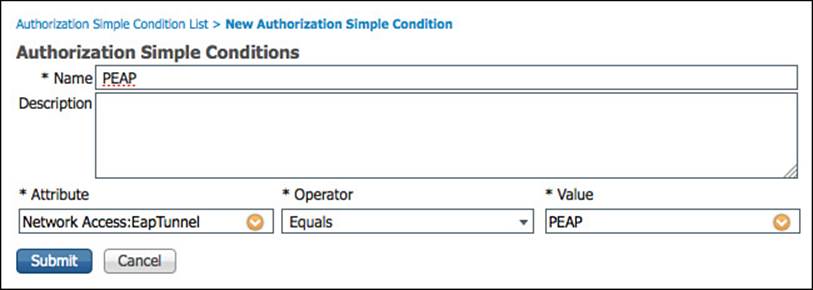
Figure 11-22 PEAP Simple Condition
Step 14. Click Add.
Step 15. Name the new simple condition EAP-TLS.
Step 16. Select NetworkAccess > EapAuthentication under the *Attribute column.
Step 17. Select Equals under the *Operator column.
Step 18. Select EAP-TLS under the *Value column.
Step 19. Click Submit.
Figure 11-23 shows the final values for the EAP-TLS simple condition.
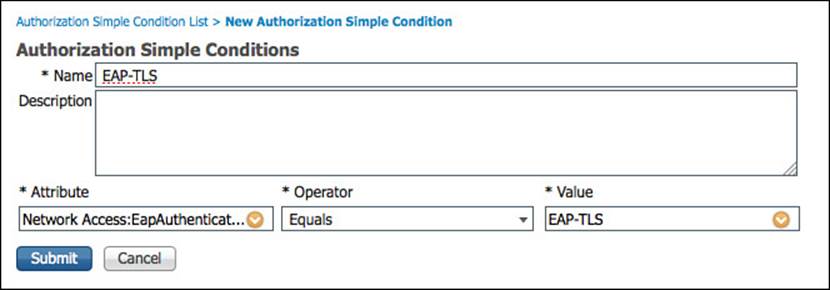
Figure 11-23 EAP-TLS simple condition.
Step 20. Click Add.
Step 21. Name the new simple condition EAPChainingSuccess.
Step 22. Select NetworkAccess > EapChainingResult under the *Attribute column.
Step 23. Select Equals under the *Operator column.
Step 24. Select User and Machine both succeeded under the *Value column.
Step 25. Click Submit.
Figure 11-24 shows the final values for the EAPChainingSuccess simple condition.
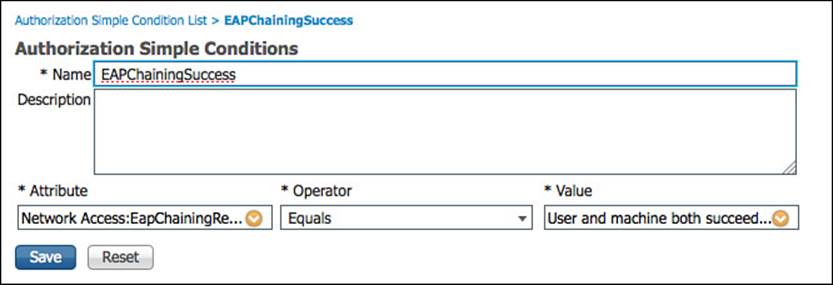
Figure 11-24 EAP chaining success simple condition.
Now, let’s create a complex compound condition that uses the simple conditions created so far:
Step 1. Navigate to Policy > Policy Elements > Conditions > Authorization > Compound Conditions.
Step 2. Click Add.
Step 3. Name the new compound condition TestComplexCondition.
Step 4. Click the button labeled Select Existing Condition from Library, as shown in Figure 11-25.
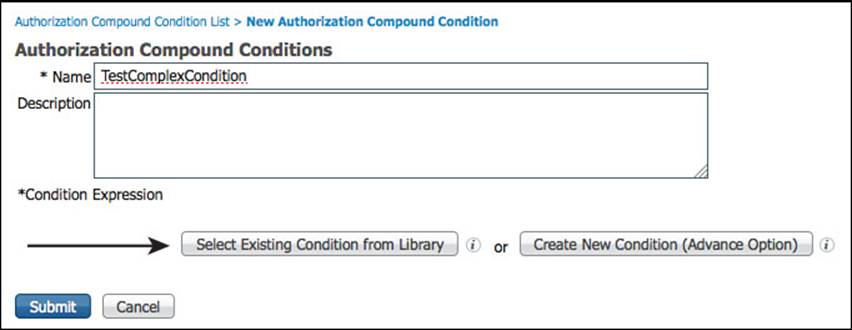
Figure 11-25 Select existing condition from library.
When you begin to build a compound condition using an existing condition from the library, two buttons appear in the upper-right corner. These are the Simple View and Advance View buttons.
Step 5. Click the Advance View button that looks a bit like a tic-tac-toe board, as shown in Figure 11-26.
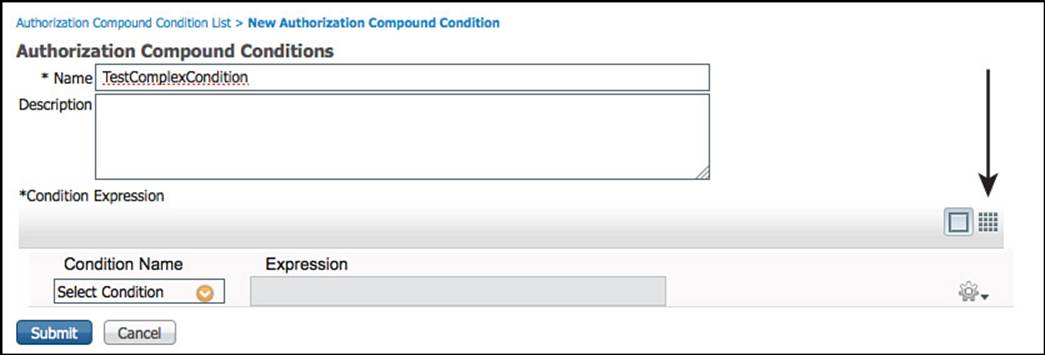
Figure 11-26 Advance View button.
After you click the Advance View button, the screen will reconfigure itself as shown in Figure 11-27. In this view you will be able to build entire expressions, similar to a mathematical formula.
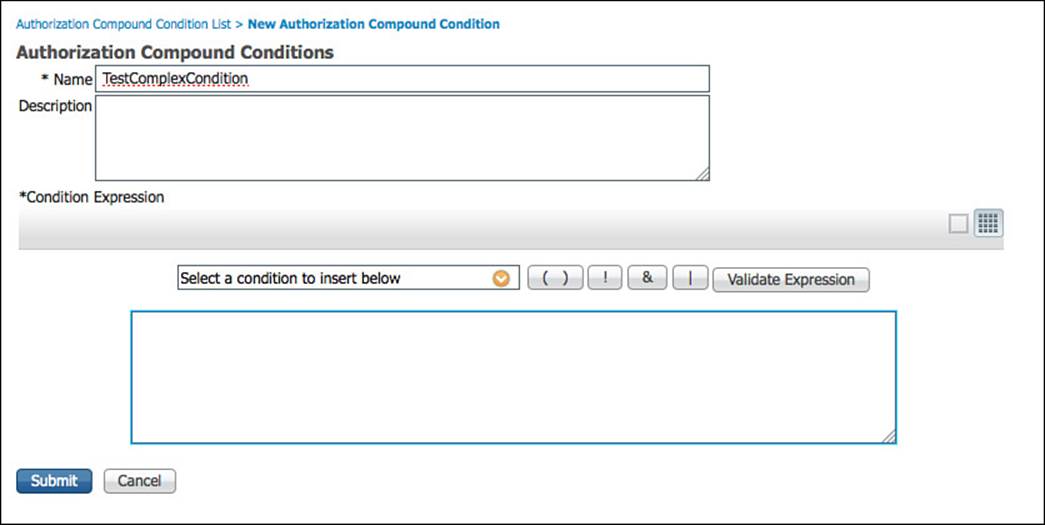
Figure 11-27 Advanced view.
Step 6. Click the parenthesis button ( ) to begin your first match in the expression.
Step 7. Select the SmartDevice condition from the drop-down list, so it appears within the parentheses like this: ( SmartDevice ).
Step 8. Click the ampersand (&) button, which represents the AND operator, so it appears after SmartDevice like this: ( SmartDevice and ).
Step 9. Select the EAP-TLS condition from the drop-down list, so your expression now looks like this: ( SmartDevice and EAP-TLS ).
Step 10. Click the ampersand button, so it appears after EAP-TLS like this: ( SmartDevice and EAP-TLS and ).
Step 11. Select the Employees condition from the drop-down list. The expression should now look like this: ( SmartDevice and EAP-TLS and Employees ).
Step 12. Now move your cursor outside of the expression and click the pipe button (|), which represents the OR operator, followed by the parentheses button. The full expression now looks like this: ( SmartDevice and EAP-TLS and Employees ) | ( ).
Step 13. Inside the second set of parentheses, build the following expression: ( ! SmartDevice and ( EAPChainingSuccess | EAP-TLS ) and PostureCompliant ).
Figure 11-28 shows the final expression to be saved. The exclamation point (!) is the symbol for NOT.
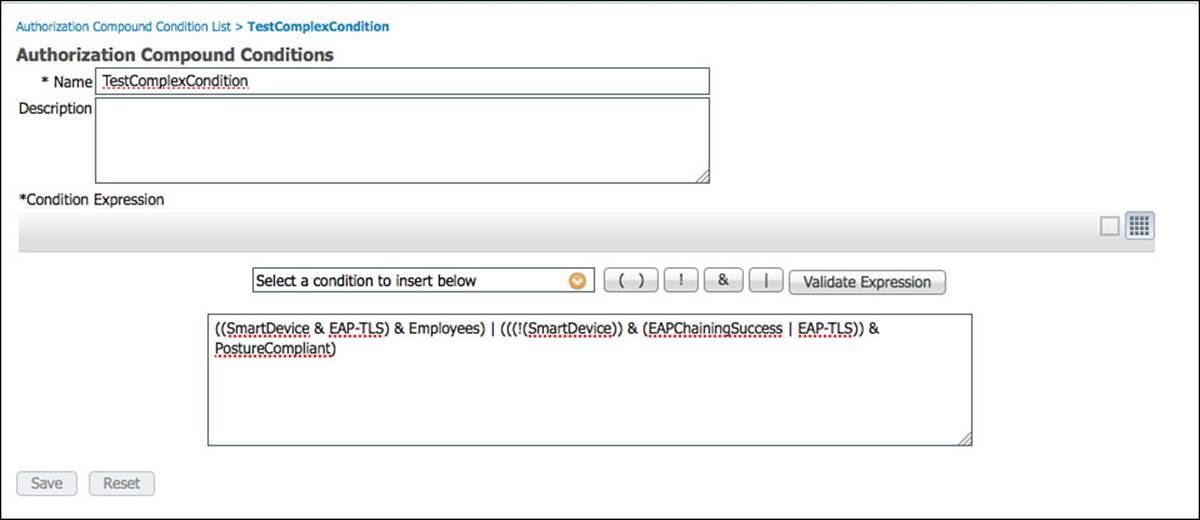
Figure 11-28 Final complex compound expression.
So, the final expression would read as If (endpoint is a smart device AND was authenticated with EAP-TLS AND the user is a member of the Employees AD group) OR (endpoint is not a smart device AND either EAPChaining or EAP-TLS authentication succeeded AND the endpoint’s posture is compliant).
Step 14. Click Submit to save the complex compound condition.
Exam Preparation Tasks
Review All Key Topics
Review the most important topics in the chapter, noted with the key topics icon in the outer margin of the page. Table 11-2 lists a reference of these key topics and the page numbers on which each is found.

Table 11-2 Key Topics for Chapter 11
Define Key Terms
Define the following key terms from this chapter, and check your answers in the glossary:
context
simple condition
compound condition