Facebook All-in-One For Dummies, 2nd Edition (2014)
Book IV. Building a Business Page
 Visit www.dummies.com/extras/facebookaio for a recap of details that will affect the appearance of your Facebook business page.
Contents at a Glance
Chapter 1: Creating a Business Page
Chapter 2: Customizing Your Business Page
Chapter 3: Touring Your Business Page
Chapter 4: Building Your Community
Chapter 1. Creating a Business Page
In This Chapter
![]() Understanding business pages
Understanding business pages
![]() Creating your business page
Creating your business page
![]() Adding a vanity URL
Adding a vanity URL
![]() Choosing cover and profile images
Choosing cover and profile images
“But I already have a website. Do I really need a Facebook business page?” In most cases, yes, you do. Facebook has proven to be an outstanding marketing tool. By integrating Facebook into your overall strategy, you expand your reach by millions. Consider these numbers:
· Facebook is the number two site on the Internet (only Google has more visitors).
· Over 1.2 billion people have active Facebook accounts.
· Over 727 million people log in to Facebook every day.
· The average user has 130 friends and is connected to 80 community pages, groups, and events.
Those are your customers. Your customers are on Facebook looking for ways to interact with you. Why not meet them where they are? Facebook business pages are an easy way to connect with your followers (and introduce yourself to new followers!).
This chapter explains how a business page works and how you can create one in just a few minutes.
Deciding to Create a Business Page
Before we show you how to create a Facebook business page, let us explain the options you may see on Facebook. Facebook has three types of pages, but businesses can use only business pages to create and interact with a community. The three types of pages on Facebook are
· Personal timeline: This type of page is a personal Facebook page that relates to your private life. (See Book I for a full discussion of personal timelines.) You can’t use a personal timeline page to promote a business; personal timelines are strictly for personal use.
· Business page: Facebook created business pages to give businesses, products, services, celebrities, artists, and causes their own space on Facebook.
· Generic community page: This Facebook-generated page is not owned by anyone in particular (except Facebook), so you can’t control the information shared. This type of page is generally populated by Wikipedia information and related status updates from business pages and personal timelines. Few Facebook users refer to generic community pages with any consistency.
 Generic community pages should not be confused with creating a business page for a community or cause. If you choose to make your own business page dedicated to a community or cause, you have control over how that business page looks, which applications are installed, and how information is shared.
Business pages weren’t part of the initial Facebook options. The result is that some businesses created personal timelines rather than business pages for their businesses. Now that business pages are mainstream and fully integrated into the Facebook experience, using a personal timeline for your business is against Facebook policy. This separation is actually a good thing. Facebook is aware that personal timelines and business pages have different needs, and they’ve addressed those by giving business pages more marketing functionality than personal timelines. If you’re contemplating marketing your business, service, or product on Facebook, you probably want as much exposure as possible for your product or business. Table 1-1 shows that a personal timeline simply doesn’t offer the marketing flexibility that a business page does.
Table 1-1 Personal Timelines versus Business Pages
|
Personal Timeline |
Business Page |
|
Limited to 5,000 friends |
No limit on followers or Likes |
|
Not allowed to install custom page applications |
Allowed to install multiple applications to streamline your social media efforts |
|
Only searchable in Facebook |
Fully searchable inside and outside Facebook |
 Keeping your personal timeline and your business page separate enables you to connect with your friends personally while keeping your business contacts separate. Although there may be some overlap, your everyday friends will appreciate that they aren't being subjected to your business discussions, promotions, and information. Likewise, your business associates or followers won't be subjected to your personal status updates or to cute photos of your puppy and kids.
Make Facebook a component of your strategy
Facebook has a lot of features and opportunities for branding and customization. You can customize your business page so completely that you may be tempted to ditch your blog or website to focus your energy on your Facebook presence. We strongly advise against that.
All your social media efforts should work together. Think of your website as your hub. From there, you may have spokes (links) out to your Facebook business page, Twitter account, YouTube channel, and LinkedIn communities. Each of those spokes is owned by a third party; only your website is fully owned by your company.
You don’t own your space in Facebookland — Facebook owns it and can evict you if it sees fit. Eviction (that is, deletion of your business page) doesn’t happen often, but if your business page violates Facebook's terms of service or any of the numerous guidelines, Facebook can and will remove your business page. The awful thing is, you don’t have a say. Facebook doesn’t contact you to warn you; it doesn’t e-mail or call to discuss your options. Your business page (and all you’ve built — community, content, trust, everything) is erased. You’ll have to rebuild from scratch because Facebook will not reinstate a business page it deleted.
It’s never a good idea to put all your eggs in one basket for the simple reason that your audience doesn’t gather in a single venue. Many people may look for you on Facebook, but others will seek out your website or blog or follow you on Twitter.
Creating Your Business Page
Setting up a business page is simple. With a few clicks, you’ll be up and running. To get started, follow these instructions:
1. Use your browser to navigate to http://facebook.com/pages/create.php.
You see six boxes representing different categories, as shown in Figure 1-1.
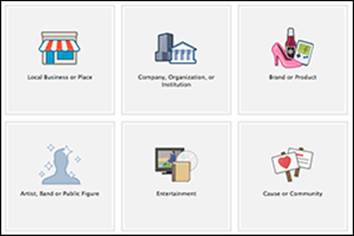
Figure 1-1: Choose one of these six broad categories for your business page.
Many of the main categories offer similar options for your business. For instance, if you're creating a business page for a bookstore, you could choose Local Business or Place⇒Book Store or Entertainment⇒Book Store. The result is the same.
Here is an overview of each category to help you choose which one best fits your needs:
· Local Business or Place: Best choice if you have a single bricks-and-mortar store. This type of business page focuses on the location instead of product. You can share business hours, parking information, and so on.
· Company, Organization, or Institution: Best choice if your business has multiple stores. You still have the option to include addresses. Note that the business page you create will be a representation of your brand, not each store. Facebook isn’t offering that functionality to the masses yet. You can make individual business pages for each store, but it may be confusing for your customers and you can only use your business name once as your username (discussed later in this chapter).
· Brand or Product: Best choice if you don’t have a bricks-and-mortar storefront or want to focus on your product. You can share your website address, products, company overview, and so on. If you’re a blogger creating a business page, this category is an excellent choice.
· Artist, Band, or Public Figure: Best choice if one of those descriptors fits you. You must be the official authorized representative (not just the biggest fan) of the artist, band, or public figure to create a business page.
· Entertainment: Best choice if your business is movies, theater, books, sports, music, and so on.
· Cause or Community: Best choice if you’re creating a business page for a cause (such as Kids with Food Allergies) or a community (such as Points of Light).
2. Click the box that best represents your business, product, or service.
A drop-down list to narrow the category and a text box for your business page name appear.
3. Use the drop-down list to choose the subcategory for your business page.
4. In the Name text box, type the title for your business page.
The name is the title of your business page and is searchable both inside and outside Facebook.
Depending on the type of business page you chose, the Name text box may be labeled as follows:
· Business or Place
· Company Name
· Brand or Product
· Name
· Cause or Community
Until you have 100 followers, you can change your business page title, but only once. When your 100th follower Likes your business page, your title becomes permanent. Facebook figures that as you grow, it’s important to keep your brand intact and not confuse your readers with changing information.
5. If you’re creating a business page for a local business or a place, type your street address, city, state, zip code, and phone number in the relevant text boxes.
6. Select the I Agree to Facebook Pages Terms check box.
7. Click the Get Started button.
The Set Up page for your business page appears.
8. In the first text box, type a description of your business page. In the second box, add your blog or website URL, your Twitter handle, or another pertinent link.
9. (Optional) Upload an image to serve as your profile picture from your computer or import one from your website and click Save Photo.
If you don’t set your profile image at this point, you can add it later (we tell you how later in this chapter). If you upload a picture, this image appears any time you post as your business page. We provide advice on choosing your profile image later in this chapter.
10. To add your page to your favorites, click Add to Favorites. Otherwise, click Skip.
11. (Optional) Promote your page.
You can create an ad to promote your page. We recommend that you get your page completely set up before running ads. To find out more about marketing your business on Facebook, see Book V.
12. If you don't promote your page, click Skip.
Your business page appears, similar to the one shown in Figure 1-2. If you are new at creating a business page, Facebook walks you through the important parts of your page.
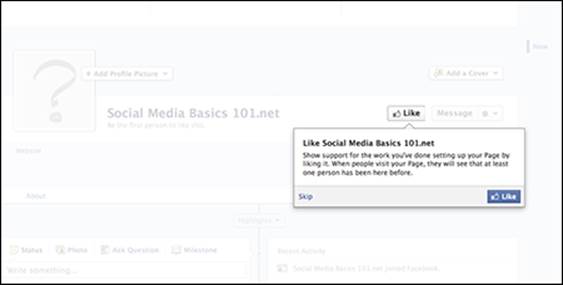
Figure 1-2: A brand-new business page in need of customization.
Creating a Vanity URL
When you initially create your Facebook business page, it has a fairly long and ugly URL (or address), such as
https://www.facebook.com/pages/Post-Planner/1234567890
An address like that makes it hard for people to remember how to find you on Facebook. Luckily, as soon as you have 25 followers, you can create a vanity URL. A vanity URL is a custom address for your Facebook business page, such as http://facebook.com/PostPlanner. Although most people refer to these customized URLs as vanity URLs, Facebook calls them usernames. Also, you don’t always need 25 followers to secure your vanity URL; sometimes you have that option as soon as you create your business page.
You can create a vanity URL for your personal timeline; see Book I, Chapter 2 for more information.
We have a few tips to share with you about vanity URLs:
· When you create your vanity URL, it’s set. If you make a typo or change your mind, you’re out of luck. Carefully check your spelling before you click the Save button!
· Try to match your vanity URL to your business page title, because people will find it easier to remember the address. If the vanity URL you want is taken, it’s okay if the title of your business page is a little different from your vanity URL. When people search for your business page on Facebook, your title is what counts.
· Think of at least three vanity URLs for your business page. You may not be able to claim your first choice if someone else is already using that vanity URL.
· Facebook does not allow you to use the word Facebook in your vanity URL. The company doesn’t want you to infringe on any Facebook trademark or imply that you’re affiliated with it in any way.
· Vanity URLs can only use alphanumeric characters or periods, and can’t contain spaces, hyphens, or other special characters — and if you use a period, it can’t come at the end of the name.
· When a vanity URL is used, no one else can use it. This is true even if the vanity URL is abandoned. The only way to claim a used vanity URL is to prove you own the trademark.
· If you have trademarked your company name, but the vanity URL is not available, you can contact Facebook to help you obtain the correct vanity URL. Point your browser to http://on.fb.me/InfringingUsername and complete the form. Facebook usually helps you within 48 hours.
You can follow these instructions to create a vanity URL for your business page:
1. In your browser, go to http://facebook.com/username.
The Username page appears with two boxes. The top box allows you to create a username (vanity URL) for your personal timeline; the bottom box allows you to create a username for your business page.
2. In the bottom box, use the drop-down list to choose the business page for which you want to set the vanity URL.
If you’re the admin for more than one business page, you see each of those pages listed in the drop-down list. If you are the admin for a single business page, that page will be the only one listed.
A text box appears.
3. In the text box, type the name you’d like to use for your vanity URL, and then click the Check Availability button.
If the name is available, you can set it; if it’s not, try another name.
4. When you have a vanity URL you want to use, click the Save button.
You can shorten any Facebook URL even more by replacing facebook.com with fb.com. For example, http://facebook.com/PostPlanner becomes http://fb.com/Postplanner. This trick comes in handy when you’re including your Facebook URL on a business card or other small space!
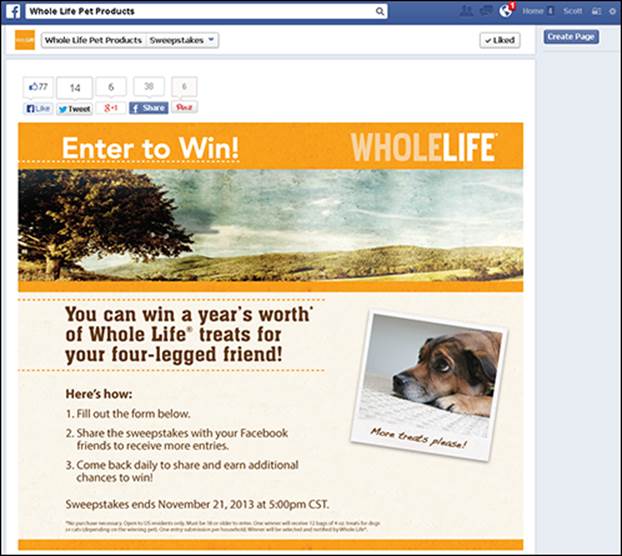
It may be tempting to link to your website and try to convert your readers into customers when they arrive there. Our experience is that people interacting in Facebook don’t want to leave Facebook and are less likely to click links that take them away. If you think about it, you don’t want your visitors to leave Facebook either. Isn’t one of your goals to convince new visitors to Like your business page? If you’re sending them away from Facebook, they may not Like your page before they click away. Instead of linking away from your business page, give a specific call to action (such as “Like our business page and receive a free chapter of our book!”).
Understanding the Importance of Cover and Profile Pictures
Just like on your personal timeline, your business page also has a profile picture and a cover photo. These two images should work together to reinforce your brand, product, or business to your audience. We like the way KLM (www.facebook.com/KLM) uses its cover photo and profile picture, as shown in Figure 1-3.
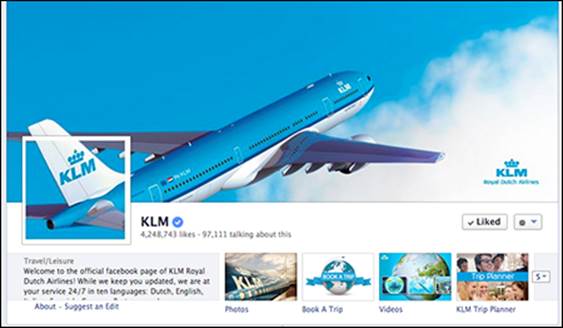
Figure 1-3: KLM uses both the cover photo and the profile picture to reinforce its brand.
Both pictures work together to convey the KLM brand. The cover photo makes use of the large space, is visually appealing, and highlights KLM’s logo (which is repeated in the profile picture). By displaying a blue sky and an airplane, you know immediately what their brand is all about. The profile picture is easily recognizable in the news feed and uses the KLM logo so followers can quickly scan and find updates from KLM.
We recommend using a strongly branded image as your profile image (the smaller image) because this image is attached to all updates and comments you make while using your business page. Don’t change your profile picture regularly, unless that’s part of your business’s image. Your followers will appreciate having a standard picture to associate with your business. In social media outlets such as Facebook and even Twitter, your followers’ streams move quickly, and they often scan that stream rather than read it word for word. A static, strong profile image becomes familiar to your followers and helps them quickly find your updates.
Your cover photo, on the other hand, can change as needed. In fact, Facebook encourages you to change it regularly and use it as a means of engaging your followers and bringing them back to your business page.
Why looks matter
In the most general sense, the overall look of a business page and personal timeline is simple and consistent. As you dig deeper into the capabilities of a business page, you discover how to leverage some of Facebook’s page customizations to create a stronger message.
When someone visits your business page, you have a matter of seconds to capture their interest. Some studies say that within four seconds, visitors judge your company, and over 75 percent of visitors are judging your company by the look of your site alone. Your business page is an extension of your web presence, and a well-designed web presence is representative of a better company.
One important consideration is the outcome you’re looking for. The appearance of your business page plays a big role in the ultimate results. For example, say you want to get people to take a customer survey. This survey will enable you to collect customer data such as e-mail addresses and will help you get information about your customer base so that you know the items they’re interested in. A simple, clean design with a clear call to action (such as a button that says Take Survey) will have better results than a complicated design with only text links.
To put it simply, if your design is aesthetically pleasing and your message is clear and simple, you’re sure to get better results!
Choosing a profile picture
People will come to associate your profile image with your presence on Facebook. We (and Facebook) suggest using your logo or a company symbol. The image you choose should be recognizable and consistent with the other business branding you do outside Facebook. By branding yourself consistently across platforms (Facebook, Twitter, your website, and so on), you make it easy for followers and potential followers to recognize your brand and engage with you.
You can use the profile picture area to highlight a special campaign or contest, but keep it simple because this area is small. Too much detail won’t stand out in the news feed. Unlike tabs, no additional functionality is allowed in profile pictures. This area is limited to a simple image only.
We suggest using an image that is 180 x 180 pixels for your profile image. Facebook will scale it down to 32 x 32 pixels in the news feed. You can use a larger image, but it may not look as good. Experiment with what you have to see what you like best. As you consider what image to use for your profile picture, remember that you don’t have a lot of real estate. Choose something that is easily recognizable (and readable if necessary) when shown in the smaller size.
Choose an image that reinforces the brand you’re trying to create and share. Figure 1-4 shows some examples of profile images; they provide little information but have a big effect. You can see how the profile images in the figure look when paired with their cover photos here:
· For Dummies: www.facebook.com/fordummies
· HyperArts: www.facebook.com/hyperarts
· HubSpot: www.facebook.com/hubspot
· Short Stack: www.facebook.com/shortstacklab
![]()
Figure 1-4: Smaller profile images that still have an effect.
Before you upload your profile image, check to be sure it matches this criteria:
· Your image should be at least 180 x180 pixels. Page profile pictures are square and are displayed at 160 x 160 pixels. The photo you upload must be at least 180 x 180 pixels. If you upload a larger image or a rectangular image, Facebook will crop the image to fit in the square. It’s important that your image is 180 pixels wide (or wider). If it’s less than 180 pixels wide, Facebook won’t allow you to upload it. If by chance you can upload it, Facebook will stretch your image to make it fit the space and you may end up with a distorted picture that looks blurry.
· You must own the rights to the image you use. If you use an image that you don’t own, you risk losing your business page.
· Your image should be saved as a PNG (.png) file. These files tend to upload better to Facebook and they have the added bonus of being small files! You can also use .jpg files.
· If you import your image from your website, know the exact URL for the image you want to use. You can enter the main URL for your site (http://www.domain.com) and Facebook will pull an image from the site. However, this image may not be the one you want to use. To ensure Facebook pulls the correct image, use the image’s URL.
To find the URL for an image from your site, right-click the image. Depending on your browser, you have these options:
· Firefox: Choose View Image from the menu. A new page appears showing the image. Note the new URL in your browser’s address bar. That’s the URL you’ll need if you want to import your image to Facebook from your website.
· Google Chrome: Choose Copy Image URL from the menu.
· Internet Explorer: Click the Properties option to find the image URL.
Uploading your profile picture
You can upload a profile image when you create your page or at any time. You can choose from photos you’ve already uploaded to albums (which you probably haven’t done yet if your page is new), you can take a photo with your webcam, or you can upload an image from your computer.
To upload a profile picture while on your business page, follow these instructions:
1. Click the Add/Edit Profile Picture link.
A dialog box appears giving you a few choices.
2. Choose Upload Photo.
3. Choose the file you want to upload to Facebook.
4. Click Open.
Your image immediately appears as your profile image.
Changing your profile picture
If you later decide to change your profile picture, just do the following:
1. From your business page home screen, hover your cursor over the profile picture space.
An Edit Profile Picture link appears.
2. Click the Edit Profile Picture link.
3. Choose from the following options:
· Choose from Photos: Select an image from photos currently uploaded to your business page.
· Take a Photo: Use your webcam to take a picture to use as your profile picture.
· Upload Photo: Select a photo from your computer and upload it to your business page.
· Edit Thumbnail: Use your mouse to center the portion of the image you want to display.
· Remove: Remove the current profile picture.
After you select a photo, you’re prompted to drag the image into the desired position.
4. Click Save Changes.
Don’t change your profile image frequently. As we note throughout this book, Facebook moves quickly and users scan information instead of reading it thoroughly. Your followers come to associate your profile picture with your updates. When you change the picture, followers may miss your updates because the picture isn’t familiar.
Use your page's real estate
Facebook has a limited area that you can customize, and that customization is valuable when you’re trying to get a branding or marketing message across to your Facebook audience. Your use of the space should be meaningful and effective. You should use every bit of space available but in a way that doesn't clutter your page. A well-designed business page can attract more traffic simply because more people share it, especially if the design is particularly innovative.
Function is important too. Giving people a compelling reason to visit your business page will bring more traffic than a cool design. For example, if your business page merely shows a static graphic, one visit may be all you get from someone. However, if you regularly post new videos, visitors will return to see the latest one.
To make the most of your business page design, consider the following:
· Make the application images shown directly below the cover photo intriguing. Entice people to click to see more.
· Consider the use of white (blank) space to make images in a tab or a profile pic stand out more.
When you're just starting out designing your page, simple is better than a more complicated and not well executed design. If you can, hire a designer to put together some professional graphics for your business page.
Choosing a cover picture
Online, looks are everything. A great design can make or break your success. The more professional your web pages appear, the more authority you’re perceived to wield. Your Facebook business page is no exception. Because your cover photo is likely a visitor’s first interaction with your page, it can set the tone and expectation of your business page, as well as reinforce your brand.
Figures 1-5 and 1-6 show the cover photos for two of our favorite business pages, HyperArts and HubSpot, respectively. Note how the cover and profile images work together. When you first visit the business page, you have a sense of how things fit together, but when you see the profile image by itself in your news feed, there is no doubt which page it belongs to.

Figure 1-5: The HyperArts cover and profile pictures.

Figure 1-6: The HubSpot cover and profile pictures.
The rules regarding what can and cannot be included on a cover picture have changed. Gone are the rules that disallowed ads, calls to action, and contact information. Facebook simply encourages you to be creative and not post any cover photo that misleads, is deceptive, infringes on anyone else’s copyright, or violates the page terms.
Even with the relaxed rules, we recommend that you keep the cover picture simple and use the space to properly brand yourself.
Facebook encourages business page admins to change out the cover picture as often as you like to keep things interesting for your followers. The actual dimensions for a cover picture are 851 pixels wide and 315 pixels high. You can upload a picture with a minimum width of 399 pixels, but your image will be stretched to fill the 851-pixel space and will likely be distorted.