Facebook All-in-One For Dummies, 2nd Edition (2014)
Book IV. Building a Business Page
Chapter 2. Customizing Your Business Page
In This Chapter
![]() Including company information
Including company information
![]() Customizing the settings on your page
Customizing the settings on your page
![]() Making a friend an admin
Making a friend an admin
![]() Adding apps
Adding apps
![]() Getting updates from followers
Getting updates from followers
![]() Featuring a business
Featuring a business
![]() Showcasing an update
Showcasing an update
![]() Going mobile
Going mobile
After you create your business page, you want to customize it, or brand it. Marketing starts with good branding, and your business page is an important part of communicating that brand. We show you how to do these tasks in this chapter.
Adding Information about Your Business Page
In this section, you provide the information about your company that you want to share publicly. Navigate to your business page. Your Admin panel may or may not be visible above your cover photo. If it isn’t, click the Show button in the top-right corner of your business page to reveal it. See Figure 2-1 for an example of an Admin panel.
Near the top of the page, click Edit Page to reveal a drop-down list and then select Update Page Info. The material you share on the Page Info page appears publicly on your business page. The options you see depend on the category you chose when you created your page.
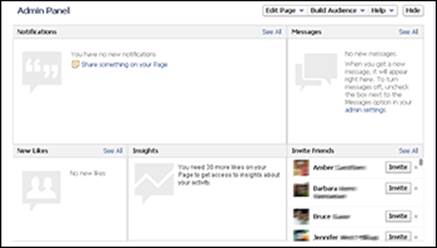
Figure 2-1: A business page Admin panel.
We don't have room to explain every option (given that there are six main page categories and approximately 30 subcategories for each category), but the following list does describe the most common and important options:
· Category: Use the two drop-down lists here to change your business page’s subcategory and group, respectively. Choosing the correct subcategory and group will help people find your business page.
· Page Address: When you’ve accrued 25 followers, you can change your Facebook page URL from a long, hard-to-remember address to a shorter, easier-to-remember address. We discuss usernames (also called vanity URLs) in the next section. We want to point out that you don’t always need 25 followers before you can claim your username. Sometimes you can claim it immediately after you’ve created your page; other times you need 25 followers. We wish we had a better answer for you about why that is, but sometimes Facebook doesn’t lend itself to easy answers.
· Short Description: The information you provide here appears on your business page’s About Page (you find the link just above your timeline updates). The About box is a good place to share your website address or a link to your Twitter handle (provide the URL to your Twitter page — http://twitter.com/username — so your followers can click and connect rather than trying to find you themselves).
 Any time you add a web address, be sure to include www. so that the link is clickable. For example, type www.postplanner.com instead of postplanner.com.
· Company Overview: Write a paragraph about your company. You could include how you started or your business philosophy. Alternatively, you could include your contact information (e-mail, phone number, Twitter handle, or website address). It’s up to you what you include here.
· Long Description: Include more information about your company, products, or niche. The description doesn’t need to be as long as your company overview. In fact, you may not need both a long description and a company overview.
· Products: List your products or services in this text box.
Your business page and its contents are searchable outside Facebook. We suggest using keywords associated with your company, product, or niche as appropriate in the About, Description, Company Overview, and Products sections. Stuffing (overusing certain keywords or including irrelevant keywords) your descriptions with keywords is considered bad form. Instead, see how you can use keywords seamlessly with your existing marketing content.
· Address, City/Town, Postal Code: If you have a bricks-and-mortar location that customers and followers can physically visit, type the necessary information. Doing so allows your customers to check into your venue and find you quickly on a map.
· E-mail: Type your e-mail address here. Be aware that this information will be publicly available when followers click the About link. Instead of sharing your personal e-mail address, it’s a good idea to create a general e-mail address (info@yourcompany.com orfacebook@yourcompany.com).
· Website: Type the URL of your website in this text box. Remember to type the entire address, including http://
.
 The information you share on the Page Info link appears on the About Page for your business page. This information is publicly available — both inside and outside Facebook.
Customizing Your Business Page Settings
As you market your business through your Facebook business page, you’ll discover that there is more to setting up your page than simply creating it and filling out the basic information. Every marketer should be aware of a few elements in the business page makeup. Knowing the flexibility of pages and how you can manipulate each aspect can open up ways to get better marketing traction out of your page.
In this section, you determine the settings you want for your business page. From the top of your Admin panel, click Edit Page⇒Edit Settings. The Settings page shown in Figure 2-2 appears.
You use the many entries on the Settings page to determine the way your business page functions for you as the admin and for those visiting your page. This section describes them all.
To review any of these settings, either click the setting name (for example, Messages) or click the setting's Edit link, which appears on the far right.
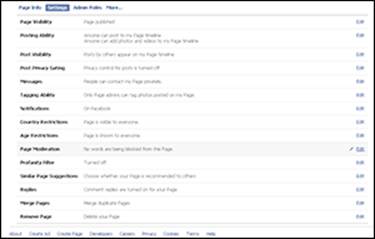
Figure 2-2: Customize the settings for your business page.
Page Visibility option
Click the first option on the Settings page, Page Visibility (or click its Edit link on the far right). If your page isn’t ready for public consumption, select the Unpublish Page (Only Admins Can See This Page) check box. Now your page is private and visible only to admins. When you’re ready to interact with followers and expand your community, deselect the check box and your page will be published publicly.
The default for new business pages is to publish automatically, so if you want to keep your page under wraps until you have it just right, be sure to visit this option first.
Posting Ability option
For the Posting Ability option, we suggest allowing everyone to post to your page and to add photos and videos to your page. You may have to remove some comments occasionally, but you’ll be building community.
People love to see themselves in print and have your attention directed to them. They want to interact with you. Make it easy for them to do so. If you find that you’re dealing with too much spam, you can change these settings for a while and explain your actions to your followers. They’ll appreciate that you’re keeping the space professional.
Post Visibility option
If you've allowed others to post to your page, the Post Visibility option enables you to decide whether you want other people to see those posts. You can allow the posts or hide them from your page.
In addition, you can choose to highlight recent posts by others in a box at the top of the page. We recommend this feature because it’s a great way for others to see what people are saying about your business. But make sure you monitor this section in case someone is overposting or posting spam.
Post Targeting and Privacy option
The Post Targeting and Privacy setting allows you to choose who sees posts on your page. If you leave the box deselected, whenever you post as your page, everyone who has Liked it or Followed it will see your posts. If you select the box, you can choose a target audience for each post. You’ll be able to target by location and by language.
Messages option
To make customer service even easier for brands and Facebook users, Facebook allows people (both followers and nonfollowers) to send a private message to a business page. Select the Messages option to turn on the feature; deselect it to turn off the feature. When the feature is on, the Message button appears below your cover photo.
When you receive a message, you see a notice in the Messages section of your Admin panel above your cover photo. (For more on the Admin panel, see Chapter 3 of this minibook.) When you click the new message, you can type a reply. Remember that your reply will always appear from your business page, not your personal timeline, regardless of how you set your posting preferences (discussed earlier in this chapter).
Tagging Ability option
Select the Tagging Ability option to allow people to tag themselves in photos you share. We like to allow our followers full access to our pages, including the capability to tag themselves. In that way, we make it easy for those followers to interact with us.
If you meet some of your followers, take pictures with them and share those photos on your page.
Notifications option
You use the Notifications option to choose how you get notifications when people post, comment, or send a message to your page. You can receive notifications on Facebook, by e-mail, or by both methods. We recommend getting notified on Facebook because it is easier to know when your page has new activity.
If you use the e-mail option and have an active page, you will quickly become overrun with e-mail messages. Scott has set up a folder in Gmail that handles only Facebook e-mails.
Country Restrictions option
If you want to restrict which countries can see and interact on your page, click the Country Restrictions option and then type the name of the country in the text box provided.
Next, choose whether you want to hide your content from users in these countries or exclude all countries but that one. For instance, if you want to show your business page to users only in the United States, type United States in the text box, and select the Only Show This Page to Viewers in These Countries option. If you want your page to be visible to all countries except the United States, type United States in the text box, and select the Hide This Page from Viewers in These Countries option. Note that users must be logged in to Facebook to see your page.
Age Restrictions option
If your products and content are not appropriate for underage users, select the Age Restrictions option and use the drop-down list to choose the age restrictions for your page. If you choose Anyone 13+, you’re publishing your business page to everyone using Facebook (except those you may have restricted based on country). If you choose to restrict your page to users who are 17+, 18+, 19+, or 21+, you're publishing your page to Facebook members who are that age or older. If you're creating an alcohol-related business page, you must choose the Alcohol-Related option from the drop-down list. Facebook notes that the Alcohol-Related option sets the restriction for your business page based on the user’s location. For instance, in the United States, your page would be restricted to users 21 and over; in Canada, your page would be restricted to users 19 and over. Note that users must be logged in to Facebook to see your page.
Page Moderation option
If you don’t want specific words appearing on your business page, select the Page Moderation option. Type those words in the Moderation Blocklist text box that appears. Use a comma to separate words and phrases. Be aware that any comment or post that uses the words listed here will be automatically marked as spam and removed from your timeline.
Profanity Filter option
Select the Profanity Filter option and then use the drop-down list to select Off (no filters; it’s possible you or your audience will use or see profanity), Medium (mild profanity is not filtered), or Strong (almost no profanity allowed).
Similar Page Suggestions option
Select the Similar Page Suggestions option if you want your page to be suggested to people when they Like a page that is similar to yours. In addition, when someone Likes your page, he or she may see a unit on your page suggesting similar pages.
Replies option
The Replies option, which is selected by default, enables people to reply to new comments on your page in threaded comments. With threaded comments, someone can reply directly to a comment, which makes it easier to figure out what people are replying to in an active thread. This feature is not supported on mobile devices.
Merge Pages option
You see the Merge Pages option if you have two pages with similar names. this option enables you to merge pages you manage if they have similar names and represent the same thing. The Likes and check-ins from these pages will be combined.
Remove Page option
Use the Remove Page option to delete your page. If your page is new and has no Likes, it will be deleted immediately. Otherwise, you’ll have 14 days to restore it in case you change your mind. After that, you’ll be asked to confirm whether to delete the page permanently. You could simply choose to unpublish the page instead; in that case, only admins will see the page.
Creating Admin Roles
As the admin of your business page, you have the capability to add others to your admin list as well as delete them. We strongly suggest adding at least one other admin to your business page as a security measure. That way, if you're locked out, you have someone you trust who can reinstate you as an admin.
To add people as admins for your business page, you either need to be friends with them or know their e-mail address in their Facebook profile. Then, from the top of your Admin panel, click Edit Page⇒Edit Settings⇒Admin Roles. The screen shown in Figure 2-3 appears.
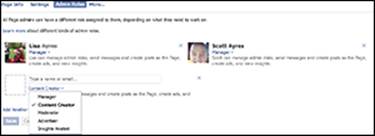
Figure 2-3: The Admin Roles page.
Start typing the person's name in the provided text box. A list of your friends appears, and you can either finish typing or select a name from the list. If you aren’t friends with the person, simply enter the person's e-mail address. Click Save. When requested, enter your password to confirm the changes, and then click Confirm. Facebook sends the person an e-mail and a notification on Facebook.
To remove an admin, simply click the Remove link next to the name of that person. When you click Save Changes, you’ll be asked to enter your password. After you enter your password and click Confirm, that person will no longer have administrative privileges for your business page.
If you click the Remove link accidentally, click Cancel. A dialog box appears, asking if you want to leave this page with unsaved changes. Click Leave This Page. You'll end up on your business page timeline, instead of on your Admin panel.
Five levels of admins are available, making it easier to assign tasks. Only managers can change a person's admin type. By default, all admins are content creators. For a breakdown of admin roles and duties, see Figure 2-4.
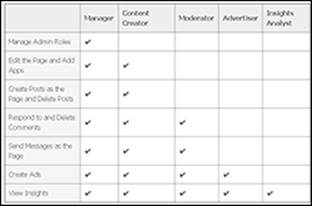
Figure 2-4: Facebook page admin roles.
All about Apps
Facebook apps provide additional functionality for a page. The Apps tab lists all the applications (or apps) you have installed on your Facebook business page. At the top of your Admin panel, click Edit Page⇒Edit Settings⇒Apps. The screen shown in Figure 2-5 appears.
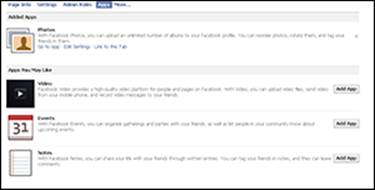
Figure 2-5: The Apps tab lists all installed apps.
By default, all business pages have the following apps installed and ready to use:
· Photos: Upload and share images with your friends and followers. Book II, Chapter 3 provides instructions on how to share and hide photos, as well as sort them into albums.
· Events: Create a special page to promote an event you’re hosting. Book II, Chapter 7 explains how to find and create events; it also explains the etiquette behind event invitations.
· Notes: Write longer posts for your audience. Notes allow limited formatting, and you can include photos.
· Videos: Create video messages from your business page and keep them stored on your Videos tab. Find out more about using video with Facebook in Book II, Chapter 4.
Under each app listed on the Apps tab, you see links. Depending on the app, you may see a link for the following options:
· Go to App: Click this link to go directly to a page that allows you to choose the settings for your app. These settings vary greatly, depending on the app.
· Edit Settings: This sparse tab usually has just one or two options and tells you if the app is added as a tab on your business page or not. If you want to remove an app from your page, click the Remove link, and that tab is removed from your main business page navigation but remains in your list of apps on the Admin panel. You aren’t deleting the app from your business page, so you can reinstate it later if you want.
To delete an app from your business page, click the X to the far right of the app. A dialog box appears, asking if you’re sure you want to remove this application. Click Remove. When you remove an app in this manner, it is no longer associated with your business page and it no longer appears in your business page navigation nor in your list of apps. If you want to use it again, you need to reinstall it. (See Book VI, Chapter 3 for instructions on how to install an application on your business page.)
If the app is not currently active, the Edit Settings window displays Available (Add). Click the Add link to include the app in your business page navigation and make the app live.
Some apps may have another tab besides the Add/Remove option labeled Additional Permission. Click this tab to set any additional permissions for this app. These permissions generally include what the app has permission to access.
· Link to This Tab: Every app you install becomes a tab on your business page below your cover photo. Each tab has its own URL or permalink. This feature is handy, for instance, if you want to link directly to a note you shared or want to remind followers about a promotion you’re running on your business page and provide a link to the entry form. You can write a status update directing your followers to the link for that tab instead of sending them to your general timeline with the hope that they'll find the link. When you click the Link to This Tab link, a dialog box appears with the permalink for that tab.
Don’t worry if you don’t see a Link to This Tab link under an app. You can still find its permalink. Navigate back to your business page, look at the App thumbnails below your cover photo, and click the app to which you want to link. When the new page appears, copy the URL and paste it wherever you need to place your link (in a status update, an e-newsletter, your blog, and so on).
Apps for a business page
The capability to install applications is one of our favorite things about Facebook business pages. Here are two of our favorite general applications for new Facebook business pages:
· A contact form: Although Facebook offers your audience the option to send you a message directly, you may want to design your own contact form that collects specific information (for example, e-mail address, name, or whether the person is a returning customer). You can create a contact form via ShortStack, TabSite, or Heyo.
· E-mail newsletter sign-up form: If you're trying every which way to increase your e-list, here's one more way. If people are visiting your business page, they might also sign up for your newsletter. Or, because every tab has its own permalink, you can link directly to your newsletter sign-up with a strong call to action in your status update. People hate to leave Facebook, so link to a sign-up housed on your business page. If you’re using MailChimp (http://mailchimp.com) or Constant Contact (www.constantcontact.com), you can use their apps. If you use a different service, contact the help desk and ask if the service has a Facebook application you can install.
Each application tab link has its own URL. That’s a great feature because you can write a status update with a call to action and provide a link to complete the action. For example, if you want to remind followers to sign up for your e-newsletter, you can share a status update like this:
Sign up for our monthly newsletter to receive exclusive discounts and coupons at www.facebook.com/postplanner/app_158086484245654.
Note that the preceding link takes the reader directly to the newsletter signup tab on the business page.
Suggestions from Your Followers
The audience of your page can click a link just below your About section and suggest an edit. This feature is meant to help you improve your page’s information. As the page’s admin, you can review these suggestions and accept or decline them.
Choosing Featured Business Pages
The Featured setting allows you to showcase specific business pages you have Liked as your business page. You can use the setting also to feature admins of your business page if you want. (Later in this chapter, you find out how to Like a business page as your business page — it’s not as confusing as it sounds!)
In general, you can Like as many business pages as you want, and five of those pages appear randomly on the right side of your business page, as shown in Figure 2-6. To see the Featured page, go to your Admin panel and click Edit Page⇒Edit Settings⇒More. Then select Featured from the drop-down list.
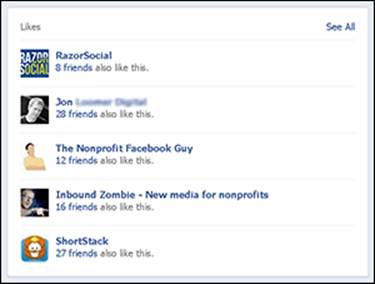
Figure 2-6: Other business pages your page Likes.
You can also showcase specific business pages instead of a random sampling of all the business pages you Like. Note: If you haven't yet Liked other pages as your page, you won't to be able to change this setting.
Then follow these steps:
1. In the Admin panel, click the Edit Featured Likes button.
If you haven’t previously selected other business pages to feature, you may see the Add Featured Likes button. Click that to get to the Edit Featured Likes button.
The Edit Featured Likes window appears with a list of all the business pages you've Liked as your business page.
2. Select the check boxes next to the five business pages you want to showcase.
3. Click Save.
The business pages you selected will appear in random order each time your business page is visited or refreshed in the visitor’s browser.
You may want to share who your admins are with your followers, especially if you’re mostly interacting as your brand (your business page) instead of as your personal timeline. By featuring your admins on your About page, any followers visiting your business page can put a personal face to status updates and comments.
When you feature an admin timeline, the admin's name is listed on the business page’s About page and linked to his or her timeline. Visitors (whether or not they are followers) can click that link to view the timeline and send a friend request to that timeline. It’s important to consider your privacy settings and how you’ll respond to friend requests. You are under no obligation to accept requests. If you’d like to keep your timeline private, you can respond by thanking the person for the request and explaining that you reserve your personal timeline for family and friends you’ve met in real life; if they’d like to connect with you, they can do so on your business page.
Sending Updates on the Go
You don’t have to have your computer handy to post updates to your business page. You can send status updates via e-mail, mobile web, your smartphone’s Facebook application, or text.
Open a browser on your smartphone and go to https://m.facebook.com to use Facebook in your mobile browser. Flip to Book II, Chapter 6 for further instructions and explanations of your mobile Facebook options.