Facebook All-in-One For Dummies, 2nd Edition (2014)
Book IV. Building a Business Page
Chapter 3. Touring Your Business Page
In This Chapter
![]() Understanding how a business page is laid out
Understanding how a business page is laid out
![]() Familiarizing yourself with business page tools and options
Familiarizing yourself with business page tools and options
![]() Using Facebook as a personal timeline or a business page
Using Facebook as a personal timeline or a business page
After you set up your business page, one of the first things you may notice is that business pages look a lot like personal timelines. However, several features of personal timelines (list of friends, summary of personal information, and so on) have been replaced with features related to interacting with your followers, tracking your followers, and more.
This chapter explains how a business page differs from a personal timeline, what each business page feature does, and how you can manage your page presence on Facebook.
Reviewing the Overall Business Page
Your business page is laid out in sections: the blue Facebook navigation bar at the top of the page, the Admin panel, your cover photo, basic page info, apps, and your timeline, as shown in Figure 3-1. The following sections explain what is included in each area of the page and how you can use the links and information to manage your business page.
The Admin Panel
If you don’t automatically see your Admin panel, click the Show button, above your cover photo. The Admin panel includes five sections, as shown in Figure 3-2:
· Posts and Notifications: See a list of the most recent interactions and posts you made on your business page. When viewing a post, you can link directly to it to engage with your followers, as well as see its total reach and paid reach. In addition, you can run an ad specifically for the post. Click Notifications to see recent comments or replies on your posts. Click See All to see more interactions by date.
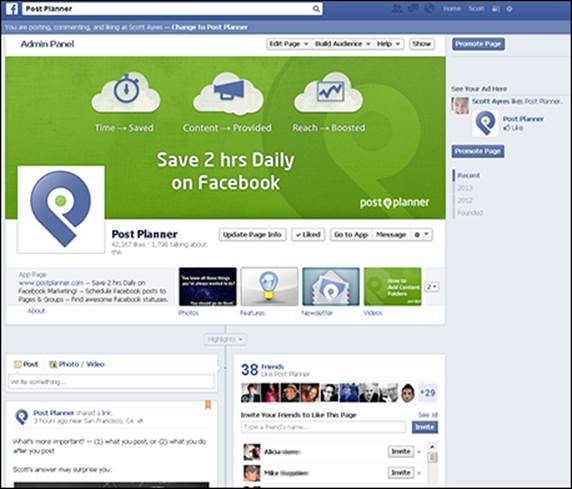
Figure 3-1: The important parts of a Facebook business page.
· Messages: See whether any followers have sent you a private message (and whether you or another admin have replied). Click See All to go to your Messages page, where you can see all the messages your business page has received.
· Get More Likes: Promote your page to others to get more Likes. For more on Facebook ads, see Book V.
· Insights: Get a glimpse of how your business page is performing. Click See All to view your complete Insights data. Some pages will have different features in this space as Facebook tests new features.
· Invite Friends: Invite your friends to Like your page. Scott recently started a local business page and invites only friends and potential customers who are local to the business. If your page is new, you may see the Create Username option here (see Book IV, Chapter 1 to find out more about usernames). Some users may also see page tips in this space.
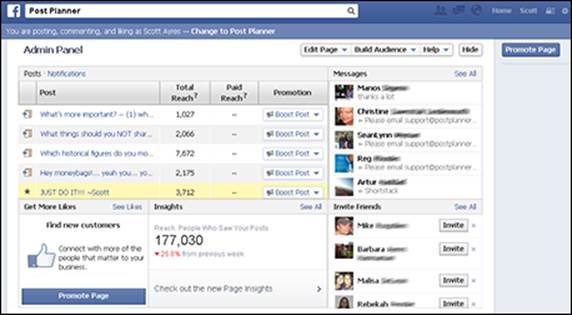
Figure 3-2: The Admin panel provides an overview of how followers are interacting with your page.
The Admin Panel Toolbar
In addition to the five sections described in the preceding section, you see a toolbar at the top of the Admin panel with five options: Edit Page, Build Audience, See Insights, Help, and Show (or Hide). Click each one to manage different aspects of your business page.
Edit Page option
When you click Edit Page, a drop-down list appears with options for the following:
· Update Page Info: Click this option to edit information about your page and business. We explain this functionality in Chapter 1 of this minibook.
· Edit Settings: Change who sees your page and who can post on it. For more on this feature, see Book IV, Chapter 2.
· Manage Admin Roles: Edit who manages your page and how.
· Use Activity Log: Click this option to go to your Activity Log page, where you can see a list of all the activity on your business page. The activity log for your business page functions similarly to the activity log for your personal timeline.
You can control how content appears on your business page by choosing to allow, highlight, hide, or delete content. You can also report or mark content as spam, and change the date of the post. To control content, click the pencil icon next the update you want to manage and make a selection from the drop-down list, as shown in Figure 3-3.
 You can manage content from the past as well. On the right side of the Activity Log page, click the year and month for which you want to see posts. You can filter your activity log also by choosing one of the options in the left sidebar, such as Photos, Videos, or Comments.
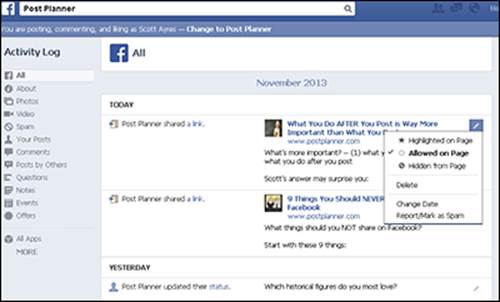
Figure 3-3: Use the activity log to manage your business page content.
· See Banned Users: Click this option to see a list of the followers you’ve banned. You can click the Unban button to reinstate a follower’s privileges. You can also click the Banned button in the top left of the dialog box to see a list of people who Like your page, other pages that have Liked your page, and subscribers and people who have administrative rights for your business page. When you’re done, click the X in the upper-right corner of the box.
· Use Facebook as [your business page name]: You can use Facebook as yourself (your personal timeline) or as your business page. We explain this feature later in the chapter in the section, “Using Facebook as Your Business Page or Personal Timeline.”
Build Audience option
When you click Build Audience on the toolbar, a drop-down list appears with the following options:
· Invite Email Contacts: You can invite contacts to your page from e-mail lists you've collected. You can upload a contact list file saved to your computer, or load an e-mail list from Constant Contact, MailChimp, and VerticalResponse. Clicking Invite Contacts for each of these will give you a list of instructions on how to import your contact list. If you choose Skype or iCloud, you’ll need to provide your user login and password. You can import contacts from Outlook by providing your e-mail address. You'll also see Email Service, where you must log in with your e-mail address and password to import and invite those contacts.
· Invite Friends: Invite specific people to Like your page. When you click Invite Friends, the Invite Your Friends to Like [your page name] dialog box appears. Use the drop-down list in the top-left corner to target people to invite. You can also type a name in the text box. Click Close when you’re done.
· Share Page: Share your business page on your personal timeline, a friend’s timeline, in a group, on another page you admin, or through a private message. Type a quick status update introducing your business page or explaining why you’re sharing the page. (A call to action, such asLike our page so you never miss another sale!, works well here.) Then click the Share Page button.
· Promote Page: Create a Facebook ad to introduce your business page to more followers. We explain how to craft a Facebook Ad in Book V, Chapter 4.
See Insights option
Clicking the See Insights option opens Facebook Insights for your page. Insights is a collection of data that shows you the performance of your page and posts on your page. You also see detailed demographics regarding those who are following your page. Anyone running a business page should become familiar with Insights. We go into more detail about Insights and its importance in Book V, Chapter 3.
Help option
When you click Help on the toolbar, a drop-down list appears with the following options:
· Visit Help Center: Go to the Facebook Help files. In Book I, Chapter 5, we explain how to use these files to find the answers you’re looking for.
· Facebook Help Community: See user-generated questions and answers on various topics. The questions and answers are from users of Facebook, so the information might not be accurate.
· Getting Started: View a page that provides details on filling out your page, building an audience, and posting engaging content. This option is a great reference when you’re just starting out.
· Send Feedback: Tell Facebook your thoughts about business pages. When you click the Send Feedback link, the Your Feedback about Pages page appears. Answer the questions and type your feedback as required. You can also attach a screenshot to further explain your feedback or issue. Click the Send button when you’re done.
Show (or Hide) option
Click the Hide button to hide your Admin panel. Your cover photo appears at the top of the page. Remember that only admins can see the Admin panel, so you don’t have to hide it unless you just like a less cluttered look.
Page Info Section
Below the cover photo, you see some basic information about your page, as shown in Figure 3-4. This information serves as an overview of your business page, as well as provides basic navigation.
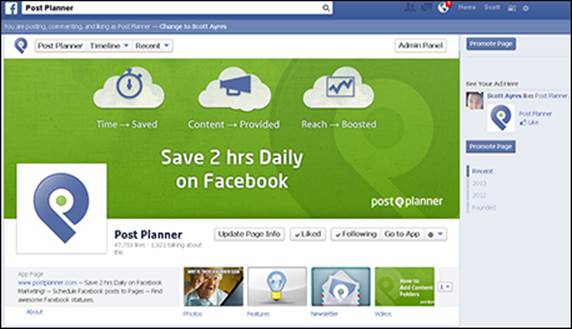
Figure 3-4: Basic info on your page.
The basic page information has the following:
· The title of your business page was determined by you when you created your page.
· Your Number of Likes is a public display of how many followers, or Likes, your page has. This number counts individuals (that is, personal timelines) that have Liked your page. If another page Likes yours, that Like doesn’t count toward your total number of Likes. We explain how to create community and increase the number of followers throughout Book IV, but particularly in Chapter 4.
· The Number of People Talking about This is the number of interactions your business page content has had in the last seven days. These interactions include Likes, comments, shares, answers to polls or questions, mentions in other status updates, tags, venue check-ins, and so on. You won’t see a Talking about This number if you haven’t had any interactions on your business page in the last week.
· The Like button allows you to become a follower of a page. You see the Like button only if you aren’t currently a follower of the page you’re viewing. (If you are a follower, the button says Liked.) If you want to see the business page’s updates in your news feed and support the brand, click the Like button and become a follower of the page.
· The Message button allows followers and nonfollowers to send the admins of a business page a private message. If you turned off this option in your Settings, you (and your followers) won’t see this button.
See Chapter 1 of this minibook for instructions on how to implement the Message button. We encourage you to keep this feature turned on because it allows customers to contact you directly if they have an issue rather than sharing their comments publicly on the timeline.
· The gear icon provides a drop-down list. The items you see depend on your relationship to the page. For instance, if you’re an admin for the page, you see options that followers and nonfollowers won’t. You’ll also see different options based on your admin level, as discussed in Chapter 2 of this minibook. When you visit someone else’s business page, whether as a follower or not, you see a different set of options. The options include quick access to the following:
· Create an Ad: Only admins can see this option. Click this option to set a Facebook ad. We explain the process of creating ads in Book V, Chapter 4.
· Send Feedback: Everyone can see this option. You can contact Facebook about an issue you’re having or suggestions you have.
· Visit Help Center: Only admins can see this option. If you have a question about how to use Facebook (either for your personal timeline or your business page), the Help Center is the place to start. You can find more information about the Help Center in Book I, Chapter 5.
· Share: Both followers and admins see this option. Any time you come across a page that shares interesting content, it’s easy to let your friends know about it. Click Share to post an update on your personal timeline, on a friend’s timeline, to a group, or directly to your business page, depending on which audience you want to share with. You can also share the link via private message.
· Unlike: You see this option if you already Like a page. Sometimes you think a page will be a fit but it isn’t. No problem. You can click Unlike, and you’ll stop receiving updates from the business page. The page admin can’t tell who Unliked the page.
· View Insights: Only admins see this option. Insights is Facebook’s analytics program. A quick glance at your Insights page shows you how many active users you have and whether your interactions are up, down, or holding steady. Flip to Book V, Chapter 3 for information about how to use Insights and interpret your Facebook analytics.
· Add to My Page’s Favorites: Everyone sees this option and it does just what it says it will. When you click this link, you can add the current page to your own page’s favorites, and it will appear under Likes on the right side of your timeline. This may be a Facebook glitch, but you can add a page to your favorites without Liking the page. If this link doesn’t show up for you, you’ve probably already added the page as a favorite. See Chapter 2 of this minibook for instructions on how to feature specific business pages in your Like section.
· Remove from My Page’s Favorites: Everyone can see this option. Not feeling the love anymore? No problem. Go to the business page you want to remove from your favorites and click this link. The page no longer appears in your list of Likes in your timeline.
· Report Page: This link is visible only if you are not the admin of a page (because you wouldn’t report your own page, would you?). If you aren’t the admin of the page, you can see this link whether you Like the page or not. Click this link if you want to report a page as sharing inappropriate content. When you click the link, a dialog box appears with a list of violations. Select the page’s infraction. You can choose from Spam or Scam, Hate Speech or Personal Attack, Violence or Harmful Behavior, Sexually Explicit Content, or Duplicate or Miscategorized Page.
· Add to Interest Lists: Select this option and then, in the drop-down list that appears, make your selection.
· Like as Your Page: You can Like another business page as your business page. When you select this link, a drop-down list appears so you can select the page.
· Create a Page: This link provides a shortcut to starting a business page. Click here and go directly to the section to start your page. See Chapter 2 of this minibook for more information on creating a business page.
· Privacy: Click here to find out more about Facebook’s privacy policies.
· Terms: Click this link to go to the legal terms all users must follow when creating a Facebook account.
The options for reporting a page change, depending on the type of page.
You also have the option of reporting theft of your intellectual property. To do that, click the Is This Your Intellectual Property? link in the bottom-left corner of the dialog box. The Facebook instructions for reporting infringement claims appear.
· An information box pulls relevant information from the Page Info section when you go to Edit Settings in the Admin panel. (The information here depends on the categories you chose when you set up your business page.) We suggest providing a link to your website and your Twitter page if you have one. Doing so allows your followers to quickly see where else they can connect with you.
To create a usable link, be sure to include www. with any URLs you share in this box. For example, if you type Shop our online store at postplanner.com, that link won’t be clickable. You can fix that by typing Shop our online store at www.postplanner.com.
· The About link takes you to the About page, which displays the information you shared in the Page Info section when you go to Edit Settings in the Admin Panel. (See Book IV, Chapter 1 for more information.) Your followers will generally click this link if they're looking for store hours, directions, or more information about your company. Be sure you’ve provided the information your followers want.
In Chapter 2 of this minibook, we explain each link on your business page Admin panel. One of those links is the Featured setting. From there you can choose to feature the admins of your page. If you do so, the featured admins appear on the About page for your business page.
 When you feature admins, their personal timelines are listed as links on your business page’s About page. In addition, the business page that lists the featured admins also appears on that person’s personal timeline in the About section.
· A list of apps installed on your business page (we discuss apps more thoroughly in the next section).
Apps Navigation
If you refer to Figure 3-1, you see four pictures under the cover photo. These pictures depict apps installed on the page to enhance its functionality.
You can have many apps installed on your business page: a newsletter sign-up, a contact form, links to downloadable content, custom applications … the options are endless. Facebook displays apps in rows of four, and by default only the first row is displayed. Users can click the small number at the end of the row (the number at the end of the row indicates how many more apps are hidden) to expand the apps box to show more rows of apps (up to 12), as shown in Figure 3-5.
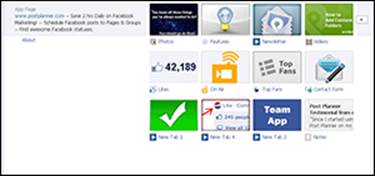
Figure 3-5: You can showcase up to 12 apps on your business page.
As the admin of a business page, you can see all your apps when you expand the apps box — you aren’t limited to seeing the top 12.
You can choose the order in which your apps are displayed. The only exception is that the Photos app must always appear first.
The Photos app is populated by the images you upload to your business page and photo albums. For more information on how to add and delete photos to your timeline, flip to Book II, Chapter 3.
You can also create and display your own images for each app, as described later in this chapter.
When you click an app, you go to a new page with that app’s functionality. For example, if you click a newsletter sign-up app, you leave the business page and end up on a page with the newsletter sign-up form. As you design your application landing page, it’s helpful to know that the page is 810 pixels wide. That’s a lot of screen real estate, and you can create some snazzy stuff with third-party application builders such as ShortStack, North Social, and Tabsite.
Changing the order of displayed apps
You can change the order in which your apps are displayed. The only exception is that the Photos app must always appear first; you can’t move it. That means you really have space to showcase only three apps on the first row of apps under your cover photo. We suggest showcasing your most important apps (such as a newsletter sign-up) in the first row of displayed apps so they aren’t overlooked.
To change the order of your displayed apps, follow these instructions:
1. Navigate to your business page and click the arrow to see the full list of apps.
2. Move your cursor over the app you want to change and click the pencil icon that appears.
3. Choose Swap Position With, and then select the app with which you want to swap positions.
The apps swap positions. You can continue to tweak the order of your apps until you’re satisfied.
Using your own images for displayed apps
You can also create and display your own images for each app. To do that, you need to create an image that is 111 pixels wide by 74 pixels tall. These images need to catch people’s attention and have a clear call to action. For example, if you want people to sign up for your newsletter, create an image that reads Join Our Newsletter! We’re sure you can come up with many creative ideas for customized application images.
When you have your image ready to install, follow these steps:
1. Navigate to your business page and click the arrow to expose a full list of your apps.
2. Move your cursor over the app you want to edit and click the pencil icon that appears.
3. Choose Edit Settings from the list.
A dialog box appears with several options.
4. Click the Change link next to Custom Tab Image.
The Upload a Custom Image page appears.
5. Hover your cursor over the existing image, and click the Edit link that appears.
6. Click Choose File and select an image from your computer.
The image must be 111 x 74 pixels and will become the thumbnail for your custom page app. After you choose the image, it is uploaded and the screen updates.
7. Close the browser window.
Your page opens in another window.
Choosing highlighted apps
Highlighted apps are the top four page tabs that appear below the cover photo on the right side. These apps are built in to all pages by Facebook, such as a map to your location or the number of Likes your page has.
You can also put up to three custom page tabs in this area. To do so, click the down arrow to the right of the Highlighted Apps area (the row containing Photos, Likes, Map, and so on) to reveal other applications or available spaces, as shown in Figure 3-6. Click the plus sign at the top-right corner of any blank area to add an application to your list. Only the top three appear at first glance on your business page. Users have to click the down arrow to reveal all the other applications you've installed on your business page.
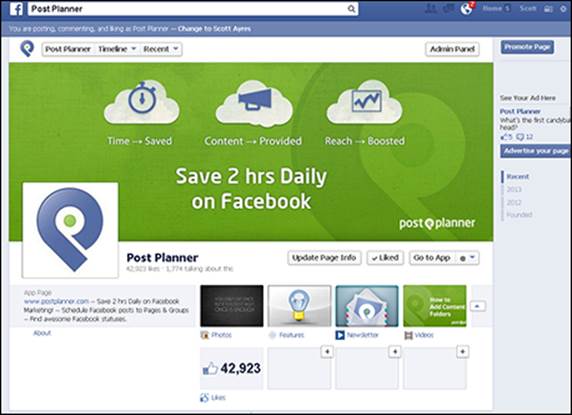
Figure 3-6: Applications installed on your page.
Photos is always the first app on your Highlighted Apps. You can’t move this one. All your latest photo uploads are here, with the most recent one displayed in the box. Upload great photos that people will want to click!
When you can see all the applications on your business page, hover your mouse cursor over the top right, and you see a pencil icon, indicating that you can edit the application. Click the pencil icon to edit the settings as follows:
· Remove the app from your favorites.
· Swap its position with another application (the top three are visible on landing on your business page).
· Link to This Tab links the tab to the page tab.
· Uninstall the application.
· Edit the application’s settings.
Editing the settings allows you to change the name of the application, as well as change the image that appears on your business page. The image acts like a button that leads to the page tab from your business page.
Your Timeline
The timeline portion of your page houses status updates and community interaction. The timeline is where you interact with your followers and where they interact with you.
Just like on your personal timeline, your business page has a line down the middle and information on the right and left sides. On your business page, though, the top-right side displays what other people are saying about your business page, friend activity, and Likes (the other pages you’ve Liked as your business page).
The timeline provides you with an opportunity to tell the story behind your business. Because you can add updates and assign them to a specific year, you’re able to start with your first product sold and mark each milestone throughout your business history. Two companies that do a good job taking advantage of this feature are Red Bull (www.facebook.com/redbull) and Fanta (www.facebook.com/fanta). Each gives a complete history of their growth with fun pictures and interesting facts.
You (and your followers) can filter the content on the timeline by clicking the drop-down list under Basic Page info, as shown in Figure 3-7.
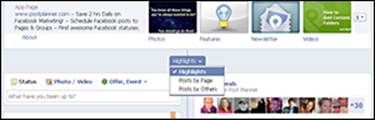
Figure 3-7: Filter the content on any business page by using the Filter list.
The list choices are self-explanatory. When you click a choice, the timeline shows only posts highlighted by the business page owners (usually milestones, but can be any highlighted content), posts by the business page (usually general status updates), or posts by others (anyone who has interacted with the business page — whether as a follower or not).
The following sections explain each timeline component.
Status update box
At the top left of your timeline, you see the status update box. Just like with your personal timeline, the status update box is where you type and share your status updates for your business page. Your business page status update options are
· Post: Type a status update.
· Photo/Video: Upload a photo or video from your computer, take a photo with your webcam, or create an album. See Book II, Chapter 3 for instructions and advice about using photos on Facebook. You can also use this option to upload or take video. See Book II, Chapter 4 for instructions and advice about using video with Facebook.
· Offer, Event +: Post an offer, an event, or a milestone to your page. (We discuss offers in Book V, Chapter 4.) Events are, well, events that pages can schedule and encourage others to attend. The milestone option allows you to create date-specific updates relating to major milestones for your business.
When you click Milestone the first time, you'll see an Invalid Date error, as shown in Figure 3-8. Go to your Admin panel, select Page Info, and add the date when the page Joined Facebook or the company started.
You can’t create a milestone if you’re trying to post to your business page as your personal timeline. Below the search box on your page, you can change between posting, commenting, and Liking as your page or as yourself.
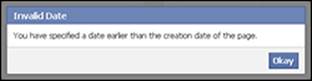
Figure 3-8: Create a milestone for when your business, product, or service began.
For information on targeting your status updates, see Chapter 5 of this minibook.
Creating a milestone update
If you’d like to add a milestone (either now or later), click the Offers, Events+ option and then choose Milestone in the status update box. The Milestone dialog box appears, as shown in Figure 3-9.
With the Milestone dialog box open, follow these steps to create a new milestone:
1. In the Event text box, type the name of the milestone.
2. (Optional) In the Location text box, type the location of the event.
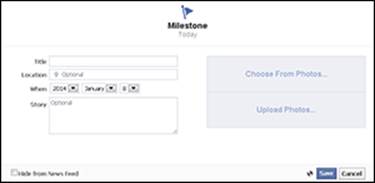
Figure 3-9: Use the Milestone box to create and highlight important updates to your business page.
3. Use the When drop-down list to choose a year for your milestone.
4. (Optional) If you want to include the month:
1. Click the +Add month link. If you choose to add a month, Facebook then gives you the option to add a specific date to your milestone.
2. If you want to include a specific date for your milestone, click the +Add Day link.
5. (Optional) If you don’t want this milestone to appear on the news feed of your followers, select the Hide from News Feed check box.
6. (Optional) To add a photo to your milestone, click Upload Photo and select a photo.
7. Click Save to complete your milestone.
When you create a milestone, it spans both the left and right columns of the timeline, as shown in Figure 3-10.
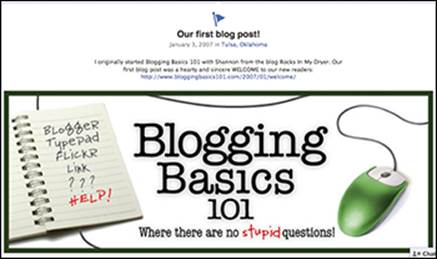
Figure 3-10: A milestone is larger than a regular update.
Milestones take up more screen real estate, so it's easy for your audience to notice them. Make your milestones pop by including relevant and interesting images.
Editing updates and milestones
You can edit a milestone or status update by clicking the drop-down arrow in the upper-right corner of the update. From here you can choose from the following:
· Pin to Top: Pin a story to the top of your timeline for seven days. Facebook limits the time to seven days to encourage business pages to create new content at least each week. After seven days, the story returns to its dated place on the timeline. Pinning a story to the top of your timeline helps draw attention to it and ensures that it’s not buried as you create new updates throughout the week. For example, if you’re hosting a giveaway on Facebook or offering a special discount to new followers, you may want to pin the post with that special information to the top of your timeline so it’s easily viewed by everyone who visits. If you don’t pin the story to the top of your timeline, it will move down the timeline each time you post a new story.
One of the best ways to get the most out of a pinned post is to use a strong call to action in your update, and then provide the means to complete that action (such as including the link to a specific page).
· Change Date: When you click this option, the Change Date dialog box appears, and you can change the year, month, and day of the story. This option appears only for regular status updates, not milestones.
· Highlight: The update will take up the full width of your timeline. It’s a great way to make a video or an important update stand out. Some page owners don’t like the left and right, back and forth setup of the timeline and have chosen to highlight every post so that things are easier to read.
· Edit: This option appears if you’re editing a milestone. When you choose this option, you can change the milestone’s event title, location, date, or story text. You can also add or delete an image.
· Hide from Page: Hide your story or milestone from the timeline.
· Boost Post: Run an ad using this post. For more about running ads, see Chapter 4 in Book V.
· Delete: Delete your story or milestone from the timeline.
· Report Story/Mark as Spam: The title of this option depends on whether you’re editing a regular story or a milestone. Use this option to tell Facebook if a story is violating the Facebook Terms of Service (TOS) or if your intellectual property is being used by someone else. We think it’s odd that this would be an option for your own stories, because you’re unlikely to report your own milestone for a TOS infringement. It’s possible that by the time you see this book, this option will have disappeared.
· Embed Post: Embed any post into a website or blog post. When you select this option, a box appears with embed code. Copy and paste that code into your blog post or your website.
Finding friends who Like this page
When you visit a business page, at the top right of the timeline is a list of your friends who also Like that business page. The purpose of this is to provide social proof. In other words, the hope is that if you see that your friends Like a brand, you’ll take that as an endorsement and also Like the brand. We discuss the idea of social proof and how it works with Facebook throughout this book. Facebook and businesses both realize the power of word-of-mouth, and they take full advantage of it by reminding you that your friends are on board — and encourage you to come on board too.
Finding recent posts by others
When a follower or nonfollower posts on a business page, those posts appear in the Recent Posts by Others box. Because these comments don’t show up in the main timeline as individual updates, it can be difficult for page admins to see at a glance who has posted a question or comment directly to the timeline. We suggest using your Admin panel to see new interactions. Click the action and you go directly to the update so you can respond.
Use your business page Admin panel to control whether the Recent Post by Others box appears on your business page.
Reviewing liked pages
Just as you can Like a page as yourself (your personal timeline), you can also like other business pages as your business page. Any pages you Like when you’re using Facebook as your business page will show up in the Likes area. If you Like more than five business pages, the displayed pages will rotate each time the page is refreshed.
You can control which pages are displayed by going to your Admin panel and clicking Edit Page⇒Edit Settings⇒More and choosing Featured in the drop-down list. Then click the Edit Featured Likes button. Use the list to choose the five pages you want to feature. When you assign featured pages, those five pages are displayed randomly each time the page is refreshed. Other pages you’ve Liked will not appear.
Managing third-party posts
Most business pages allow their followers and other pages to share information on the timeline. The idea is that an open community is an inviting community. Usually people are respectful and are truly interested in engaging with your brand.
Sometimes, though, you’ll find a spammy or otherwise inappropriate post on your business page. You can manage posts by others by moving your cursor over the post you want to address and clicking the X to the right of it.
When you click the X on someone's post, it becomes hidden and you see the following options:
· Default (Allowed): This option is available for posts. Facebook allows anyone followers and nonfollowers, to write on your timeline. The default for these posts is Allowed.
· Highlighted on Page: This option is available for posts. If you want to highlight a post by a follower or nonfollower, choose this option. The post will appear as a milestone (spanning both the right and left columns of your timeline). You may want to highlight a post if it’s a particularly glowing accolade of your business, product, or service.
· Allowed on Page: This option is for timeline posts by a follower or nonfollower.
· Delete Post: This option is for timeline posts by a follower or nonfollower. You can remove the post from your timeline. The post cannot be reinstated.
· Report/Mark as Spam: This option is for timeline posts by a follower or nonfollower. When you mark a post as spam, you remove it from your timeline. To reinstate a post (unmark it as spam), click Undo or visit your activity log and use the filter in the top-right corner to display your spam. Click the icon to the far right of the post and choose either Delete Post or Unmark as Spam from the list. If you click Report/Mark as Spam, you can ban that user from your page.
If you want to delete the post, click the icon and choose Delete Post. The Delete Post dialog box appears and you have three choices: Delete, Delete and Ban User, and Cancel. If you choose Delete and Ban User, the person who posted can’t interact with your business page again. A warning appears, asking if you’re sure you want to delete the post and permanently block the person or business page from posting to your timeline. If you’re sure, click Remove Post and Ban Page (User).
When you click X on someone's comment, it becomes hidden to everyone but that person and their friends and the following options appear:
· Unhide: If you change your mind and want to display the comment, just click Unhide and the comment is live on the page again.
· Delete: You can delete the comment so that no one, not even the person who left the comment, can see it. Should you change your mind, you can choose Undo to restore the comment. If you click Undo after clicking Delete, the comment remains hidden from everyone but the person and his or her friends.
· Report: When you report a comment, a dialog box appears that enables you to choose whether the comment is harassing, spam, hate speech, sexually explicit, or violent.
· Ban: Ban a person from commenting or posting on your page again. The person will still be able to see your page and updates but can’t comment on them.
To make it easier on you and your followers, create a set of posting guidelines for your page. Explain exactly what is and isn’t appropriate for others to post to your timeline and what the consequence will be if the guidelines are ignored. Remember, you want to build community and encourage others to share and discuss, but this is still your page and you can set your expectations. If you have clear guidelines available and occasionally remind your followers where to find them, you may be able to stem some uncomfortable situations. For example, PETCO shares rules on their Info tab about what is and isn’t appropriate to post. You can see it in action at www.facebook.com/PETCO?sk=info.
Reviewing the Right Sidebar
The right side of your business page has two items: a navigation button and a clickable list of years. At the top right of any business page is a button that changes depending on whether you’re an admin or not. If you’re an admin, you see a Promote Page button, which takes you to Ads Manager, discussed more in Book V. If you’re not an admin, you see the Create a Page button, which takes you to the main page for creating your own business page.
Below the button is a list of years associated with posts from the business page. The number of years (and which years) listed depend on how the business page has updated its timeline. As we discuss earlier in this chapter, it’s possible (and encouraged) to create stories associated with years that predate Facebook. (Again, the timeline on the Fanta page at http://fb.com/Fanta was updated to reach as far back as the 1950s.)
Using Facebook as Your Business Page or Personal Timeline
People have both personal and professional relationships. Sometimes those relationships overlap; sometimes they are unrelated. The same is true on Facebook. You may choose to keep your personal timeline focused on friends, family, and a few colleagues, and use your business page to connect with other businesses and to interact with your customers.
Because your personal timeline and your business page are separate but connected, the Facebook folks thought it would be a good idea to give you the choice of how you’d like to interact on Facebook and your business page — either as yourself (your personal timeline) or as your brand (your business page). That means you have the option to post comments to other business pages either as yourself or as your business page!
The idea of switching back and forth between timelines may be confusing at first, but after you get the hang of it, you’ll see how useful this feature can be.
Your personal and business pages are connected to you. When you use Facebook as your personal timeline, the people and pages you interact with see the image and name associated with your personal timeline (such as Scott Ayres). When you use Facebook as your business page, the people and pages you interact with see the image and name associated with your business page (such as Post Planner).
Table 3-1 shows how your personal and business pages differ.
Table 3-1 Personal Timeline versus Business Page
|
As a Personal Timeline |
As a Page |
|
You can interact with friends on your timeline, in groups, in chat, and so on. |
You can interact with individuals in the confines of your business page. Your business page can’t post to an individual’s personal timeline. |
|
You can make new friend requests. |
You cannot make friend requests. |
|
You can Like a business page. This Like counts toward the total number of Likes for a page. |
You can Like a business page. This Like does not count toward the total number of Likes for a page. |
|
You can tag individuals in status updates, photos, video, and so on. |
You cannot tag individuals in status updates, photos, video, and so on. |
You can’t post comments to someone’s personal timeline while using Facebook as your business page. Allowing businesses to post on personal timelines could get spammy quickly, as you can imagine.
Switching from one to the other
To use your Facebook account as yourself (meaning as your personal timeline), just log in to Facebook as you normally do. When you’d like to switch to your business account, click the gear icon in the top-right corner of the blue toolbar. From the menu, choose Use Facebook as [Your Page]. (The menu lists all the pages you are associated with as an admin.)
You can easily switch back to using your personal timeline by clicking the gear and choosing Switch Back to [Your Name].
Being able to switch between appearing as your brand (business page) or yourself (personal timeline) allows you to do a few things:
· You can post as yourself on your own business page. On your business page, just below the search box, is a note that reads You are posting, commenting, and liking as your page. You can change to your profile by clicking Change to your name. The wording of the note changes and Facebook lets you know you are now posting, commenting, and Liking as yourself.
· Your page can Like other pages. You have to Like a page before you can tag it in an update. When you’re using Facebook as your business page (not your personal timeline), you can go to a business page and Like it, but that action won’t clutter your personal news feed.
When you Like a page while using Facebook as your business page, that Like does not count toward that page’s overall Likes. Facebook counts only Likes received from a personal timeline. In other words, if Scott uses the Post Planner business page and Likes the business page for ShortStack, that Like is not recorded as part of the overall number of Likes for the ShortStack page. But if he switches back to using his personal timeline, and then heads over to the ShortStack business page and clicks Like, that Like is recorded in the overall number of Likes for that business page.
· You can interact with other business pages as your brand instead of as yourself. If you want to comment on another business page as your business instead of as yourself, just be sure you’re using Facebook as the timeline for your page.
The Facebook toolbar when using Facebook as your business page
When you switch to using Facebook as your business page, your Facebook experience is similar to when you’re using your personal timeline, but everything is now focused on your business page instead of your personal timeline page.
In this section, we describe how the elements on the Facebook toolbar differ, depending on whether you’re using Facebook as your personal timeline or as your business page.
Facebook link
When using Facebook as your personal timeline, the Facebook link takes you to your main news feed, where you see top stories, recent updates, updates from your Facebook friends, pages you’ve Liked, and groups to which you belong.
When using Facebook as your business page, the Facebook link takes you to a news feed for your business page. Because a business page can’t connect with individuals and is restricted to Liking other pages, this news feed displays only updates from the pages you have Liked while using Facebook as your page.
Pages you Like with your personal timeline do not show up in this news feed unless you have also Liked the page as your business page.
Friend requests
When using Facebook as your personal timeline, the friend requests icon (silhouette) displays a list of people who have requested to become Facebook friends.
When using Facebook as your business page, this icon displays a list of Facebook users who have recently Liked your business page. You may click their names to see their personal timelines, but you may see only limited information, depending on their privacy settings.
Facebook business pages can’t be friends with individuals. If you want to friend someone, you’ll need to switch back to using Facebook as yourself and then make a friend request. We don’t suggest friending your followers unless you know them in real life. Respect that your followers have connected with you on your business page because they support your brand.
If you’d like to see a list of all your followers, click the silhouette icon, and then click See All at the bottom of the list. The People Who Like [Your Page Name] dialog box appears. Unfortunately, Facebook does not make it easy to find specific followers — you have to scroll through the list one by one.
The People Who Like [Your Page Name] dialog box also displays other business pages that have Liked your Page, who you’ve made an admin of your page, who is subscribing to your page but hasn’t Liked it, and who you’ve banned from your page. Just click the down arrow next to People in the top-left corner, as shown in Figure 3-11, and choose which list you want to see.
You can grant administrative privileges to any follower by clicking the Make Admin button next to the person's name (see Chapter 2 of this minibook for instructions on how to grant admin privileges). Alternatively, you can ban a specific follower from your business page by clicking the X next to the person's name.
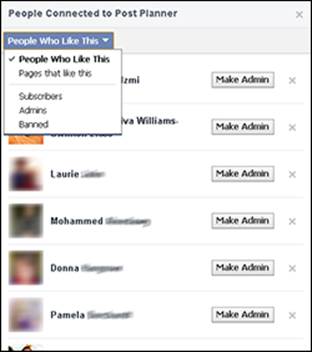
Figure 3-11: See who has Liked your page, who is an admin, and who you’ve banned.
Personal messages
When using Facebook as your personal timeline, the messages icon (two speech bubbles) displays a list of personal messages various people have sent to you. Depending on your privacy settings, you may also receive personal messages from people to whom you are not directly connected (such as friends of friends). You can read more about managing your privacy settings in Book I, Chapter 4.
When using Facebook as your business page, the messages icon displays a list of personal messages followers have sent. Facebook allows followers to send you private messages as a way to handle communication away from the public timeline. Although followers can send a private message to a page, a page cannot initiate private messages to followers.
The Message feature for pages is turned on automatically. You can turn it off by going to your Admin panel and clicking Edit Page⇒Edit Settings⇒Settings⇒click Messages. Then deselect the option that allows people to contact your page privately by showing the Message button.
Notifications
When using Facebook as your personal timeline, the notifications icon (globe) displays a running list of people who have mentioned you in status updates, posted updates related to your actions (for instance, Liking a photo you shared or commenting on a status update you already commented on), and so on.
When using Facebook as your business page, the notifications icon displays a list of your followers who have recently interacted with your page either by Liking a status update or link, tagging your business page in an update, or commenting on a status update or link.
Search text box
When using Facebook as your personal timeline, you type search terms in the Search text box to find people, pages, groups, apps, and events. You can also find basic web results, posts from friends, posts published publicly, and posts to public groups.
When using Facebook as your business page, you can still use the Search tool. However, your results are limited to people, pages, events, general web results, and posts by everyone. Because a business page can’t join a group, you don’t see results for groups.
Profile link
When using Facebook as your personal timeline, the Profile link goes to your personal timeline. When using Facebook as your business page, the Profile link goes to your business page.
Home link
When using Facebook as your personal timeline, the Home link sends you back to your main news feed.
When using Facebook as your business page, the Home link sends you back to your business page’s news feed. However, your business page news feed displays updates by other pages, not friends associated with your personal timeline.
Account menu
When using Facebook as your personal timeline, the gear icon provides the following options: Switch to Using Facebook as Your Business Pages, Create a Page, Manage Pages, Your Ads, Create Ads, Mange Ads, Create App, Manage Apps, Settings, Log Out, Help, and Report a Problem.
When using Facebook as your business page, the gear icon provides the following options: Switch to Using Facebook as Your Personal Profile, Use Facebook as Page (this could be another page for which you are the admin), Create or Manage Pages, Facebook Ads, Log Out, Help, and Report a Problem.
All materials on the site are licensed Creative Commons Attribution-Sharealike 3.0 Unported CC BY-SA 3.0 & GNU Free Documentation License (GFDL)
If you are the copyright holder of any material contained on our site and intend to remove it, please contact our site administrator for approval.
© 2016-2026 All site design rights belong to S.Y.A.