Salesforce.com For Dummies, 5th Edition (2014)
Part II. Keeping Track of Customer Relationships
Chapter 7. Managing Activities
In This Chapter
![]() Looking into Salesforce activities
Looking into Salesforce activities
![]() Making new activities
Making new activities
![]() Managing activities
Managing activities
![]() Changing activities
Changing activities
Activities in Salesforce are scheduled calendar events and tasks. In many ways, the events and tasks in Salesforce are just like the activities you use in Microsoft Outlook, Google Apps, or any other productivity application. You can schedule events on your calendar, invite people to meetings, book a conference room, and add tasks to your to-do lists so that you don’t forget to get things done.
 You can synchronize Salesforce with Outlook so that you don’t have to input activities twice. (See Chapter 3 to install and configure Salesforce for Outlook.)
However, Salesforce takes activities further: You can easily link events and tasks to other related records, such as accounts, contacts, and so on. You can view activities both in the context of a relevant item (for example, all activities that relate to an account) and as a stand-alone from your calendar and task lists in the comfort and convenience of your home page. And, if you’re a manager, Salesforce allows you to stay up to speed on your users and how they’re spending their time.
By managing activities in Salesforce, you can better coordinate with your team, quickly assess what’s going on in your accounts, and focus on the next steps to close deals or solve issues.
In this chapter, we first show you how to schedule events and create tasks. Then, we cover how to find and view activities, both from your home page and from specific record pages, such as accounts and opportunities.
Reviewing Activities
You can use activities in Salesforce to track all the significant tasks and events involved in acquiring, selling, and servicing customers. Think about all the actions that you and your teams perform to accomplish your job — meetings, calls, e-mails, even the occasional physical letter — and imagine the value of all that information in one place at your fingertips. You can have such a place in Salesforce, and you can easily link your activities together in an organized fashion.
Salesforce features several types of activities that you can access from the Open Activities and Activity History related lists displayed on many of the major records, including accounts, contacts, leads, opportunities, and cases. In this chapter, we focus on events and tasks, but in the following list, we briefly explain all the various activity records you can track in Salesforce:
· Task: Essentially a to-do. Use this activity record as your online yellow sticky note. It’s an activity that needs to be completed, but it doesn’t have a specific time or duration associated with it. For example, if you know that you’re supposed to follow up with a contact by sending a written letter, you can create a task such as Send Letter.
· Event: A calendared activity. An event has a scheduled time, date, and duration associated with it. Examples of common events are Meetings, Conference Calls, and Tradeshows.
· Log a Call: A task record of a completed call. Use Log a Call during or after a call to make sure that you capture important details. For example, use it when a contact calls you and you want to record comments or outcomes from the discussion.
· Send an Email: Logs an activity for an e-mail that you send to a contact or a lead. You can send e-mails from Salesforce or a third-party e-mail product like Microsoft Outlook or Gmail for Business, and capture that information directly inside Salesforce.
Salesforce’s online suggestion box feature, also known as Salesforce Ideas, allows you and a community of other Salesforce users to post suggestions on any topic for others to vote on and discuss. Ideas can be used just internally within your company and among your peers, or to gather requests from external constituents like your customer base. This sharing of ideas is a valuable way for your company to mine feedback that could result in product or service innovations, or process changes. Ideas are ranked based on popularity over time, and you can group Ideas into multiple subject areas. To see examples of companies getting feedback from their customers, visit My Starbucks Idea at http://mystarbucksidea.force.com, and saleforce.com’s own IdeaExchange athttps://success.salesforce.com/ideaSearch.
Creating Activities
Before you can begin managing your time or activities in Salesforce, you need to know the easiest and most reliable way to add events and tasks.
Creating an event
When you want to schedule activities that have a particular place, time, and duration, use event records. By using event records, you and your sales teams can keep better track of your calendars.
You can create an event from your home page, its calendar views, or the Open Activity related list of a record. The best method to choose often depends on what you’re doing. If you’re carving out meetings on a specific day, add events from your Home tab calendar’s Day View. If you’re working on a customer deal, you might create the event from an opportunity record. The end result is the same.
If you’re just getting accustomed to filling out records in Salesforce, create events from the record that’s most directly associated with the event. By using this method, many of the lookup fields are prefilled for you. So, when you save, you ensure that you can find the activity quickly because it’s linked to all the right records.
To create an event from a relevant record (such as a contact or account record), follow these steps:
1. Enter a name in the search field in the upper left, next to the Salesforce logo. Search for the record to which you want to link the event and click the Go button.
For example, if you want to schedule a meeting about an account, you search for the account name.
When you click Search, a Search Results page appears.
2. Click the name of the particular record you want.
The record’s detail page appears.
3. Scroll down to the Open Activities related list on the page and click the New Event button, as shown in Figure 7-1.
A New Event page appears. If you created this event from a relevant record, the name of the person or the related record is prefilled for you.
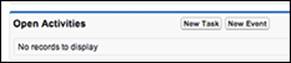
Figure 7-1: Creating an event.
4. Fill in the relevant fields.
Pay close attention to the required fields highlighted with a vertical red bar. Depending on your company’s customization, your event record might differ from the standard, but here are tips on some of the standard fields:
· Assigned To: Defaults to you. Use the Lookup icon (the little magnifying glass) to assign the event to another user.
· Subject: The event’s subject, which appears on the calendar. Click the combo box icon. A pop-up window appears, displaying a list of your company’s event types. When you click a selection, the window closes and your selection appears in the Subject field. To the immediate right of your selection’s text, add a brief description. For example, you might click the Meeting link and then type Define Requirements to explain the event’s purpose.
· Related To: The standard event record shows two drop-down lists that you can use to link the event with relevant records, as highlighted in Figure 7-2. One relates to certain types of records — an account, opportunity, or case. The other relates to a person — a contact or lead. First, select the type of record and then use the associated Lookup icon to select the desired record. For example, if you select Account from the first drop-down list, you can use the Lookup icon to find a specific account.
If you use the Related To fields on activities, you’ll rarely have problems finding an activity later. For example, if you sell through channel partners, you might associate a meeting with a partner contact, but you might relate the meeting to an end-customer account. When you save the event, it appears on the related lists of both records.
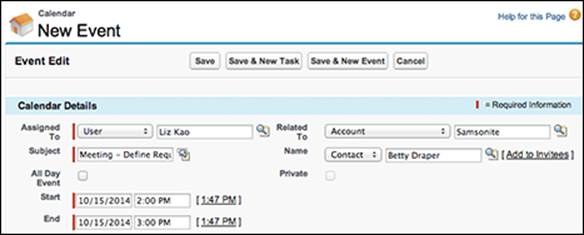
Figure 7-2: Linking the event to related records.
· Time: Allows you to specify the start and end time. You can use basic shorthand and avoid unnecessary key strokes. For example, type 9a for 9:00 a.m. or 2p for 2:00 p.m.
· Recurrence: Allows you to create a series of events that repeat over a duration of time. This saves you from manually re-creating an event for each occurrence. You can set the frequency of the event, and optionally, when the last occurrence of the recurrence (got that?) happens.
5. Click Save.
The page you started from reappears, and the event appears under the Open Activities related list for the associated records. The event also appears on the home page of the user assigned to the event.
Alternatively, click the Save & New Event or Save & New Task button if you want to immediately create another activity. A new activity record appears in Edit mode.
Using pop-up reminders
Similar to Microsoft Outlook, Salesforce triggers pop-up reminders about events at a set time before the event is scheduled to start. If you live your life daily in Salesforce and have the application constantly logged in on your machine, this feature will gently remind you via a pop-up window, to make sure that you don’t forget an important meeting with a customer.
 Make sure that your browser’s pop-up blocker protection is set to allow pop-ups that come from the Salesforce domain. Otherwise, if your browser has the pop-up blocker feature turned on, when you create an event, a little warning box appears every time your browser attempts to display a reminder box.
If, on the other hand, you’re the type that lets pop-up reminders pile up on your computer screen, or if you log in to Salesforce infrequently (what sacrilege!), you can disable this feature. From your name in the upper-right corner of the Salesforce app, choose My Settings⇒Calendar & Reminders⇒Reminders and deselect the Trigger Alert When Reminder Comes Due check box, along with any of the other boxes that are selected by default. Remember to click Save after you finish.
Creating a task
Some sales reps refer to tasks as action items; others call them reminders or to-dos. Whatever your favorite term, use task records when you want to remind yourself or someone else of an activity that needs to get done.
You can create a task from the My Tasks section of your home page or from the Create New drop-down list on any page within Salesforce. We use both methods, depending on whether we’re planning out our weeks or strategizing about a particular account, contact, or other record.
To create a task from the relevant record, follow these steps:
1. Enter a name in the Search bar for the record to which you want to link the task and click the Search button.
For example, if you want to set a task to review a proposal that relates to an opportunity, search for the opportunity name. After you click Search, a Search Results page appears.
2. Click the name of the record you want.
The record’s detail page appears.
3. Select Create New Task from the sidebar or click the New Task button on the Open Activities related list of a record, as shown in Figure 7-3.
Either way, the result is the same. A New Task page appears.
When creating tasks, go to the record that the task is most directly related to before adding the task. By taking this path, you ensure that your task is easy to find because it’s automatically associated with the correct record and its account. For example, if you’re creating a task to follow up on an e-mail to a contact, you most likely add the task from the contact record.
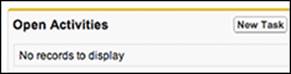
Figure 7-3: Creating a new task.
4. Fill in the relevant fields.
Like the event record, your fields may vary, but here are some tips on adding a task:
· Assigned To: Defaults to you. Use the Lookup icon to assign the task to another user.
· Subject: The task’s subject, which appears on the My Tasks section of the Assigned To’s home page. Click the combo box icon. A pop-up window appears, displaying a list of your company’s activity types. When you click a selection, the window closes and your selection appears in the Subject field. To the immediate right of your selection, add a brief description. For example, you might click the Send Letter link and then type Introduction to explain the task’s purpose.
· Related To: Shows two drop-down lists that you can use to link the task with relevant records similar to the event fields. First select the type of record and then use the associated Lookup icon to select the desired record.
· Priority: Denotes the task’s importance. High-priority tasks display an exclamation mark (!) to the left of the activity on the assigned user’s home page.
· Status: Defines the status of the task.
· Due Date: The date by which you expect the task to be completed. This is typically optional. Clicking your cursor in this field makes a calendar window pop up, and you can select a date from this calendar.
5. (Optional) Select the Send Email Notification check box if you want to notify the user to whom you’re assigning this new task.
You can’t guarantee that every user will log in to Salesforce daily, so e-mail notifications are an effective way to make sure that tasks are delivered to the right people in a timely fashion.
6. Click Save.
The page that you started from reappears, and the task displays under the Open Activities related list for the associated records. The task also appears in the My Tasks section of the home page of the user who’s assigned to the task.
Make sure that you set your My Tasks view on the home page so that your tasks are included in the filter. The view defaults to Overdue, which can confuse some people when they don’t see a recently created task in that area.
 Always link your tasks with the relevant records in Salesforce. Otherwise, you run the risk of losing valuable customer information that might have been captured in that task.
Logging a call
Sometimes, you perform a task and just want to log the activity after the fact. For example, a contact calls you on the phone, or you get stopped in the coffee room by your boss to talk about a customer issue. In these situations, instead of creating a task and then completing it, use the Log a Call feature.
When you click the Log a Call button, you’re simply creating a task record that has a Completed Activity Status. To log a call, go to the record that the call relates to (an account or lead record, for example) and follow these steps:
1. Scroll down to the Activity History related list and click the Log a Call button.
The Log a Call page appears, displaying fields for a completed task at the top of the page and fields for a follow-up activity at the bottom of the page.
2. Fill out or modify any of the fields to log the call.
The Status field is preset to Completed, as shown in Figure 7-4.
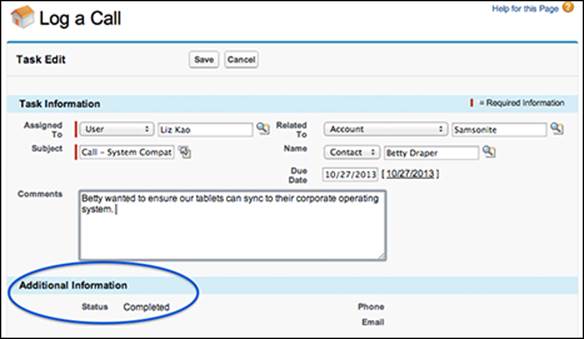
Figure 7-4: Logging a call.
3. If applicable, add another related task by filling out the fields below the Schedule Follow Up Task header.
Although certain fields are labeled as required, the follow-up task is optional.
4. Select the Send Notification Email check box for the logged call (and for the follow-up task if you choose to schedule that) and click Save when you’re finished.
The detail page that you started from reappears. The call record appears under the Activity History related list. If you set up a new follow-up task, that record appears under the Open Activities related list.
Rather than using the Notes feature in Salesforce to track details of your interactions with customers and prospects, we recommend using Log a Call to record this type of information. Tasks allow for easier reporting, timestamping, editing, and viewing capabilities. You can even track interactions with multiple people at once using the Shared Activities feature. If you don’t see this feature when creating a Task, ask your Salesforce Administrator to turn it on.
 If you’re an administrator and someone asks you to allow Shared Activity tracking, you could enable that from Settings⇒Customize⇒Activities⇒Activity Settings⇒Allow Users to Relate Multiple Contacts to Tasks and Events. However, this is an irreversible request, and you should reflect on the majority use case for this. For example, in some financial services businesses, tasks often involve contact in addition to your prospect. However, no one’s going to use this (maybe not even the person who asked for it) unless it’s properly announced, along with benefits derived from its use.
Organizing and Viewing Activities
You can view your activities from the home page and from a specific record’s Open Activities or Activity History related list. If you’re planning your calendar, use the home page. If you’re working from a particular account, contact, or other item, you can get better context on pertinent activities from the related lists on the record.
After you create (or are assigned to) activities, you probably want to view them so that you can prioritize and complete them.
On the home page, change the default view in the My Tasks section to All Open or to Today, depending on how efficient you are, so that you can see all tasks that you still need to complete. The current default view, Overdue, only shows you tasks after the due date has passed, which we have found to not be many users’ first choice.
If you’re planning around a specific record, such as a contact or opportunity, you can view linked activities from the Open Activities and Activity History related lists located on a detail page.
The two related lists work hand in hand. An event record automatically moves from the Open Activities related list to the Activity History related list when the scheduled date and time pass. A task record remains on the Open Activities related list until its Status is changed to Completed; then, the record appears on the Activity History related list.
To view activities from a detail page, follow these steps:
1. Open a saved record.
The detail page of the record appears. The saved record appears at the top, and related lists are at the bottom of the page.
2. Scroll down until you see the Open Activities and Activity History related lists.
If you already created related activities, activity links appear in the lists.
3. Click an item listed under the Subject column.
The activity record appears.
Updating Activities
Things happen: Meetings get canceled, and small tasks suddenly become big priorities. With Salesforce, you can perform many of the actions that a normal time-management tool would allow you to do, including delegating activities to other users, rescheduling, editing information, deleting records, and so on.
You can do the following basic functions by clicking buttons at the top of an activity record:
· Edit: Update any of the fields in the record whose fields now appear, and make sure that you save.
· Delete: Delete the record. A pop-up window appears in which you can confirm the deletion.
· Create a Follow Up Task: Generate a related task. A New Task page opens, prefilled with information from the prior record.
· Create a Follow Up Event: Schedule a related meeting. A New Event page appears, prefilled with information from the prior record.
Assigning activities
Sometimes, you may create activities and assign them to others (intentionally, not because you’re trying to shirk your duties). Sales Development reps often do this as they set up meetings for their account executives. Salesforce lets you easily reassign tasks and events, and notify users of assignments.
To assign an activity, open the activity record and follow these steps:
1. Click the Edit button.
2. Click the Lookup icon to the right of the Assigned To field.
A pop-up window appears, displaying a list of your Salesforce users.
3. Use the Search field to search for the user or select the user from the list.
After you make a selection, the pop-up window disappears, and your selection appears in the Assigned To field.
4. (Optional) Select the Send Email Notification check box to alert the user by e-mail and then click Save.
The activity record reappears, and the Assigned To field has been modified.
Completing a task
When you’re done with a task, you want to gladly get it off the list of things to do. You can mark a task as complete from your home page or from the Open Activities related list in which the task link is displayed.
To complete a task, follow these steps:
1. If you’re viewing the task from an Open Activities related list, click the Cls link (Salesforce shorthand for “Close”) to the left of the task. If you’re looking at the task on the home page, click the X link in the Completed column.
Both links create the same result: The task appears in Edit mode, and the Status field changes to Completed. (Your company might have its own terminology for the Completed status.)
2. Type any changes and click Save.
Some reps update the Comments field if they have relevant new information. The detail page reappears, and the completed task now appears under the Activity History related list.
All materials on the site are licensed Creative Commons Attribution-Sharealike 3.0 Unported CC BY-SA 3.0 & GNU Free Documentation License (GFDL)
If you are the copyright holder of any material contained on our site and intend to remove it, please contact our site administrator for approval.
© 2016-2026 All site design rights belong to S.Y.A.